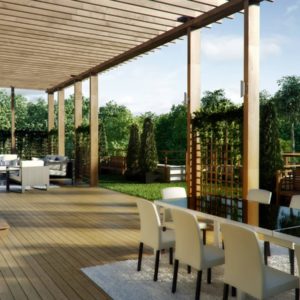
Surely every person will say that rest on the nature is wonderful. And if he is also civilized, cultivated - then he generally does not have a price! Many owners of their own houses with plots arrange their terrace, as a rule, even during the construction of the house. After all, the terrace, attached to the house, is just a cultivated and ennobled place for a wonderful holiday! There are terraces also stand-alone. But in this article we are going to talk about the attached version.
In addition, the terrace can be open plan, closed, semi-closed. The only thing that should not be confused with this kind of arrangement of the territory with verandas, which are closed terraces, not glazed, but having a roof.


If you have an outdoor terrace, you can place a lot on it for comfortable rest and pastime. But for the summer hot season, it's worth taking care that the sun gets here as little as possible. Perhaps, pull the tent, install the garden umbrella.

As you could already see on the photo of the terraces attached to the house, their forms are not too diverse. They can be square or rectangular, asymmetric or enveloping the structure along its perimeter. In the latter case, it is appropriate to register only if the area of the plot near the house is not too large, and the terrace can not be made wide.


The terrace can also be single or multi-level. It can be near the main entrance to the house, or maybe in the backyard. Often, it is still drawn up on the south side, since so you can enjoy the sunbeams for a maximum number of days throughout the year!


Running Styles
Among the most popular styles are:
- Modern. It's comfortable here, but at the same time there's a minimum of everything. Simple and functional, strict lines, laconic forms, comfortable and comfortable. Furniture is simple, but practical. The same goes for the decor, if there is one, then the most functional one or not at all.
- Traditional. Here you can not do without decor. And it can be used in a variety of forms. Materials are used to use natural, for example, the same wood and stone. Talk about the presence of railing on such a terrace is only after it is clear at what height there is a flooring relative to the ground, whether small children, pets will run, and generally, depending on what your preferences are. If you decide that the railing is necessary to make the terrace safer, consider the beauty of their decoration.
- Colonial. Here it is accepted to use as a basis - architecture classical style, in which colorful elements are used. This style is practical, beautiful, comfortable and symmetrical, decorated with fresh flowers, and architectural elements are borrowed in the former colonial countries.
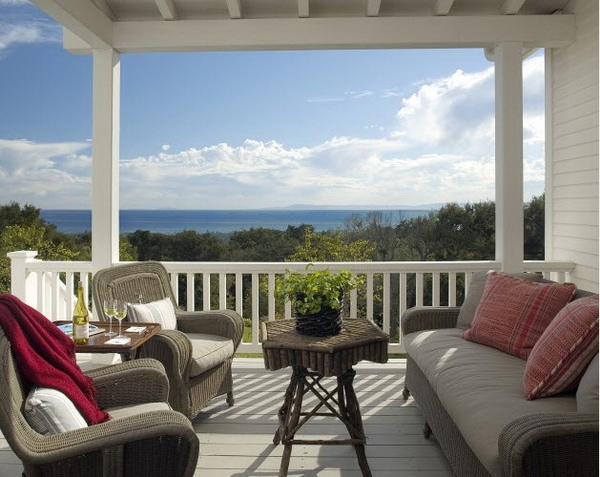
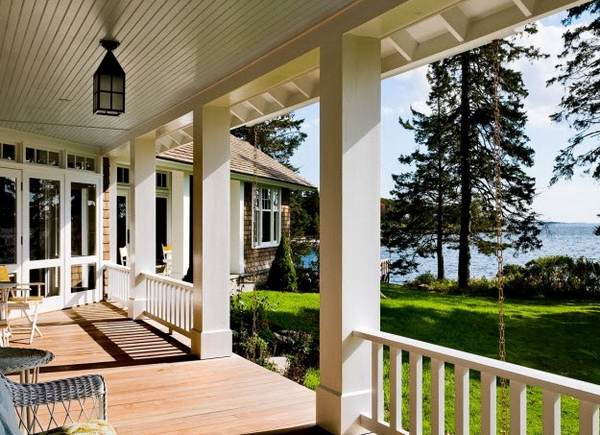
- Coastal. This option is perfect if the house is located near the sea or a pond. And after all so it also is. Being in such a place, I want everything to be the most harmonious, combining with the surrounding nature. Here it should be given special attention finishing materials to be used. For example, it can be a gray composite decking, or maybe a gray cedar. In any case, the view from the terrace should be opened to the water (sea or water body).
- Country, in which everything is comfortable and convenient, can simultaneously look stylish and original.


![]()

How to attach a terrace to the house - options
In fact, there are many. And, in the end, no one forbids you to fantasize about this. But let's look at the main ones.

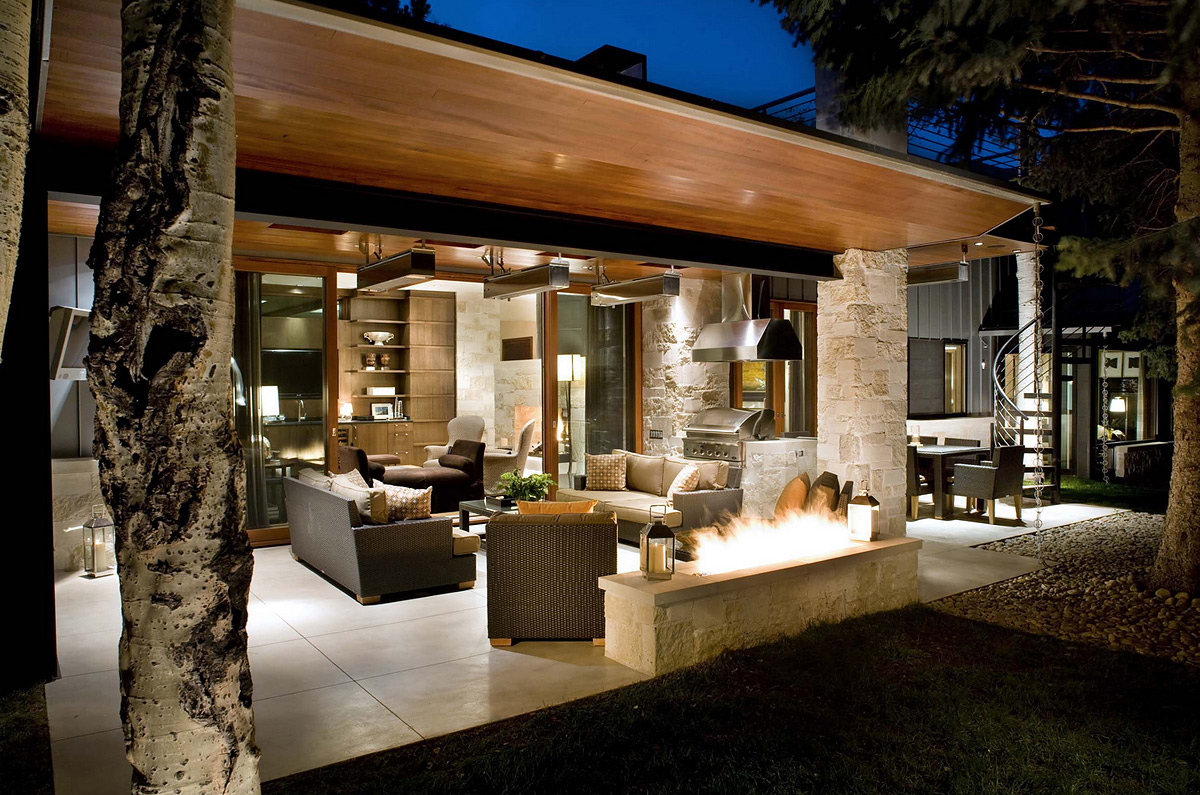
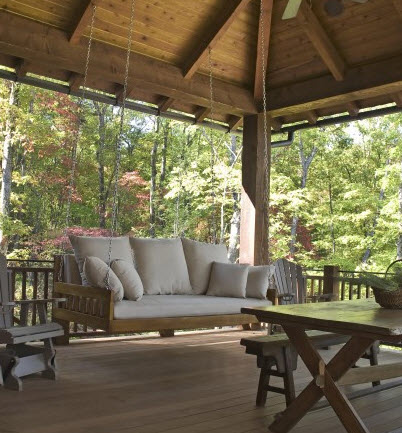
A very common form of design. To some extent, it resembles a living room, where there is soft furniture, a low table, and sometimes even a fireplace! The only difference from living space is that garden furniture is being arranged. But for giving softness and coziness, garden furniture is equipped with numerous pillows, blankets, covers on straps or zippers, etc.

Trapeznichat in the air? What can be more beautiful!
But every dish served will seem incredibly tasty, if you use it on open terrace, attached to the house! Therefore, we can say with confidence that every owner of the house, uniquely equips himself with this opportunity! If you arrange this option on an open terrace type, family dinners, as well as receptions of guests will be made in any bad weather. Also use the options of garden furniture. At its sole discretion, it is possible to install equipment that helps to prepare food.

By arranging the hanging sofa in the rest area, take care of a small table near it. He is useful to you, you'll see!

Decor of the terrace
Regardless of the shape and type of the terrace, there are some universal ways to create a decor. So, for example, there can be lighting devices, thought out and organized by a variety of variations. The same wall lanterns with forged structures, and maybe design of suspended versions of luminaires.

On the veranda attached to the house, the fireplace must be set up in an original way, next to which there are soft sofas and wicker tables. The level of comfort will go off scale, and your guests will not want to leave you!

Plants for decoration can be used as growing, or simply in flowerpots. The main thing is to think over what kinds of species you prefer.

Terrace of a modest size. How to apply?
Even the tiniest territory can be very comfortably ennobled. For example, decorate it with flowers (pots), put a couple of chairs (garden furniture) or chairs. For lighting and decorative function, install the luminaire. Before the door you can put a bright, unusual and original mat of small size and voila!

Well, if you can not figure out how to organize a space near your own house, do not despair! There is always an outlet to contact a professional designer who will do everything himself - for you!
100 photos - terrace design in a modern style
Terrace - a playground, attached to the house or standing separately. Usually it resembles a large porch that adjoins the wall at the entrance of the house. In the southern areas, terraces are usually open. In the middle lane - covered with awnings or canopies. The design of the terrace can be initially included in the plan for the construction of the house and built on a foundation with it. But, if the house already exists, to attach a terrace to it will not be difficult for any home master. Let's talk about what the main terrace designs exist and how to build them yourself.
Before you start the construction of the terrace, you should perform the design and decide which version of the design to give preference.
The simplest designs of terraces are made at ground level. These are the platforms, paving slabs, pavers or clinker. Paving is carried out on a gravel-sand cushion, laid in a previously arranged excavation in the ground, a height of 20-30 cm.
On a gravel bed, you can also build a wooden terrace with flooring from planks or composite decking. Above the excavation lay wooden bars or steel profiles playing the role of lag. They are mounted on wooden supporting beams. The floorboards are fixed on top.
More complex in the design of the terrace, raised above the ground. Moreover, they can be raised, both by 15-20 cm, and by 2-3 m (level of the second floor). In this case, you can not do without a foundation. Such a terrace rests on reinforced concrete slabs, blocks or piles, playing the role of a monolithic, columnar or pile foundation. An example of an elevated terrace: a platform in the form of reinforced concrete slab, lined with ceramic or granite. When building a wooden elevated terrace, on the chosen foundation (concrete columns, slabs, stilts) are fixed wooden logs, which are topped with a trim or a terraced board (decking).
We will give you several options for building a terrace, designed in the form of information master classes.
Option 1. Clinker-clad terrace
This version of the terrace is built on a sandy, compacted cushion, at ground level. The clinker tile, from which the flooring is spread, allows the formation of curves, curved lines of the site. To clearly indicate the boundaries of the terrace, fences are installed along its perimeter. For example, small wooden poles, impregnated with antiseptics.
The works are performed as follows:
1. Clear the soil in place of the paved terrace. Remove the stones, driftwood, remove the top layer of the soil, a thickness of 20 cm.
2. In the excavation obtained, sand is covered with a layer of 15 cm.
3. On the planned boundary of the area dig a trench with dimensions 70x70 cm (depth, width). A layer of gravel or sand, 15-20 cm high, is poured onto the bottom of the trench. It is necessary for better drainage of water at the site of the fencing posts.
4. In the trench, on the drainage layer, set two rows of wooden posts (on the inner and outer side). Their verticality is controlled by the construction level. The bars, installed along the ends of the fence, are fixed with screws. Such a solution provides a stronger grip of the structural elements, does not allow them to move and fall out of the row.
The enclosure has the appearance of a closed "pocket", which will later be used as a flower bed framing the terrace. If the flower bed arrangement is not included in your plans, then the border can be made in one row by installing bricks, finished plastic fences, etc. in the trench.
5. In order not to let the soil wash out from the future flowerbed, a layer of roofing material is placed inside the enclosing "pocket", setting it on the walls of the posts. The ruberoid is laid to the height of the planned level of backfilling with soil. At several points the waterproofing layer is fixed on the walls of the posts with screws or nails.
6. In the ground, from the wall of the house to the fence, pegs are driven in steps of 3 m and pull on them cords with a slope of 2-3 cm per 1 pm. Thus, the level of the sand backfill is planned, which must necessarily form a slope for drainage of rainwater from the terrace area.
7. Sand filling is rammed and leveled according to the level of the tensioned cords, filling up, if necessary, the missing amount of sand.
8. Begin the installation of clinker tiles. Each tile is laid on a sand layer, tightly pressed and taped on the surface with a rubber mallet.
9. The remaining free areas, between the paving and the fence, are covered with a large decorative gravel.
10. The seams between the tiles are filled with fine sand using a stiff brush.
11. Surplus sand on the surface is washed with a stream of water from under the hose. The head should be small so that the sand does not wash out of the seams.
12. To allow rainwater to flow freely from the cobbled platform, drainage is performed. To do this, along the pillars of the fence lay with a slope drainage pipe with slots, wrapped in a jute cloth (so that the slot does not get debris and soil). For masking, the surface of the pipe is covered with gravel.
The end of the laid drain pipe is connected to the pipe storm sewage. Through the tee, the drains are connected here. A gutter with a grate is installed in the right place.

Option # 2. Wooden terrace on a gravel bed
Durable and simple in execution terrace, built on a gravel dump, can easily be made of steel profiles (log), wooden bars and boards. As they will practically lie at the ground level, for this version of the terrace it is allowed to use only hard, non-rotten wood: larch, oak, garap, teak, merbau, etc. Before use, the boards are treated with antiseptics that protect them from moisture, putrefaction, insects, UV rays.
Progress:
1. At the site of the future site, remove the top layer of soil, 20-30 cm thick.
2. The pit is covered with gravel.
3. On the gravel laid steel profiles, forming a slope of 2-3 cm per 1 pm. The distance between the profiles is about 500-600 mm.
4. The bearing beams are attached to the profiles. The distance between the beams is about 600 mm, if the thickness of the terrace board is 27 mm. With a board thickness of 20 mm, the pitch of the beams will have to be reduced to 400 mm. To further protect the beams from moisture, in the places of their contact with the profiles are laid rubber gaskets cut out along the width of the boards.
5. Bearing beams are covered with a dark protective fabric (geotextile, for example) to prevent the germination of weeds.
6. Perpendicular bearing beams collect planking from the boards with gaps of 2-3 m. Between the boards and the protective fabric, spacers are installed to prevent the accumulation of moisture in the floor space. Between the walls and the flooring leave a compensation gap of 1-2 cm.
7. After the assembly, the plank floor is covered with antiseptics, staining impregnation or varnish.

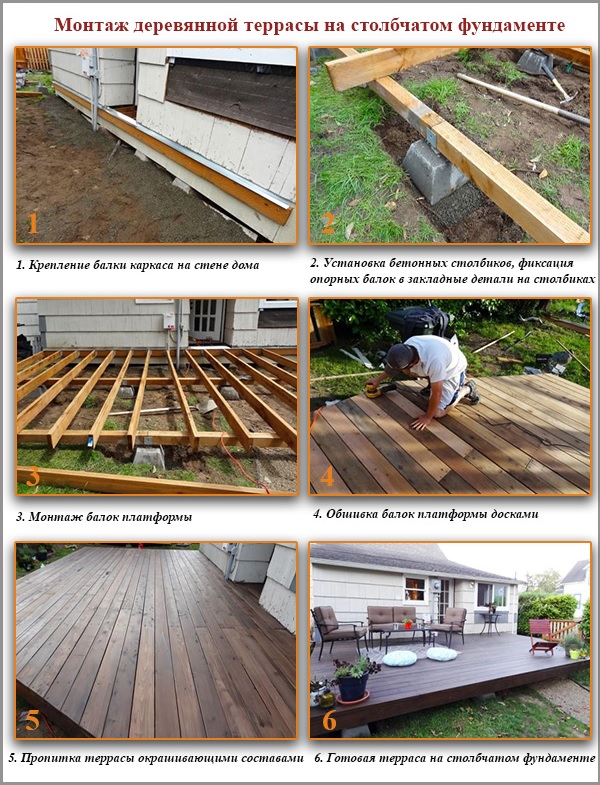
Option # 3. Terrace on the columnar foundation
The wooden terrace on the columnar foundation is the traditional and the most safe option. The construction is adjacent to the house and, in fact, is one with it. The pillar foundation is able to raise the platform by 15-60 cm. At the same time, the scavenging space formed under the deck helps to efficiently ventilate the elements of the terrace and minimizes the possibility of rotting wood.
Step-by-step construction instruction:
1. To connect the future terrace area with the house, on the adjacent wall horizontally (at the level of the terrace) fix the first beam. Above the upper edge of the beam, a drain is assembled from galvanized steel.
2. In the places of installation of concrete columns, excavations are made. Columns should be installed in steps of 1.5-2 m. Deepings are performed taking into account the desired elevation of the terrace, the height of the columns and the obligatory gravel bedding layer, 10-15 cm thick.
3. In the recesses fall asleep gravel backfilling, then - install trapezoidal concrete columns. To the top of each column, a metal part is fastened under square beams.
4. Support beams are embedded in the embedded parts on posts, fixed with screws.
5. Over the supporting beams, perpendicular to them, the beams of the platform are mounted at a distance of 40-60 cm from each other.
6. To the beams of the platform screws are fastened terraced boards, observing between them gaps of 2-3 mm. Gaps serve to prevent the accumulation of rainwater on the floor and its free flow into the sub-space.
7. If unprepared edging boards are used for the terrace, the surface of the flooring may appear uneven after installation. Therefore, the floor is leveled with a sanding machine, bringing all the points of the terrace to one level. After grinding, remove the wood dust and process the boards with impregnation - antiseptic or coloring. When using a special terraced board, additional grinding of the surface is not required.
The column foundation for the terrace can also be constructed from flat concrete blocks. A similar version of the construction of the terrace is presented on video:
Option # 4. Terrace from the KDP on the pile-screw foundation
Sometimes it is irrational to install a terrace on a columnar foundation. For example, with a high groundwater table, on wet and unstable soils. In this case, the soil will swell and expel the concrete columns. Difficulties in the device columnar foundation can occur and in areas with large differences in levels, on the slopes. In all these cases, for light buildings, another type of foundation is more successful - a pile-screw. Screw piles make it possible to raise the terrace area to the desired height (even 2-3 m!), Perfectly hold the wooden flooring with all the necessary furniture. In addition, screwing the screw piles for the terrace takes place within 1 day.
Let's consider the technology of constructing a light terrace of WPC on screw piles.
Progress:
1. Determine the pile installation points. They are screwed in steps of 2-3 m, with mandatory installation in the corners of the future site.
2. Screw the piles with a special technique or manually. With manual screwing in the slots on the upper edge of the pile insert a metal scrap serving as a lever. In the process of scrolling this lever, piling the blades breaks the ground and falls to the required depth (below the freezing level of the ground).
3. The twisted piles are cut to the level of the future supporting frame.
4. Inside each screw pile fill the grout to increase its strength and prevent corrosion of the internal cavity.
5. Over the piles mount a steel metal frame of profile pipes. The frame has the form of a frame with intermediate elements located in 50-60 cm increments. The finished frame is covered with a primer, paying special attention to the welding places.
6. On the piles lay aluminum lag. Since contacting aluminum with the carcass steel starts the process of corrosion, it is recommended to lay the lugs only through rubber gaskets.
7. The mounting of the boards of decking on aluminum lags is carried out by means of terminals which are inserted into the slot of the log. The terminals allow mounting the boards without the use of self-tapping screws and the need to drill holes in them. If the aluminum profile used does not allow the installation of terminals, the mounting of the decking boards is performed traditionally - with the help of self-tapping screws.
8. After assembling the composite flooring, a fencing aluminum profile is mounted along the ends of the decking. Now the terrace of composite decking is virtually indistinguishable from an expensive wooden structure!

As works on installation of the terrace on screw piles are performed, it is shown in the video-story:
Very often, after the construction of the main building and even the creation of the interior decoration, the owners are thinking about building a veranda adjacent to a private house of urban type or country houses. It seems that without a veranda the building looks unfinished, and the general spacious room where the whole family could gather for evening gatherings by the fireplace in winter or conversations with soft drinks in the summer will not be superfluous. Bright, spacious and so cozy - the veranda can be the final and very bright stroke in your picture of creating your own home.
If the veranda was planned at the initial stage of construction, then there will be no problems with its erection - the identity of the used building materials and the overall style of performance will create a single and harmonious ensemble. But when adding a veranda to an existing building, there should not be any difficulties in getting a balanced structure. If it is a summer veranda for family evening tea drinking, then such a structure can be erected and independently (with some building skills). But for the construction of an off-season heated veranda closed type will need to turn to specialists.


Can the appearance of the veranda spoil the entire image of the building? Of course, such a turn of events is possible, but only if the design of the verandah is fundamentally different from the style of execution of your private home. In avoiding such situations it is necessary to draw up a detailed project, to plan construction materials, methods of finishing the facade. And do not forget to legalize the construction in the BTI.


There are several options for placing your future veranda structure in relation to the parties of the world:
- east - with this arrangement in the morning on the veranda will be sunny and light for a pleasant breakfast, and at noon here you can hide from the scorching sun;
- southern - if you plan to create a winter garden (greenhouse) on the veranda, this arrangement will be an ideal option;
- western - you can watch the order, sitting in a comfortable chair on your own veranda;
- northern - only suitable for the southern latitudes of our country.


The dimensions of the verandah will depend on the parameters of the main structure. Still, experts do not recommend building adjacent to the house rooms with a length of more than 7-7.5 m and a width of 3-3.5 m. In order for your veranda to be a solid structure and served your family for many years without distorting the walls and shifts of floors, it is necessary to create a deep enough foundation. Ideally, the depth of the veranda base is comparable to the base of the house itself.


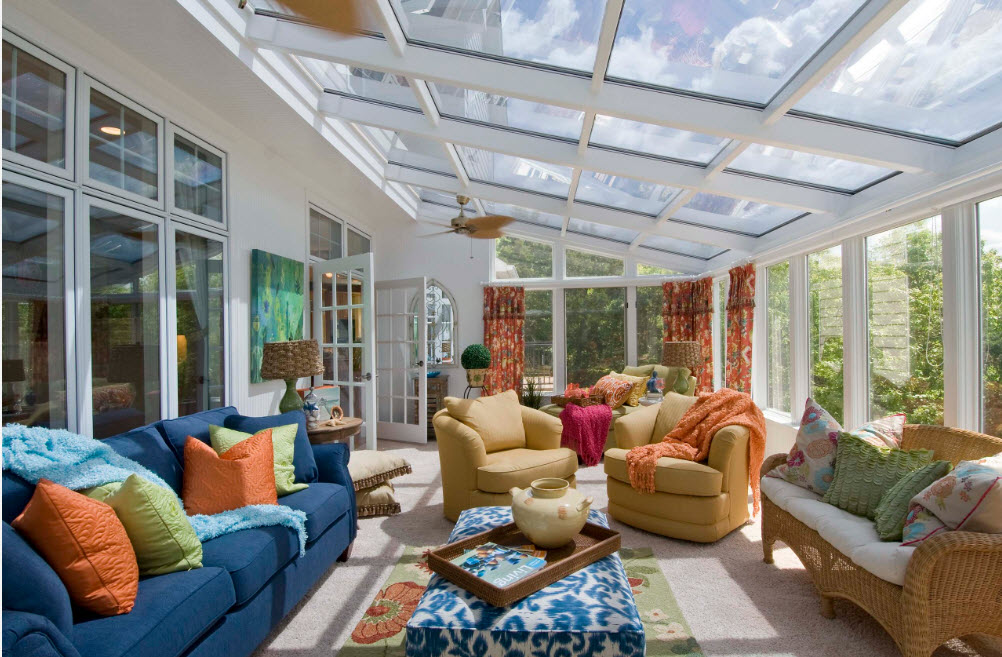
The optimal option for creating a veranda roof is a one-sided, sloping design that will not allow you to think about accumulating moisture (snow), which means it will last much longer. Of course, the structure of the veranda assumes a colossal use of glass surfaces - it can be both panoramic windows and glass sliding walls, which make it easy to transform the veranda into a summer terrace with a roof.


![]()
The original designs - the execution of the veranda
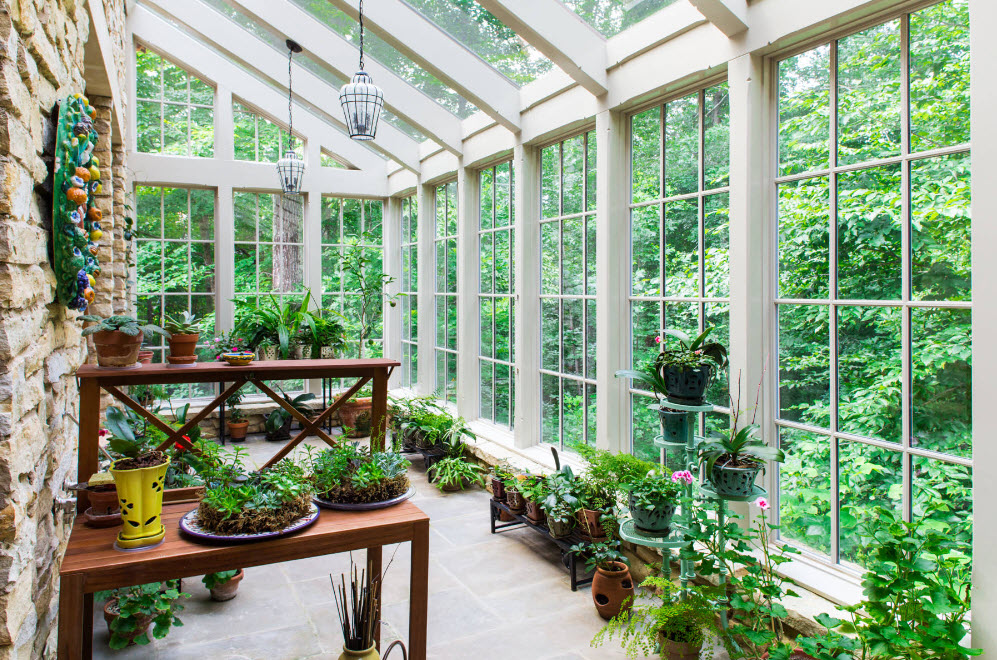
The main feature of the veranda structure is the presence of a large number of windows. The bright room seems bigger than its size, it is spacious and at the same time convenient. With the help of a glass roof, it is possible to create a practically transparent room, flooded with sunlight. In such a room, you can spend the whole day without the use of artificial lighting.


When designing the veranda, you can use the wildest desires that could not be realized when building the main building. Glass structures, smooth lines, unexpected combinations of construction and finishing materials, original color solutions - a brake for your accomplishments can only be the financial budget for the construction.


If you do not lack the area for building a veranda and want to get not just a spacious but also original room, create a vaulted roof for the building that mimics the construction of the tent. Such a roof can be made of glass - in any case, the building looks solemn, majestic and creates a special atmosphere for interior decoration.

The interior of the veranda is a kaleidoscope of ideas
Finish
Involuntarily, many of them have a veranda associated with a wooden structure. And this is not surprising, because it was from the wood most often built summer verandas. Later, the wood was combined with glass to produce a closed off-season space. That is why wood as a building and finishing material is used very widely in modern design projects. The abundance of glass surfaces allows to practically erase the boundary between the interior decoration of the veranda and the external landscape. In its turn wood trim brings the natural warmth into the atmosphere of the room.


Another way is not to depart from the tradition of using wood as a decoration of the verandah and create at the same time a bright and harmonious image of the room - painting the surfaces in light colors. The paneling, facing board or rake, painted in white tone, will be an excellent opportunity to create a light, light, almost weightless image of space.


If we talk about the design of the floors, then the opinions of designers about the interior of the verandah vary. Some advocate the continuation of the use of finishing materials, which were used in all other rooms of home ownership. Others, offer more practical alternatives. If you have children who run to the veranda from the garden in dirty shoes or pets that do the same, then it's unlikely that the laminate on the veranda will last long from endless washing. A more practical option would be facing with ceramic tiles or using natural stone. In addition, if your veranda is equipped with a fireplace, then decorating the space around it with the help of a stone used for and floor covering, will help create an incredibly harmonious, holistic image of the room.


Ceramic tiles as a floor covering of the verandah - the best option for those who have a room has access to the backyard. It is easy to take care of porcelain tiles, it has high strength, durability and is a durable way of flooring. Not to mention the fact that the choice floor tiles is incredibly wide - you can get a spectacular imitation of wood, stone or any other material you like.

![]()

Furnishings
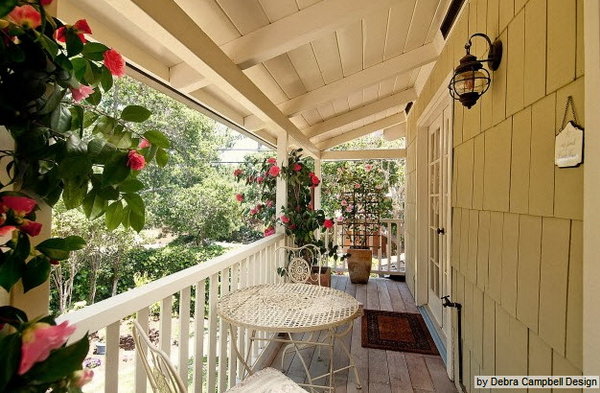
When choosing furniture for the veranda, you can go two ways, the first option - the installation of a usual for lounge chairs and sofas, the second is the purchase of garden furniture, but with a high level of comfort. For example, wicker furniture made of rattan (natural or artificial) will not easily bring a note of respectability of country rest to the space of the veranda, or it can become a highlight of the interior. Soft seating and lots of decorative pillows will make your stay in the veranda rest area comfortable, pleasant and cozy.


When behind the large panoramic windows of the veranda there is a beautiful landscape, when it seems that the nature itself is present in the room, the situation is desirable corresponding. Where, how on the nature to ride on a swing? Organize a hanging swing on the veranda and get a comfortable place to relax with a view of nature, but also the original interior of the room, which can become the pride of the whole house
![]()
Even in a small veranda space, you can organize a cozy sitting area with excellent views. Compact sofa, light garden chairs, small table-stand or mini-ottoman and rest area is ready. For the reception of guests it will be possible to use folding chairs with a backrest. No less convenience can be achieved with the use of sliding tables, which in the usual state occupy a minimum useful space of the veranda.


Decor
To decorate the veranda space, you can use a variety of techniques. If in the main rooms of your home you could not realize some ideas, then when you design the veranda it's time to give yourself free rein. Wicker lampshades for floor or table lamps, decorative cushions, sewn by hand, a coffee table made up of building pallets, a patchwork or curtains with fringe - everything that you used in the main interior you did not dare, can become an organic part of the veranda design. But in this case too, the rule "better is less, but better" will act without exceptions. Even a spacious and bright veranda can be smothered with an abundance of decorative elements.


In a bright veranda room with an abundance of glass surfaces, you may need drapes for windows. Everything depends on the location of the veranda in relation to the parties of the world and the most popular time of visiting this space by you and your family. Any of the types of blinds can be an excellent option to create the ability to mute the sunlight and a more cozy atmosphere of the room.

In the case of a veranda equipped with a glass roof, it is also possible to use blinds (most of the fabric) to protect the room from sunlight. But in rare cases it is possible to do with standard products, mainly draping of similar glass surfaces requires individual tailoring and the presence of special holders for the fabric, which is equipped with a glass roof.


In some cases, effective design panoramic windows becomes a translucent snow white tulle. it universal option drapery, harmoniously fit in almost any style of interior design.

What functions can a veranda attached to the house
Living room
One of the most popular options for arranging the veranda is the design of the living room with a seating area. Cozy soft armchairs, roomy sofa, coffee table or ottoman between them - for the organization of the rest area on the veranda, traditional furniture for the living room is used. Whether to add a TV to this song is up to you. But the arrangement of the existing fireplace - an ideal option for creating a comfortable and cozy atmosphere on the veranda. Near the glowing hearth, you can collect the whole family on a weekday evening, discuss the past day. Here you can receive guests on weekends and holidays.


In the living room area, located on the veranda, you can allocate space for the organization of a small cabinet. After all, there is so much light here - just enough to install a small desk at one of the windows, pick up a chair that will be combined with the rest of the room's furniture and equip work area a local source of artificial light to work by the dark.
Trapeznichat in the room, from the windows which offers an excellent view of the local landscape - a special pleasure. In addition, in many private homes, the owners prefer to use space exclusively for organizing work areas for cooking. In this case, the availability of a separate room that can be used for family meals and dinner parties with guests becomes a difficult functional segment, but also a pride in homeownership.


As in the main building of the private house, on the veranda you can find a mix of living and dining areas. Even in a small room, thanks to the use of an open plan, it is possible to efficiently place different functional segments while maintaining a sense of spaciousness and freedom. As a rule, in such situations zoning is very conditional, only due to the furnishing of each segment, sometimes with the help of lighting fixtures and carpeting.


What can be cozier, more comfortable and more pleasant than the opportunity to sit by the fireplace on the veranda, admiring the surrounding view and the dance of fire in the hearth? Only the prospect of a meal in a circle of seven or friends. The dining room and living room, located on the veranda equipped with a fireplace - the pride of suburban home ownership.


Winter Garden
It is difficult to imagine any other place in a private house, except for a veranda, where it would be possible to place simultaneously a large number of indoor plants. Even the veranda located on the north side of the building is capable of becoming an excellent winter garden (with the right choice of plants). Well, with the southern location of the building and do not worry at all. The abundance of sunlight, the possibility of timely airing and even staying on the street will have a positive effect on the development of your plant pets.


Game room
In the veranda area, you can take those functional segments that did not have a place in the rooms of the main building. On the veranda you can equip a music room, a workshop, a mini-observatory. Having installed a billiard or tennis table, you can organize useful entertainment for the whole family and guests. Of course, no one canceled the presence of a rest zone - comfortable armchairs and sofas, the accompanying tables-stands are simply necessary in the veranda for a full rest.


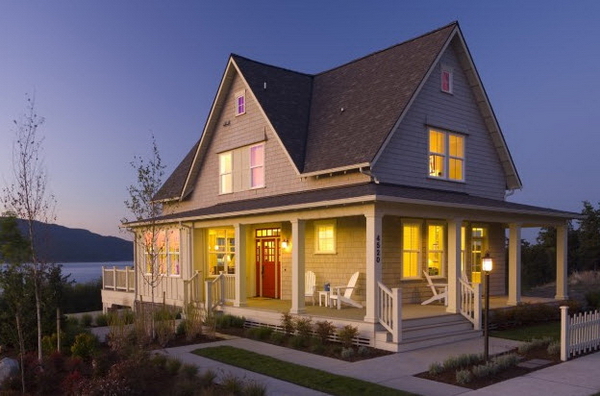
A beautiful veranda is able to make any vacation home more attractive and spacious. It is especially pleasant to spend summer days, gather with the whole family and drink tea. Therefore, it is not surprising that many people want to attach a veranda to the house.
Of course, it is better to build country house or a cottage with a veranda, or in advance provide for the possibility of "docking" the veranda to the house. However, you can attach a veranda to almost any building. And you can do it yourself, because it has a fairly simple design and does not require warming, as it is a summer room.

First of all, it is necessary develop a project. And it does not matter - do you build a veranda to the house yourself or hire a team of builders. In any case, a competent project will guarantee a successful and durable extension. After this, it is necessary to take care of the legality of the building and obtain a building permit. For this it will be necessary to coordinate the project with the architect of the district administration. And after the construction is completed, register the altered house by contacting the BTI and the district architect. Unfortunately, without these documents your veranda will be considered self-construction, and you can not sell, exchange, donate or even rent out a house.
The design of the veranda should match the style and design of the house. It should be its harmonious continuation. Usually, an attached veranda is made of the same materials as the house itself. AT wooden houses it is made of logs or logs, in brick - made of bricks. But this is not necessarily the rule. Very interesting look wooden extensions to stone houses.

Have a veranda along the main or front facade so that inside there is a door, allowing to get to the main room. Dimensions of the veranda depend on the wishes of the owners. Usually it is 3-6 meters in length and 2.5 meters in width.

The foundation of the veranda is recommended to do the same depth as the foundation of the whole house,to avoid distortion. The frame is usually made of beams or logs. The walls and roof of the veranda should fit tightly to the house. The roof is often made of a single-pitched and more flat roof than the roof of the house.
Today, sliding walls have become very popular, so it is convenient in all respects. Spreading out the walls, you easily turn the veranda into a open summer terrace.The classical verandah should be light, so large windows are installed from 2-3 sides. It is desirable that entrance door It was also partially glazed to give the annexe even more lightness.

Most of the walls of the veranda have windows,so large furniture (cabinets, shelves, shelves) is located near a blind wall. At the windows or in the center place a table, chairs and sofas. To save a useful place, you can make a folding table attached to the window sill. Since the verandah is a very sunny room, it is possible to hang curtains, blinds or curtains from straws on the windows.

Veranda to the house - photo ideas

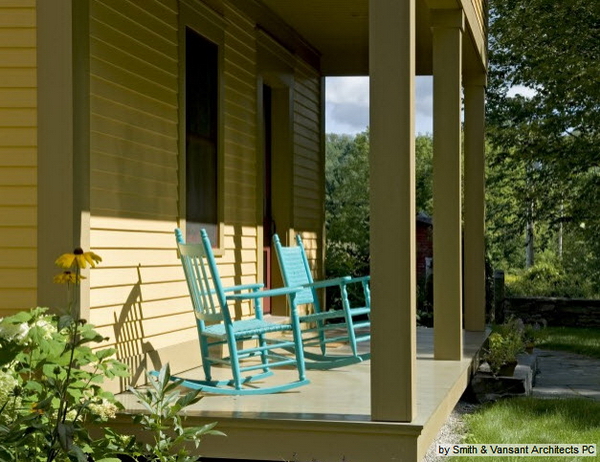


Ideal place for evening rest, especially in the warm season, is the veranda. It is desirable that the terrace was own and located away from the urban smog. It is here that you can retire from the daily hustle and bustle in the company of friends and relatives. Veranda attached to the house, with the right design becomes the decoration of the house and the pride of the owner.
Country houses must necessarily have verandas, this is the opinion of the majority of the owners and this is absolutely true observation. This zone allows you to relax in the fresh air when there is no desire to remain in the house. There is fresh air here, and the sun does not bake. In addition, the terrace will remain a favorite place of leisure and in the winter season, if during its construction this wish will be taken into account. Warming the terrace and heating it, you will create a place for excellent New Year or Christmas gatherings.
Only the veranda is able to hide from the rain and scorching sun and at the same time "envelop" with fresh air.
Where to build a veranda
The street loggia is located on the side or central facade. Any angle is acceptable, the main thing is that from this room there was a passage directly into the house, and the entrance gate was within sight.
The Council, consider the length of the facade to which the veranda will be attached, since this parameter plays an important role. Width indicators do not play an important role, but often this parameter is 2 - 2.5 meters.
Before the beginning of all works, the territory is cleaned and all the unnecessary elements (porch and visor) are cleaned and dismantled.
![]()
Considering the construction in perspective, this occupation does not seem laborious. However, for this opinion to remain so, it is necessary to develop an action plan, to follow it and clearly set the sequence of actions:
- Legal registration of all necessary documentation for the legalization of construction;
- Determine with the veranda type;
- Development and constructive acquisition of elements for the construction of the veranda;
- Make a list necessary materials with the subsequent acquisition;
- Hire professionals or do construction yourself.
The legalization of the verandah
If you started construction without preliminary processing of documents, in certain cases it becomes a violation of the law. And if the moment comes when you decide to part with this real estate (donate, sell, lease), this will be a problem.

Even if you have all the necessary documents for the house, and the extension is not legalized, you can not do anything, since it will be illegal. The extension must be designed and approved by the architectural department.
Importantly, the law provides for a fine for illegal construction in the amount of 3 - 5 wages.

If this does not suit you, then you need to consistently, observing the legitimate demands to go to achieve this goal:
- Make a project;
- To work out the architectural solution;
- Develop functionality and design;
- Take into account every nuance, element or detail of the future structure.
Know that the project requires approval and strictly follow it as you build it. Each correction will be eliminated in the future.
When you have a ready and approved project for a house and an extension, you will receive a building permit. This takes time. After the completion of the construction work, it is important to re-register the altered structure. For this, a representative of the BTI is called, which examines the conformity of the structure to the submitted documents. If everything is correct, get documents that require approval in the architectural bureau. After that, you legalize your altered real estate.

Types of verandas
Street loggia refers to a small and light structure, by definition it is an additional element in protecting the entire structure from adverse weather conditions. Building on the building standards, the veranda is referred to as light, unheated structures:
- Glazed;
- Open;
- Partially open.
Which of the presented options appeals to you? Of course it's a matter of taste and preferences. But depending on the chosen option, you will get an unlimited space with a canopy, a half open area or a veranda able to give fresh air in the summer, and in winter to serve as a cozy and warm "nest". Part of the area is enclosed by a wall or glass ceilings.

If you opt for a fully enclosed but functional annexe, you will get additional living space. It will need to be insulated and provided with heating.
Design plan
When constructing a veranda, it is necessary to carefully read and determine the necessary design features:
- Foundation;
- Frame;
- Floors,
- Doors;
- Roof or canopy;
- Windows, partitions (the material necessary for their design).

Selection of building material
An important criterion in the construction of the veranda is the complete stylistic relationship between the buildings. That is, if the house is made of wood, then the same material is used for the terrace. There is a very fine line in the compatibility of building materials. For example, a tree perfectly combines with a brick, so some elements of this material take place. But if the main structure is faced with a siding, then a loggia with an abundance of glass, plastic and metal will perfectly suit it.

Well, from all of the above, it is clear that for the construction of the veranda used wood, brick or metal profile and then its sewing. The claimed material is brick, but it is cheaper to build from timber or logs.
Foundation
The veranda requires a foundation of brick (columnar), tape (concrete) or metal.
The council, so that later there are no unpleasant moments, use the same technology as for the main building.
Independently to conduct the necessary calculations are not necessary (if you are not a specialized specialist in construction), this should be entrusted to qualified specialists.

The very construction of the base under the terrace begins with the cleaning of the territory, while removing the layer of land (up to 15 cm). Then we make a breakdown and begin to build a foundation, and the depth of the additional structure must correspond to the main one. But in any case they do not connect, you need a gap.
Frame
The main building base is made of brick, metal or wood. Everything depends on the originally chosen project and the type of terrace. If you make a warm extension, then the construction is made of bricks. If the climatic features of the area require warming, do it immediately. And you want an open structure, then you will build a railing there and leave a place for the "French windows".

Floors
The floors are laid before the beginning of the internal work. Depending on the operation parameters, you will need:
- Boards;
- Concrete for screed;
- Linoleum;
- Ceramic tile;
- Self-leveling floors.
Selecting the material, you need a view of the terrace. If this open structure of wood, then the ideal option for the floor is a terrace board or board. It is important to take into account the bad weather with the open type and choose materials strong, designed for outdoor use. Do not forget about security.

Remember, tiles on an open terrace can become icy in bad weather, then traumatic situations are possible.
Doors and windows
If you are building a closed veranda, then the door installed is the entrance door. So it must be strong, functional and status. But it does not break the unity in the whole house.

The same criteria apply to windows, they must be not only representative, but also fulfill their basic, shut-off function.
Interior decoration
The open space evokes a romantic mood, especially if there are wicker furniture, fluttering curtains, many colors and beloved people.

Another thing is closed veranda, here it is necessary to take care of the functionality of the terrace in winter. Insulate and plaster the walls. But the presence of large windows allows you to create a joyful mood. Opening them in the summer, you can put flower pots on the windowsills. Light curtains will take off from any whiff of the breeze, thanks to this freshness and mood of rest will become unchanged. In order to create a playful summer mood in winter, the walls can be decorated with panels or pictures with thematic images. In the interior use juicy, cheerful colors. This decor will create a cheerful mood for both owners and their guests.

Independence or trust in specialists
Whatever the decision on the type and style of construction, if the owners decided to build it, then they need it so. This is their decision and priority. The security of the building is important. And it can be provided only by qualified work. Hiring employees or a construction team will cost a round sum. But, who can guarantee security to relatives if you decide to build your own forces. No one. Trust the basic work of professional builders. You will reduce costs when decorating or finishing. This work is under your power, but here the erection of the frame, the observance of the necessary technology when using a particular material, the installation of the roof, etc. leave the masters.
Apply to companies specializing in construction, find out about their reputation, about how many years they work in this area. This is the only way to ensure safe construction with subsequent use.