The installation of skirting boards on the ceiling is the final stage of repair, when the finishing of walls and ceilings is already completed. And it is on the basis of the quality of this work that the final result will depend. Therefore, even in such a seemingly trifle, it is necessary to understand. Here and consider in this article how to glue the ceiling skirting.
What do skirting do?
For the manufacture of modern ceiling decor, such materials are used:
- Polystyrene.
- Polyurethane.
- Styrofoam.
- Tree.
The peculiarity of them is that they are strong enough, durable, easy to use. Working with synthetics is a pleasure. At the same time, the materials quite realistic imitate stucco.
Consider each material in more detail, so that you can make a choice more thoughtfully.
Styrofoam
Arguments in favor of foam plastic are:
- a small mass, which greatly simplifies the repair;
- low cost.
Polyfoam, in addition, is very easy to process. For inexpensive repairs - this is an acceptable option.
Polystyrene cons.
- Insufficient strength. Although a special strength for skirting on the ceiling and is not required, but the material easily breaks during operation.
- Flammability.
Foam plastic baguettes are perfectly combined with putty and gypsum board surfaces. Mount them best on plaster or acrylic putty, special glue or alabaster solution.
Important! Mount the plinth from the foam plastic can be in a room with high humidity (moisture resistant material). But it must be abandoned in rooms where there is a risk of fire. Fire resistance does not apply to the benefits of this material.
Polyurethane
Of the listed materials, the absolute leader is polyurethane. His unique properties are that he:
- unusually flexible;
- resistant to fire;
- does not absorb water;
- not "preserves" smells.
Important! He has only one minus: higher cost, in comparison with polystyrene and foam plinth skirting.
There are several varieties of polyurethane decor on sale. Sometimes use the same skirting for floor and ceiling. They are attached to a special glue, and in the corners apply special lining. To glue the ceiling skirting is not difficult at all. It is enough to use a special gluing compound. The field of application of the material is very wide.
Important! The slats are white, but they can be painted.
Tree
Wooden decor is appropriate if the room is finished with chipboard, lining or MDF. When using wooden decor, you can "plant" on the glue only small parts. The plinth is fixed using self-tapping screws. The use of nails for installation is undesirable. After the skirting is fixed, the screws are treated with putty for the color of the wood. The same putty is used for sealing joints.
For the manufacture of moldings, the following types of wood are used:
- Aspen.
- Birch.
- Red tree.
Important! Wooden skirting boards must be treated with a special composition from insects before installation. Also, special treatment is needed to increase the fire resistance.
Polystyrene
This material has the same advantages as polystyrene foam, however, it is more dense and durable. The joints are much more accurate. But the cost of polystyrene is higher. Mount it can be on the adhesive for polystyrene.
Correct choice of plinth
Well, it's quite logical, before you mount the ceiling decor, you need to correctly pick it up. Plinths differ in length, width, pattern and texture. In addition, they can be convex or concave.
Of course, the choice of this or that variant entirely depends on the taste preferences of the owners, but there is a set of universal basic rules that are suitable for everyone without exception. For example:
- for a spacious high room suitable wide and massive plinth;
- for a small room - thin and narrow.
Important! In addition to the height of the ceilings, we must take into account the type of wallpaper on the walls. Solid wallpaper will look better with a plinth decorated with patterns, and for walls with a pattern, smooth skirts are more suitable.

When choosing the following points should be taken into account.
- Weight. Here the principle "the less weight, the better" operates. Sometimes spectacular-looking bars move away from the surface under their own weight.
- Ease of care (removal of contaminants, the need for periodic tinting).
- The width of the surface of the strip adjacent to the wall. The principle is this: the wider this width, the easier it is to assemble.
- Flexibility. This criterion is relevant if the room has a complex configuration.
- Strength. This factor determines the durability of the decor.
How correctly to glue a ceiling plinth?
To get started, get these tools:
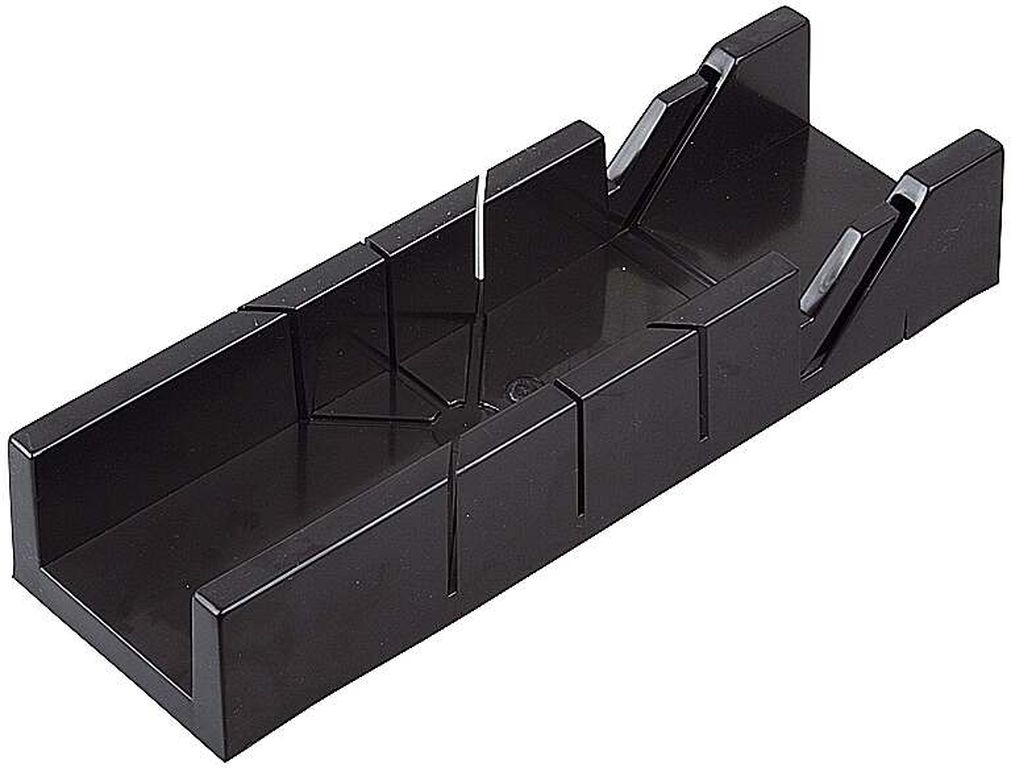
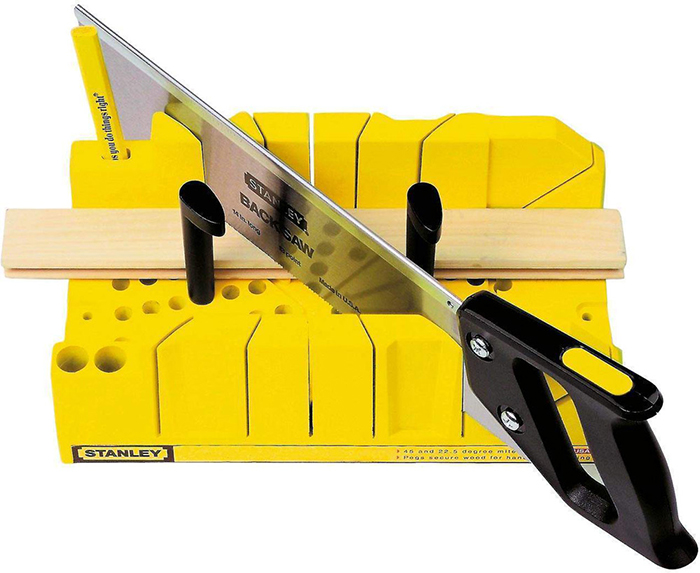
- Joiner's stool. This device allows you to cut pieces of material at the right angle.
- Hacksaw or fret saw. If these tools are not available, they can be replaced with a sharp knife.
- Pencil.
- Roulette.
- Adhesive composition. It can be special glue, sealant or "liquid nails".
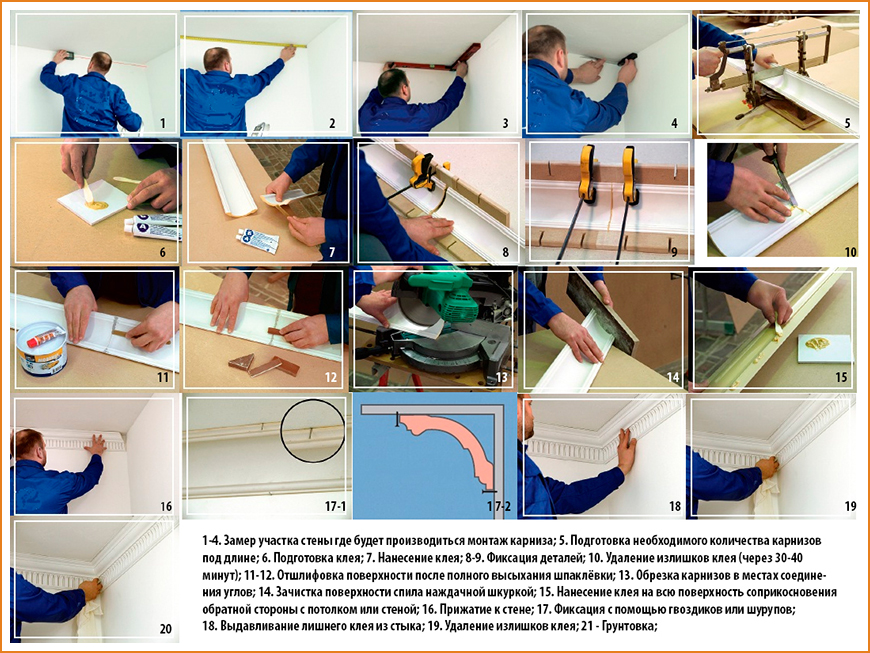
Rules for the performance of work:
- Before starting the fillet pattering, pound the places of adherence of the baguettes to the walls and ceiling.
- After this, using a spatula or a building syringe, apply adhesive composition on the baguette.
- Begin mounting from a long wall. At the same time, gently press one part of the bar to the ceiling, and the other - to the wall.
Important! This rule "works" if the walls are flat enough. If - no, then too much to press the plinth to the wall is not worth it. It will repeat the unevenness of the surface and it will look ugly. It is much more rational to fill the voids with a sealant or putty, and then clean it with fine-grained emery. If you do everything neatly, the joints will be completely invisible.
- If in the process of working on the surface of the glue, nothing terrible. With your finger, stretch it around the joint. Small gaps in this case will be sealed.
Important! If too much glue has been released, you can remove the excess with a sponge soaked in water, and then wipe with a clean dry cloth.
- After the skirting board is mounted, treat the corners and joints with filler.
- If you plan to paint the plinth, you must first coat the surface with a primer. It is desirable to paint the decorative element with water-based paint. Apply paint with a brush or spray.
How to smoothly cut the material?
In order for the "corners" of the bars to look immaculate, it is best to use a building chair. This tool helps to cut the material smoothly and at the right angle. Typically, this is either 45 or 90 degrees.
Important! Practice at first with a small piece of the bar, but you can be sure: the result is amazing!
Now you know how to properly glue the ceiling skirting. The work is not very difficult, but requires care and accuracy.
It would seem that it can be simpler than a ceiling baguette, but, strangely enough, its gluing drives many people into a stupor. The main problem of self-taught masters is the reduction of corners and joints.
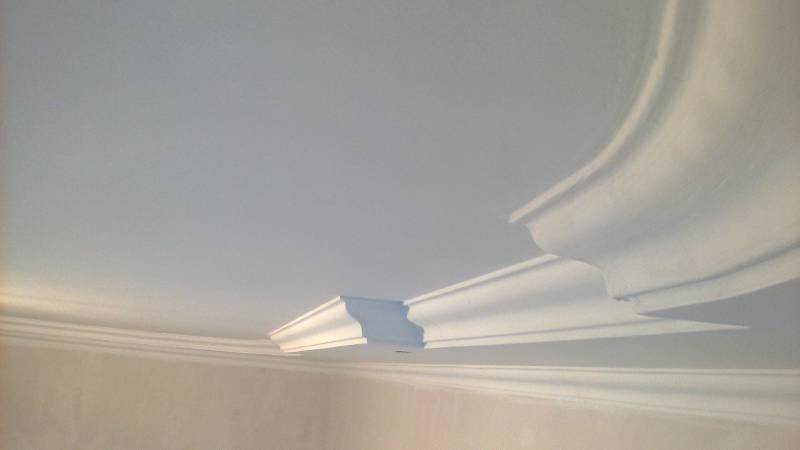
For this article, we specifically chose a ceiling with a rather complex geometric pattern to visually demonstrate the process of gluing not only on flat planes. So, glue the plinth ceiling, and remember all the subtleties.
Material selection
Ceiling plinth is of several types, so first let's see which one is the best in our case.
Types of ceiling skirting boards
We think everyone understands that each type of baguette has both small and large sizes. We will describe only the types of materials from which they are made, and we will focus on the basic qualities of each of them.
So:
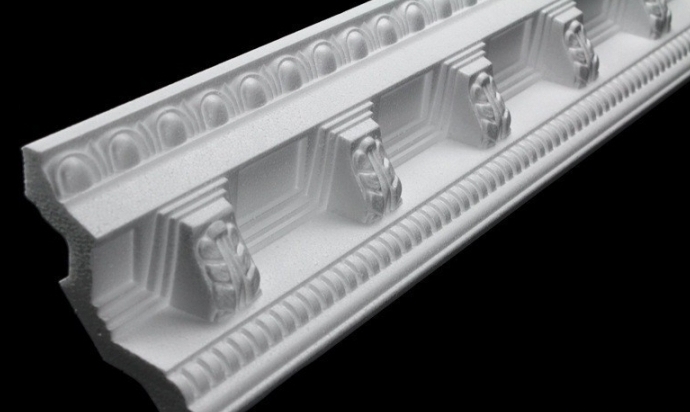
- Before you the plinth from polystyrene foam. Pay attention to the photo above - it clearly shows the granular texture of the material, which will appear even through whitewashing. No wonder this option is the cheapest: it is very easy to damage, it is fragile, plus - it has toxicity.
We have overtaken the horror, but still make one reservation - the foam is also of high quality. The price of such an option will be much higher than other analogues, since all listed shortcomings have been minimized.
Advice! If you want to see under your ceiling a skirting board, then bear in mind that it will take a lot of time and energy to paint it. It will also be necessary to constantly return to the already painted areas, and remove the stains that form in hard-to-reach places.

- Plinth made of expanded polystyrene - this is another common and accessible material. It is considered to be a reliable, practical and beautiful solution. These are the baguettes we have chosen for our facility. They are well bent, have a uniform structure, easily shpakkuyutsya and have a fairly strong surface (see).
- What today only do not make of plastic. Exceptions did not become ceiling skirting (see). This fairly inexpensive material can create a sense of luxury in any home, while it is durable and durable. The disadvantage of decorative PVC skirting boards is the complexity of the installation - they require very precise cutting, since the joints can not be sealed with putty.
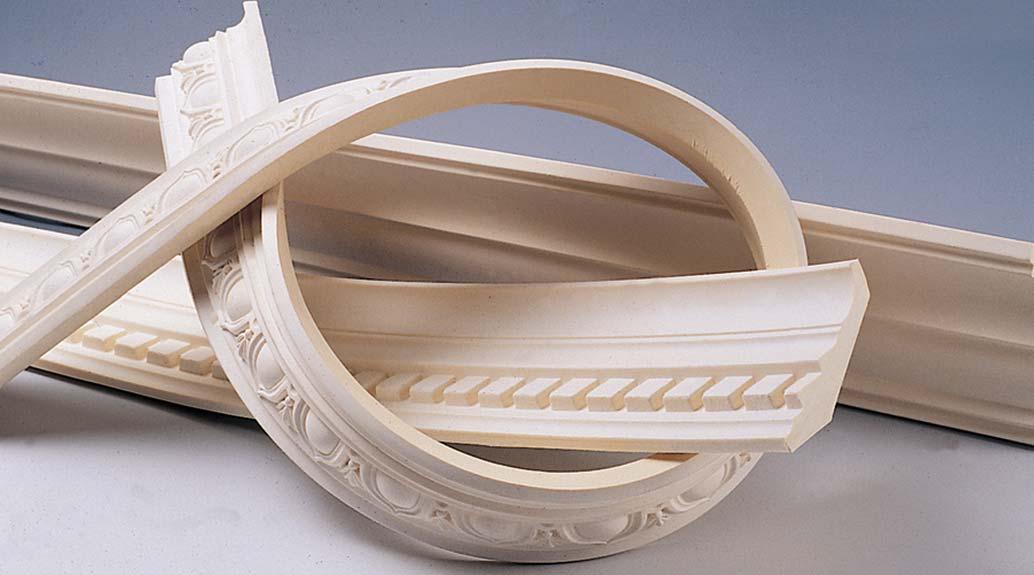
- Before you. It is a modern, durable material with excellent flexibility, which is designed to ennoble rounded surfaces (arches, curved ceilings, etc.). Such baguettes would be the ideal solution in our case, but there is a big "No". Pay for one two-meter rubber skirting from one and a half to two thousand rubles - this, sorry, to put it mildly, wasting. We have applied another solution, which we will discuss in detail in the second chapter of this article.

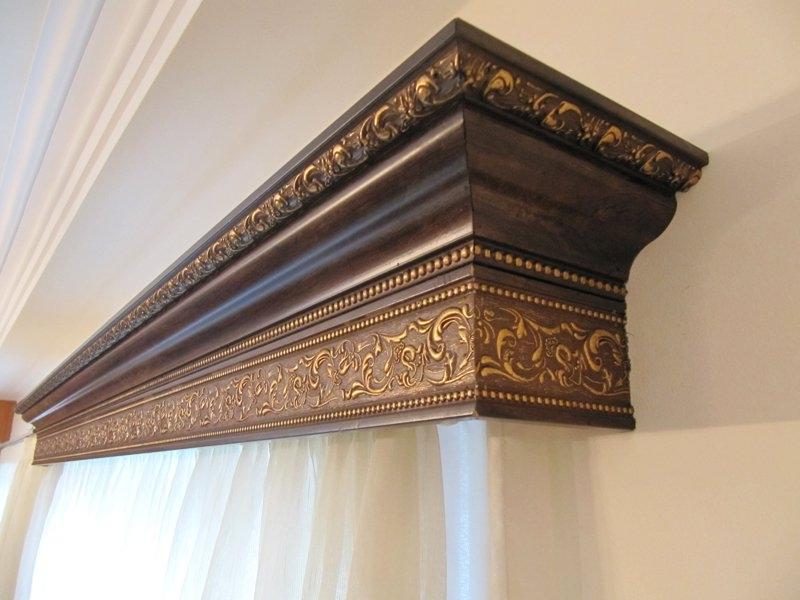
- Gypsum fillet - this is one of the most expensive and elite jewelry for your ceiling (see). Such skirting boards are made to order according to actual measurements, so they are ideal for any shapes and surfaces. Fillet of gypsum is a favorite material of designers, as they give a lot of imagination, and they allow you to create chic interiors for every taste.
- There are also wooden plinths, but about them we will mention casually, as they are applied, only in the interiors where the tree is involved.
Than to glue a ceiling plinth
Another important question - what to glue the baguettes?

Let's list the main options:
- The first in our list are glues, which are called liquid nails. These are modern compounds that allow you to carry out all the work qualitatively and quickly. There is no need to hold every detail (as, for example, using the "Dragon" glue) - the coupling with the surface is instantaneous.
- There are two types of liquid nails: water-based; Compositions with resins, synthetic rubber, toluene and a mixture of aliphatic hydrocarbons.
- The first option is excellent for foam and polystyrene skirting boards. It gives a good hitch with the plaster, glossy and paper surface. It is easy to wash off with warm water, which is convenient when sticking to wallpaper and tiles, that is, we use it when the finish of the room is partially completed, and you do not want to get it dirty.
- The instruction of the second variant says that it is intended for gluing PVC products and polyurethane skirting boards. Of course, it will work for other surfaces, but the quality of the plaster with the gypsum is worse than that of the water-based glue. It is also very difficult to remove from the surface - for this, a solvent is used.
Advice! Adhesives on a water basis are both transparent and white. Be sure to spill the joints and baguettes, since after drying, such glue will turn yellow.
If you repair in full swing, then forget about ready-made solutions. We will use the putty, so we create a monolithic structure, hide the joints between the baguettes and save a lot of money.
The process of installation and finishing of ceiling moldings
As already mentioned, we will glue foam polystyrene baguettes on gipsokartonnoe and gypsum base. The ceiling has two levels - the upper curly and the lower straight.
Glue ceiling skirting
Please note that the whole room was originally with a rough finish. Paint skirting and puttying require a certain order. If you have a conventional ceiling in one level, then zashpaklyuyte it and the walls, then proceed to pasting the skirting. In our case, everything is a bit more complicated.
The first thing to do is to seal the seams and hats of self-tapping screws on the plasterboard. After that, the main part of the ceiling shpaklyuetsya. How to perform these operations with your own hands, you can find out in other articles that are presented on our website.
Now proceed to the gluing of the baguette, for which we breed the putty.

So:
- Absolutely any finish putty. In our case, we use the same one to which the ceiling and walls are putted.
- Pour a small amount of water into a clean bucket. Top with a dry putty. Do not put it at once a lot, because if the mixture is too thick, it will have to be diluted with water, and the total amount of diluted mass will increase. In this case, you risk not having time to work out the mixture to the end, and it will solidify right in the bucket.
- Stir the mixture to a homogeneous (homogeneous) mass by hand, or with an electric drill with a mixer attachment. Allow the putty to stand for several minutes, so that the moisture is evenly distributed over the mixture - this will eliminate the appearance of lumps. Then stir the mass again. As a result, putty should become a consistency of thick sour cream.
Advice! Carefully study the annotation to the putty. Some mixtures are suitable for manual mixing only.
Next, using a small spatula, put the filler with a continuous layer on the previously cut off skirting boards, and glue them to their place (the mixture is superimposed on the mounting pads on the back of the plinth). Do not hold a baguette in your hands, as it can break from the weight of putty. It is most convenient to perform this manipulation on a free table.

We set the baguette in the right place and squeeze it well along the entire length, thereby expelling the excess fillings that need to be removed. To do this, take a small spatula with sharp corners, apply it to the plane of the wall, and draw them parallel to the plinth.
The collected mixture is moved to the second larger spatula, and the operation is repeated. Thus, we additionally cover the places where cavities formed due to a lack of a mixture. If the surface of the baguette is stained, wipe it with a dry cloth at once.
Cutting ceiling skirting
Now a little about that, and place them in the landing. All inconsistencies in the corners are formed due to the fact that either you have incorrectly cut the corner, or displaced it in the plane - and most often both occur.
- The chair is used for precise cutting of corners. The photo above shows the simplest version of plastic, which is enough for almost any job, since it has cut angles of 90, 45 and 22.5 degrees. These are the most common corners in homes and apartments.
- If you are an extraordinary person, and decided to build, for example, octagonal rooms, then you need to purchase a chair with manual adjustment of the corners.
- There is another problem - rarely you will find rooms with ideal walls and corners, they usually "dance" everywhere. How to be in this case? Well, firstly, small differences in joints can be hidden with putty. And secondly, there is one more, more precise way of cutting, which was used by us - but about it a little later.

And now let's talk about the exact location of the plinth. Polystyrene and polystyrene baguettes are flexible enough that they easily move relative to the height angle. To avoid such difficulties, it is necessary to preliminarily draw a line on the wall whose spacing from the ceiling will correspond to the height of the skirting board.
Data on the dimensions of the skirting boards you bought are indicated on the label. If there is no data, measure the width yourself. To do this, put the plinth in a corner, look at it from the end, align it as precisely as possible visually, and make a mark with a pencil. After that, measure the distance obtained, and transfer it to all angles. Now it remains only to connect the tags, for which it is most convenient to use a coloring thread.
In our case, the bottom border of the baguette is the edge of the second level (the box), the height of which was originally calculated under the plinth - so we'll align it.

Now let's talk about how we marked and cut the plinth. Pay attention to the photo above. On the right outer corner clearly visible marks pencil on the ceiling. As you probably already guessed, according to them the plinth is cut off.
- Place the workpiece from the baseboard in a corner, aligning the bottom edge, or the marks that you received earlier;
- Draw a line along the top border of the baguette;
- Repeat all operations on the second side of the corner.
As a result, you get two lines, the intersection point of which, and there is the angle you need. Attach the baguette again and move the upper and lower marks on it. Similarly, the marking of internal corners is performed.
Now it is very important to cut the baguette correctly. Place the blade of the knife or the small hacksaw to the marks, and tilt it to the desired side by 45 degrees. An approximate scheme, where the inclined line represents the blade of the cutting tool, is given above. If you do not do this, and cut it perpendicularly, as a result, you will get a huge hole in the junction of the joint, which you do not cover with putty.
If you notice that we did not install plastic corners on the outer corner of the plasterboard, then, most likely, you are quite an experienced person in the repair. We refused them for the reason that the sheet joint will hide under the baseboard, so we saved money and time without losing quality. This is what tied us to a certain sequence of gluing and puttying.
If the drywall is sewn differently from us, or the bottom edge of the baguette does not coincide with the height of the levels, then no corners can not be dispensed with.
Docking joints and flexing the plinth
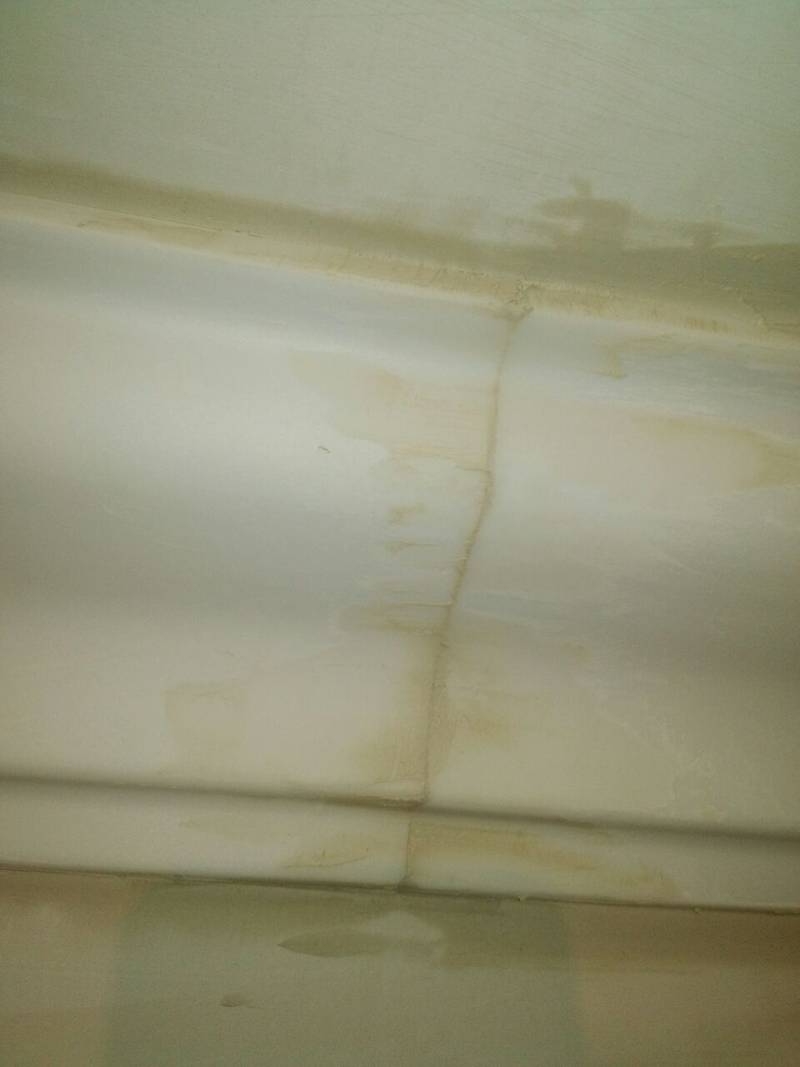
When gluing each next skirting board, putty is put on its end. When we press the baguette, it will be squeezed out of the joint, thus filling the seam, after which the excess putty is removed. Analogously we act at connection of corners. Carefully see to it that the baguettes do not move relative to each other in height.
Now let's talk about how you can bend the skirting board to the desired radius.
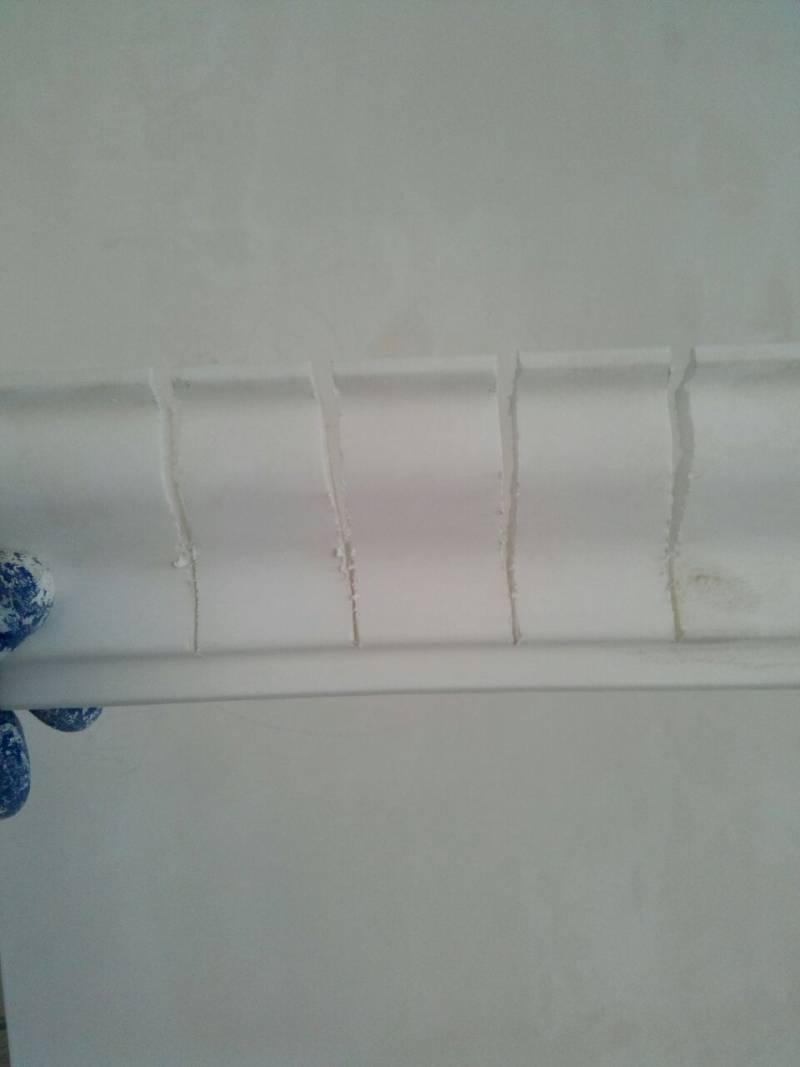
Initially polystyrene plinths do not have sufficient flexibility, so we have to make cuts, removing unnecessary segments. Look at the photo above to see how it's done.

As a result, we managed to bend the baguette into an arc, for this it is enough to add the resulting accordion.
Advice! For the inner radius, the slots are made from above, for the outer radius, from the bottom (it does not matter for symmetrical skirting boards).
To accurately measure the length of the bent element, measure the distance with tape measure, and cut off the plinth with a margin of 10-15 cm. Make cuts, then attach it to the seat, and make a mark on the fact.
With the help of a stationery knife, remove all irregularities from the slices. We spread the obtained "caterpillars" with putty, not forgetting the ends and the accordion, and carefully paste, removing the surpluses of the mixture. Using a small spatula, cover all irregularities on the surface, then allow the filler to dry well

Here's what we got as a result (see photo above). After the plinths dried, we plastered the box and walls, and polished them. Now you need to sandish the baguettes themselves. To do this, use zero abrasive paper or abrasive mesh No. 320.
Ideally, you should get a flat surface without any changes. If in some seams there are cavities, then you need to repair them again.
Attention! Some ceiling skirting boards (especially foam) have uneven factory edges. Carefully inspect them before gluing, and cut them out if necessary.


Painted plinth with a brush or spray. It is necessary to carefully pass all the bends, not missing any hard-to-reach places. If your brush does not allow you to do this, then get some paint brushes.
Remove all layers and stains immediately: roller on the planes of the ceiling and walls, brush on the baguettes.

Also, pay attention to painting the interior corners, because, often, they remain poorly colored.

In the end, if you did everything right, you should get no worse than ours. The more time and attention you give to the joints, as well as the proper placement of the baguette, the better will be the finish appearance of your ceiling.
Do not forget that you need to whiten in several layers, only so you can hide the seams completely.
Most often, we skirting ceiling, glue on putty, this is what makes it possible to achieve a sense of monolithic multi-level ceiling. Someone probably knows other ways, but we think that there is no need to invent a bicycle when, someone has been riding it for a long time, it's enough to learn a precious experience. We also recommend that you watch the video, then you must try it out in practice.
The most pleasant stage of repair works - pasting of walls with wall-paper and installation of a ceiling skirting, as the premise already gets a cosiness and the coveted moment of the termination of repair comes nearer. In order for molding to fully perform its practical (masking the flaws of the ceiling-wall joint) and decorative (giving the room a refined and special charm) function, it must be properly glued.
Ways of fixing the plinth
Before gluing the ceiling skirting, you need to determine the way:
- Mounting on top of wallpaper. Advantage - the opportunity to pick up molding, when you already see the whole picture of the room, without being afraid of making a mistake with the design.
- Mounting on walls, only prepared for wallpapering. Dignity - no chance to spoil the finish in the process of fixing curbs.
Fastening of a ceiling skirting board
Preparation for installation work
Glue the ceiling skirting can only be after the day it is unpacked. Therefore, after buying the baguette there is at least a day to fully prepare for the installation process.
First of all you need to buy all the materials and tools that you might need:
- Glue or putty, depending on the chosen method of installation.
- A chair, a saw with a small tooth and a construction knife, they will help to gently make a saw in the place of docking of two baguettes with the necessary external or internal angle.
- Spatula, rags and sponges, in order to remove excess glue and putty.
- Paint and brushes for coloring the border.

Tools for installing skirting boards
If the experience of gluing the ceiling skirting is small or not at all, you need to practice to saw the corners. Therefore it is better to purchase an additional baguette and perform on it all kinds of corners that are available indoors.
Ceiling plinth must always be glued on a dry and clean surface, so the fixing point needs to be wiped with a dust cloth. If the baguette is attached to a plastic surface, it must be degreased and wiped dry.
We choose glue for fixing the baguette

Glue for ceiling skirting
If you are going to glue the ceiling skirting to a finishing finish, it is better to use a finishing filler or a solution for sticking drywall.
If mounting is done on top of the wallpaper, special glue is required. Here, the choice is made between 2 types: acrylic and polymer. Glue on a water basis (acrylic) is used in children's rooms, bedrooms, a hall and other rooms where safety and absence of a pronounced smell are important. Polymer adhesives, such as "Moment" and "Titan", are recommended for use in rooms with high humidity.
![]()
Edging of plinth before finishing
- The process of mounting the molding must begin with cutting the edges at the desired angle. In order not to get confused, the prepared baguettes can be placed near the walls around the perimeter in those places where they will be fastened under the ceiling. Places joining the plinth on a straight wall are adjusted already in place so that there are no large gaps. Therefore, it is not necessary to cut them off immediately.
- To make the corners perfect, it is better to adjust them without glue composition. We take two baguettes, filed under the desired degree and join in the corner. If the gap is large - correct the joint, cutting off excess with a knife. If the quality of the joint suits - we take a pencil and outline the places of adherence of the baguette to the wall and ceiling.
- After all the corner joints are prepared, it is necessary to dilute the mixture. There are 2 ways to prepare it:
- Finishing putty mix with water until a uniform soft mass, the excess of which will be squeezed out from under the baseboard. It is important that the mixture be as thick as sour cream, but it does not flow;
- In the water, add shpaklevku and glue PVA (proportion 1: 1: 1) and knead to form a homogeneous mass and leave for 2-3 minutes. Adhesive mixture is ready, you can start working.
Editing the skirting board on the wallpaper

Editing the skirting board on the wallpaper
The algorithm of work on attaching the baguette to the wallpaper is the same as in the previous case. But there are some nuances:
- The glue is also applied to both surfaces of the baguette, but not evenly, but pointwise with a pitch of 3-4 cm or a narrow strip. The glue must be so large that it holds the glued product well, but does not protrude when pressing on the molding. If it still appeared on the wallpaper, you must immediately wipe it with a dry sponge or cloth.
- After applying glue on the baseboard, you need to wait a little time (so that it clings) and then paste on the walls. If you do not do this, you will have to stand for a long time, pressing the molding against the wall and ceiling, which is very inconvenient.
- Painting the plinth is more convenient before installing it, this eliminates the risk of paint falling on the wallpaper.
If the walls are uneven
Often it is necessary to paste a baguette on uneven walls with wallpaper, because of which there are large cracks and gaps. The wallpaper thus does not allow to fill the joints and improve the appearance. To fix the situation, it is necessary to take the sealant in the color of the molding (usually white) and neatly camouflage the joints. Do this after the glue has completely dried.
When carrying out repairs there are no minor works. In particular, this applies to finishing works, which are carried out at the final stage of repair. Any deficiencies in the work can spoil the entire overall type of repair, because the elements of the finishes are in sight and should be performed perfectly.
Important steps in finishing the ceiling is the sticker of the ceiling skirting, called frieze or fillet. This element creates a smooth transition between the wall and the ceiling, logically completing the design.
Working with a ceiling skirting board is not time-consuming and difficult even for beginners. But there are several basic questions that will arise in the process of work: These questions need to find the right answer to get the perfect ceiling finish decorating the whole room. The most commonly used ceiling skirting, made of polystyrene, expanded polystyrene and polyurethane. Such fillets are light, moisture resistant, flexible and do not react to temperature changes. They have a wide width and a wide choice of patterns, reliefs and drawings, their use allows creating any decorative effect. A ceiling plinth made of these materials is easy to paint, so that a variety of artistic decorations can be created.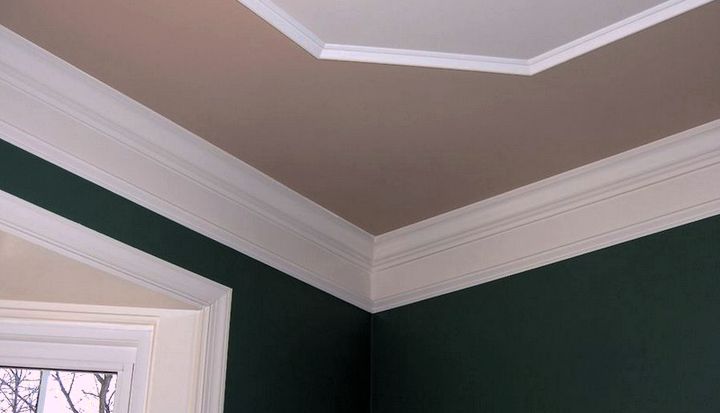
Under the ceiling skirting can hide small irregularities and flaws, but its main purpose is to decorate the room, harmoniously blending into the overall interior.
The most careful and careful consideration should be given to the design of the corners. If the work is not careful, jaws or mismatches may form in the fillet junctions, and then the appearance of the whole ceiling will be spoiled.Material of manufacture and necessary quantity of baguettes
The profile of polystyrene and expanded polystyrene is unstable to mechanical influences, therefore during installation it requires additional accuracy. Polyurethane fillets are characterized by increased strength and the ability to retain distinct relief shapes.
It is possible to use a PVC skirting board, but it should be taken into account that this material can not be painted, and under the influence of temperature drops it can deform. To create a specific finish, a ceiling plinth made of gypsum, wood or aluminum is sometimes used, but such fillets have low ductility, high weight and characteristic mounting features.
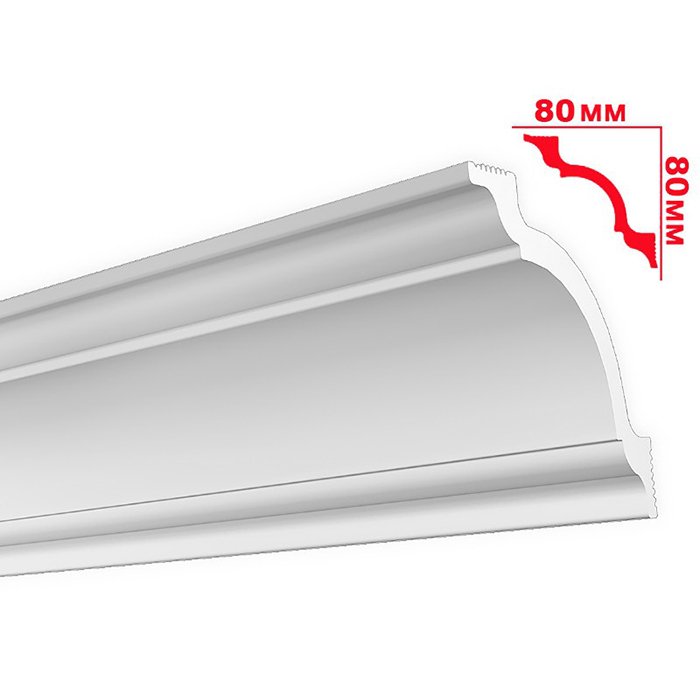
Before buying, you need to calculate the amount of material. To do this, measure the perimeter of the room - this value is equal to the total length of the ceiling skirting. Baguettes are produced in lengths of 1.2, 1.5 and 2 meters. Dividing the perimeter of the room by the length of the fillets to be purchased, their number is calculated. To joints it was less better to purchase the longest products.
Choosing the width of the fillet, you should consider the height of the ceiling in the room.
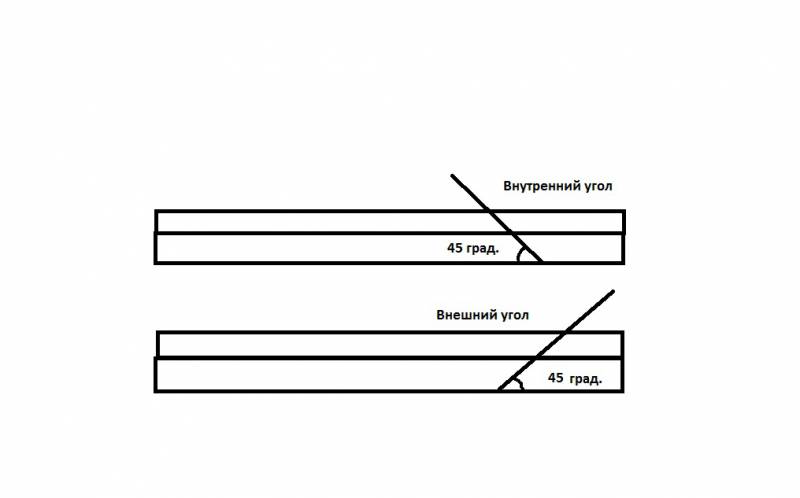
Inside corner - concave part of the wall at an angle of 90 degrees.
Outside corner - convex part of the wall at an angle of 90 degrees.

- Inside corner
For internal corners the cut is made from the top down: the upper part of the fillet is cut at an angle of 45 degrees with respect to the underside of the fillet.
If you compare the chair with the dial from the clock, and the hacksaw on the metal with the arrow from the clock, then when one fillet is placed in the stool on the right side, the metal hacksaw is guided at an angle of 45 degrees to the area of fourteen hours.
Conversely, when another fillet is placed in the stool on the left side, the metal hacksaw is guided at an angle of 45 degrees to the area of ten hours.
- Outside corner
For external corners the cut is made from the bottom up: the lower part of the fillet is cut at an angle of 45 degrees with respect to the upper part of the fillet.
When installing one fillet in the stool on the right side, the hacksaw is guided at an angle of 45 degrees to the area of ten hours. When installing another fillet into the stool on the left side, the hacksaw is guided at an angle of 45 degrees to the area of fourteen hours.

- Inside corner
The sides of the fillets attached to the inner corner of the walls must be perpendicular to the straight. On the wall, in the area of gluing the fillets, a pencil marking is done. For this, a fillet is taken and applied to the inner corner of the wall at the same time as it touches the ceiling and part of the wall surface that connects to the inner corner.
Pencil draws a line along the upper edge of the fillet on the ceiling (from the corner of the wall) about 30 centimeters long. Another fillet is taken. It is applied to the inner corner from the side of the other wall, while simultaneously touching the ceiling. On the upper edge of the attached fillet, an even straight line is drawn (from the corner of the wall), about 30 centimeters long.
The first fillet is applied to the corner from the side of the wall along which the markings from it were made. And in the contact area of the fillet with the indicated point of intersection, with a pencil on the upper side of the fillet make a mark. The same is done with another fillet, on the upper side of which we put the same mark with a pencil.
We apply a ruler to the fillet so that one part of it touches the marked point on the upper side of the fillet, and the other touches the angle of the lower side of the fillet. While holding the ruler and fillet in this position, cut the cutter with a hacksaw, leading it along the line along the ruler. The same procedure is done with another fillet.
- AToutside corner
The markup is made according to the same principle. With the help of two fillets, the marking of two lines on the ceiling is done. A point of intersection of these perpendicular lines is formed. Applying fillets to the outer corner on one side and on the other side of the walls, marks are made at the point of intersection of the point of intersection with the upper sides of the fillet.
At the same time, pencil marks are made on the lower sides of the fillets at the place where the fillet faces touch the outside corner of the wall. Using a ruler, the marks on the upper and lower sides of the fillet are connected. Holding the ruler and fillet in this position, the cutter is cut with a hacksaw, leading it along the ruler. The same is done with another fillet.
The marking of mounting for a ceiling fillet can be made in several ways:
- Using the
- Using a marking cord, colored chalk or blue
Experienced masters make markings on the walls when mounting wide fillets. To exclude various kinds of slopes and the appearance of gaps. Or when installing fillets of plaster molding, which has a large mass.
Throughout the perimeter of the walls, at the level of the control line, brusks with an even surface are mounted, onto which a fillet of gypsum is laid. The bars perform the function of supporting the fillets when bonding to the wall surface.
The need for marking occurs when uneven ceiling or wall surfaces.
Beginners in this area are encouraged to make markup. The width of the fillet is measured. The ruler or level, in contact with the wall surface, is applied to the ceiling and based on the width of the fillet on the wall, points are marked in 4-5 places (depending on the length of the level).
To the marked points a level is applied, the accuracy of its horizontal position is checked, and a straight line along the level surface is drawn with a pencil.
If the ceiling surface has irregularities, then without a ceiling cord simply can not do.
From two edges of the wall to the ceiling, a ruler is applied and, based on the width of the fillet, two marks are made on the wall with a pencil. So, to attach the fillet to the ceiling and to the wall, the marks were at the level of the bottom side of the fillet. Take a drill, at the indicated points two holes are drilled.
Install screwed plastic plugs into the holes and do not fully twist the two screws. To one of the screws, on the one hand, the marking cord is tied, stretched to the stop along the wall surface and is attached to the other screw, on the other hand. After that, the surface of the marking cord is rubbed with colored chalk.
From the center of the wall, the cord is pulled and released. From the sharp contact of the cord with the wall surface, an even straight line forms on the wall. Which will be the control line. The same is done around the perimeter of the walls.
Chocline can be used for this purpose. In fact, this is the same thing. The motor of the marking cord located in the cassette, into which the blue is covered.
How to glue the plinth to the ceiling - a step-by-step scheme (Installation of fillets along the perimeter of the walls)
- Before drawing a control line on the walls, the walls must be cleaned of paint or old wallpaper. This is done with a spatula or a metal brush for deeper cleaning.
- If there are irregularities on the walls, then they need to be leveled with putty.
- The cleaned wall is treated with a primer for better adhesion of the wall surface to fillets. The primer is absorbed for 4-5 hours.
- On the walls, marking is done by applying control lines along the entire perimeter of the walls.
- Take the polymer glue or dilute with putty according to the instructions.
- The fillets begin to stick from one of the corners of the room. Using a stool or markings on the wall and ceiling, corners are cut out on fillets (the cutting order of angles is described below).
- On the surface of one of the corner fillets, apply glue or putty. After that, the fillet is glued to the wall surface starting from the marking of the control line.
- The same procedure is done with another corner fillet. Formed gaps between the corner fillets; fillets, a wall and a ceiling are covered with putty using a spatula.
- The putty left at the junction between the fillets is gently wiped off from them. This can be done manually or with a sponge. The putty remaining when the gaps between the fillets, the wall and the ceiling surface are smeared are removed with a spatula and cleaned with a sponge.
- In the same way, fillets are glued along the entire perimeter of the walls.
Tools and stuff
You need the following tools to work:
- Pencil.
- Roulette.
- Level, at least one meter, or colored chalk and marking cord (for marking the control line)
- The chair.
- Putty knife.
- Putty.
- Polymer glue.
- A piece of sponge (to clean the putty).
- Hacksaw for metal or a shoemaker.
Choosing a skirting board
From Greek, the plinth is translated as a slab (tile), an element created to protect the angle between the wall covering and the floor. From which it can be concluded that the ceiling skirting is an element for protecting the angle between the ceiling and the wall covering intended for decorating the interior of the premises.
Ceiling skirting boards are designed for the following purposes:
- Hiding of uneven surfaces between wall surfaces and ceiling.
- Decorative interior decoration of premises.
- Visual changes in the volume of space of premises due to the width of fillets and their color scale.
- With plastic PVC fillets of PVC can wash off dirt and dust. They are recommended for use in the kitchen or bathroom.
- Fillet of expanded polystyrene is lightweight and cheap. Good absorption of moisture: not recommended in bathrooms and kitchens. Have the property of flammability.
- Fillet from polyurethane contain rubber and have high plasticity. They can be given different shapes during installation. Due to water repellent properties are used in rooms with high humidity.
- Fillets of plaster moldings consist of environmentally friendly natural material. Are a decorative element of interior decoration of premises.
- For beginners in repair it is better to use a chair.
- Fillet from expanded polystyrene can be glued on putty, it is better to attach PVC from PVC to screws, from polyurethane to polymer adhesive, from gypsum stucco to gypsum mixtures.
The composition of expanded polystyrene has properties similar to polystyrene, but the manufacturing techniques are different. It is easy on weight. It absorbs moisture well, therefore it is not recommended to mount it in kitchens or in bathrooms.
Unlike plastic fillets, polystyrene foam can be painted in different colors. Experts recommend to fix it using polymer glue, but in practice it is possible to carry out the installation using the putty. It has the property of flammability.
Polyurethane

The chemical composition of the plinth contains rubber, which contributes to its flexibility, elasticity and the presence of water repellent properties. It is used for finishing rooms with high humidity. Mount recommended using a polymer glue.
Plaster moldings

The main component of gypsum stucco is a natural mineral (sulfates). Environmentally friendly material. Often, fillets of plaster moldings are made by hand on request. Therefore, the price for such fillets, unlike fillets from other materials, is higher.
Fillets of plaster moldings are used as decorative decorations of premises. Installation is carried out on gypsum mixtures.