If you do not have the opportunity or the particular desire to change the enamel bath, which has lost its attractive appearance, then you can resort to its restoration. Depending on what material for enamel renewal will be chosen by you, the question of buying a new bath will be postponed for up to 20 years! In this article, we will tell you how to restore the enamel of the bath with your hands after getting acid or with deep chips.
It is worth noting that the factory enamel is called the primary enamel, and the enamel, the restored bath is secondary.
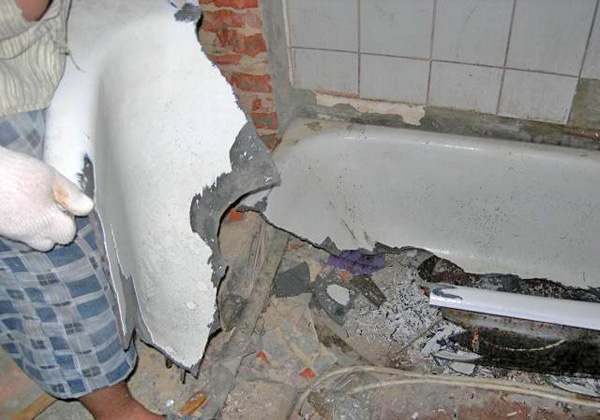
Enamelled bathtubs are made of steel or cast iron. After the protective layer of the enamel is destroyed, the metal frame is corroded. Over time, under the paint layer, rust extends to large areas, which can not only ruin the appearance of the product, but also the plumbing fixture itself. If the defects are not rectified in a timely manner, the moisture penetrating into the interior will lead to severe damages.
Required Tools
Materials and tools:
- Cleaning agent, usually used in everyday life.
- Grinding waterproof skin.
- Two-component putty.
- Enamel or other material for the restoration of the bowl.
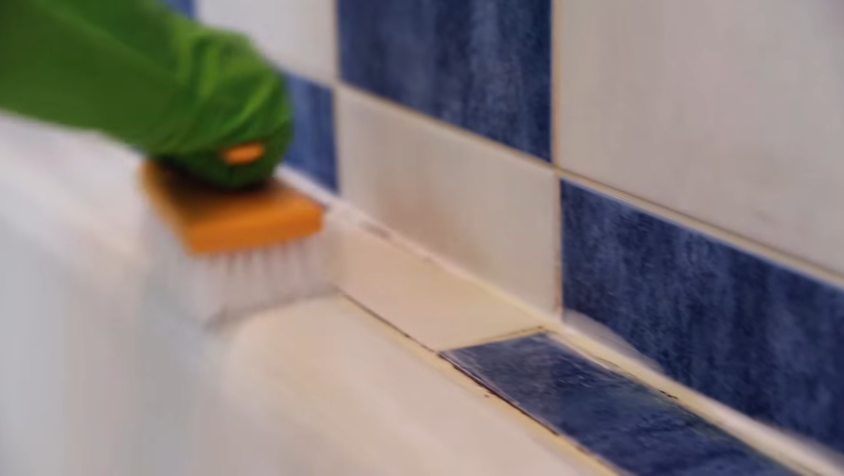
In order to eliminate small defects, it is necessary to thoroughly treat the sharp edges of the chip. This is done with a moisture resistant skin, previously soaked in water. After grinding, the surface should be soaked with a swab dipped in acetone, white spirit or any other solvent. The bath should be low-fat, clean and dry. Enamel is applied in thin layers, each of them must dry well.
Enamelling

The self-enamelling process consists in applying enamel using a nebulizer or a brush specially designed for this. However, before, it is necessary to prepare the surface for enameling. The process consists of the following stages:
- Apply to the old enamel cleaning abrasive powder, which does not contain chlorine in its composition.
- Sand the bath with a moisture-proof paper or a drill with a grinding wheel along with the powder. It is especially important to thoroughly clean the surface of rusty stains.
- Wash away the abrasive chips that formed when cleaning the bowl.
- Degrease the bath.
- Warm it up. To do this, fill the bowl with hot water and leave for 10 minutes.
- Now you need to drain the water and carefully drain the bath to get a matt completely dry surface.
Note! Enamel the bath should be very tidy! Bubbles and stains should not form in the process! Violations of the technology will lead to peeling of the enamel upon drying.
Enamelling takes about three hours. Enamel should be applied in layers with an interval of 20 minutes. The layers should be at least 2. However, to achieve the best results, apply 4 layers of enamel. Ordinary enamel for a bath dries about 7 days. Do not be seduced by quick-drying coatings, as they are not very reliable.
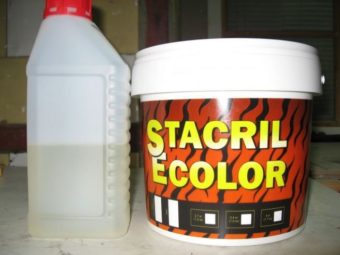
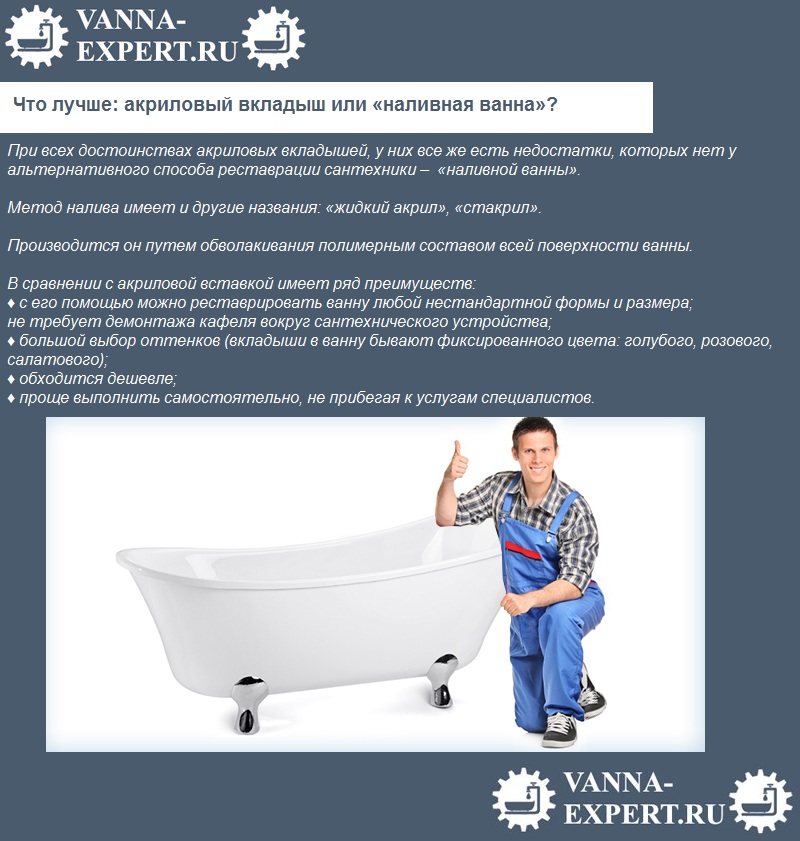
Restoration with stakryla
The method of reconstructing a bath with liquid acrylic is developed not so long ago. This became possible due to the appearance of a new material, the so-called stakryla. What is this innovative tool? It is an acrylic two-component material, which was specially invented for the restoration of enamel baths. It consists of acrylic and a special hardener. During the joining of these two components, polymerization begins. After the glass is applied, it turns into a 6 mm high quality acrylic film.
Thanks to the excellent properties of the product, you can quickly and highly efficiently restore the bath:
- The material is viscous, which makes it possible, without special efforts, to make a coating having an optimum thickness of about 6 mm.
- The fluidity of the stakryl gives the effect of enveloping the surface, so that the material is laid as flat as possible.
- Slow polymerization allows you to carry out work in a quality and without haste, since the glass will not thicken before the prescribed time. As a result, the bowl of the bathtub will be much stronger than if it were covered with enamel or installed a liner.
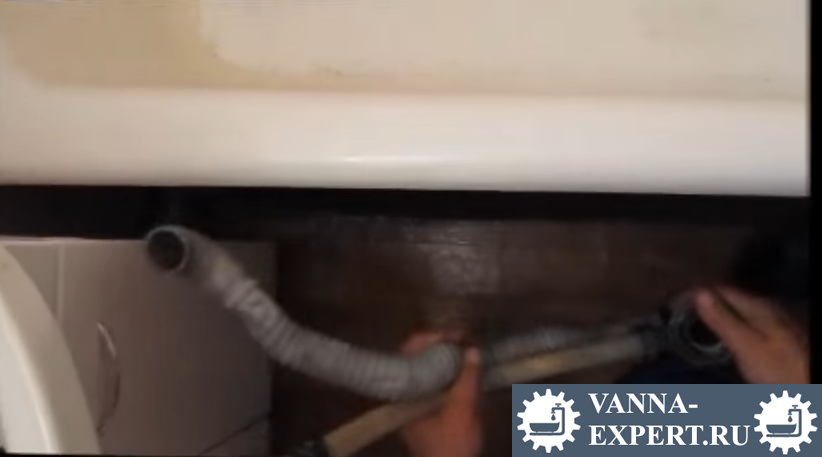
The technology of restoring stakrilom is easier than enameling. First you should prepare the bath, it is done in the same way as when applying secondary enamel. However, you must first disconnect the siphon and overflow. Under the sink put the container, where later drains excess acrylic.

Now you need to prepare a mixture of acrylic, combining the stekril with hardener. Do this according to the instructions attached to the material. Then slowly pour the finished mixture on the top edge of the bowl. After the jet reaches the middle of the bowl, gently move it around the perimeter of the bath. After the circle closes, repeat the actions starting from the middle.
The process of restoration in bulk should be continuous. Do not try to save, because such a restoration will lead to a waste of material. Let it be better that the excess goes into the container under the drain hole.
Note! Acrylic polymerizes depending on its type, usually this period varies from 1 to 4 days. It is better to buy a stakril with a longer drying time, since it is such a surface that will be of high quality! The service life is approximately 20 years!
Inserting an acrylic liner

The technology of inserting an acrylic liner is still known as the "bath in the bath". Financial costs will be higher than with standard enamelling. It is also worth noting that the procedure can not be carried out at home, since the acrylic liner is made on industrial equipment.
The insert is molded in accordance with the measurements of the particular bowl of the bath. Color and shape can be very diverse. The finished product must be inserted in an old bath. The drain holes are joined. And then both bowls are fastened with glue composition, which is first applied to each of the surfaces. On the level of the tile, the insert is cut, and the joints can already be sealed by silicone.

Note! Both production and installation of the acrylic liner should be carried out by specialists, because even the smallest deviation from the technology can lead to the depressurization of the bowls and the subsequent formation of hazardous fungi.
After the acrylic liner is installed, it is necessary to fill the new bowl with cold water and leave it for 24 hours. The bath is now ready for use. It is worth noting that the life of the liner, subject to all rules for the care of it is at least 5 years.
Do you already have experience in recovering enamel? Which of the above ways did you apply? What difficulties did you have in the process of restoration? What helped you to cope with them? Write your comments on the article! Your experience can be useful to many!
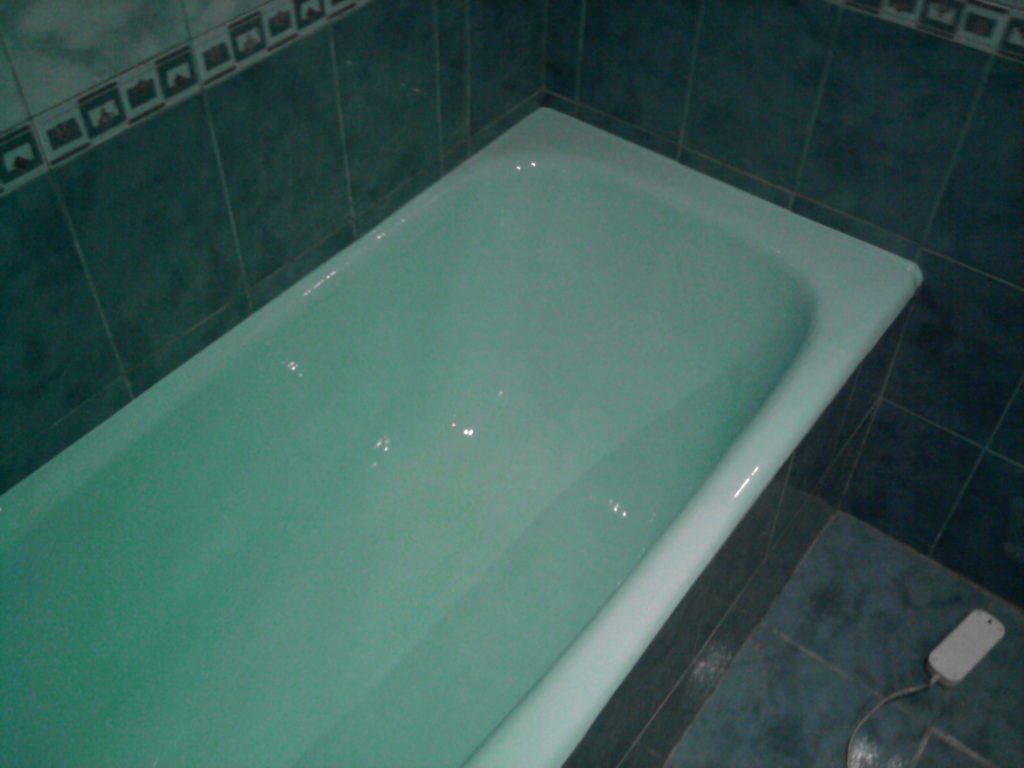
During the repair order you want to put everywhere, including in the bathroom. A brand new wall covering, a beautiful ceiling, fresh plumbing ... There is only one important nuance - an old bath with a horrible, yellowed and cracked coating, on the surface of which there may be rather terrible black chips. This element of convenience in an apartment is not so easy to change as it seems, and expensive is a pleasure. But there is a way out. The lost appearance of the coating can be restored, and quite quickly and cheaply. At the same time it will be easy to manage without the help of professionals. Restoration of the enamel coating of the bathroom with your own hands is quite realistic and does not require a frantic financial cost.
Why "save" a bath?
Before you learn how to reanimate the old coating in the bathroom without completely replacing it, you need to figure out why you need to restore it at all. Why is not it easier to buy and install a new one?
The new bathroom is worth a lot of money, and especially - quality, cast iron. Of course, you can buy the usual metal, but it delivers a certain discomfort to tenants living in the apartment: filling with water is accompanied by a loud sound, which even in thin-walled houses is heard by neighbors.
The new bath still needs to be installed, dismantling the old one. And it's not as simple as it seems. Such work will entail a large amount of debris, moreover, heavy. In this case, women will not be able to cope with it - in any case, strong men's hands are needed and those who dismantle everything will take out. And just everyone can apply a new enamel coating.
Fortunately, the factory enamel in the tub is durable enough, and some apartment owners do not even face such a procedure as its restoration. This can be achieved through a special technology, which is applied. The bath preparation is subjected to strong heating and only then covered with a protective coating, that is, enamel. In theory, it can hold for centuries, but because of the constant cleaning and treatment of the bath, this does not happen. On the contrary, the bath slowly but surely loses its appearance, the enamel turns yellow and becomes not smooth to the touch, but rough.
Yes, enamel is needed not only for beauty - it also protects the bath from the effects of various aggressive factors (for example, cleaning agents, water of different temperatures). Without the enamel metal loses some of its qualities - for example, in the place of damage, cast iron will start to rust, and rust will spread further, destroying the product.
Attention! If damage to the enamel is not eliminated in a timely manner, then rust can destroy the entire product or radically change the appearance of the bath.
Of course, factory conditions in the apartment can not be created and it is ideal to restore the enamel - too. But it can still be applied again, which will help to return the bath to a beautiful and neat appearance. And this - without unnecessary financial and physical costs.
Note! Enamel, put home at home, can not serve as long as the factory, but still able for a fairly long time to turn your old bath into a new one. But you need to handle it carefully - it is less resistant to mechanical / chemical influences and even able to change the color due to contact with certain substances.
In general, now there are the following methods to restore the appearance of the bathroom.
- Coating with acrylic - the so-called bulk bath. The interior of the structure is filled with liquid acrylic.
- Acrylic insert - sold in construction shops or made to order. Fits into the bath.
- Replacing an old bath with a new one.
- Coating with enamel - simply speaking, applying a special paint on the inner surface of the bowl.
What is needed?
In order to carry out the restoration work, certain materials and tools will be needed:
- respirator;
- brush, roller for applying enamel;
- old clothes or apron;
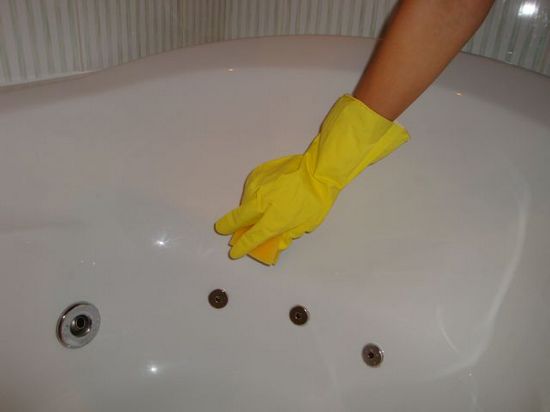
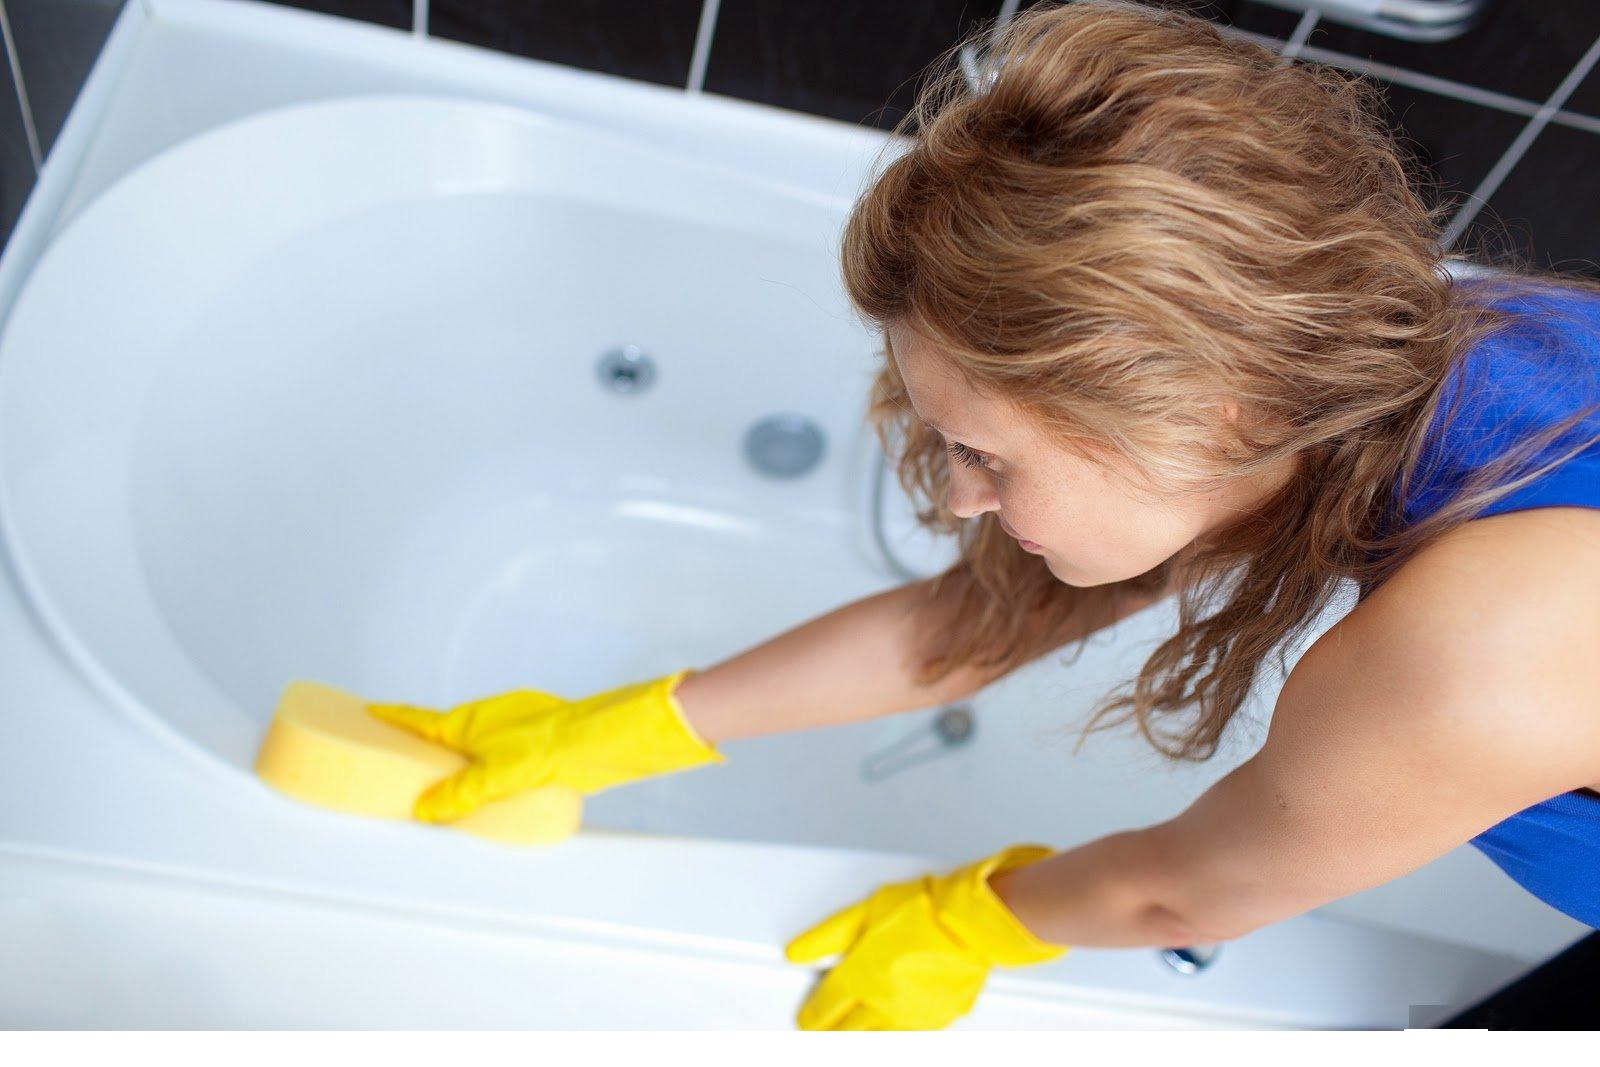
- rubber gloves;
- grinding machine or sandpaper;
- old rags;
- primer;
- acetone;
- set for the restoration of bathtubs - simply put, enamel for baths.

Now in the construction market there is a large selection of different enamels for bathtubs, aimed at both professionals and domestic craftsmen. At the same time, if you are a beginner, you better get the simplest option - it does not require special skills in use. Such enamels are sold in both aerosol cans and in cans (they are applied with the help of a brush or a small roller).
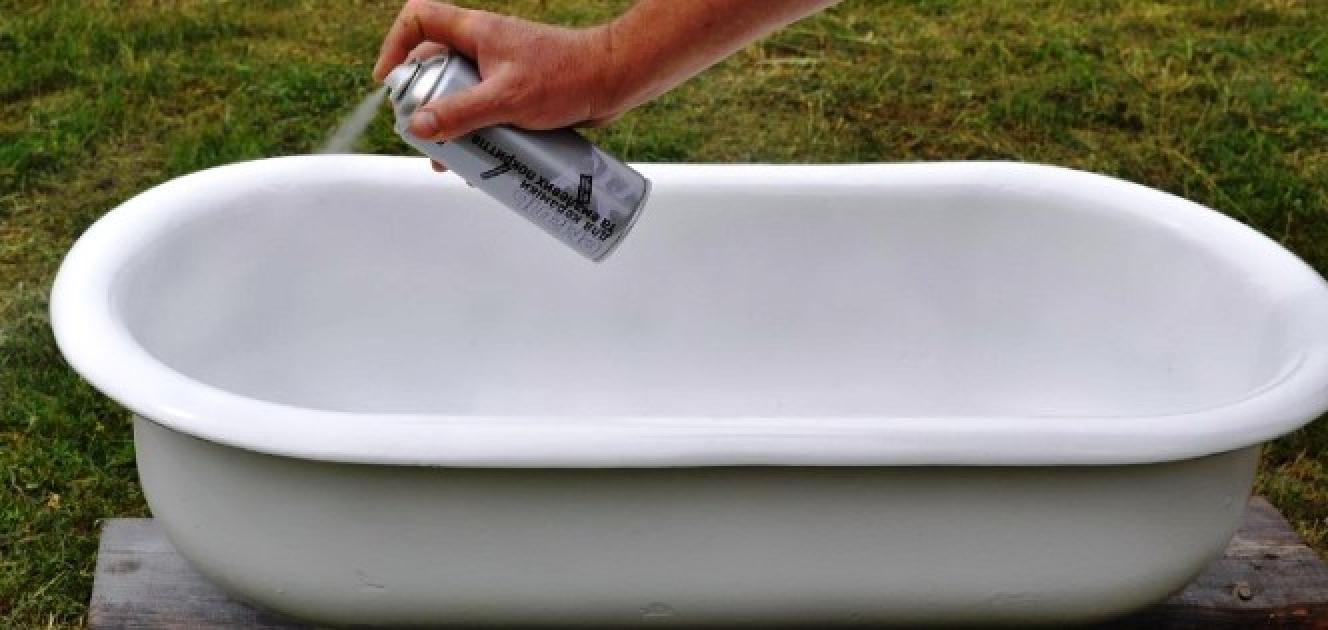
Note! It is best to use the composition that is designed for brush application - it perfectly covers the old coating, it is easy to work with. Aerosol means, however, choose when it is necessary to restore a small chip - the enamel then lies in a non-uniform manner.
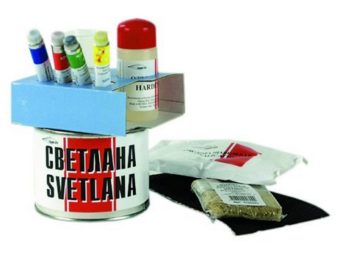
A set for the restoration of baths usually has two components - a hardener and enamel itself. There must also be a drug that will help prepare the bath itself for painting. By the way, the replacement of enamel is an excellent option for choosing a new color bath. The latter can be painted in blue, red, green and other colors with the help of special colors.

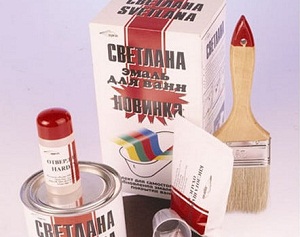
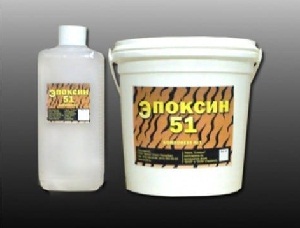
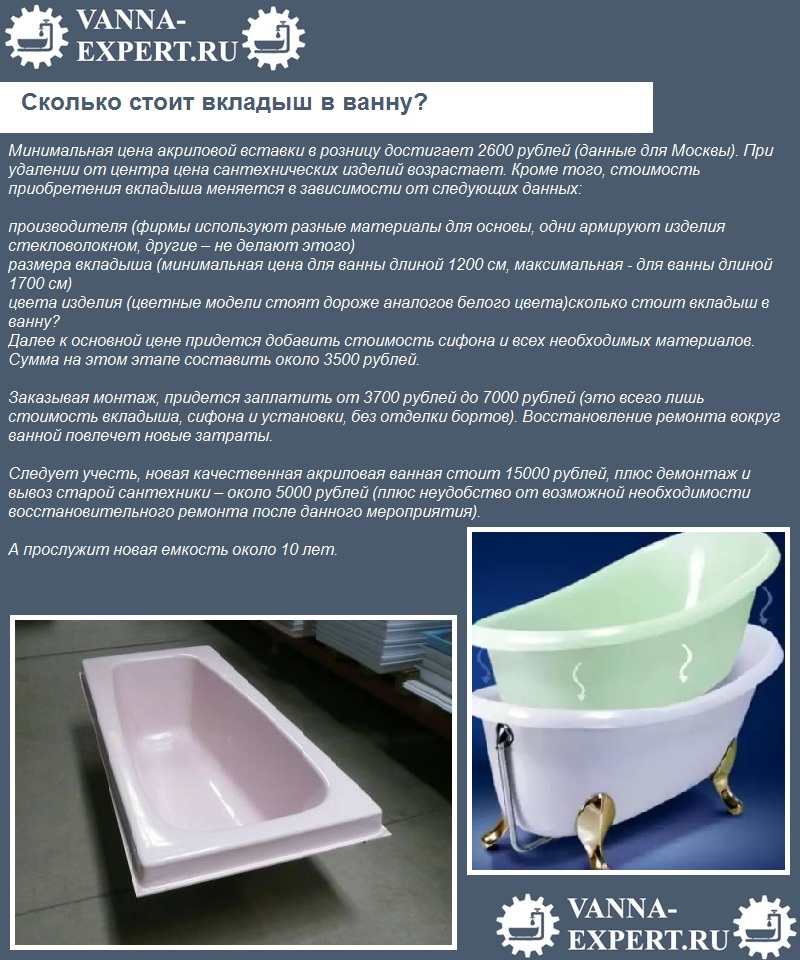
Table. Sets for the restoration of baths.
| Name | Description |
|---|---|
"Reaflex-50" | This set is focused on the use of professionals, it is very fluid, because it will be difficult for a newcomer to work with him. To close the old coating, you will need to apply the compound several times. Restoration of the bath will take at least a week, since each layer should be thoroughly dried. But the coating turns out to be excellent. |
"Svetlana and Fantasy" | This enamel medium density, they are easily applied, not strongly spreading, which is optimal for an inexperienced restorer. Easy to apply with a brush. The kit also includes a preparation that treats the surface of the bath before commencing work. You can use special colors. |
"Epoxin-51" | Thick, rather viscous enamel, which is applied by brush - in the density and the whole complexity of the work. In this case, the enamel splits perfectly, leaving no stinging. Does not require pre-puttying. It dries for at least 2 days. |
| A group of drugs that are not inherently enamel. Well cover the surface, applied easily - just simply water the bath with this remedy. |


Preparing the bath for the procedure
Before you start coating the bath with new enamel, you must prepare the surface to be treated. It should become smooth and bright as possible.
Step 1. The bath is cleaned of rust. This will help special preparations based on acids. Many of them are quite effective. For example, a drug based on hydrochloric acid removes red spots in just 10 minutes, but it also destroys all the remaining enamel in whole pieces. Also, it is important to rinse well off the surface of the bath and follow the instructions for use. There are also more sparing drugs, which are not so fast, but still efficiently cope with rust. Well-functioning funds based on oxalic acid, acting more accurately than drugs based on hydrochloric acid. Drugs of the latter type are washed off with water after 30-40 minutes.
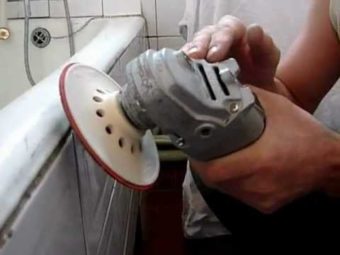
Step 2. Next, you need to make the surface of the bath from the inside rough - for this, either sandpaper or a grinding machine is used. The latter will significantly speed up the work. It is important to clean all chips and cracks well.
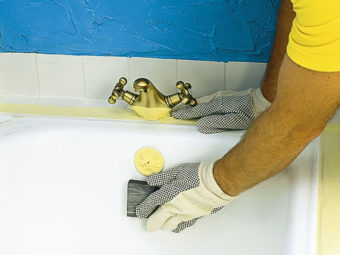
Step 3. After using the grinder, all dust and dirt must be washed off the surface of the bath. After that, the surface is degreased with acetone.
Step 4. The next step is applying a primer, for example, GF-020. The layer of this substance must be well dried for about two days.
Advice! To speed up the drying process will help the reflector. And, by the way, it is not necessary to apply a primer.
Step 5. Now you should warm the bath warm well - hot water is drawn into it. But you can use a building hair dryer - in this case, you do not need to additionally dry the bath.

Now the bath is ready to renew the coating.
Enamel bath coating
We continue the restoration work. Now turn to the bath enamel coating from the inside.
Step 1. The restoration kit is prepared for use in accordance with the instructions. The enamel should be well mixed until homogeneous.

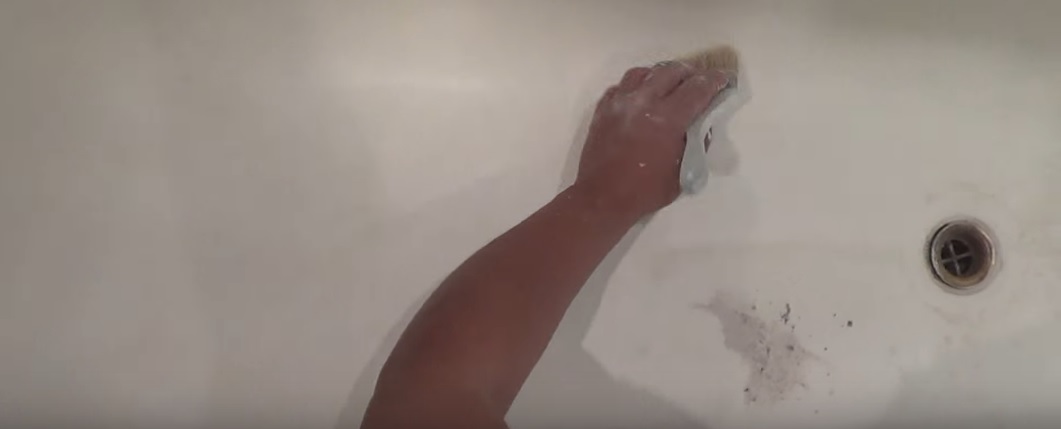
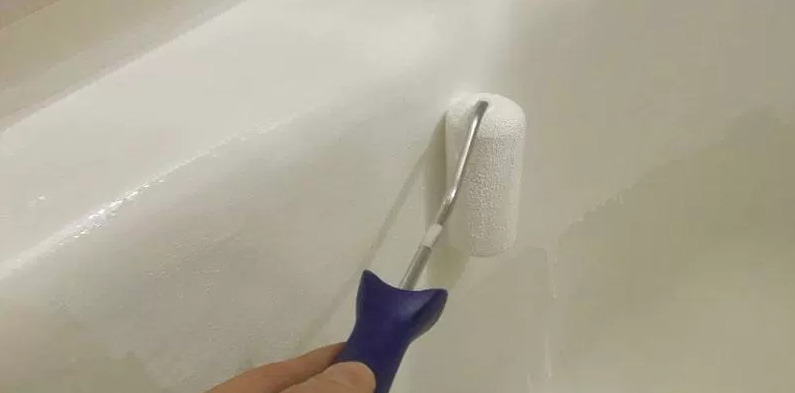
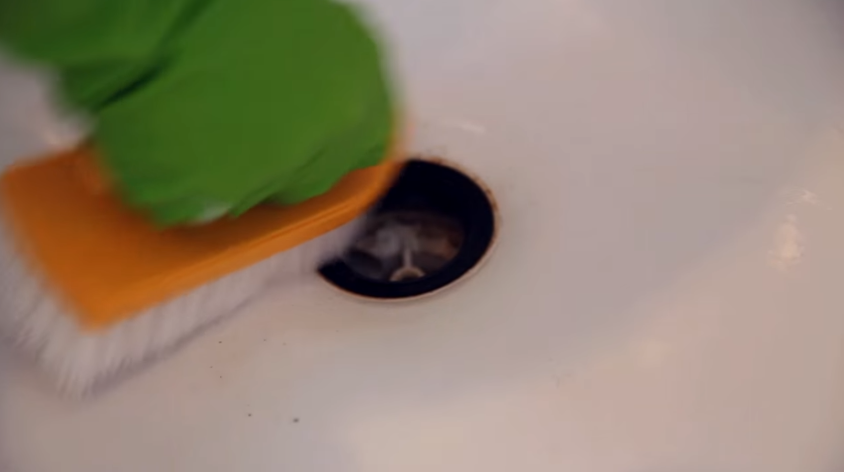
Step 2. Using the brush, the enamel is applied with long or short strokes. Long top-down and bottom-up, and then right-left or short-bottom-up-right-left. Carefully painted corners, areas near the drain holes.

Step 3. Thus, the enamel is applied several times. Each of the layers must be thoroughly dried according to the instructions.
Video - Enamel bath coating
Chipping and scratches
To restore the former beauty of enamel, it is not always necessary to resort to cardinal measures and to paint the entire bath. Sometimes it is enough just to repair chips and scratches. It is not so difficult to do this.

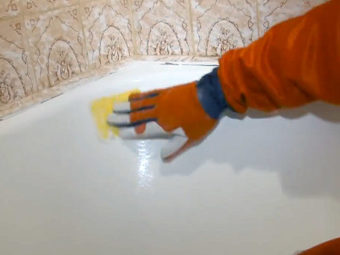
For example, from small scratches help to get rid of a mixture of dry white with glue BF-2. It is simply applied to places where there is little damage. In this case, it should be applied in several layers in such a way that the latter does not protrude above the surface of the main coating of the enamel. Apply the substance conveniently with a normal brush.
For deeper chips the preparation on the basis of nitro-enamel, where "Supercement" - a special building glue is added, is suitable. The mixture is prepared in a 1: 1 ratio. The resulting substance is also applied in layers, each of which is given time to dry (approximately 24 hours).

Also with a strong damage will help to cope and a mixture of white zinc with epoxy (1: 2). By mixing epoxy resin according to the rules, the remaining components are added to it. Zinc white can easily be replaced with porcelain fragments. Dry such mixture, deposited on the site of the cleavage, will be at least 5 days, but it serves for many years.
When carrying out these works it is necessary to make sure that the color of the enamel and the paint, with which the scratch will be restored, coincide. Otherwise, the bath will be spotty.
And finally - some valuable and useful advice.


Attention! All chemical preparations with which restoration works are carried out are poisonous and dangerous to health, therefore it is impossible to neglect personal security measures. If the work is not done correctly, there is a high risk of getting into the hospital.
Restoration of the bath with the replacement of the old enamel with a new one is a completely self-enforceable way to return the product to its former beauty. At the same time, the new coating will be used for at least 5 years with a careful attitude towards itself. Of course, then again you have to paint the bath, but given how much cheaper this kind of work than all the others, it is definitely worth it. By the way, the chemical composition of water is an important factor that affects the long life of the enamel. It is also advisable to take this into account when choosing a method for restoring the bath.
Restoration - a great chance to change the color of the bath
On any cast-iron bath, cracks appear over time. Wear, unfortunately, almost does not depend on how you care for plumbing, and chips, cracks, roughness are inevitable. Enamel is erased due to hard water and the use of cleaning agents, and the appearance of the bath becomes unsightly. How to act in this situation? You can buy a new bath, but it costs a lot of money.
Let's try to restore the old bath, bring it to the proper, original look. You will be surprised when you find out what can be done from an old bath with your own hands without spending a lot of effort on it.
A bath made of cast iron refers to everyday use items. Therefore, its replacement will not only be expensive, but also time-consuming. If your bath is rubbed and lost its appeal, it is better to apply simple and affordable means for its restoration.
Recovery of bath enamel
If your cast-iron bath suffered only because it became dark, rough, and covered with rust in some places, then applying a new layer of enamel can be quite sufficient. In order to produce these works, you will need the following:
- A drill and a special nozzle to it, which will help to remove the old coating;
- Acid is oxalic;
- A remedy to degrease the surface;
- Enamel;
- Brush or roller for applying the enamel layer.
The process sequence for the old cast iron bath is as follows:
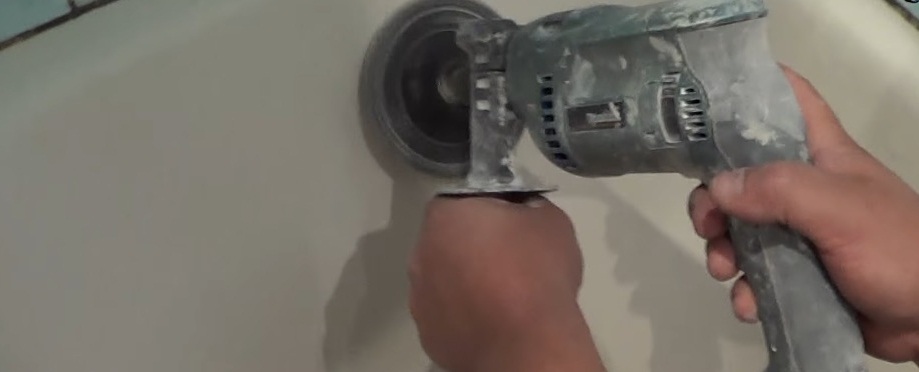
- First, clean the entire surface of the bath from the old enamel. This will help you with a drill with a special nozzle. You can use a metal brush, but in this case the work will take more time, besides, you can damage the surface, and we do not need it.
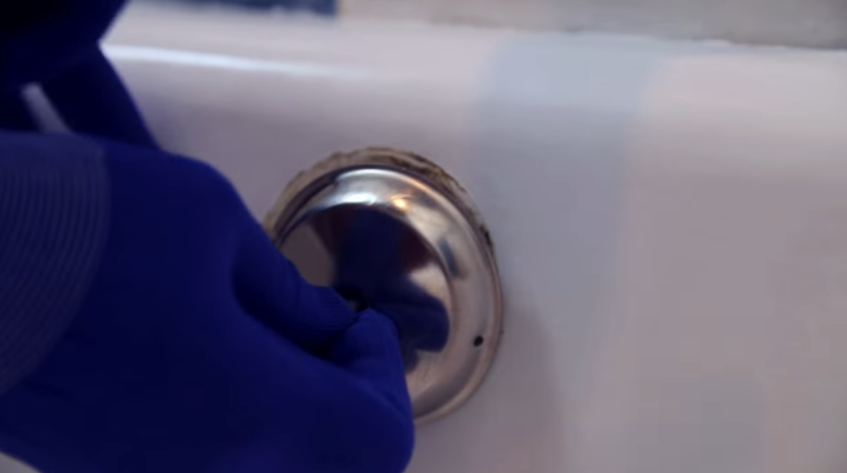
- If on the surface with the old enamel there is a water stone (hardened deposits of lime), oxalic acid will help get rid of it. Carefully wipe it with a bath in damaged areas. Do not forget to use protective gloves.
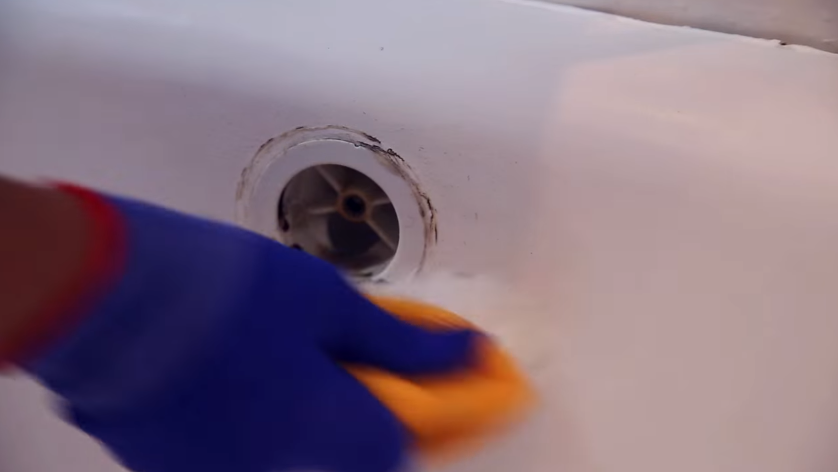
- After the surface of the bath has been removed from the plaque, clean it of dust and degrease. To make this easier, without contaminating the surrounding surfaces, cover everything except the bathtub with sheets or newspapers.
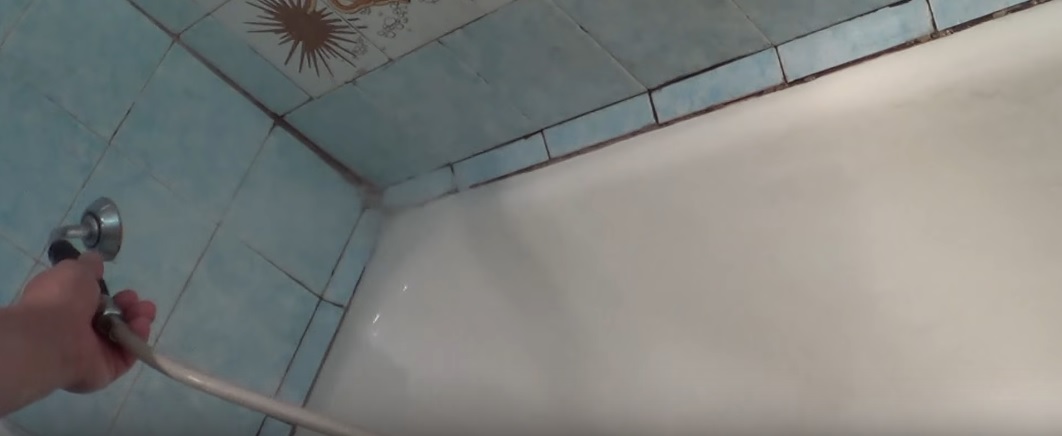
- Now, draw hot water into the tub and let it sit for 10 minutes. Drain the water, thoroughly wipe and dry the surface.
- Prepare the enamel for application by mixing the hardener and the base element. Apply the first layer on the prepared and dried surface, leave to dry for half an hour. In the same way, apply the second and third layer. The fourth layer of enamel will be fixing, after its application the restoration of the bathroom is finished.
For information: after the bath is completely painted with enamel, it can be used only after 3-4 days, after the layers are completely dry and fixed.
This method has some advantages. First, you can for the bath at your own discretion. Secondly, the restoration of a cast-iron bath in this way is very easy to conduct independently, even if you do not have special skills in such work.
Nevertheless, there are also disadvantages. Due to the cleaning of the old enamel layer, a lot of dust is formed. In addition, the hand coating can not be compared with the factory enamelling. After repair, such a bath will require careful handling, and a new coating is unlikely to last more than 2-3 years.
Choose a coating to restore the enamel of the bath
There are two materials that can paint the bath to restore its surface: epoxy or acrylic enamel based on the appropriate resins. In order to make it easier for you to choose the most suitable material, we will give their comparative characteristics.
- Enamel based on epoxy resin (epoxy enamel) exists in the paint and varnish market for more than 20 years. If you correctly prepare the surface of the old bath and follow the manufacturer's recommendations when applying such enamel, it will last for a long time. The disadvantages include the complex technology of preparing a mixture of the required concentration and its application.
- Acrylic enamel to restore the surface of the baths began to be used no more than 10 years ago. By its durability this material is in no way inferior to epoxy enamel. In addition, acrylic is much easier to apply to different surfaces, even with different angles of inclination. But to prepare a compound based on acrylic enamel is difficult: acrylic itself has a high viscosity, and the hardener used in the mixture is liquid. It is necessary to mix the composition long and thoroughly, observing the ratio of materials in order to achieve the desired concentration. In addition, acrylic is an expensive material.
Whichever coverage you choose to restore the old bath, you will need to know the rules used in the workflow.
What else you need to consider when repairing cast iron baths
Choose the correct time of year in which you will carry out repairs. It is desirable that the street was warm and dry, because when restoring the bath windows should be kept open. It is advisable to send small children somewhere far away from the apartment so that they do not damage the smell of the means used.
Be sure to purchase a respirator, and not an ordinary "petal", but a professional, with an absorber of organic. You can use a gas mask.
Stock up with a dense oilcloth or rubberized apron and rubber gloves, at least three sets.
Take a flute brush size of 70-90 mm, made of natural bristles. It is not superfluous to buy two at once, because if one of them gets dirty, it should be thrown away immediately. Make sure that the brushes do not come into contact with something greasy: any exposure to enamel with fat-containing substances will negate all repair work.
Tip: Tweezers and a paint knife will be useful to you when you need to remove the stubble that comes out of the brush. New brushes are often strewed, and old, already used, is highly undesirable.
You will need acetone or solvent # 646. Do not use solvents based on saturated hydrocarbons, for example, white spirits - they are definitely not suitable for bath enamel work.
Stock up, which does not leave pile on the surface. Suitable for such fabrics:
- Calico, many times stretched;
- Cotton fabric;
- Flannel;
- Napkins made of microfiber (these are used for rubbing glasses).
Restoration of a cast-iron bath with acrylic
Now this method is considered the most effective and simple, thanks to modern technology.
For information: as in any work, this method will provide you an excellent result only if you use high-quality material. Therefore, when buying, be sure to require a quality certificate for the product you are purchasing.
In order to perform this work, you will need:
- A liner, suitable for the size of your bath, made of synthetic acrylic;
- Special mastic or two-component assembly foam;
- Silicone sealant.
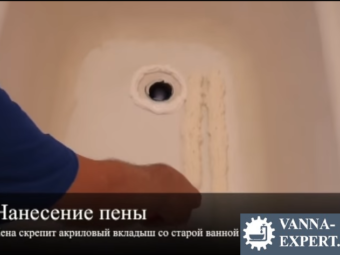
First of all, make holes in the liner for draining and overflowing. Make holes and surfaces around them. Strengthen the insert at the selected location, using a mastic or a two-component mastic to fix it.

Apply foam to the surface of the liner at regular intervals to avoid the occurrence of voids, on which the acrylic layer can subsequently bend. This drawback will lead to the rapid appearance of cracks in the acrylic.
This method has both advantages and disadvantages:
- Restoration of the cast-iron bath with this method is not laborious, you will cope with it pretty quickly.
- Do not forget about the choice of high quality material. This way the bath will last you a very long time.
- Acrylic is smooth and shiny, the surface of this material looks very impressive. In addition, acrylic does not wear out, it serves a very long time and retains color regardless of operating conditions.
- Of the disadvantages can be identified only that the work on the restoration of the bath with an acrylic liner should be carried out before you apply for the finishing of walls in the room, otherwise you need to get rid of the tiles around the perimeter of the bath.
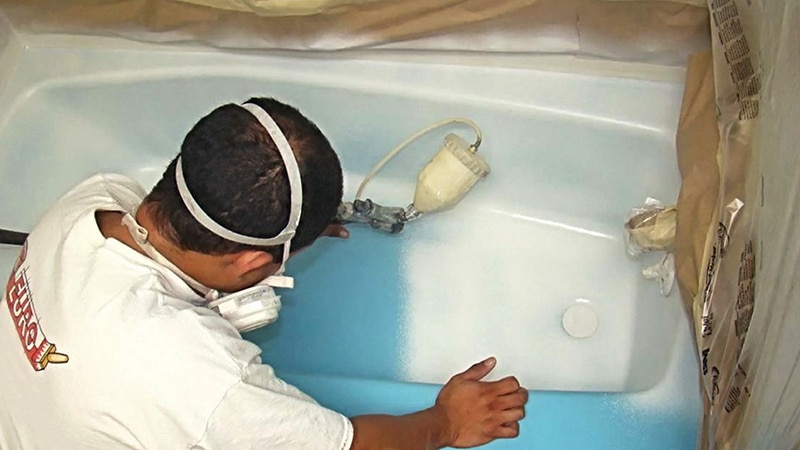
How to restore bath enamel with liquid acrylic
To restore the bath in this way, you will need to purchase. This special composition can be found on the shelves of stores called "Stakril". In practice this is the same as bath enameling. But in this case, a layer of much thicker material is needed. Stackel spreads evenly over the surface due to the modernized composition, so you do not need to distribute it manually.

- To apply this method, you will need to carefully prepare the surface of the bath, as well as when enameling. Get rid of the old coating, peel, rinse and dry.
- In order to apply an acrylic coating, you do not need a brush. It is necessary to pour the product over the surface, starting from the sides, and after - the walls of the bottom and bottom in the last turn.
- Before proceeding with the work on pouring the bath with acrylic, disconnect the sink and place the container under the drain hole, so that excess material has an outlet for drainage. Thus, acrylic will be applied evenly.
- The coating of liquid acrylic forms a layer of about 5-6 mm. It should dry, this will require leaving it for about 4-5 days.
This method can be called quite time consuming. But it provides a very high quality and durable coating in comparison with the use of enamel. This is almost not terrible mechanical damage, and manufacturers offer a wide range of colors and shades, so you can choose the interior design to your liking.
Video about the restoration of enamel in a cast iron bath
As you can see, the repair work to restore the bath of cast iron is not as complicated as it might seem at first glance. Of course, they will require you a lot of time and effort, but the restoration will cost much less than replacing the bath. Cast iron - heavy metal, and the transportation of such a massive object will cause a lot of trouble, and mounting and subsequent repair of the bathroom, all the more.
If you have any questions or suggestions on this topic, please describe them in the comments. We will happily discuss with you what interests you. Good luck in work!
Any, even the most reliable and qualitative bath, in due course can become covered with cracks and roughnesses, yellowing or rusting. It is almost impossible to avoid this - even the most mild detergents and household chemicals lead to thinning and wear of the surface coating. In this case, the owner of the bath raises the question of buying and installing a new bowl. However, this is quite an expensive solution, which, moreover, entails the need for repair in the room. Therefore, it is better to restore the bath - it does not require large expenses, and the work can be done on its own.
There are three main methods that allow you to restore the appearance of the old plumbing: applying a new enamel coating, restoration with bulk acrylic and using a special liner. To choose a concrete method is better in view of own financial possibilities, materials, from which the bowl is made, and also its condition.
In addition, it should be noted that such a solution has a number of drawbacks, since the new coated bowl will not have the performance characteristics that were produced in industrial conditions.
- The materials used for the restoration of sanitary ware are less durable and not so durable, so the surface requires a more accurate and gentle maintenance.
- When you enamel the bath or restore it with liquid acrylic, you may encounter the following problem: the original color of the bowl will shine through the new coating (especially if the layer is too thin), changing its hue.
- During use and cleaning, the color of the bath can change under the influence of chemicals.
- Sharp or bulky items will cause new damage even if they fall from a low altitude, and dyes (for example, hair dyes) can leave indelible stains.
- Fans of smoking in the bathroom will have to give up their habit, since a cigarette can leave an ugly burn on the surface.
However, the restored plumbing is repairable, and its properties directly depend on the quality of materials and the accuracy of the work.

Method number 1. Application of a new enamel
Despite the growing popularity of modern polymer compounds, steel and cast iron sanitary ware with enamel coating is often found in modern homes and apartments. Metal is a strong and reliable material, but the enamel coating wears out quickly enough. Restoring enamel coating is a fairly simple process that does not require special knowledge or skills.
True, this way of restoring the appearance of baths has one significant drawback. Cracks that appear on the surface grow very quickly, the enamel begins to flake off, water accumulates beneath it, which leads to unpleasant odor, dampness and mold. In addition, this method is not suitable for baths with a large number of small defects - they can be visible even after coating.
How to choose the composition for the restoration of enamel?
For a new coating to be strong and reliable, you need to choose the composition for the restoration of the baths. There are not so many options, so for the right choice, you need to know the basic characteristics and properties of the compounds.
| Name | Manufacturer | Durability of the coating | Features of work |
|---|---|---|---|
| Russia, Germany | An average of 5 years (under the conditions of application and operation, the indicator can reach 7-9 years) | Two-component enamel with hardener, which completely hardens in 48 hours. It fills all small defects of the bath surface well. It is difficult to work with a solution, since it is very thick and "clings" in about 60 minutes |
| Russia | 6-8 years | Two-component solution with epoxy resin. Use it is possible when the bathroom has no noticeable defects and damage. It requires quick work, as it freezes in about 70 minutes. In liquid form it is toxic, and can cause allergy |
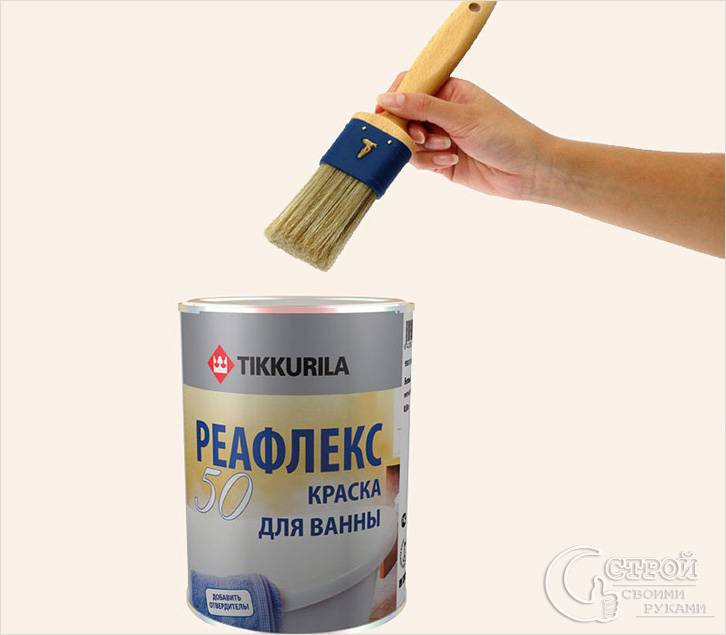
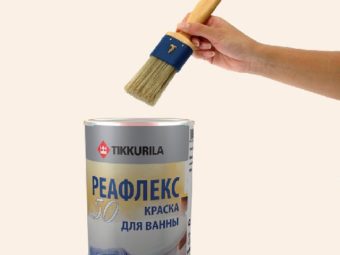
| The company "Tikkurila" (Russia, Finland) | 10-15 years | One of the most high-quality, but expensive formulations for the restoration of sanitary ware. Working with the solution is simple enough, but you can use the bath for the intended purpose in not less than a week |
| Rendom House, Russia | 6-8 years | Kits for the restoration of bathtubs, which includes a two-component coating for the bowl, a hardener and surface preparation agents |

Step-by-step instructions for the restoration of the bath enamel
Stage one. Preparation of improvised tools and materials
To enamel the baths you will need the following tools:

Enamel, which will be used to restore the bath, should come complete with all the necessary components. To give the coating the desired shade, you can purchase a special tint paste (unless prohibited by the manufacturer). In addition, it is very important to protect the mouth and nose with a respirator, hands - gloves, and all work should be carried out only in a well ventilated or ventilated room.
Stage two. Preparation for application of enamel coating
Before you start to enamel the bowl, you need to thoroughly clean the surface, since it depends on this, the quality and aesthetic appearance of the coating.
| Step # | Description |
|---|---|
| The bath should be sprinkled with an abrasive agent and cleaned with a coarse-grained sandpaper. You can also use the grinding attachment of the electric drill, and also remove the old enamel by sandblasting or hydrochloric acid, diluted with water in a proportion of 1 to 4. |
| Areas on which there are rusty stains, treated with a rust converter, wait 30 minutes and clean well with emery. If there are deep cracks or chips on the surface, it is better to use car shpaklevkoy - there is a risk that the composition will not be able to fill them, and the layer of enamel will turn out to be uneven |
| Remove the remains of the old coating and wipe the bathtub well using a rag or lint-free cloth |
| Fill the bowl with hot water, leave it for 10 minutes to warm the surface, drain the liquid and dry the surface. Ensure that there are no crumbs, villi or debris left on the tub |

Preparation of the bath must be carried out in such a sequence, not missing a single stage, otherwise the enamel will quickly come down. The cleanest, smooth surface of the bath is the guarantee that the new coating will be durable and reliable.
Stage three. Application of enamel coating
Combine all the components of the enamel as indicated in the instructions, mix the composition well. Divide it into two parts - for the base and finish coat. Apply the first layer with a wide brush - it should be thin, but as flat as possible, without any changes. To begin better from the edges of the bowl, gradually moving down. The composition must be very well smeared so that it fills all the pores of the material. After applying the first layer, leave it for 10-15 minutes, but do not wait for complete drying, otherwise the enamel can become dusty, and then the work will be spoiled. Then apply the second layer with the same brush, the direction of the smears - from the middle to the edges. Leave the bath for another 15 minutes and repair the defects (they even happen to the experienced masters), using the brush in the same way. Perform this procedure until the enamel becomes too viscous.
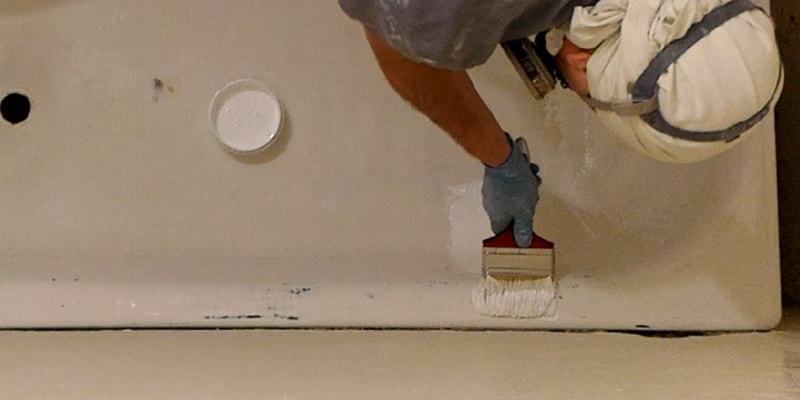
Sometimes for application of a mix the capacities with an atomizer are used, but experts recommend to avoid such a method, as on the surface there can be bubbles and streaks, because of what the enamel will peel off. Instead of the atomizer, it is better to use a compressor - it will allow to distribute the composition evenly over the walls of the bath and create a coating of the same thickness.

It is better not to use the bath for a week - that's what it takes to make the enamel completely hardened. The room temperature should be maintained at 23 degrees.
Video - restoration of the bath by enamelling
Method number 2. Filling bath
This way of restoration of sanitary ware consists in the following: a liquid acrylic is poured into the bowl, which subsequently hardens and forms a new coating. In comparison with the enameling of the surface, which is described above, it has a number of advantages.
- Acrylic is a thick and viscous substance, due to which it lies on the surface in a thick, even layer, hiding all defects and unevenness of the bath.
- The composition does not leave on the surface of streaks, streaks and blisters.
- To restore the bath, you do not need to remove the tile or dismantle the bowl.
- The process takes less time than enamelling or restoration with the aid of a liner.
- Acrylic creates a film on the surface, which repels dirt and plaque.
- Application of the mixture does not require special knowledge and skills.
- Most of the materials that are used for the restoration of bathtubs, practically do not have an unpleasant smell.
![]()
The result of this method of restoration will be a smooth, glossy surface that perfectly retains heat and does not retain dirt. As in the case of enameling the bath, you need to think about choosing the material before proceeding with the work. It is important to note that neither for the sake of economy, nor for any other purpose can you use ordinary acrylic for the restoration of baths, which is sold in building stores. In its characteristics, it differs from sanitary acrylic, which is used specifically for the restoration of sanitary ware, so you can completely ruin the bath and harm your health. The choice in this case is made between stakrilom and liquid bulk acrylic.
Stakril or liquid acrylic?
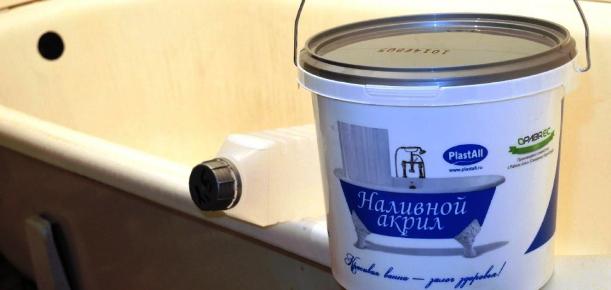
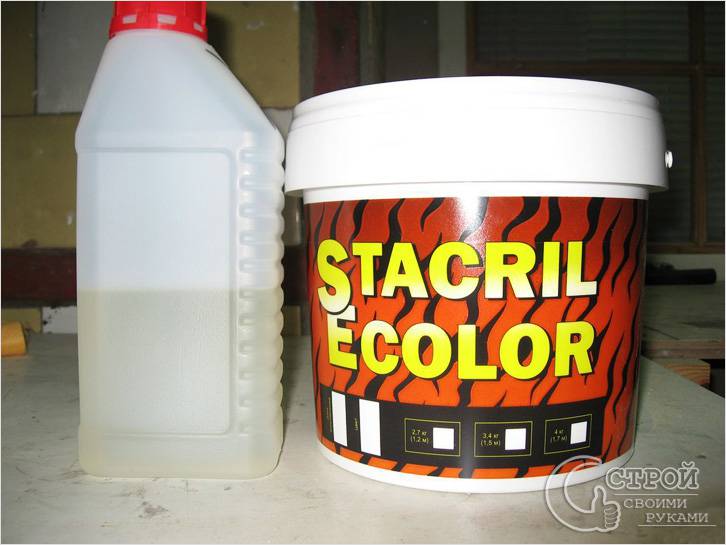
Today, two kinds of materials are used for the restoration of baths: stakril and liquid acrylic (Plastall is the market leader in the production of such materials, so liquid acrylic is often called plastol). Many consumers believe that they are no different from each other, but in fact it is not.
Stakril appeared in stores about 10 years ago and has already managed to prove itself well. It fits well on any surface and costs less than a plate, but the restoration of baths with it can be quite difficult for beginners, as the composition quickly grasps. Working with a plate is much easier, because it is less fond of operation and does not have a sharp odor. In addition, this material retains its properties even after freezing.

The company Plastall offers consumers who want to restore the bath by themselves, a whole range of materials.
| Name | Freezing time | Features |
|---|---|---|
| "Plastol" classic | 36-48 hours | Easy-to-use material that flows well, has increased ductility and good adhesion. Does not have a sharp odor, does not require the addition of diluents or other substances, forms a smooth and burn-resistant film. The mixture retains its properties for 90 minutes |
| Plastol-24 | 24 hours | A new material based on an improved classical formula. It is applied in one layer, the surface does not turn yellow, does not crack or peel, is resistant to mechanical damage and abrasion |
| Plastol-M | 36-48 hours | A budget solution with an optimized formula, so the result of using the material does not differ from the restoration of the baths with the help of more expensive products. Has no sharp odor, does not cause allergies, the mixture retains characteristics for 90 minutes |
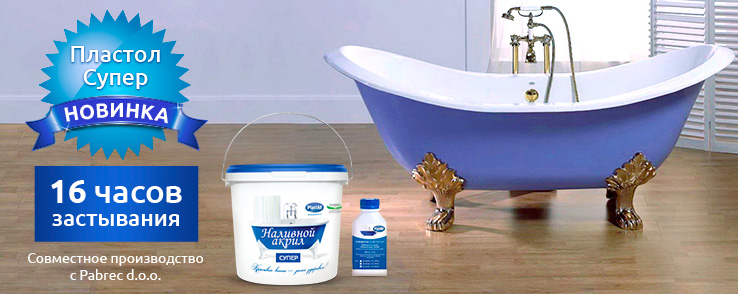
| "Plastol Super" | 16 hours | The most "fast" liquid acrylic, which freezes in a matter of hours. Does not form bubbles and bands, does not require the addition of solvents and other components, but the mixture is "viable" for as little as 45 minutes |
When choosing a material, it is important to pay attention to the price - a good product can not be cheaper than listed on the manufacturer's website, and fakes do not provide the required quality of the finished coating. Those who do not yet have experience in the restoration of baths, it is recommended to buy acrylic with a margin, so that it is enough for the whole surface.
Step-by-step instruction for the restoration of baths with bulk acrylic
Stage one. Preparing to pour acrylic
The preparation of the surface for restoration practically does not differ from the preparatory stage when the bath is enameled. It is necessary to clean the old coating and sand the cup so that its surface becomes matte, warm and dry. After that, you need to disconnect the siphon, designed to drain water, and place a container under the tub, into which excess acrylic will drain (material must not be spilled into the sewer system - this can lead to serious problems with water flow).
![]()


Stage two. Pouring the bath with acrylic
Prepare the mixture as indicated in the instructions, pour into a convenient container and put a rubber spatula next to it. If you need material of a specific color, you can use the coloring paste, but first make sure that it is authorized by the manufacturer. Its amount should not exceed 3% of the total volume of acrylic.


Take a container with acrylic and a thin stream to pour the composition on the sides of the bowl, pushing it with a spatula under the edges of the tile. Do not pour too quickly and strongly - you need to act so that a layer of 4-6 mm thick is obtained, and the material slowly drains to about the middle.

Evenly move the container around the perimeter of the bowl without making long breaks until the circle closes.
Move the jet closer to the middle of the bath to do the same to grab the entire surface. Do not try to smooth out streaks or irregularities - this will only worsen the situation, and all defects will disappear during the drying process. The time for the complete hardening of acrylic is specified in the instructions, but it is better not to use the bath for three days.


Throughout the entire period, until the material will dry up, it is better not to touch the bathtub or even to approach it, as getting the slightest particles of dust or debris can ruin the appearance of the restored sanitary ware.

Video - Instructions for the restoration of Stakriel baths
Method number 3. Restoration with a liner
Restoration of baths with acrylic liners is also called the "bath in the bath" method. The liner is a construction made of acrylic, plastic or silicone, which is an exact copy of the bowl. You can buy it in a specialized store, after making all the necessary measurements of the bath, then glue it to the old bowl.
The most popular today are liners made of acrylic - they are much more aesthetic and stronger than plastic or silicone. This design is ideal for old baths that can not be restored with a new layer of enamel or liquid acrylic. In addition, the surface of the liners keeps the heat perfectly, its surface is absolutely smooth, but it does not slip at all.
This is the most reliable way to restore the bath (the service life of a quality acrylic liner is about 15-20 years) and, contrary to popular belief, it does not reduce the internal space of the bathroom.

However, this method of bath restoration has its drawbacks.
- Complexity in installation. The installation of an acrylic liner is quite a complicated and time-consuming process. The insert is placed so that it covers the edges of the bath, and if the bowl is installed close to the wall, you will have to clean up the edge and break the tile.
- The possibility of water between two baths. If the installation was not performed correctly, as well as due to wear or use of poor-quality materials, water may enter between the liner and the bottom of the bowl. This will lead to dampness, mold and odor.
- Inconvenience in the process of operation. Sometimes the manufacturers make too thin liners, because of what they can cave in under their feet and eventually deform or burst.
- Liners are made only for standard baths. As a rule, baths are divided into two types - 1,5 m and 1,7 m, and if the bowl has a non-standard size or shape, picking up the liner will be very difficult, and sometimes impossible.
- High enough cost. Compared with the new acrylic bath liners are inexpensive, but for this cost you can buy a new steel bath.
To reduce the risk of such problems, you need to buy only quality designs, as well as clearly adhere to all stages and rules for installing liners.

How to choose a liner?
In order not to be mistaken when buying a loose leaf, you need to make the following measurements:
- the width of the bowl on the inner surface, and the measurement should be taken from both sides;
- length along the inner and outer surfaces;
- the depth of the bowl in the place of flow.
In order not to make a mistake, which will entail trouble and additional costs, you can invite a professional gaveler.

Another important criterion is the shape of the tub, rectangular or rounded. Based on these parameters, you can choose the right liner. As for the quality of the product, it is necessary to pay attention to its surface (it should be smooth, without rough edges, protrusions and other defects), as well as thickness. Quality liners, which can serve owners for a long time, have a thickness of at least 6 mm.
It should be noted that most modern stores sell products with a thickness of 3 and sometimes 2 mm - such liners are very short-lived, and it is not recommended to use them for bath restoration. At best, the design will last about 5 years, after which it will have to be dismantled and replaced.
Step-by-step instruction for restoring the bath liner
Stage one. Preparation of a bath and improvised means
For installation of acrylic liners, mounting foam and silicone sealant are used. It should be noted that in order to perform the work, it is necessary to use only the means specially designed for this purpose. A simple foam that is used in repair work, in this case will not work - it has a small density and expands too much. To improve these characteristics, additional components are added to the foam - this is the material that is used to mount the acrylic liners. In addition, in this case a sanitary sealant is used, which is waterproof and resistant to mold.
Preparation of the bath for restoration with liner - a fairly long and time-consuming process, which in the absence of appropriate skills is better entrusted to specialists.


| Step # | Description |
|---|---|
| Release the side of the bathroom, if necessary, remove one or two lower rows of tiles. Remove the old enamel is not required, but the surface is recommended to be cleaned with abrasive material means - as a result, it will become rough and will better mesh with other materials. After that, it is good to clean the bowl of debris and crumbs, degrease with acetone or alcohol | |
| Disconnect the bath from the communications by removing the top and bottom plums. The cross should also be removed, and it is not worthwhile to use a hammer or other similar materials for this purpose, so as not to damage the drain. Before proceeding with installation, it is better to check the condition of the pipes - if they are too worn, it is better to take care of replacing | |
| Try on an acrylic liner - the structure should come in easily or with a little effort. In no case can not be hammered by using improvised tools | |
| Cut through the holes in the acryle for the plums. It is most convenient to do this in the following way: to plug the tub with a cork, to lubricate it with some substance that leaves traces on the surfaces. Similarly, treat the second drain hole. Lay the liner in the bowl, press it in places of draining and take it out - traces should be printed on the bottom of the structure. After that, it remains to mark the centers and drill holes of the required diameter. In order not to injure the skin in the future on the sharp edges of the slices, they should be well cleaned | |
| Determine the slope that is needed for a good drain of water - usually it is 1.5-3% in the direction of the drain hole | |
| Step 6 | Once again it is good to degrease the surface of the bath. On the upper opening of the drain, apply sealant, screw on the adapter, which is also applied sealant. After that, it should be applied to the drain hole, the width of the strip should be 2-3 cm, and the height depends on the density of the liner attachment to the bowl |
Stage two. Insert installation
The main rule that should be remembered when installing an acrylic liner is that all work should be done quickly enough (in about 4-5 minutes), otherwise the adhesive will solidify and badly "grab" materials.
| Step # | Description |
|---|---|
| At the bottom and sides of the bath apply a mounting foam. Its quantity also depends on the tightness of the structure, but usually it is applied by strips with an interval of 4-5 cm, and on the sides the strips should be vertical and stretch from the bottom to the very top |
| Install the liner |
| It is good to press the sides of the liner with your hands, then stand with your bare feet to the place where the drain is located and move forward towards the opposite edge - thus the liner will fit into its place and firmly press against the surface of the bowl. After that, it is good to press the walls of the structure well. Press on the liner with any solid objects or beat on it is not recommended, otherwise it may damage the acrylic even during installation |
| Connect the bath to the communications, if necessary using a sealant |
| Plug the cork with a stopper and fill it with cold water so that its surface falls 1-2 cm below the top drain hole. Leave the bath for 5-6 hours, then drain the water and wait another 12-13 hours |


After complete drying of the materials, it is necessary to restore the tightness between the bowl and the walls, put the tile in place.
Video - Acrylic liner in the bathtub
Summing up, it can be noted that the appearance of the old bath can be updated without much damage to the family budget. With the right choice of the method of restoration, quality work and appropriate care of the surface, the owner of the bathtub will be able to forget for years or even decades all the problems and concerns associated with plumbing.
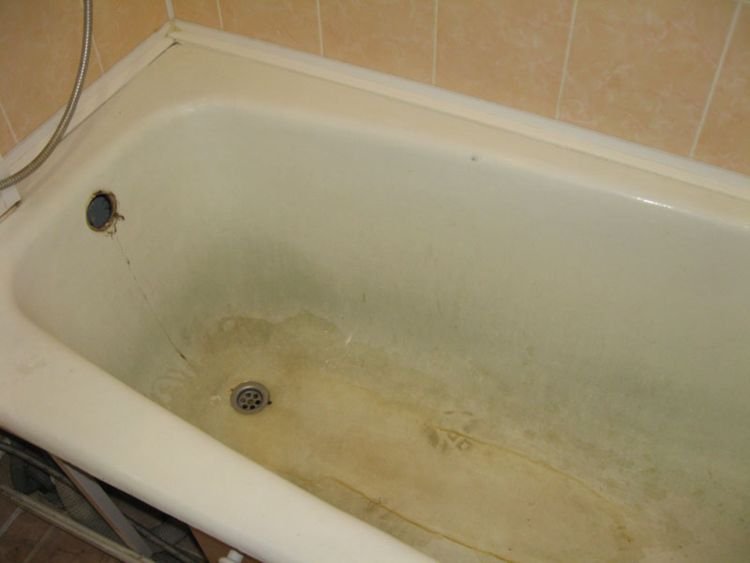
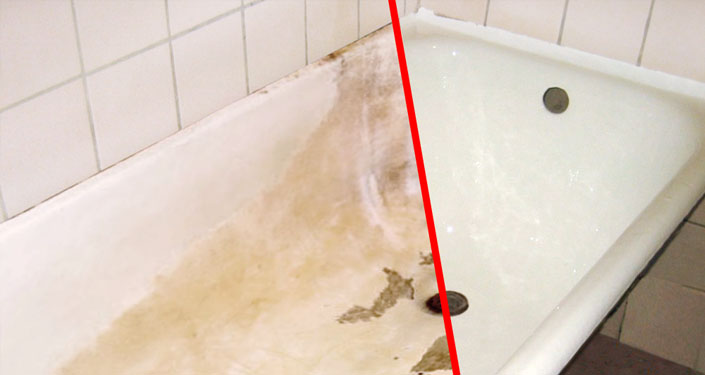
After ten to fifteen years of operation, on a pristine white bath, rusty stains, stained spots and chips of enamel coating appear. It is impossible to get rid of these drawbacks of the product with the help of ordinary household chemicals. This is due to the natural wear of the protective surface, which requires restoration or replacement.
When the factory spraying becomes unusable, many owners have a question, how to restore bath enamel in the home. In addition, very often there is a problem of choosing the method of restoration, as it is difficult to figure out which remedy for the restoration of enamel baths is better to use in doing so. I must say that today there are such methods to update the surface with their own hands:
- application of epoxy enamel;
- method of "filling bath" with liquid acrylic;
- installation of acrylic liner.
It should be noted that repairing the bath enamel is usually a long and time-consuming process. Some owners prefer to entrust the restoration of a cast-iron bath to specialists, but this approach does not always justify itself. Qualified masters are not so many, and their services are quite expensive. Often the cost of such a restoration of the product is comparable in value to the new bathroom. The work done by yourself, with all the necessary technologies and recommendations, will surely please you with a positive result.
Before embarking on the restoration of the bath, stock up everything necessary for this for this
The above methods will help you restore the bath, whether it is a conventional enamel crack or complete destruction of the factory coating, up to the metal base of the container. It is only necessary to acquire the necessary tools and materials for carrying out restoration work, and also to find out the sequence of actions and technology of applying a new layer of sputtering.
Preparatory stage of works
Restoration of the enamel cast iron bath with their own hands is impossible without the correct preparation of the surface of the container for painting. Here you have to deal with acids and alkaline elements. It should be remembered that when dealing with aggressive volatile substances, you should observe safety precautions and work only in a respirator, protective gloves and apron. Required access to the premises of fresh air, it is also recommended to take the kids and pets from the house for the period of restoration.
To remove corrosion and deep spots during the initial cleaning of the product, the solution of oxalic acid is optimal. This cleaner is not as effective as, for example, cleaning agents based on hydrochloric acid. However, it does not damage entire parts of the product when applied, nor does it require a thorough cleaning.
At this stage of work, rough abrasive wads and brushes can be used, since the primary degreasing involves the complete removal of rust and stale dirt. If necessary, clean the bath up to the metal base.

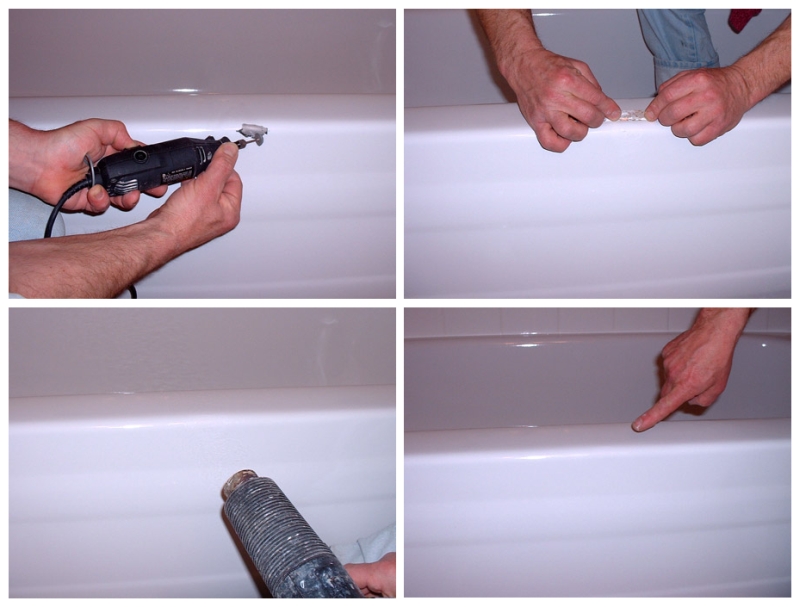
At the first stage of work it is necessary to clean all damaged areas of the enamel
If necessary, align the damaged areas with an automotive or any other suitable epoxy-based filler for the metal surface. It should be noted that the putty should be applied in several layers in stages. The thickness of each of them should not exceed two millimeters.
Drying of one layer of putty at room temperature will take about seventy minutes. After complete drying of the treated areas, they must be primed with a glyptal primer mix and also allowed to dry.
For smooth application of the enamel coating, carefully grind the entire surface of the container until the gloss is completely eliminated. Check the degree of abrasive treatment with a scattered beam of light. A well-prepared surface of the bath does not cast glare when sliding a flashlight.
To conduct a qualitative restoration of the bath coating, you must carefully collect the dust and re-treat the damaged enamel with an acid detergent. It is very important not to touch the surface with your hands.
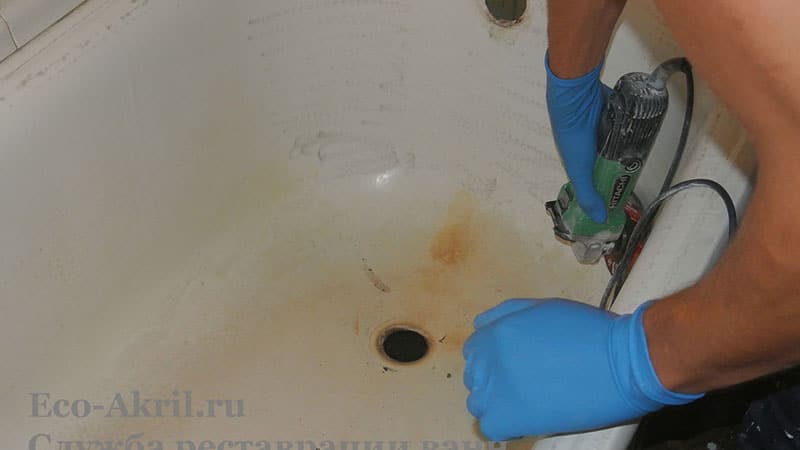
Carefully ground the surface of the bath - a guarantee of uniform application of the paint
If all stages of preliminary preparation are carried out correctly, then the new coating will lie smoothly and smoothly.
What you should pay attention to during surface preparation
To learn how to restore the enamel in the bathroom with your own hands qualitatively and for a long time, you need to familiarize yourself with some details and tricks of preliminary surface preparation. There are such nuances:
- Primary degreasing It is better to carry out the bath with a powder cleaning mixture, and again - with its liquid analog.
- Abrasive treatment will be performed with a finer quality fine-grained emery, although this is a much longer and laborious way.
- Thorough cleaning Enamel pure water after every use of household chemicals will help to avoid the destruction of entire spraying areas.
- Uniform distribution of water on the plane of the bath, and not picking it up with drops indicates a high-quality degreasing and ready for painting.
Painting with epoxy enamel
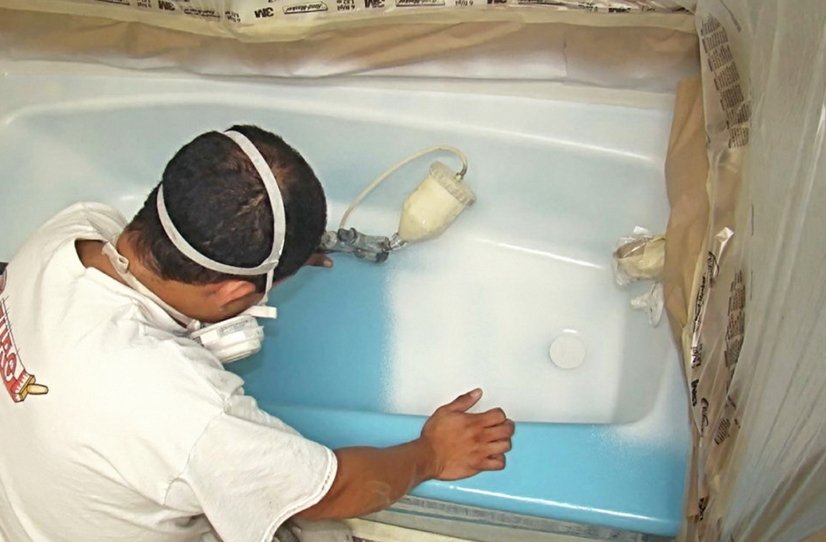
The industrial method of coating the bath with enamel provides for coating on the hot surface of the container. At home, this method is impossible. For this purpose, apply either a brush or roller coating on the bath surface, or applying enamel from a spray gun.
The application of an enamel coating from an atomizer will help to achieve a smooth and even surface
It is worth noting that there is no consensus on which of the options for restoration is better. Each of them has its own positive and negative features, as well as nuances.
Painting the bath with a spray gun will make it possible to get a smooth surface with minimal enamel consumption. However, it is worth remembering that for such purposes the paint does not fit in ready-made aerosol cans. Use only a professional tool and paint the paint to the required proportion yourself. In addition, you need to protect the walls, floor and plumbing from hitting them with random spray of enamel with a plastic film.
Painting the bath with a roller or brush will fill all the cracks and chips of the surface much better than the restoration using a spray gun. However, with this method of coating, the surface will not be perfectly even.
The technology enamel paint is applied in several layers. Each of them must dry completely before applying the previous one. Usually it takes at least two hours to solidify each layer.
The final spraying of the enamel dries up about six hours, but you should know that you can use the bathroom only after forty-eight hours from the time of the finish coating. During this time, the layer can harden and acquire the necessary strength.

Work is necessary in gloves and a respirator, as enamels are very toxic
Properly carried out preparatory work and compliance with all technologies in the restoration process guarantees a successful result. Such a restoration of the bath enamel reviews about themselves leaves a generally positive, because it will serve a new spraying of three to five years, and the financial cost of updating the product is minimal.
Application of acrylic by filling
Restoration of baths with acrylic provides for the use of a two-component mixture. A solid base and a liquid hardener are always sold as a bundle and have the name Stackel.
To get a mixture of a homogeneous consistency, it is very important to thoroughly mix the compound. Experts recommend doing this only manually for at least ten minutes.
The method of "filling" the bath requires the application of acrylic on a pre-heated plane. To do this, the container is filled with hot water and left, while the compound is being prepared. After the bath has been heated, it is necessary to drain the liquid and dry its surface. To do this, you can use a soft napkin without a hair or a normal hair dryer.
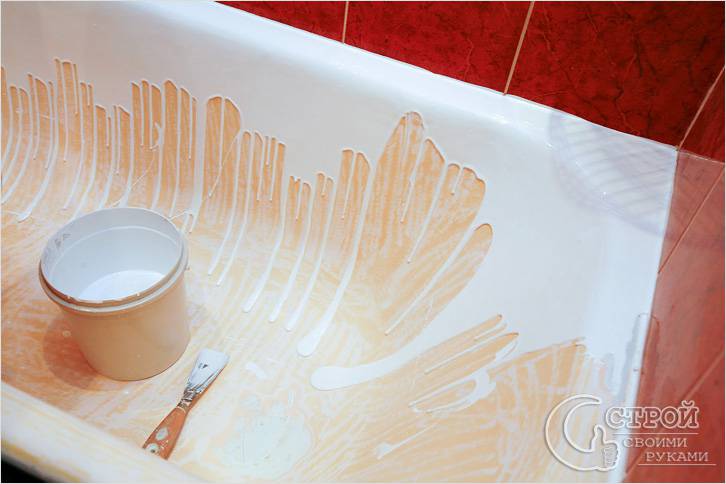
Pour the mixture carefully and without rushing. To begin better with the farthest corner of the rim, moving in a circle. The paint gradually drains from the walls of the bath, filling them up to about half. Do not try to smooth the influxes, and also to remove bubbles by hand, they will gradually spread themselves.

The liquid acrylic is gradually evenly distributed throughout the bath plane
In the same way, starting from the same place and moving in the same direction, the mixture is poured from the middle of the side of the container. The paint on the bottom of the product can be leveled with a rubber spatula. Excess stakryla can also drain into a pre-installed under the drain of the tank capacity. Dripping from the sides of the mixture is better to remove the same rubber spatula.
It is very important to do all the work without hurrying up, neatly and smoothly. You should try to get a uniform trickle of liquid acrylic and fill the product only around the perimeter, moving in one direction.
Restoration with a liquid acrylic bath will take at least two hours, even for a professional, and a beginner can spend much more time. Full curing of the sputtering occurs within two to six days, it all depends only on the enamel grade. The longest drying types of stakryla usually form a more reliable and durable coating, according to experts.
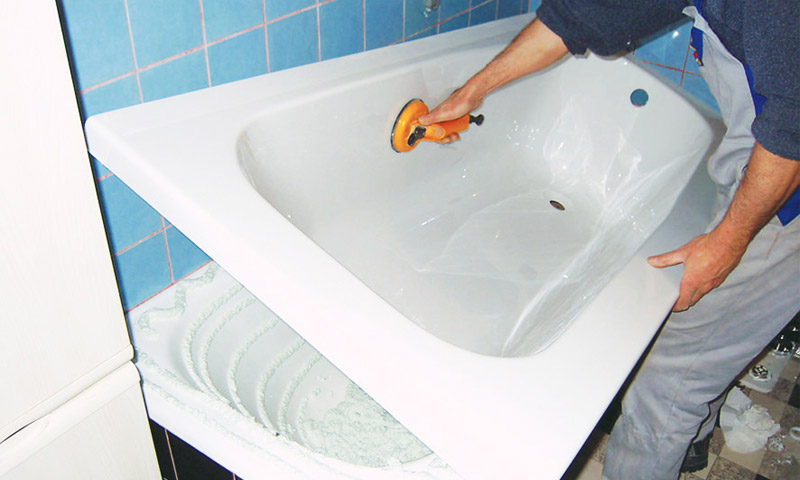
Restoration of the bath with the prepared liner
One of the simplest methods restoration of old products will restoration of bath enamel by own hands through finished acrylic liner. However, this method is the least budgetary, since it requires the purchase of an insert made in industrial conditions.
The preparatory stage of the work in this case is completely analogous to the two previous methods of restoration. In the prepared and low-fat capacity try on the liner, it is important to look to coincide drain holes, and the sides of the bath were free from tiles or other decor. In extreme cases, the product can be cut along the line of laying tiles, but experts do not recommend this.
The insert is removed and the internal part of the bath is smeared with an adhesive compound. After that, install the liner. It is necessary to carefully inspect all places of articulation of the product with a container and carefully seal the seams with a sanitary silicone.

Acrylic liner will be the easiest and fastest way to restore the bath
After installing the insert in the bath, cold water is collected and allowed to stand for 24 hours. After 24 hours, you can drain the liquid, wash the surface and use the product. Typically, the life of the acrylic liners is about seven years. Accurate operation and timely maintenance can extend it even up to ten years.
All existing methods for the restoration of enamel with their own hands are designed for a relatively short period of operation, but they can significantly save on the purchase of a new product and carry out cosmetic repairs of an obsolete bath.
Before proceeding with the restoration of the bath, stock up everything necessary for this. At the first stage of the work, all the damaged areas of the enamel must be cleaned. Carefully ground the surface of the bath - a guarantee of uniform application of the paint. Applying the enamel coating from the spray gun will help to achieve a smooth and smooth surface. Work in gloves and a respirator. as enamels are very toxic Liquid acrylic is gradually evenly distributed throughout the plane of the bath Liquid acrylic for sale comes in a set consisting of a solid base and liquid hardener After installing the acrylic liner you need to fill the bath with cold water and let it settle for about 24 hours. Apply the enamel better from a professional spray gun rather than an aerosol can Acrylic liner will be the easiest and quickest way to restore a bath