MDF is one of the most popular materials used for decoration. Such panels look very representative and also suitable for any style. Very often used for finishing the doorway. Let us consider in more detail how to make slopes from the MDF with your own hands on the front door.
Slopes from MDF - a popular variant of finishing the doorway
Material Features
To complete the mandatory condition is the removal of smooth and accurate slopes. Often, the owners decide to do everything themselves. For these purposes, a wide variety of materials are used, one of the popular options is MDF.
Slopes of MDF can be used for entrance doors in almost any interior. This material has a number of positive qualities:
- Strength. Not afraid of strikes of moderate strength and most damage.
- Decorativity. Excellent looks, brings an atmosphere of coziness and style.
- Variety of coatings. It can differ in color and type of the top layer: veneer, eco-wool, PVC, etc.
- Ease of installation. Easy to process and install with your own hands, even for the beginner.
- Imitation of a tree. The cover basically imitates a wood texture, it can look like an expensive breed.
- Soundproofing. Provides additional protection against noise from the outside.

The main advantages of MDF panels are their strength and ease of installation
It should be taken into account that under unfavorable operating conditions, in particular high humidity, and also with the use of poor-quality material, MDF can cloud with time, swell and exfoliate. Also, the coating does not withstand strong impacts and contact with sharp objects.
Warming of the opening and preparation
The first thing you need to get started is the preparation of the opening itself. To do this with our own hands is very simple. First you need to clear the opening of everything that is superfluous, in particular, and from the debris of construction debris. If you are afraid of dirtying or damaging a new door, you can leave a protective film on it or even remove the canvas for the duration of the work.
First of all, remove the dust and seal all the cracks with mounting foam or sealant. Then you need to take care of applying an antiseptic impregnation or primer. In order to further isolate the opening from the cold and noise outside the apartment, it is necessary to lay a layer of insulation along the slopes. As such a substrate is most often used:
- mineral wool;
- isolone;
- sintepon;
- polyurethane foam;
- expanded polystyrene.
Correct finish of the slopes of the entrance door assumes a layer of insulation
An excellent option - spraying insulation, but this is a very costly exercise. To facilitate further lining and final isolation of the gaps, it is recommended to perform. It will be sufficient to have a small layer, it is not necessary to display a perfectly flat surface. At the corners set special angular profiles, this will not only facilitate the alignment problem, but also strengthen such a vulnerable part of the slopes.
Marking and sawing
No less important stage in the process of finishing the doorways, rather than preparation and installation itself - is the cut of the necessary fragments. In order to remove the dimensions of the most accurate one roulette will not be enough. Use a square and templates to create unique patterns.
You need to start with the bar that you plan to consolidate in the first place. Usually this is the top panel. Note that in most cases, the edges of the slopes are not evenly cut, but go slightly at an angle. All this should be reflected on the MDF. Follow-up elements should be applied after the initial panel is installed. That is why the process of marking and sawing is combined with the installation.

Cutting MDF panels should start with the upper bar
MDF can be cut using a hacksaw, saw, but the best option is a jigsaw. Due to its cutting element, it is possible to obtain an ideal cut without splitting and burrs. In addition, you will not need to make any effort.
When working with sidewalls, be sure to take into account the presence of the threshold. This is an important point, since it can significantly affect the height of the side panels.
Installing Panels
In order to install doorways in the opening yourself, you need to perform several stages of work:
- First, you need to determine the method of attachment. If the panels do not have a lock connection, the easiest way is to fix them on the frame. As the last one you can use aluminum profiles or wooden bars, which is more preferable.
- Determine the level at which the finish will be placed. In this case, it is important to take into account the thickness of the panels themselves, since if the material protrudes excessively in the opening, it may be difficult for the door leaf to move.
- The frame is fixed in the wall with bolts. To do this, you will also need a drill. On the inside, you can fix the bar to the door frame itself. Also there is an alternative to the wooden frame - special guides that are installed at the corners of the opening. This option is suitable for mounting L-shaped panels.
- After the frame is fixed to it, MDF panels are applied and all the surpluses are cut off. You can first secure the upper crossbar, and then proceed to the sidewalls or do the opposite. To wooden MDF slats can be glued with liquid nails or nailed. In the latter case, small nails without hats are used.

Examples of finishing the slopes of entrance doors with MDF panels
In order to eliminate drafts, in addition to heat the slopes and provide a more secure grip, a mounting foam is used. It is important not to smear MDF in the process of foaming, since it will not be easy to clean it.
Final finishing
After the mounting foam dries, and the glue seizes, you can proceed to the final finish. First of all, it is necessary to cut off all the protruding sections of the foam along the edges. Do it best with a paint knife. In order that the foam does not collapse under the influence of the external environment, it must be gently plastered. To not smudge new slopes, glue them with paint tape.

The final stage of installation of slopes is the installation of platbands
To impart a perfect appearance to the doorway, casing is installed over the embedded slots on the slopes. The last stage is the disguise of connection points. If you used nails, then you need to use a special mastic in tone trim or furniture stickers.
Thus, it is possible to install the slopes for entrance doors from both MDF and other similar materials without much effort. To do everything by one's own hands is entirely within the power of everyone, since available materials and simple technologies are used for work.
One of the most complex and painstaking processes is the installation of a door, which requires certain knowledge. At the same time, MDF doorways are one of the main parts of the door space. Slopes are divided into internal and external. Installation of them is carried out at the last stage of door installation. They perform two functions: practical in terms of insulation, as well as aesthetic. They can be installed in various ways, but it is worth noting that the main material of the product will directly depend on the quality characteristics and protection of the door.
There are basic rules that need to be known and taken into account when installing doors:
- For free opening of the door, slopes must be installed on the lower level of the box (20 mm).
- The distance between the slopes must be different.
- To ensure the correct installation of the box, you need to carefully measure.
Choice of finishing method
You can finish the doors in any way. The standard option is to attach the ready-made slope to the door frame. Thus, you do not spend time on the main job of making a slope.There are other ways, for example, finishing plasterboard or plaster. They are also in demand, but the work is more difficult to perform by a person who does not have special building skills.
To choose the right way of finishing is recommended taking into account the type of the door frame. In the event that the escarpment will be performed for the interior door, then the insulation is not required. Decorative materials are an ideal choice for decoration.
But the entrance doors require careful work. Ideal option will be MDF. It is a fibreboard. It is in great demand in the construction market for this phase of work. MDF is not affected by changes in the temperature regime, nor does it allow the appearance of dampness. It is recommended to choose the color of the slopes for the color of the door. An ideal kind of high-quality finish can be a combination of materials, for example, plaster and MDF.
Tools and materials
Before you begin to work on the installation of slopes, it is worth knowing what tools, materials will be needed. We will consider how to make door slopes from MDF with our own hands in a combined way.
To do the work you will need:
- Foam for sealing joints.
- Dowels for fixing MDF.
- Putty, sand, cement, primer.
- Mortar.
- Liquid Nails.
- Profile building.
Manufacturing process
This way of working requires careful attention. Therefore, it is best to follow each step of the instruction.
When the door is already installed, you will see how the crevices formed on the edge of the door. Between the door frame and the wall they must be sealed, for this it is necessary to apply a mounting foam.

It will take some time for the foam to completely freeze. After that, its remains should be cut off and the irregularities removed.
Then proceed to the surface treatment, where the joints will be installed. Initially, apply a primer. It will help strengthen both materials and give them protective properties. To ensure the smoothness of the opening, plastering is necessary. Using the building profile, you will be able to apply evenly the plaster. Corner to the corner of the slope is to be fixed with the help of dowels.
Then they start the plastering process. To obtain the necessary material, it is necessary to mix cement, sand and lime mortar. There is an alternative option - a façade putty, it can fully replace the mixture for plastering.
Putty should be applied a thick even layer. Surplus solutions can be removed using a wooden rod. To strengthen the corners of the opening it is necessary to use a perforated profile. In a layer of not dried plaster it needs to be laid tightly. Then apply a layer of plaster and thereby remove irregularities on the surface. In this case, it is worth paying attention that you need to wait for each layer to dry out and only then apply subsequent layers.

After the application of the puttying is completed, it is necessary to proceed directly to the installation of MDF panels.
- First, it is recommended to begin work with the basis for the slope. Lime-cement mortar is laid on the surface and allowed to dry thoroughly. Then apply a coat of primer.
- Secondly, MDF will need to be cut. To do this it is necessary to form three separate parts for the future product - one upper and two side ones.
- Thirdly, you need to apply a certain amount of adhesive mass to the top of the opening. Then press the part and hold it until the glue has solidified completely. The same procedure is carried out for the other part of the slope. In order to tightly fix MDF panels, builders recommend using a spacer, which is laid at the floor level.
- Fourthly, the space that was formed can be sewn using a small piece of plastic. You can fix it in any convenient way.
- Fifthly, it is necessary to measure each corner of the doorway. To prevent the appearance of slots before mounting, you will need to apply pieces of material and check the tightness of the connection. At the corners it is necessary to attach the panel parts. Note that the angles should be half of the total opening angle.
- Sixthly, decorating should be done in the same way and with the same material that the door is made of.

A lot of admiring the door you just supplied, you understand that this is not the whole work. Outside doors are ready and look just great, but here in the corridor, devastation, you can see bare, old concrete or broken bricks. To completely complete the installation of doors and hide the potholes in the wall, you need a beautiful finish of the slopes of the front door. It can be done in different styles and from different materials. In this article, we will look at how and from what materials this can be done with our own hands.
To trim the slopes of the front door can be in several ways and materials:
Let's go in the same order and consider how to make the slopes of the front door with your own hands without calling a specialist. In fact, it's not so difficult and you will do it nicely.
Finishing with plaster and putty
 This finish is the most durable, as it contains cement, but it is also the dirtiest, because of the same cement. It is more profitable to trim slopes with plaster, when the walls are not covered with wallpaper or are not finished with other materials, or you are going to tear it all up and make a new repair.
Necessary tools and materials:
- Bubble level, rule
- Trowel, spatula, tassel, sandpaper
- Beacons
- Cement, sand, putty
- Paint tape
- Primer
To begin with, that would not have a fungus on the old wall and the grip with the solution was better, the wall should be well primed. Dilute the primer as indicated on the packaging and treat the walls.
After the primer has dried, you can start. Close the paint box with a new door box and all the places that you think can get dirty in cement.
First, you need to set the guide beacons. To do this, make a bit of a thick solution or dilute the water in plaster (with gypsum work quickly, it very quickly freezes). Nalyapyvaya on the wall, so to speak, bloopers, put them in the level of guiding beacons. If you have large potholes in the wall and you need a lot of solution, you can attach a paint net on the wall, which will play the role of reinforcement.
Dilute the mortar, cement sand, 1x4. First, pour all potholes and deepest places with a mortar. Let the solution get a little stiff and continue. Using the rule, or even a rake, level the slope by pulling the solution over the beacons. Do the same with the other slope and top.
When all is dry, fill the slope with the finishing putty and wipe it with the smallest sandpaper. After that, the doorway can be painted or.
Finishing plasterboard
 To make slopes of the entrance door drywall, you can in two ways. Glue the plasterboard on the glue, or screw it on wooden slats or metal profile. The second option, we will not consider separately, since it is rarely used and is similar to the third option (slopes from MDF), with a little bit of ingenuity, you will surely understand how to do it.
We will understand, perhaps, the simplest variant of finishing the slopes of the entrance door with plasterboard. For this we need:
- Drywall
- Adhesive for gypsum board (for example, Perlfix)
- Stationery knife
- Rule, level
- Metal Corner (Perfangle)
- Putty
It is necessary from the sheet or the remains of drywall, cut pieces of the necessary width. Dilute the adhesive for the plasterboard with water and apply large fluffs of the resulting solution to the back of the plasterboard. Apply glue to the wall and strongly press down, while leveling the slope on the level. Do the same for other parties. After the glue dries, cut off the extra gipskoraton (if there is one), at the corners, with the putty, glue or stapler, attach the pencil. Sewn.
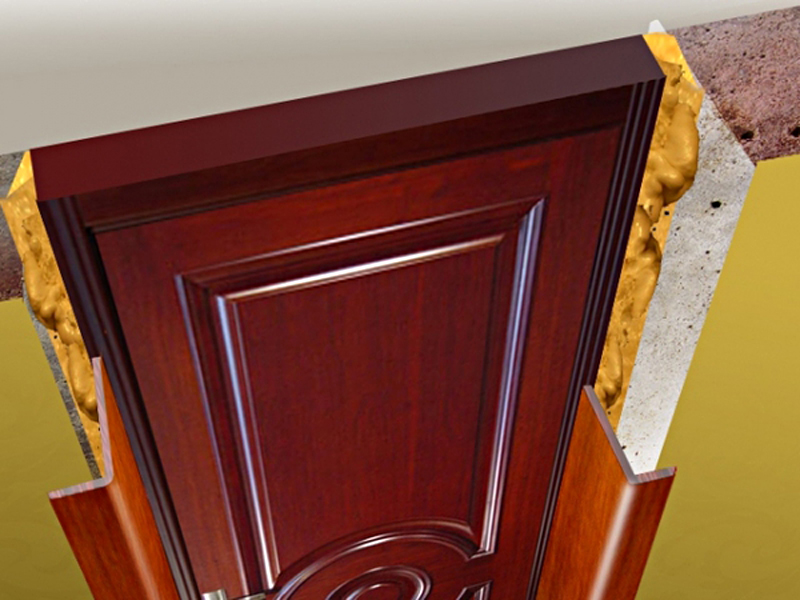
MDF paneling
Here we come to the last option, let's see how to make the slopes of the entrance door from the MDF. Such a finish, will be the most beautiful and will have a finished look. For this type of finishing we will need:
- MDF panels, decorative corner, platbands
- Wooden slats
- Dowels (quick mounting), screws, clamps or carnations
- Hammer drill, drill

To begin with, you need to fix the wooden rails to the inner and outer edge of the slope, using a perforator and dowels, to which the MDF panels will be attached later. It is necessary to do this according to the level, in the right places under the dowels, by laying rails or wedges of the necessary thickness.
After exposing the frame, attach the MDF panels to it. This can be done with the help of small studs, clamps or screws, the latter will need to be wrapped up, that they would not interfere with the next panel. The edge, corner panel, screw the screws, right through to the corner bar, just turn closer to the edge, so that they can then be covered with a decorative corner.

Angles under 45 *
Angles can be hidden with decorative corners or platbands priklev their liquid nails. Cutting corners in clypees or corners, use a stool that cut them under 45 degrees.
Now our finishing of the slopes of the front door has come to an end. In this way, on the frame, it is possible to trim the slopes of the entrance door with any other material, for example plastic or laminate.
We offer, for better assimilation, watch a video on this topic.
From this article you will learn about the most popular way to trim the slopes of interior doors without flaws in practicality and durability. We offer a detailed scheme for mounting slopes from door MDF doborov. Also, you will learn the rules of the appropriate preparation of the opening and installation doors.
Each professional builder eventually adopts more and more technical solutions that are perfect in all respects. The controversy about the most acceptable variant of the decoration of doorways and portals can be considered closed, the best way is already found and practiced more often.
Surprisingly, the installation of slopes from MDF does not require professional participation, it is simple enough for domestic masters to use with a set of simple tools: jigsaw, syringe gun and mounting knife. Among other things, you will need: a tape measure, a square and a pencil, and a brush-maklovitsa. Proper and durable finishing of slopes requires adequate preparation of openings and compliance with the rules for the installation of door frames.
Rules for installing the door
The door frame is assembled on non-hardened screws, the upper segment is always located on top of the side racks, and not between them. After assembling the box, it is necessary to cut off excess edges from the edges of the crossbar so that the mounting groove is continuous on all three sides.

The only win-win option for fixing interior doors is a direct mounting technique with 8x120 mm frame anchors in the number of three pieces for the hinged and two pieces for the back side of the box. When fastening to "dry" partitions, the anchors are replaced with screw nails.

After fixing, the box should be adjusted for bending, then the process joint is filled with mounting foam from the back of the side of the slope. The door after filling the seam should be kept closed for about 40 minutes, laying on the vest remote plates. After the polymerization of the foam, the adjustment wedges must be removed and the cavities formed.
Preparing the opening before installation
The openings in brick or concrete partitions must be plastered before the doors are installed on two guide boards nailed to the opposite walls. At this stage, the desired angle of the slope and the opening dimensions of the opening are set. Each face of the opening should have a uniform chamfer from 3.5 to 15 °. The opening itself should be 100 mm wider and 60 mm above the door leaf door leaf.

After door installation cleaning of the mounting groove from the mounting foam is carried out, the fitting of the door trim piece is made. If the thickness of the slit is more than 3 mm when installing the board in the mounting groove, it is desirable to apply a leveling layer of tile adhesive to the plaster. The installation groove should be periodically cleaned, after drying the surface must be impregnated twice with an adhesive primer.
Marking and trimming of the gates
The finishing of the slopes of interior doors with MDF dolly does not belong to dusty work, so it is better to do it after finishing the finishing works in the rooms, so that you can immediately install the platbands.
The standard width of the dobors is 90, 120, 170 and 380 mm. If the width of the slope is larger than the available standard sizes, two or three parallel boards run on it. In the case of telescopic dovetails, which have a pile-and-groove profile, a wide slope will have to be drawn from an even greater number of slats, but no slots at the junctions of the door unit will be guaranteed. And yet, it is better to expand door blocks in "dry" partitions with narrow slopes by telescopic devices.

First, the upper crossbeam is to be marked and cut. To do this, on the floor right under the door you need to expand the necessary number of boards in parallel with the back side up. Measure the width of the top edge of the opening at opposite points. Mark it on the back of the boards with the condition that the line of longitudinal cutting of the usual tools is turned to the door frame, and the telescopic ones to the platbands. Measure the length of the upper slope in the wide and narrow part, set the exact difference on each side. Transfer the markup to workpieces with an indent from the corners of 5 mm and number the boards in the order of installation.

Vertical darts are measured and installed after securing the upper crossbar. On the angle piece attached to the end of the door frame, a difference in height is established, the received dimensions are transferred to the marking. The boards of lateral slopes are desirable to be made 1-2 mm longer so that it is possible to accurately fit the part with a sandpaper.

How to install and on which adhesive
Slopes from MDF boards can be attached to liquid nails or mounting foam . When using foam, you can not increase the plaster for a more dense fit, but this requires a professional approach. The choice in favor of glue should be made with a thickness of the gap between the MDF panel and plaster up to 5 mm, the foam is used to fill thicker joints.
The boards on the slopes are glued in rows, starting from the door frame. First, trimmed details are tried on and visually notice the level of tilt. Then on the back side of the board, glue or foam is applied, in 15-20 mm from the cut edge, segments of cork wood or other elastic material are inserted into the adhesive composition, approximately equal to the adhesive seam after drying. These mortars serve as fulcrums: in order to fit the board as close as possible into the groove of the box, it is sufficient to press down the edge slightly.

The upper escarpment is trimmed first, the boards are temporarily fixed by the repair. The common plane can be easily removed with a square, but for this it is necessary to set the right direction to the first board. After grasping the crossbeams mark and cut the details for the vertical faces. They also try on first "on dry", adjusting the dimensions and the cut for a tight abutment. After gluing, each board is wedged from the floor and pressed up, the allowable gap between the slope and the floor covering is 2-3 mm.
How to properly trim and install the platbands
After installing the dampers and the glue hardening, it is necessary to close the ends of the slopes and the foamy suture with the platbands. The method of fixing them for different shapes of the box and dolly profile may differ.
Telescopic platbands are installed by the comb in the groove of the box or the fitting, the fastening can be reinforced with a concentrated PVA glue or with liquid nails. You can install such platbands only after the glue or foam has completely solidified on the dowels, otherwise their tearing can be possible.

Smooth platbands are attached to the docks with small furniture studs with anodized coating and without hats. Installation of them is possible after 1-2 hours after the installation of the tools.
Cut off the platband only with a stool or a cutting saw. With regard to the angle of the cut, then at 45 ° sewn with semicircular shape of the front surface, and rectangular cut off strictly perpendicular. In this case, the contour of the clypeus is formed according to the scheme opposite to the assembly of the door frames: two vertical posts and a crossbar between them. Thus, the cut places will not be visible, since they are facing upward.