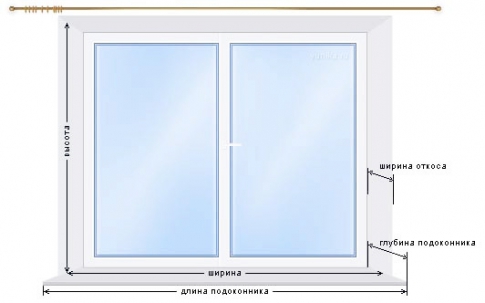
To measure the opening for the installation of the window must be approached very responsibly. After all, an incorrectly made measurement can lead to the fact that you have to produce additional expensive work or to remake the plastic window. Most companies that produce windows do not recommend measuring themselves. They are not responsible for the correspondence of the sizes of the manufactured window to the window opening, if the customer is measuring the measurement, and not the company's specialist. But sometimes it becomes necessary to measure the window opening yourself. In this case, you need to follow the guidelines for the correct measurement of windows.
Measurement of plastic windows
There are two types of window openings: one quarter and one quarter. A quarter is a protrusion from the sides and from above the window opening, preventing the window from falling out and protecting against the penetration of precipitation and wind into the room. The width of the quarter in the panel house is 50 mm, in the brick house it is 65 mm, or ¼ of the brick.

The window is measured in 4 stages:
- calculating window opening dimensions
- outflow measurement
- window sill
- slope dimensions
How to measure plastic windows
Measurement of the window opening begins with the street side, then go to the inner side. To do this, open the window and measure the width of the opening between the top and bottom. This data may vary. To the smallest of the results obtained, add 3-5 cm if the house is paneled, and 4-6 cm for a building made of bricks. This value will be the width of the window. To check if the window width is correctly measured, compare the result with the width of the opening of the inside of the window and with the distance between the contact points of the slopes with the window frame. It must be in the gap between these values. To calculate the height of the window, you need to measure the distance from the bottom of the window opening to the edge of the upper quarter. To this value, add 2-3 cm to cover the quarter and subtract 2 cm by the thickness of the mounting foam. If the window has a reflux and a window sill, when it is installed, a sub profile will be used. In this case, the height of the window is reduced by another 3 cm. If the measurement is done correctly, the height will be practically equal to the distance from the end of the upper quarter to the upper edge of the ebb.
If the window opening does not have quarters, then when calculating the width of the window from the width of the opening, take away 3-8 cm for the mounting gap. The height is calculated, subtracting from the height of the opening 5-6 cm, of which 3 cm - on the podstavochny profile.
The length and width of the ebb are calculated as follows: to the distance between the right and left quarters add 5 cm. This is the length of the ebb. To calculate its width, add 2 cm to the distance from the end of the quarters to the window.
The sill is measured from the side of the room. It should be taken into account that the new plastic window has a thickness of only 5-6 cm, whereas the windows that were installed earlier were wider. Therefore, to calculate the width of the window sill, subtract from the distance from the outer sash of the old window to the edge of the window sill 5-6 cm. The length of the sill is the distance from the edge to the edge of the inside of the window aperture.
The width and length of the slopes are measured along the inside of the window opening.
All values should be written in millimeters.
If you are building a wooden log house, do not forget to take into account that the frame will "sit down" for at least two years. If the windows will be installed once after the assembly of the frame, then when calculating the height of the window from the height of the opening, you need to subtract 10-15% for shrinkage and another 5-6 cm for mounting. The width of the window is measured as described above. If you do not take into account the shrinkage of the frame, then the lowered upper crowns of the log house can break the window. Experts recommend to install windows in the frame only after it has shrunk. The method of installing windows in a chopped house differs from the usual one, since there should be no rigid fastening of the window to the logs, in order to avoid breaking the window or "hanging" the upper rims. A casing is used, which is attached to a bar inserted into a vertical groove cut at the ends of the logs of the window opening. In this case, the crowns can move down the bar, without breaking the windows and without hanging.
If there is an opportunity, it is necessary to entrust the windows to the employee of the organization who will produce and install the windows. In this case, you can be sure of the correctness of the measurement. In addition, the company will be responsible for the manufacture and installation of windows. If the measure is made independently, then the responsibility will be borne by you.
Method for measuring structures, window openings
Hardly anyone will argue with the assertion that improper installation of even the "coolest" windows can negate the entire expected effect of their application. Therefore, if you are going to mount new windows yourself (and at the same time take full responsibility for the quality of the installation), then it will be extremely useful for you to pay attention to those subtleties and unexpected difficulties that are almost never described, So: the biggest problem is the correct determining the size of the future window. This is all the more difficult because in most cases an old window in the opening does not allow to predict "what's inside", and it is at this stage that the first delay mine is laid, which turns any installation into a feverish search for an exit from the impasse.
1. Rule one:
The person performing the measurements should have an excellent spatial imagination and an analytical mindset, be well acquainted with the design of the future window and have a personal editing experience. Believe me, the symbiosis of these qualities is not so common, and it is not so easy to educate, and it is not so simple, therefore, in most cases, smaller requirements are in the hope of a chance, and often the problems that arise often are tried "in working order" (for several years) . So what should take into account the gauger, so that the company "did not fly out into the pipe," and the installers did not have to spend the night at the sites?
2. Rule two:
Measure the future window should be made on both sides of the opening: inside (from the room) and outside (from the street). Both these measurements are essential to determine the depth of a quarter of the existing window opening. Obviously, the window should be no less than (!) The outer dimensions of the opening, so as not to "fall out" outside. But how much more - depends on many unpredictable factors, which we consider below.
3. Rule three:
Never forget to clarify with the customer whether the outline of the existing opening will be kept from the outside to your next visit. For it can be removed from the old plaster, sewn lining, an additional row of bricks or a team of fellows will expand it "to the devil knows what size" without prior notice. And your complaints about this are tense: "Well, it was obvious!".
4. Rule four:
It is necessary to take into account the fact that the existing opening can be strongly skewed (especially in panel houses), which leads to the need to increase the window size by the amount of skew. In other words, in order to prevent through gaps between the edge of the opening and the edge of the window box, the window size must be larger than the outer dimension of the window opening by at least 30-40 mm in width and 15-20 mm in height. This can be achieved in two ways: either simply increase the overall size of the window box, or expand the window at the expense of special additional profiles, snapping onto the box.
5. Rule five:
Make sure that your taste and taste of your customer coincide with respect to the appearance of the window from the side of the street. For some like that almost the entire box of the window was walled into the wall and was not visible from the outside, and others prefer to show the window in all its glory. And try to prove which of them is right. In the same case, if the first option is preferable, do not forget about possible distortions of the window opening (see point 4.), so as not to overdo and hide inside the wall not only the box itself, but also the edge of the glass unit. The second option is more preferable because of the lower probability of errors and the lesser severity of their consequences.
6. Rule Six:
Never forget that from the outside of the window, from below (and sometimes from above), an ebb to drain rainwater should be installed. Therefore, the bottom edge of the window box should be no lower than the outer edge of the opening (regardless of the method of installation of the ebb). This is necessary in order to ensure that the special drainage holes on the outside of the window frame are not blocked. In addition, the joint between the tide and the frame (as well as between the sill and the frame) must necessarily be sealed, for example, with silicone. In general, it is preferable to set the reflux under the window, in order to exclude any possibility of seepage of water in the place of their connection. Do not also forget about the window sill, which should also be installed under the window (and not to the back), and hermetically sealed with silicone, which, on the one hand, increases the mechanical strength of the joint, and on the other - does not allow moisture to seep through the joint under the sill. To ensure that the condensate (if any) does not drain under the window, the sill is installed with a slight incline downward (SNIP recommends a gradient of 3 degrees).
7. The seventh rule:
After you determine the size of the future window - compare them with the internal (control) dimensions of the window opening (see point 1). This comparison makes it possible to find a mechanical error in a timely manner in the previous calculations, to assess how thick the plaster layer will have to be placed on the internal slopes in order to equalize them with the edge of the window, and also whether it is necessary to "bite" into the slopes so that your window is in place. In any case, one should strive to get out of this kind of silly work.
It's no secret that with all the variety of building materials, the only practical method of sealing the window is to fill the joint between the window frame and the wall with polyurethane foam. In the list of undeniable advantages of this option are: excellent thermal insulation and sealing, the ability to assume and evenly distribute mechanical stresses and wind loads, indifference to the unevenness of sealing surfaces, ease of use and relative cheapness. Indeed, today there is no more technological method. But the thoughtless and inept use of this method is fraught with very unpleasant complications. Firstly, the foam is destroyed (darkens and embrittled) under the influence of sunlight and atmospheric exposure, so it must be (!) Protected with a layer of sealant, plaster or, in extreme cases, paint. But it is enough to look at the freshly baked facades of new buildings to make sure of the regrettable fact that practically nobody not only does the plastering of foam, but does not even bother to cut off its surplus hanging from the peaks and joints and gaining "unexpected" color over time. Secondly, the foam is not a waterproofing material, so it must be (!) Protected from rainfall by any waterproofing material (silicone sealant or paint is quite suitable). Thirdly, it was recently revealed that even a dried foam can change its volume under the influence of temperature by not less than 5%, or even 10%! So what? And the fact that as a result of these periodic "pull-protrusions" at too much joint thickness (8-12 cm), the window box "walks" by 4-6 mm, which, on the one hand, leads to the destruction of the plaster layer adjacent to window, and on the other - to the disruption of the work of the locking mechanisms of the fittings, and the window is not closed, it does not open - depending on the season. Thus, the installation "on the foam", i.e. without mechanical fastening, widely practiced immediately after the appearance of mounting foam in the market, does not stand up to any criticism, does not provide a rigid fastening of the window in the opening and does not prevent the box from bursting with foam. In connection with the foregoing:
8. Rule eighth:
Strive to ensure that the width of the joint between the wall and the window frame does not exceed 3 cm, especially for large window sizes! Moreover, it is not difficult to do this - all manufacturers of window profiles, except for the basic set necessary for making the window itself, necessarily produce a full set of additional profiles that allow to increase the width of the window box with the same glazing dimensions. These profiles are specially designed and designed for such cases, so do not be afraid that the window will become "inferior". Moreover, I categorically do not recommend saving on such expanders, because the greedy will pay twice. But how difficult it is to explain to the Customer the necessity of wasting his money on incomprehensible details!
9. Rule ninth:
To avoid serious misunderstandings in the future, it is necessary to seal the outer seam between the frame and the wall. If all the doors in the window open - no big problems, outer seams are always available. But if there are blind parts, it is better to seal immediately, because after the window is installed and the double-glazed windows in the deaf parts are put in place, access to the outer seams ceases, and again to remove the double-glazed windows, or, even worse, to call climbers-plasterers the customer does not want. In fact, at this point, we should dwell in more detail, since there is a legitimate question: "What is better to seal?". Unfortunately, I still do not know at the same time: a technological, universal and inexpensive method. The whole problem is that the wall surface adjacent to the window is in most cases so uneven and the opening is so skewed that the width of the seam along the perimeter of the window varies from 0 to 5 cm (!). In such cases, the only solution is plastering, and then painting, to give the seam at least some elasticity at the junction with the frame. If the width of the seam does not exceed 15 mm, then you can choose either silicone sealant or you use a technology-based, but very expensive polyurethane self-expanding sealing tape (PSUL). Personally, I think the use of tape is justified only for sealing the upper troughs (visors) when installing windows on balconies and loggias because of its high cost and loss of waterproofing properties in an uncompressed state.
Attention! This manual can not contain all the nuances that must be taken into account when measuring PVC windows. If you have any doubts about the correctness of the dimensions, please contact the professional gauges. The company for the decoration of balconies and slopes is not responsible for the measurements made by the customer under this instruction.
The dimensions of the future window directly depend on the size and features of the opening. Panel houses have standard openings, in brick apartment buildings, the size of the openings can differ by a few centimeters. In the private house, production and commercial premises, the openings can be any. It is necessary to carry out metering in such buildings with special care.
Metering in a house with a quadruple opening
When measuring openings in a house with a quarter, it should be taken into account that the window should go beyond the external slopes (Figure 1, A) on each side of 15-25 mm (only the top and side). This is due to the generally accepted norm "Carrying out measurements and installation of PVC windows" according to TP. 152-205, GOST 52749-2007.
Picture 1
Thus, to the width of the outer slope (Figure 1, A), it is necessary to add 30-50 mm (less if there are curvatures of the wall). The resulting size will be the size of your window.
To check the accuracy of the measurement (in width), you can use the following methods:
The width of the window should be less (or equal to) the distance between the contact points of the slopes with the frame (Figure 1, B).
The width of the window must necessarily be less than the inner window opening (Figure 1, C).

Figure 2
From the base of the opening to the outer upper slope (Figure 2, F), subtract 20 mm (clearance under the mounting foam at the bottom). To the resulting size (Figure 2, D), you need to add 15-25 mm (entering the upper quarter). If a profile profile is used (a mandatory condition for windows with a window sill and an ebb), you must subtract from the resulting window size 30 mm. Hint: most often the size of D is equal to the height of the window.
Dimensions of the window, both in width and height, with the stand profile should be less than the opening for 30-80 mm for the installation seam. If, based on the measurements, it turns out that a quarter is more than 50 mm and the foam joint is more than 40 mm, then an additional profile should be used.
To check the correctness of the measurement (height), you can use the following methods:
The height of the window without regard to the profile profile should be less than the distance between the upper inner slope and the sill (Figure 1, E).
The height of the window, taking into account the profile profile, should be less than the distance from the upper inner slope and the lower edge of the window sill (Figure 2, E + G).
Metered in a house without quarters
When measuring in a house without quarters, it is necessary to take into account that the installation clearance when installing PVC windows should be within 15-40 mm (on each side). Therefore it is necessary:
From the width of the opening, subtract 30-80 mm. This is the size of your window in width.
From the height of the opening, subtract 50-60 mm (30 mm is taken by the stand profile). This is the size of your window in height.
Be sure to consider the possible curvature of the wall.
If these conditions are not met, we strongly recommend that you contact a professional gauger to find out the circumstances of this discrepancy.
Self-timer. Stages
So, you decided to do it yourself: First you need to free access to the window, open at least one leaf. Window measurements should be taken from the side of the street and monitored from the side of the room. Experienced gauger may not open windows (especially in panel houses).
First of all, let's define what is a sheet of PVC window measurement. Take the pen and make a small nameplate:
Dimensions of the window (width and height), mm
Dimensions of the window sill (width and length), mm
Dimensions of the drainage (width and length), mm
Dimensions of sandwich panels (or PVC panels, MDF, etc.) for window finishing (width and length), mm
As you already noticed, all sizes when ordering and calculating structures are taken in millimeters, unlike stretch ceilings (there are all in centimeters, I do not know why).
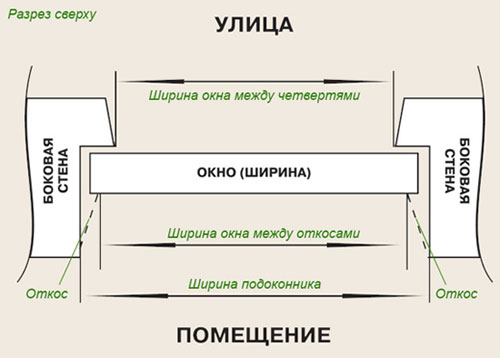
So: First open the window, and make measurements of the window opening outside (from the street side). You need to measure the width of the opening from the slope to the slope. For a more accurate result, measure the width of the opening at the bottom and top of the window. (see picture 1). Record the smallest result. Then measure the height of the opening (to the right and left of the window (see figure 1)) and also write down.
Fig. 1. Take measurements outside
Further attention: to the received width it is necessary to add 2-3 cm (for the panel house), 4-5 cm (for brick)! This, so-called, distance for the "overlap" of the new window by a quarter. But to the height of anything you do not need to add! "Overlap" on the upper quarter will be due to the so-called installation profile (sweetheart, heel, etc.). We will write the resulting dimensions in our "sheet of gauging".
The length of the tide = the distance between the right and left quarter + ~ 50 mm (the excess can always be cut off during installation)
Width of the dewatering: we measure the distance from the window to the end of the quarter and add to it 20-30 mm. We obtain the required width.
Now you can close the window, or rather cover the first part of the frame. After all, we still need to measure the width of the window sill and sandwich panels (see Fig.2). Here the main thing remember that the new plastic window will be much narrower than the old (~ 50-60 mm), respectively, and the window sill, and the internal slopes will become wider! Measure the width and length of the window sill, the dimensions of the panels for decoration and record these data in the measuring sheet. Remember that better is more than less! Because The surplus can always be removed during installation, and at a cost this, in practice, will not affect either. So always leave a small stock:
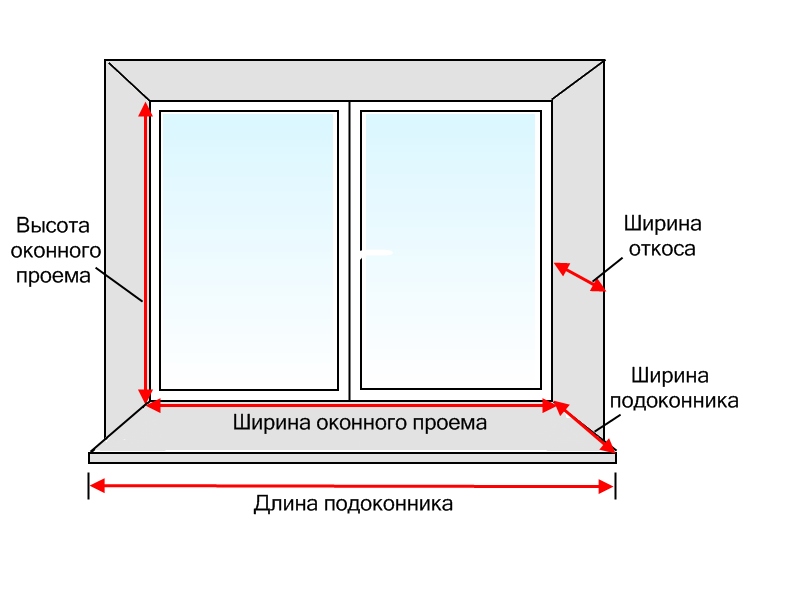
Fig.2 Measurement of the window sill and sandwich panels
Greetings, my brothers and sisters are the handles!
In the last page of my blog, we thoroughly examined the process. After reading it you probably become 80 level masters in the installation of windows and can only install one power of thought and that's good! But another important aspect when installing windows is their correct metering, so that on arrival at your place your windows clearly fit the size of your window opening.
Now someone will start to poke my finger at the eye - it's necessary, if at the purchase of the windows the zamerschik comes and everything will be professionally measured. This is true, but many of us, whose hands grow from one place, and also part-time inquisitive minds - are trying to make repairs by themselves, and I'm trying to convey to you, my assholes, that many types of construction work can be done by yourself and not only to gain invaluable experience, but also to save a lot!
Read the article to find out how to properly measure the plastic window!
Types of window openings
Window openings are with a quarter and without. And each of them has its own nuances in gauging.

Measurement of windows without a quarter
So, we decided on the type of window opening - first we measure the window without a quarter. For the beginning we measure width and thus we subtract from the received result of 6 sm.

For what it is done - on each side remains 2-3 cm under the mounting foam.
We measure the height of the opening.
 Just like with the width, we subtract from the result obtained a straight 6 cm. 3 cm is given under the framed profile, directly on which there will be a window and 3 cm on the mounting foam.
IT IS IMPORTANT TO KNOW!
Dhandles - handles I'll give you a little advice. Measurements of width and height do in three points of the opening - left, right, middle. This is done in order to determine the minimum size, from which the distance required for the mounting foam will be subtracted.
Measuring windows with a quarter
Friends, according to GOST when installing and measuring windows with a quarter of the window should go to 30 - 60 mm per quarter, so when calculating the width of the window you have to calculate it so that the window was more than a quarter, but less walls.

We measure the height of the window with a quarter. This is done so. First measure the distance from the bottom of the window opening to a quarter and add 2 cm to it so that the window goes past a quarter. If you order windows with a window sill and a low tide, then you should take into account the fact that they have a pod profile, the width of which is 30 mm.
After all calculations it is necessary to take away from 30 to 60 mm for the mounting foam and in principle the calculation can be considered finished.

In order to measure the width of the window with a quarter it is necessary to add to the outer dimension between the quarters 40 - 60mm for the window, so that the window goes past a quarter. When measuring, it is also necessary to take into account that the distance for the mounting foam is required.
IT IS IMPORTANT TO KNOW!
Friends, do not deepen the window too much in a quarter, as this can ruin the window's aesthetics and further complicate the subsequent installation of the mosquito net.
We examined with you the measurement of windows with a quarter and without it. It is necessary to understand that all these works are carried out in a warm time and imply that the old windows have already been dismantled, but if it is not possible, the windows can be measured even if there is an old window. Here everything is simple - for the original size you take the outside dimensions of the window frame.
How to make a window measurement - video
Measuring the windowsill

Here everything is elementary - measure the necessary length of the window sill and add to it 10 cm in order for the sill to be sunk into the wall from two sides. The width of the window sill is measured taking into account the width of your wall, forgive for taftalogy. The window sill should protrude a little. Here I will not give any specific advice, because this parameter can be varied and calculated individually. Let's say that I personally have in one room 3 cm, and in the other bedroom practically no protrusion, since it rests against a metal heating pipe.
A few practical tips
Friends - the handles we examined with you the measurements of the windows with a quarter, and without. In principle, there is nothing complicated and you can do all the work yourself, but if your hands and eyes are shaking, you will be helped by qualified laborers. By the way, you can order only the measurement of windows, and make installation work yourself - it's up to you and only you!
If you have read the entire article to the end, then you probably already understood the principle of metering, but there are several more nuances that I would like to pay attention to.
Friends, even if you have to insert ten windows - measure each separately, do not take the average values. Especially it concerns private houses, where the difference between neighboring windows can reach up to 20 cm.
Pay attention to all the small things - if you have heating from polypropylene and sewn into the walls, then it's good, and if I'm welded from pipes 100, it's necessary to watch that they do not interfere with the installation of window sills, also it is necessary to look at the jumpers - will there be an opportunity To remove or it is necessary to be adjusted under them that the window normally opened.
I remind you that all sizes or better to say the tolerances and plantings can differ significantly from yours, as each of you has its own situation, its openings - concrete, brick, cinder block, saman, etc.
Also, before starting the measurements, you need to clearly determine the type of windows that you will insert. Types of window profiles - 3, 4, 5 chamber. Types of double-glazed windows - 1, 2, 3 chamber. All these characteristics affect the thickness of the window, which is important when properly measuring windows.
Good luck to all!
To measure the opening for the installation of the window must be approached very responsibly. After all, an incorrectly made measurement can lead to the fact that you have to produce additional expensive work or to remake the plastic window. Most companies that produce windows do not recommend measuring themselves. They are not responsible for the correspondence of the sizes of the manufactured window to the window opening, if the customer is measuring the measurement, and not the company's specialist. But sometimes it becomes necessary to measure the window opening yourself. In this case, you need to follow the guidelines for the correct measurement of windows.
Measurement of plastic windows
There are two types of window openings: one quarter and one quarter. A quarter is a protrusion from the sides and from above the window opening, preventing the window from falling out and protecting against the penetration of precipitation and wind into the room. The width of the quarter in the panel house is 50 mm, in the brick house it is 65 mm, or ¼ of the brick.
The window is measured in 4 stages:
- calculating window opening dimensions
- outflow measurement
- window sill
- slope dimensions
How to measure plastic windows
Measurement of the window opening begins with the street side, then go to the inner side. To do this, open the window and measure the width of the opening between the top and bottom. This data may vary. To the smallest of the results obtained, add 3-5 cm if the house is paneled, and 4-6 cm for a building made of bricks. This value will be the width of the window. To check if the window width is correctly measured, compare the result with the width of the opening of the inside of the window and with the distance between the contact points of the slopes with the window frame. It must be in the gap between these values. To calculate the height of the window, you need to measure the distance from the bottom of the window opening to the edge of the upper quarter. To this value, add 2-3 cm to cover the quarter and subtract 2 cm by the thickness of the mounting foam. If the window has a reflux and a window sill, when it is installed, a sub profile will be used. In this case, the height of the window is reduced by another 3 cm. If the measurement is done correctly, the height will be practically equal to the distance from the end of the upper quarter to the upper edge of the ebb.
If the window opening does not have quarters, then when calculating the width of the window from the width of the opening, take away 3-8 cm for the mounting gap. The height is calculated, subtracting from the height of the opening 5-6 cm, of which 3 cm - on the podstavochny profile.
The length and width of the ebb are calculated as follows: to the distance between the right and left quarters add 5 cm. This is the length of the ebb. To calculate its width, add 2 cm to the distance from the end of the quarters to the window.
The sill is measured from the side of the room. It should be taken into account that the new plastic window has a thickness of only 5-6 cm, whereas the windows that were installed earlier were wider. Therefore, to calculate the width of the window sill, subtract from the distance from the outer sash of the old window to the edge of the window sill 5-6 cm. The length of the sill is the distance from the edge to the edge of the inside of the window aperture.
The width and length of the slopes are measured along the inside of the window opening.
All values should be written in millimeters.
If you are building a wooden log house, do not forget to take into account that the frame will "sit down" for at least two years. If the windows will be installed once after the assembly of the frame, then when calculating the height of the window from the height of the opening, you need to subtract 10-15% for shrinkage and another 5-6 cm for mounting. The width of the window is measured as described above. If you do not take into account the shrinkage of the frame, then the lowered upper crowns of the log house can break the window. Experts recommend to install windows in the frame only after it has shrunk. The method of installing windows in a chopped house differs from the usual one, since there should be no rigid fastening of the window to the logs, in order to avoid breaking the window or "hanging" the upper rims. A casing is used, which is attached to a bar inserted into a vertical groove cut at the ends of the logs of the window opening. In this case, the crowns can move down the bar, without breaking the windows and without hanging.
If there is an opportunity, it is necessary to entrust the windows to the employee of the organization who will produce and install the windows. In this case, you can be sure of the correctness of the measurement. In addition, the company will be responsible for the manufacture and installation of windows. If the measure is made independently, then the responsibility will be borne by you.

Before you remove the dimensions of the plastic window, you need to know the features of its opening and configuration. It should be very carefully approached to measurements, because in panel houses, the dimensions of the window structures are approximately the same, and in brick buildings - differ by several centimeters. It is worth noting that it is quite difficult to correctly measure plastic windows, it is better to entrust this responsible task to professionals, especially since the companies producing such designs often provide a free-of-charge measurement service. But if you still want to try your hand, strictly follow the instructions given for measuring the plastic windows.
The windows should be measured from the street and from the living area. These dimensions are needed to determine the depth of the window opening. It should be remembered that the window should have no less dimensions than its outer part, and how much more, it will have to be calculated. In some cases, the opening may be skewed, so you will have to increase the size of the structure by the amount of skew. Once you determine the dimensions of the window, you will need to compare them with the internal dimensions of the opening. So you can find the mechanical errors in the calculations that could have been made, and then evaluate what the plaster should be to impose on the internal slopes.
In order to measure the window, it is necessary to prepare some instruments: a measuring instrument, a blunt chisel (15-20 mm), a building level, pliers, a small hammer, a pencil, a ruler and an elastic band, and a form for recording the result. Measurement is very convenient to produce using a tape measure or telescopic ruler.
Measurement of plastic windows with a quarter
Window openings can be with or without quarters. Typically, the presence or absence of a quarter affects the choice of window sizes. In houses of standard construction, there are often openings with quarters, and without quarters you can mostly find in private houses and occasionally in standard construction.
It should be borne in mind that the window openings in houses with a quarter should go outside on the upper and side slopes by about 20-30 mm. The width of the window should be measured on the outer slopes, then it is added to it 40-60 mm for the window to go from two sides to a quarter or slightly less if the wall is a curve. Once you have measured the width between the outer slopes, the result should be checked so that it does not exceed the distance between the points at which the internal slopes abut the frame. The width of the window frame should not be greater than the width of the internal opening, otherwise you will have to turn to professional gauges. The height of the window is the distance from the base of the opening to the upper slope, minus 10-20 mm at the gap for, and plus 20-30 mm for the approach of the structure in the upper quarter.
If, during the installation of windows, you plan to use a sub-profile, which is mandatory for trimming and trimming, you will need to reduce the height of the window by another 30 mm. On this, the plastic window with a quarter is completed. To check the correctness of your work, you can check the following dimensions: the height of the window frame without the substructure profile should not exceed the distance from the window sill to the upper slope from the inside. And the height of the window with the substitution profile should be no greater than the length between the bottom edge of the window sill and the upper inner window.
In houses without a quarter the aperture of a plastic window should be measured by measuring the width and height in the lower and upper part of the opening. As the initial value for the calculations in this case, choose the lowest indicators. So, first of all you need to determine the width of the opening, from the obtained value it should be taken away 20-30 mm for gaps on the seals of the mounting foam. From the received height of a window also it is necessary to take 20-40 mm under a seal layer. Do not forget to take into account the height of the substitution profile, for which you need to remove another 30 mm from the height of the window.
Height measurement of windows in height and width
To measure the window, it is necessary to add 3-5 cm to the width of the outer slope (slightly less in case of curving the wall). To properly perform the work, it is necessary to take into account some nuances. The window should be slightly wider or the same in size with those places where the frame is in contact with the slopes. In addition, the structure should be smaller than the inner opening of the window. To accurately measure the window in a non-standard window opening, it is recommended to trust specialists who can on the spot assess the situation and identify the reasons for the discrepancies.
If you are measuring windows in height, then in this case you need to take 2 cm from the distance between the upper outer slope to the base of the window opening, this distance is necessary for the mounting foam in the upper part of the opening. The rules for measuring the height of the window are simple enough and clear to every developer. In order for the window structure to go into the upper quarter, you need to add 1.5-2.5 cm to the resulting size. If you install windows with a window sill and a tint, be sure to use the substitution profile, and from the size obtained take 3 cm.
Typically, the window design is determined by the color and configuration of the existing window. If possible, the products should be the same on the facade of the building. When designing a structure, it is necessary to take into account some practical recommendations and technical limitations. First of all, the specified sash dimensions in the window system directory should not exceed the maximum. Due to the limited possibilities of perimeter fittings, the width of the inclined-turn flap should be more than 400 mm. Due to the arrangement of the floor and other factors, the dimensions of the openings may be different, so measurement should be done during the construction and reconstruction of the building, and all dimensions should be coordinated with the project.
Now you in general know how to independently measure the plastic window. But it's better to apply to professionals with the necessary skills and experience.