In fact, the corrugated sheet is a sheet of galvanized steel, with stiffeners that do not allow it to bend, deform.
Today this material is very widely used in construction. In particular, it is usually used for facade cladding, roofing, as well as for the lining of fences, gates and gates.
Features of corrugated board
Naturally, like any other material, profiled sheets also have individual characteristics, which must be taken into account when planning a project.
How good is it to use profiled sheets for the fence?
Let's figure it out.
Advantages of profiled sheets as a base material for mounting fences
Here it is possible to allocate such moments:
- Very reasonable price of the sheets themselves. Without exaggeration, we can say that the purchase of this material is available to most people;
- High speed of carcass plating. You do not have to wait until something dries, stiffens, etc. Even a very large area can be sewn in just a couple of days;
- Low weight of material. This is a huge plus, as it does not require solid foundations, high load-carrying capacity from supports (see also article). Yes, and unloading of such sheets passes quickly due to their small weight;
- The big color scale. And it really is so - the assortment of colors and shades of profiled sheets is so wide that it is possible to pick up material for any house or object.
Now let's talk about the reverse side of the question, so, you must agree that before making a fence from the proflist, negative moments are also incredibly important to consider.
Disadvantages of profiled
Here you need to understand that the shortcomings are those only in a certain context, because someone, for example, the small weight of the sheets will seem to be a minus, and in some situation it is vice versa - it will be a plus.
Therefore, take into account not only the features of materials, but also the nuances of the situation itself, the project. Somewhere one quality is required, but somewhere this same property will be superfluous, is not it?
So, to the shortcomings of the material, as the basis for mounting the fence, you can relate the following points:
- Not very high strength of the whole structure as a whole. If desired, attackers can easily tear off sheets from the frame. Therefore, if you need a fence in a house where you do not permanently reside, and no one follows the house, then think, it may be worthwhile to look at another technology;
- If there is no specific skills and experience, then with your own hands this fence will still be difficult to assemble. But basically now not about the sheets speech, but about the technology as a whole. After all, the elements of the carcass must be welded together, and not everyone knows how. Of course, you can all connect and bolted, but it will be an order of magnitude longer, and not so firmly. The sheets can be screwed easily.
Are the above points flawed? It's up to you.
Let's consider now how to properly make a fence from the proflist, and in what order everything is done.
Fence installation
Advice: use steel pipes as supports, at least 2-3 mm. thick. If the metal is thinner, then it will not be a skeleton, but one name.
And to start everything, of course you need from the markup, here is the instruction:
- determine the place where the fence will stand, drive pegs to all corners;
- we connect the pegs with a string.
Advice: use the strongest and most noticeable rope, otherwise during work for it will constantly cling and tear it accordingly. This in principle is not terrible, but, nevertheless, it is inconvenient, and time is lost.
Now we need to determine the distance between the supports. In most cases, the gap between the pillars makes from 2 to 2.5 meters. Distance in principle it can be any, but not more than 3 meters, since the horizontal jumpers will most likely start to bend.
With the distance determined - let it be, for example, 2 meters.
Now you need to mark the points where the supports will be located.
From the corner to the corner measure the distance of 2 meters, then we will put the poles. If you can not make all spans of 2 meters due to the length of the span, then just calculate the average value and arrange the poles on it.
Approached the digging holes for the insertion of poles and their concreting. You can dig like a shovel, or an ordinary garden drill - that is available, so use it. The optimum pit depth for the pillars is not more than two meters in height - this is 50-60 centimeters.
After the pits are ready, we drive into each of them the racks, we stretch between the corners "string-beacon" - along it we will align the line of the future fence, so that the zigzag does not turn out.
So, the racks are inserted, vertically aligned, we prepare the concrete and fill all the holes.
Tip: for the preparation of concrete as a filler stone, it is best to use rubble, since it is inert. Keramzit, a brick fight - quickly break down from moisture.
Now you need to wait until the concrete is completely solidified, because if you continue working immediately, without waiting for the mixture to harden, there is a risk of breaking the right vertical support.
If the concrete is frozen, then it is possible to weld or fasten horizontal bearing jumpers. It is on them that we will later tighten the profilists.
But before fixing the sheets you need to do something else ...
The entire metal frame is important to protect against corrosion. For this, the metal needs to be sanded with sandpaper, and then treated with a special primer and if desired, painted in any color.
If everything is ready, then proceed to the last stage.
We take a tape measure, a pencil and a Bulgarian, we cut the sheets, if necessary. Then we put them to the frame and drill holes in the places of fastening to the pipes. We remove the sheets and drill in the marked points, holes for bolts or screws in the frame.
In general, that's all. Now we put the sheets, we fasten them and admire the result!
Conclusion
We have reviewed briefly how the installation of a standard fence of profiled sheets is performed, and what are the features (see also the article). If you want to get additional information, then watch the video at the end of the article - it's superfluous 100% will not.
Successful editing!
Construction of fences made from corrugated board is a common method of enclosure fencing. Such a fence perfectly matches with any landscape. Manufacturers produce canvases in various colors.
We will tell: how to properly make a fence from the profilist with your own hands, tell you about the features of different designs, describe the step by step instruction. In the article you will find answers to the questions: how to make a fence of profiled sheet with metal, stone and brick supports.
Materials for construction
To independently install a fence, it is necessary to prepare certain building materials:
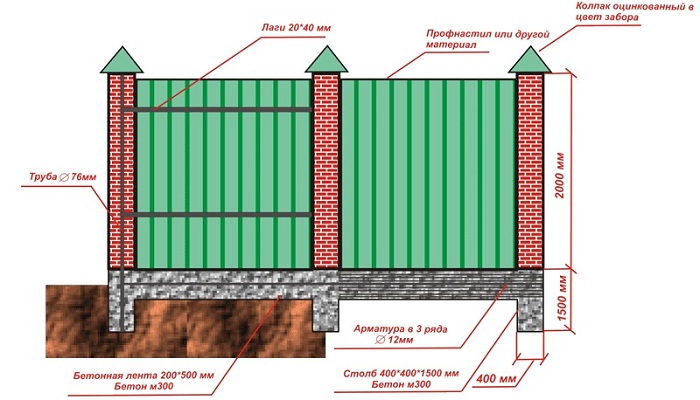
- Polymeric profiled sheeting. It can be painted on one or both sides. The material is covered with a composition of polyester, which ensures a long service life of the product. Do not purchase galvanized profiled sheets. They have one advantage - the price, while zinc coating is quickly covered with rusty stains. On a sunny day, this fence will additionally raise the temperature. If you plan to put a two-meter fence of corrugated board yourself, while the foundation will be installed foundation, from the planned height (2 meters), subtract the height of the base. The difference is the height of the profiled sheets to be purchased. The distance between the poles is the width of the span from the sheets of corrugated board. If you do not know how to install the poles, we advise you to place them at a distance of 2.5 - 3 m from each other.
- Supports. Metal pipes, round, rectangular or square are used. If desired, stone or brick posts are installed as supports. Supports made of bricks look much more attractive than metal ones. To install non-metallic poles use decorative brick, stone, cement and sand. What poles are needed for maximum strength of the structure? Supports made of metal should measure 40 x 60 mm or 60 x 60 mm. Then the design will withstand loads of varying strength.
- Metal logs - they are necessary for the transverse fixing of the corrugated board. Optimal will be logs measuring 20 x 20 mm. The technology of building a fence with a height of 2 meters or more involves two rows of lags. Otherwise, the structure can be deformed under physical influence.
- Mountings (or dowels for mounting). With their help, you can fix the profiled sheet to the fence.
Stone, sand, gravel (screening), cement - will be needed to create a foundation. To properly build a fence of profiled sheet, you need to install it on the foundation. Without a quality foundation, the fence will not last long. Vegetation, soil washing, animals can deform the structure over time, and the foundation will prevent this possibility.
More details on what types of foundations exist, we already wrote in the article: "Types and ways of pouring."
Tools for work
When we build a fence from the proflist by our own hands, we need the following tools:
- Sledgehammer.
- Shovel.
- Roulette.
- Cord.
- Level.
- Apparatus for welding works.
If the tools and materials for the construction are prepared, we turn to the construction of the fence of the proflist.
How to build a fence?
Stages of work:
- Land marking and material calculation.
- Installation of foundation and columns (installation of support posts in a fence without a foundation).
- Installation of corrugated board for lags.
Before building a fence of corrugated board, we mark out the territory and collect the site data. How to do it correctly, we wrote.
At the corners of the future fence we hammer pegs, between which we stretch the thread. Along it, you need to put marks, where there will be pillars or pillars of metal.
The construction of fences from the profiled sheet in a sloping area assumes a gradual construction. We check the height and evenness of the step using the level.
Count the number of columns to be set. To do this, divide the length from the corner to the next by 2 to 3 meters. It will be spans. It is necessary to make markings for the gates, wickets and take into account these additional supports during the acquisition of the material.
According to the type of construction, the fencing of the profiled sheet can be of the following types:
- Fence without foundation. Sheet of corrugated board is placed along the height of the fence.
- Constructions.
The construction of the fence from the profiled sheet is less costly without a reason. In addition, the installation is faster, but the second option looks more respectable, although it requires more costs for materials, funds, labor.
Fence construction with metal pillars
To properly put a fence of corrugated board, where the posts are used as pieces of metal pipes, do the following:
- We put corner posts in marking places. To properly make a fence from the profiled sheet, we advise you to immerse the pole in the ground for a third of the length, in this case the maximum resistance to wind is created. Pour grout concrete solution.
- We organize the formwork. In this way, a bead is created that connects adjacent bars. The width of the formwork depends on the wishes of the owner, but the aesthetics look about a width of about 20 centimeters. If we build a fence of profiled sheet with formwork - it will stay longer.
- By the length of the structure, at a distance of 2 - 3 meters, we establish the markings. Between the corner columns we pull the thread.
- We dig in the columns according to the layouts. The construction of the fence from the profilist with your own hands assumes the installation of poles at the same distance.
- Pour the concrete mixture into the formwork container. In addition, we compare the accuracy of the transverse, longitudinal and vertical columns. Leave the design until completely dry.
- To the finished structure we weld cross strips. To put the fence out of the profiled sheet correctly, it is necessary to check the evenness of the construction by the building level.
- We attach the corrugated board to the transverse lags. For reliable fixing we use self-tapping screws for metal. We advise you to choose fasteners that match the color of the sheets.
Important: Pay special attention to the attachment of the first sheet. On how exactly it will be attached, the appearance of the entire structure depends. After all, each subsequent profilist is attached to the previous one. It is necessary to make an overlap, the size of one wave.
Installation of poles of brick and stone
The construction of metal fences made of corrugated board with brick columns assumes the creation of a formwork for the future foundation.
The brick layer is built using reinforcement. Metal parts are located in a vertical position and are covered with brick.
Construction of a fence of corrugated board with own hands with columns of brick can not be performed without reinforcement. Brick is a rather heavy material. Metal bridges will only strengthen the load on the foundation, which can eventually break down under the influence of gravity. If we make a fence of the profilist with our own hands, it is necessary to reinforce the foundation layer.
- Brick lay out the pillars and intermediate jumpers. If the height of the fence is standard, install the brackets in the poles at a height of 20-30 and 1.50-1.60 m from the ground, where the horizontal bars will be welded. Check the verticality periodically.
- To the mortgage details we weld horizontal strips. It is advisable to cover the metal parts with paint. This will help to avoid corrosion in the future.
- With the help of self-tapping we attach profile constructions. You can use riveting and attach them with a special rivet.
The peculiarity of the construction of the fence from the profiled sheet with brick columns means the creation of a roof for each column. The design will not be affected by atmospheric precipitation and weather phenomena (snow, rain, wind).
More detailed instruction with video lessons and images on the installation of fences namely with brick pillars is presented in this article:?
Video
You can see how to build a fence from the proflist by yourself with this video:
Designers advise for finishing the facade to install a fence of corrugated board with their own hands with posts. He looks stylish and emphasizes the status of the hosts. On the rear side, it will be appropriate to build a fence with metal columns.
Determine which option will suit us more, and put the fence. As you can see, it's quite possible to build a fence from the profilist with your own hands, and video, photos and detailed instructions will help you achieve your goal.
One of the most inexpensive fences for a dacha or a private house is from a corrugated board. The structure of his simple - stolen pillars, which are attached to the transverse lag. The corrugated sheet is fastened to this grid by screws or rivets. Everything is really simple, especially if you know how to use a welding machine. Although there is a technology without welding - on bolts or on wooden crossbeams. In any case, you can build a fence of profiled sheeting yourself. You can do all the work alone if you need it, but it is more convenient with the assistant when mounting the sheets.
Design with metal posts
The simplest manufacture - a fence with poles of metal, dug in the ground. You can use pipes of round or square section, but it is more convenient to work with square - profiled ones.
The length of the pillars is taken depending on the desired height of the fence, plus it is added from 1 to 1.5 meters to penetrate into the ground. Bury in the ground is necessary below the depth of freezing of the soil. For each region, the soil freezes to different depths, but in the central part of Russia it is about 1.2 m. When determining the depth at which the pipes are buried, it is better to be safe and make holes deeper. Otherwise, the strength of the winter punching rack will simply be pushed out, and your fence will fall (see photo).

For poles usually take profiled pipe section 60 * 60 mm with a wall thickness of 3 mm. The distance between the poles is from 2 to 3 meters. The thicker the profiled sheet, the less often you can put poles. If the ground is heavily digging, it makes sense to make distances longer, otherwise you can save on buying a metal - the thinner, the cheaper and the price difference is significant.
Logs for fence made of profiled sheet are made from a profile pipe 40 * 20 or 30 * 20 mm. The second option - wooden bars 70 * 40 or so. When using wood, a considerable amount of money is saved, but the tree quickly disappears, moreover, it jars from moisture. Most likely in a few years you will have to change logs, and they will be already metal. But as an economy-option for several years will go.

Doing a fence of corrugated board with your own hands with wooden lags, do not forget to carefully treat the wood with antibacterial composition (for example, Senezh Ultra). It is better to do it in the bathroom - to immerse the bars for 20 minutes in the solution completely. So they will serve longer.
The number of logs depends on the height of the fence. Up to 2 meters - two are enough, from 2.2 to 3.0 meters you need 3 guides, even higher - 4.
The ways of fixing the lag to the pillars
Metal logs are welded either between pillars or from the front. The first method is more labor-intensive, with more waste: you have to chop the pipes into pieces. But with this arrangement of the log, the construction is more rigid: each column serves as a support for the sheet and it "walks" less, if desired, a pair of additional fastenings can be placed along it.
If you weld pipes in front of the post (on the street side), there are fewer jobs, but you still have to cut it and waste will be: it is necessary that the welded seam of two sections falls on the pole. Unless you will guess the distance so that they lie flat. Then you purchase the materials in advance, and then you calculate the step of installing the poles.

To fasten wooden bars welded in front or on the sides holders - metal corners or U-shaped guides. They then drill holes and fasten with bolts or screws.
There is a variant to collect a fence from a corrugated board without welding. For this, there is a special fastening element, called the X-bracket. This is a cross-shaped plate with curved edges, which is attached to self-tapping screws.


Corrugated board for fences
For fences, a corrugated board with C marking is used for fences and walls. Still there are H and NS, but they are not suitable for fences - it's more roofing materials. Seldom can be found marking A and R, profiles A can be used for fences.
In the marking after the letter is a figure - from 8 to 35. It indicates the height of the rib in millimeters. So C8 means that the corrugated sheet is intended for fence, and the height of the wave is 8 mm. The higher the wave height, the more rigid the surface will be. In strong winds, take at least C10, or even C20.
The thickness of the sheet is from 0.4 to 0.8 mm. The most optimal option is a thickness of 0.45 mm or 0.5 mm. They are suitable for a fence up to 2.5 m high. If you need a higher, take at least 0.6 mm.
The height of the sheet is usually around 2 meters, you can find 2.5 m. The width is very different - from 40 cm to 12 meters. Different factories produce different profiled sheets according to the format.

Profiled sheeting can be galvanized, can be painted (painted 15-25% more expensive than galvanized). The paint is applied in two types: powder and polymer coating. Powder coating is more durable, but also more expensive.
There are sheets painted on one side - the second one is galvanized, covered with gray soil, there are two. Double-sided coating is naturally more expensive than one-sided painting, but the look is better, and the service life is longer.

Support pipes and logs for the fence are usually primed, then painted. And somehow it happened that they paint them with dark paint. Attaching to them, then, the dyed one, which is painted on one side, receives a clearly visible "skeleton" on a light gray background. In a small area, this is critical. Pay attention, and building a fence of corrugated board with your own hands, paint the supporting frame in a light gray color. The result will please you: it looks much better from the yard.
How to fasten the profiled sheet to the frame
Fasten sheet self-tapping screws or rivets. Self-tapping screws for the profiled sheet are galvanized, painted. Pick them in the tone of the fence color. Screw with a screwdriver using a nozzle.
The installation step depends on the wavelength and the height of the fence. The higher the fence, the more often it is necessary to install fasteners. Normally holds, if strengthened through the wave to increase strength, with two lags can be mounted in staggered order, and not one over the other.
When installing, it is important to set the first sheet vertically. Then all the others will be installed without problems. When laying the sheets, the next one goes to the already set one wave. Strengthen in the lower part of the wave. Install the screw must be strictly perpendicular. Then the hole is covered by the washer and the precipitations will not cause the paint to peel off.
On how one can fix a corrugated sheet to the fence, watch the video.
Fence from the corrugated board with your own hands: photo report
The fence was built from the neighbors and the frontal. The total length is 50 meters, the height is 2.5 m. The brown profiled sheet is used on the front, in the boundary layer is galvanized, 0.5 mm thick, grade C8.
In addition, such materials were published:
- on poles profiled pipe 60 * 60 mm, wall thickness 2 mm, pipes 3 m in length;
- on the poles of the gate and wicket set 80 * 80 mm with a wall of 3 mm;
- logs 30 * 30 mm;
- the frame of gates and wickets 40 * 40 mm;

A ready fence of profiled sheeting was built by one person
The fence is installed on metal poles, between which the basement is then poured. It is necessary for the owners, since it is planned to break a flower garden before the fence (the fence made under it is visible). Also, it is necessary that the water does not flood the yard during heavy rainfall. Metal sheets are not fastened from the ground immediately, but are slightly retreating. This gap is closed by a notch - a tape that remains in some production. This is done specifically to avoid blocking air access, in order for the earth to dry out more quickly.

Preparation of metal
The first stage is the preparation of pipes. From the warehouse, the pipe comes rusty, so that it serves for a long time, it is necessary to clean the rye, then treat it with anti-rust and then paint it. It is more convenient to first prepare all the pipes, primetovat and paint, then just start the installation. Rust was scraped off with a metal brush installed on the bulgarian.

The pipes in the warehouse were only 6 meters high. Since the height of the fence is 2.5 meters, it is necessary to bury another 1.3 meters, the total length of the post should be 3.8 meters. To save, cut in half into 3-meter pieces, and the missing was finished with different scrap metal available in the farm: pruning corners, reinforcement, pieces of different pipes. Then everything was cleaned, primed and painted.
Installation of poles
The first to put two corner posts. The pits were drilled with a drill bought in the shop. Soil is normal, for one hole depth of 1.3 meters took about 20 minutes.

The first pillar was exposed horizontally and so that it rose above the ground to a height of 2.5 meters. To expose the second, it was necessary to repel the height. The water level was used. Fill it with so that there are no bubbles - from the bucket, and not from the tap, otherwise it will lie.
We put the second post on the repaired mark (it was put on the bar, which was placed next to the hole) and concreted. When the cement was seized, a twine stretched between the pillars, along which all the others aligned.
The technology of pouring was used standard: in the hole, a rolled roofing material was installed twice. Inside, put the pipe, poured with concrete (M250) and exposed vertically. The level was controlled by a plumb line. Correctly set up poles - this is very important, otherwise the whole fence will warp.
In the process of work several times it turned out that the concrete was poured not inside the rolled roofing material, but between it and the walls of the pit. It was a small pleasure to take it out of there, because the protruding part was cut into petals, nailed to the ground with large nails. Problem solved.

After the concrete was seized, the portable formwork was made of planks covered with a thick film. With their help they poured a socle. To make it stronger, at the bottom to the poles from both sides welded bars of the armature. A formwork was placed around them.

Jumper setting
Purified, primed and colored pipes for crossbeams were cut and welded. Brewed between the pillars. They are also tedious to put in a level to strengthen was easier.

After the welding is finished, all the welding places are cleaned with a wire brush, processed with "Anti-rust" and then painted.
Mounting of the profiled sheet
Since the upper jumper passes along the very top of the fence, and it is welded exactly to the level, there were no problems with alignment and installation of the sheets. Fastened first along the edges, then set the intermediate screws. To make it easier to place them evenly, a thread was stretched between the extremes.

Equally installed fasteners - also beautiful
Afterwards, the gate was welded and attached. As a final touch - installed on top of the additional elements - U-shaped profile, which closes the top of the fence and plugs on the pipes.

As you understand, there is nothing particularly complicated. It is important to set exactly the poles and weld the frame. This is the main task. A lot of time - about 60% is spent on the preparation of pipes - cleaning, priming, painting.
Fence made of profiled sheet with brick poles

Of course, the fence with brick poles looks more decorative. If desired, you can do it, but it will take more time. There are two options:
- Make a full-fledged ribbon foundation. But it's long and expensive. On well-drained soils, it is possible to make a foundation of shallow laying, on burial grounds it is necessary to dig in below the depth of freezing of the soil. And although the tape will not be wide, there's a lot of work - digging the entire trench for the entire length of the fence, setting up the formwork, knitting the fittings, pouring and then finishing it. Over put brick poles. Durable, reliable, but expensive.
- To make under the scheme described above: carrying pillars with a socle. Around the pillars lay a brick. This method is less expensive. About,

The whole technology is the same, only the reinforcement will be required more rigid - two belts with two bars with a diameter of 10-12 mm. In the pillars it will be necessary to install the embedded elements to which the guides will be attached. Their (mortgages) can be welded to the pipe, after it is exposed and grabbed the solution.
Photo of design of fences from proflista
Often a profiled sheet is combined with forging, sometimes a frame from a profile pipe is welded, a corrugated sheet is mounted in it and all this is decorated with metal patterns - forged or welded. Another option is to make the fence non-standard - to set the wave not vertically, but horizontally. A small, seemingly change, but a different kind. Some ideas in the photo gallery are below.
Today, the construction of fences is demanded for its strength, reliability and stability. In this case, not the last role in the selection of the fence for the country plot plays its aesthetics. The fence should not only be durable and durable, but also harmoniously fit into the overall design.
The universal material for the fence is the corrugated board, which is based on a galvanized sheet metal. Previously, profiled sheets were used only to cover the roof of non-residential buildings, garages and for fencing construction sites. But this is already in the past.
Profiled sheet
Modern manufacturers of corrugated board have brought it to a higher level of quality. And to date, corrugated board - it's all the same galvanized metal sheet, covered with high-quality protective layers, corrugated on a special machine and attractive in appearance. It is made by applying a method of cold rolling, hot-dip galvanizing and applying to the surface of a coating of various protective compositions:
- the application of a protective layer of alumino is considered to be the simplest and cheapest method, which provides acceptable strength and protection against corrosion. Such material is suitable for covering a garage, outbuilding and a small fence;
- coating polymer composition, which provides a higher protection and allows you to paint corrugated board in any color;
- application of plastisol, which will ensure the profiled sheet maximum strength and durability.
Due to the fact that the corrugated board has a corrugated shape, it is distinguished by its strength, stiffness and resistance to damage and wind.

Advantages of fence from corrugated board
The erection of the fence of a section of profiled sheets with its own hands has a number of advantages:
- as a rule, fences made from corrugated board are installed faster than fences made of brick and natural stone, they do not require the availability of expensive equipment and special knowledge and skills. It is only necessary to correctly calculate the perimeter of the site, the amount of consumable material and install the supporting poles. To make the enclosure attractive, you can also use brick, natural stone, forged items;
- possibility of combining with other building materials, including grid-netting;
- regardless of the height of the fence, its strength and reliability remain the same;
- the property of soundproofing allows to protect the site from extraneous noise;
- environmental Safety;
- rich color palette. At the same time sheets of corrugated board do not lose their color, do not fade and do not fade during their entire life.

In addition, the fence of corrugated board - it's cheap. But, most importantly, you must strictly adhere to all the rules, how to make a fence of corrugated board with your own hands.
Necessary tools and materials
Before you build a fence of corrugated board, you need to prepare all the building materials and tools. To calculate the number of profiled sheets, it is enough to know the length of the fence along the perimeter of the plot and add it with the height of the fence. And also need:

IMPORTANT! Use rivets made of aluminum to join the corrugated sheets, because they do not withstand the loads.
- drill and construction level;
- welding machine and electrodes for framing;
- solution tank, cement, crushed stone and sand;
- rope and wooden pegs;
- paint for staining poles and transverse lag under the color of the fence.
After installation, the fence will look like this:

Installing the fence from the corrugated board with your own hands
Perimeter Markup
Before starting the construction of the fence from the corrugated board, it is necessary to correctly measure the perimeter of the enclosed territory and calculate the number of supporting poles. The marking of the territory is carried out by clogging the pegs at the corners of the future fence, between which a strong thread is tightly tightened, and the necessary measurements are taken. Only after this is the draft of the future fence made of corrugated board.

Mounting of pillars
Before proceeding directly to the installation of pipes for fence posts, it is necessary to dig holes along the perimeter for foundation pouring. Of course, it is possible to dig a shovel, but this is a labor-intensive process. Therefore, it is better to use a garden drill. After each excavated pit, the distance is measured and the next hole is rummaged. And so on.
The reliability, durability and appearance of the future fence will depend on how correctly the support poles are installed around the perimeter of the site.
The height of the supports for the fence from the corrugated board depends on the height of the fence itself. To place the supports should be strictly rectilinear, and the distance between them should be up to three meters. And in order to install pipes, it is necessary to excavate pits for 1-1.5 m deep.
IMPORTANT! The higher the fence, the deeper the pit should be.

After all the pits for the pillars have been excavated, you can proceed with the installation of the supports themselves, during which it is important to constantly check that they are strictly vertical. For this it is necessary to use the building level. If the supporting poles have been installed rectilinearly and vertically, then you can start pouring concrete. Those pipes that will be lowered into dug pits with a depth of 1.5 meters are poured with a solution only per meter, and the remaining 50 cm of the pipe must be tightly wrapped with ruberoid, and then filled and sanded with sand. In this condition it is necessary to leave the foundation for three days.

IMPORTANT! Filled in concrete pits for concrete mortars must be staked using improvised materials. This is necessary to free air that has remained in solution.
Mounting of support lags
After the support pillars have been installed and the foundation has become firmly entrenched, it is possible to proceed with the installation of transverse logs that are placed parallel to each other.
In order to reliably fix the logs to metal poles, it is best to use a welding machine.
There is a second way to fix the lag - with bolts and nuts, but it is not as reliable as welding.

IMPORTANT! Mount the support logs to the posts at a distance of not less than 20 cm from the top edge of the pillar and from the ground.
Fastening of corrugated board to a metal frame
Completes the construction of the fence from the corrugated board installation of the actual profiled sheets, which are fastened to the carcass rails using self-tapping screws, rivets or galvanized bolts. As a rule, the sheets should overlap one wave.

After the profiled sheets have been fixed to the fence frame, all metal elements must be covered with a primer, and then with two layers of enamel.
In case it is necessary to install the fence from the corrugated board in the area with an uneven terrain, this must be taken into account even at the stage of perimeter marking and when mounting pillars. So, if both elevations and depressions are found along the perimeter of the site, then foundation pouring should be carried out taking into account the depth of the depressions, which guarantees the strength of the future structure. And the distance between supports should not exceed three meters.

Care of the fence from the corrugated board
To ensure that the fence of profiled sheets has long and reliable, except for a strong frame, it is necessary to exert very little effort and from time to time to clean it from contamination.

Recently, the use of profiled sheets in the construction of fences and fences has become very popular. The market of building materials is saturated with profiled sheets of various colors and strength to create an attractive and reliable fence.
The profilist has a number of advantages over stone, concrete and other structures. Firstly, the corrugated sheet is coated with zinc and polymer coating, which allows to protect the material from the effects of atmospheric phenomena and sunlight. This in turn increases the life of the profiled sheet. Secondly, the cost of installing the structure and the material itself is much lower than other analogues. In this case, any fragment of the fence from the profiled sheet can easily be replaced, if the old one becomes unusable. Thirdly, the fence of the profiled sheet has a high level of noise insulation. Profiled sheets are very simple to operate and do not require additional care.
Another advantage of this material is that the fence from the proflist can be easily made by yourself, saving considerably on the services of the masters.
Preparatory stage
Starting to install a fence from the proflist, you need to measure the perimeter of the enclosed territory with your own hands. This is necessary for an accurate calculation of consumables: support poles, lags, proflist, concreting mixture. It is important to remember that the supporting poles need to be selected according to the height of the fence plus 1.5 m for their further concreting. After that, we proceed to the marking of the territory, clogging the peg on the place of installation of support pillars. Between the pegs, it is necessary to pull the cord-rower, so that in the future the fence is straight and straight. After this, it is possible to start digging holes with a depth of 1-1.5 m and a diameter of 0.2-0.3 m.
Installation stage
After the completion of the preparatory phase, we proceed to install the pillars. As supports are used a variety of materials: pipes, channel bars, concrete, stone pillars. It is recommended to choose rectangular poles, since it is easier to fix lags and profiled sheets on them.

The pillar is installed in a dug hole of 1-1.5 m, followed by concreting. It is recommended to pour the supports deeper than 1.5 m to avoid further overturning or deformation of the fence. In order to firmly install the pillar, the concrete mix should contain 3 times more crushed stone than cement, and 1.5 times - than sand. To establish a support it is absolutely necessary to use the level. The next support is recommended to install at a distance of 2 m. The drying time of concrete is 3-4 days, only after this period you can proceed to further action. It is also important at this stage to close the top of the poles to avoid the accumulation of water inside the structure.
After installing the poles, you can proceed with the installation of the log. The number of logs depends on the height of the fence. At a height of 1.5-1.8 m, two lags are sufficient, if the fence above requires the installation of an additional rack. The log is fixed to the support posts by welding, parallel to the ground, with an indentation of approximately 0.3-0.4 m from it. If, however, this unit does not, you can mount the logs with bolts, but this fastening will be less reliable.
After the framework has been mounted, you can proceed directly to the installation of profiled sheets. Profilists are attached to logs with the help of screws or rivets, setting each lap overlapping one wave. In this case, the spacing between the fasteners should not exceed 0.2-0.25 m.
The final stage of installation of the fence from the profilist with your own hands is the additional processing of the attachment points. To protect against corrosion, welding places, screwing screws, rivets must be treated with a primer, followed by painting them in the color of the fence. If there are scratches on the profiled sheets during the mounting of the fence, they also need to be covered with a double layer of enamel.
Following the instructions and taking into account all the details, mounting the fence from the profilist with your own hands, will not be a difficult task. A qualitatively installed fence will for a long time fulfill its aesthetic and protective purpose.