Alexey Shamborskiy, June 25, 2014
Masters claim that the implementation of slopes on the windows is one of the most complicated processes at the final stage of the organization of finishing works. Even with the most painstaking measures to change the window, the opening itself receives considerable damage and many are interested in the question of how to make slopes on windows with your own hands.
Embodiments of slopes
There are several technologies for making slopes - plaster, leveling with plasterboard, creating plastic slopes, puttying. Each of the options is different for its technology, work process, advantages and disadvantages. In search of the question of how to make slopes with your own hands, most choose two options: plaster and the creation of plastic slopes. You can find below the video installation of slopes on the windows with your own hands, which allows the owners to save a little and do the proper work with their own efforts. However, one must understand, only the person who is slightly oriented in the construction sphere will be able to master the forthcoming volume. Only in this case it will be possible to talk about a qualitative and accurate slope.
Plastic slopes on windows

The process of installing slopes on plastic windows with your own hands begins with the preparation of the surface along the entire perimeter of the window. In the U-shaped form, wooden slats are installed. It should be noted that all work is carried out according to the building level, which will avoid errors. After, near the window a niche is knocked out, where self-cuts-bugs will be attached, on which the F-shaped groove is attached. The second step is the fastening of the next groove, which is part of the structure, which allows to tightly hold the strip covering the near part of the wall overlap. It turns out a certain niche, where the plastic slopes are mounted. Some prefer to fill the resulting niche with mineral wool or other heat-insulating materials. From the first time, plastic slopes on windows are far from perfect for everyone, but you can hide some defects with the help of transparent silicone. For plastic windows, choose materials that are resistant to the effects of ultraviolet rays and to mechanical damage.
Video installation of plastic slopes:
Plaster of slopes

This method of leveling slopes bribes with its simplicity. To complete the work, plaster and putty. Dry mix, it must have a cement base, dilute to creamy consistency, after which you can proceed to leveling off the slope. Before starting work, a work surface should be prepared. Slopes are removed from the ledges, deep cracks and holes are pre-treated. After the beacons are installed. Here it is necessary to take into account a small slant from the window box directly to the corner of the window slope itself. Then you can start applying the solution. For greater adhesion, reinforcement is recommended - a fiberglass mesh is attached to the slope. Often, when plastering slopes on windows with their own hands, it is required to apply several layers of mortar. The next layer is applied after the first layer has dried a little. Once the final layer of the solution has dried, you can proceed to the finish of the slopes.
Video of plaster of slopes:
It is important to note, during installation works on the installation of slopes it is almost impossible not to come into contact with the window frame, which can cause damage to the structure. This can be avoided by using a protective tape, which must be glued around the window frame. After the end of work, the tape is removed.
Installation of slopes from plasterboard

For clarity, we suggest you look video on installing a slope of gypsum board on plastic windows with your own hands:
PVC construction is one of the most useful inventions of a person. Such windows create excellent shelter protection from weather conditions, street dust and noise. In contrast to wooden, plastic windows do not need to be painted every year, they are not afraid of moisture and temperature changes. The only condition is a competent installation of slopes on plastic windows.
The slope is the gap between the window and the wall, the window opening. Previously, most of the slopes made plaster for whitewashing or painting. With the widespread distribution of PVC windows in Moscow, plastic slopes have become popular. They are considered the most reliable method of protecting cracks and seams on the window from external influence.
The main advantages of plastic slopes:
- Resistant to changes in temperature and humidity.
- Sufficient soundproofing.
- Durable.
- Mold and fungus are not affected.
- Easy to install.
- Have an affordable price.
Finishing of the plastic window in the home
To create a standard window, you will need:
- plastic 8 mm thick, 6 m long;
- starting profile;
- wooden slats up to 15 mm;
- building level;
- stapler and staples;
- F-strap;
- heater;
- self-tapping screws;
- silicone or liquid plastic.
Main stages:
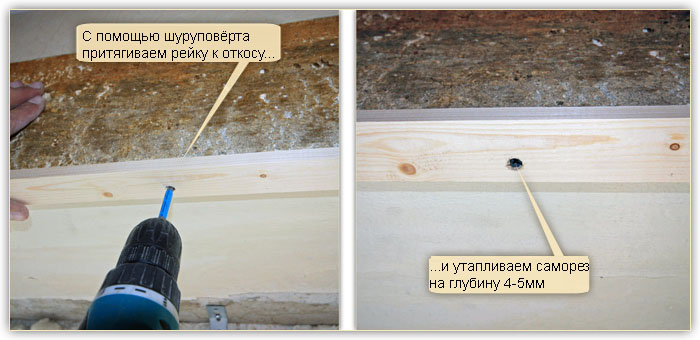
- Removing the remnants of sealant from the window, we attach self-tapping wooden slats along the entire perimeter of the slope. It is very important to observe the ideal geometry, for this use the building level.
- On the outer border we fix the starting profile. It should fit snugly against the inside edge plastic window.
- To the wooden rod stapler fix the F-shaped strip.
- Install plastic panels, fixing them in the profile and the F-shaped bar. Under the plastic we push a layer of cotton wool, which will serve as insulation.
- Joint the joints with liquid plastic or silicone under the color of the slopes.
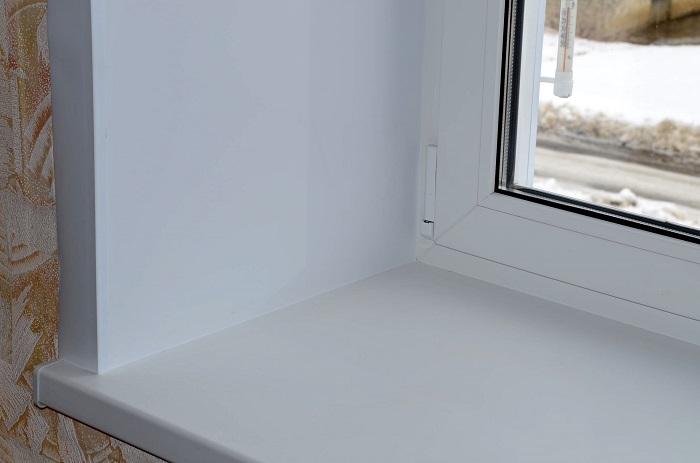
At this installation of slopes on plastic windows is completed. Finished details complement the plastic construction and fit into any design.
Professional decoration of slopes
Installation of plastic slopes is not very difficult work, but still requires certain skills. If you are not sure that you have enough knowledge and free time to install slopes on the plastic windows yourself, we recommend that you contact the specialists of the company "Otkosik". Among the residents of Moscow, we have won enormous prestige by installing plastic slopes quickly, reliably and at a reasonable price.
Prices for installation of window slopes
Use our calculator to calculate the cost of installing slopes, choose the type and color of the future slope and window sill in online mode.
The prices are indicated taking into account the cost of all materials, delivery and installation.
Payment after all works (without prepayment).
When ordering from 20 lm. discount is given.
Entrust the beauty of your windows to professionals from the company "Otkosik"!
After replacement and installation of double-glazed windows, window openings need finishing. And if only a specialist is required to install the window, then everyone can complete the finishing work. This process has a simple technology, so it is not difficult to install plastic slopes with your own hands. Practical, inexpensive, easy-to-use plastic panels are mounted in only 3-4 hours, completely changing the appearance of the window opening.

To qualitatively install slopes, you should clean the surface of the opening well and prepare all the necessary tools and materials. Plastic panels should have a thickness of at least 8 mm, and along the length and width correspond to the parameters of the opening. Too thin plastic will not last long, besides, it can easily be damaged during installation.

In addition to the panels for work, you will need:

It is possible to take up the finishing not earlier than 36 hours after the installation of the double-glazed unit. During this time, the mounting foam, on which the frame is mounted, has time to completely freeze, and even accidentally hitting the structure, it will not move.
Now you need to clean and prepare the walls of the opening, performing the following operations:

Manufacturing and installation of plastic slopes
When the walls of the opening are dry, a vapor barrier film is glued along the perimeter. At the junction points, the pieces are laid with an opening of 5-7 cm and glued along the seam. The edges of the film should not protrude beyond the window frame. After that they begin to make slopes.
Step 1. Installing the start profile

On the outer edge of the window frame, the starting profile is screwed with short self-tapping screws. In the corners, when the horizontal bar is connected to the vertical bars, the profile is fixed so that its internal walls fit tightly to each other, without gaps and slots.
Step 2. Fastening wooden racks

Fastening of wooden slats
Take the slats 15 mm thick and 40 mm wide, cut them along the width and height of the outer edge of the opening. With the help of driven dowels the slats are attached along the perimeter by the flat side to the surface so that their edges do not extend beyond the plane of the wall. Both the top and side rails must be set horizontally and vertically with the help of a level. If the walls of the opening are not level enough, thin wedges are placed under the slats.
Step 3. Cutting the slopes
![]()
![]()
Very accurately measure the length and width of the walls of the opening, as well as the angle of the bevel on each side. On the panel, cut lines are marked and cut slabs are cut with a jigsaw or sharp knife.
By the way about plastering slopes with your own hands - you can read on our website.
The resulting details are applied to the walls and to the top of the opening, check their location and tightness at the corners.
Step 4. Installation of slopes

The F-shaped profile is cut to the size of the outer perimeter of the opening and the ends are filed at an angle of 45 degrees. The section of the profile is applied to the rail so that it is completely covered with plastic, but does not overlap the slot for fastening the slope. Secure the profile on the rail with staple staples. Similarly, mount the remaining segments.

The workpiece of the upper slope is laid in the upper starting profile, previously covered with a sealant. While holding a slope on the weight, fill the gap between the panel and the wall heater. The layer of insulation should not be too thick or have voids. The outer edge of the slope is inserted into the profile groove and pressed lightly to align the panel.

Further, side slopes are installed, carefully distributing the heat-insulating material. If the outer walls are insulated, there is no need to insulate the slopes in addition. In this case, the voids between the panels and the base slope base are filled mounting foam. It is very important here not to overdo it, since excess foam can squeeze out the panels or arch an arch. It is desirable to use the foam with a low coefficient of expansion, apply it in small portions, evenly distributing the height of the gap.


Step 5. Finishing finish
Places of adherence of panels to each other and to the windowsill should be well degreased. Next, the seams and slots are filled with acrylic sealant. Clean rag soaked in acetone, wipe the traces of glue and sealant on the panels and profile, plaster the section of the opening under the windowsill.

Sealant filling
For the design of the doorway, plastic slopes are also used. The installation process is slightly different from the installation of window slopes. Preparation of the surface of the opening is the same: frozen foam around door frame cut with a knife, the walls are cleaned of wallpaper, paint or plaster, carefully seal the solution with all the cracks. If you fix the slopes on the surface itself, it should be leveled with a cement-sandy mortar. If the wireframe technology is to be used, it is sufficient to seal the cracks and deep grooves.
 Step 1. Mounting the frame
Measure the width of the walls of the opening from the door frame to the corner line. Reiki is cut to pieces according to measurements. On the side walls pencil marks horizontal lines at a distance of 50-60 cm. By marking holes for dowels and fixing the slats. If the surface is uneven, use mounting wedges or thin bars, which are placed under the slats. On the lintel, 3 cross bars are attached - 2 at the corners and one in the middle.
Step 2. Cutting the panels
On the pencil panel, cut lines are drawn, forming a slope. Particularly carefully measure the angle of inclination, because the mismatch of joints can not always be imperceptibly closed. All fragments should be wider than the skin to be covered by 10-12 cm to cover the edges of the corners. It is necessary to cut out three blanks - 2 side pieces and one on the lintel. After this, the workpieces are attached to the walls of the opening and check the correctness of the cutting.
Step 3. Installation of slopes
Take the first slope and apply it to the wall of the doorway. Aligning the joints in the corners, on the back side of the workpiece, mark the fold line with a pencil. With a sharp knife make a vertical slot in the panel cavity, leaving the entire front side. Again, a slope is applied to the surface, leveled and screwed with small screws to the frame.

When the main part of the escarpment is fixed, the protruding edge is screwed. To do this, determine the boundary of the panel, retreat from it 2 cm to the opening and draw a vertical line. 6-7 holes are drilled through this marking, wooden wedges are clogged in them, and then press the edge of the slope to the wall and screw it, exposing the screws to the level of the wedges. Instead of wedges, you can use dense wooden plugs.

Install a second lateral slope, after which they panel the lintel. The upper edge of this blank should overlap the ends of the lateral protrusions; After the installation is completed, the material is carefully cut at an angle and the joints are glued. Internal seams are smeared with a sealant, the surplus is removed with a clean rag, if necessary, they cover the hats of the screws with the color of the slopes.


Video - Installation of a slope on the door
Frameless method of decoration
If the walls of the opening are perfectly smooth and level, you can simply glue the slopes:
- to increase adhesion, the surface is covered with a deep penetration primer and dried;
- plastic panels are cut according to the measurements, so that the edge of the slope falls exactly on the corner of the wall;
- then apply glue along the perimeter of the workpiece and a few strokes on the center, and then press against the surface;
- while the glue is not frozen, align the corners and edges;
- glue the side slopes, then close the lintel. The lateral sections of the upper panel must overlap the edges of the slopes by 2-3 mm.
At the end, vertical seams are sealed, and on the outer perimeter of the aperture are fastened decorative platbands under the color of the door and slopes.
Video - Plastic slopes with your own hands
Video - How to make slopes on plastic windows
Hello! I already missed the blog. The number of orders in recent years has increased greatly, and there was no time at all.
But for this time a whole collection of interesting cases has accumulated. So, for example, about two weeks ago a client asked us to replace slopes.
She moved to an already renovated apartment, but she did not like the quality of the finish.
The internal slopes for plastic windows were made of siding, and she needed something more refined.
They offered her a plaster finish. What other options are available, you can learn from my post.
Windows should fully perform their functions. Comfortable microclimate in the house is created after high-quality sound and heat insulation of window constructions. To achieve this goal, slopes are installed on the windows.
What are slopes? Slopes are the inner walls of the niche of the window opening. Finishing with various materials or plastering of internal and external slopes is an integral part of the installation of the window.
The opinion that, having frosted the window, you solved the issue with the thermal insulation of the house, - wrong. Foam, not protected by slopes, quickly collects moisture, then its destruction occurs. Slopes not only provide the room with the necessary insulation, but also give the window a complete look.
From the aesthetic appearance of the window opening depends the design of the whole house or apartment. Slopes also protect the installation seams, which protects the windows from fogging.
Variety of finishing slopes for plastic windows
The list of basic services of companies installing metal-plastic windows includes measurement, installation and adjustment of the plastic window. Further the customer independently decides how to make slopes on the windows of plastic. There are several types of slopes:
- plastering
- gypsum plasterboard
- plastic
- metal
- from foam plastic
- wooden
Let us consider in more detail the most common of them.
Plaster slopes
The device of the slope data passes in several stages. To increase the setting, the surface is first treated with a primer. Then apply a few layers of plaster, each of which must be allowed to dry.
Plaster is the cheapest, but ineffective way of finishing slopes, since the absence of heat-insulating properties of this finish leads to overcooling and further fogging of windows.
The plaster is applied using a grid, and the gap between the window and the plaster must be filled with silicone.
Plasterboard slopes
With the correct installation of slopes from plasterboard will be pleased with the quality, aesthetic appearance and durability. Competent insulation with mineral wool or foam will create high thermal insulation properties of slopes. After installation, the drywall is primed and shpaklyuetsya.
The paint is applied lastly after the previous layers have dried. Remember, drywall is very afraid of moisture. Therefore, they are not recommended to trim the external slopes of PVC windows, but you can install such slopes on the balcony, if it is glazed and insulated.
Plastic slopes
Decorating window slopes with plastic is the most versatile option. Ease of installation, reliability of construction, high noise and heat insulation qualities in combination with an attractive appearance are the main advantages of not only internal, but also external slopes made of plastic.
Sheet plastic slopes often replace sandwich panels. Installation of slopes from sandwich panels is an excellent option for facing the sides of window openings.
Three-layer panel consists of two external decorative layers of plastic and internal insulation. Extruded polystyrene foam is used as an internal heat-insulating layer.
A great advantage of this material is a huge selection of color shades. It will not be difficult to find a panel for any color of the window. The structure of sandwich panels is very similar to the surface of plastic windows, so additional decoration with plastic slopes is not needed.
To install the slopes from the sandwich panels with your own hands, it is enough to have the desire, and better a little experience in carrying out these works and compliance with the technological instruction. The acquisition of sandwich panels in almost finished form will greatly accelerate and simplify their installation.
Note!
For finishing the slopes of windows, foam panels of PVC are also used. Thanks to its porous structure, this material creates additional insulation of the room, does not deform from the temperature drops and does not separate from prolonged heating.
source: http://balkonsami.ru
Plastic slopes for finishing the inside of the PVC window
After installing a plastic window, the question arises about the need to finish the internal slopes. Finishing of slopes is made using sandwich panels, as well as with the help of more budgetary - wall panels PVC. Both materials have their own advantages and disadvantages.
Internal slopes
The finishing of window slopes with wall panels is a budgetary version of the finish, which allows to achieve a high-quality appearance and to obtain an ideal flat surface of internal slopes. When using other materials: plaster and gypsum board, additional painting will be required.
PVC wall panels consist of two plastic plates, between which are stiffeners. If you use poor-quality material when decorating slopes, these stiffeners will be visible on the front surface.
In addition, poor-quality PVC wall panels can eventually turn yellow and deform.
After all, the window is purchased for dozens of years, and saving several hundred rubles in the future can overshadow all the joy of the purchase. The company Kvadrat in its work uses only high-quality PVC wall panels that serve for a long time, do not deform and do not turn yellow.
The maximum width of the wall panel is 25 cm. If the depth of the window opening is greater, we recommend not to join the PVC wall panels, but use sandwich panels.
Finishing of slopes with sandwich panels
Sandwich panels - this is an excellent material for finishing slopes. Unlike wall panels, inside the sandwich panel are not empty cameras, but foam polystyrene or polystyrene.
Use of fillers, allows you to achieve greater thermal protection of the window structure. Sometimes slopes of sandwich panels are also called "warm slopes".
The cost of slopes from sandwich panels is higher than the cost of slopes from PVC wall panels. If we consider a standard double-leaf window, sandwich slopes will cost more by about 300 rubles.
Wall and sandwich panels are designed strictly for interior finishing works. They can change their properties under the influence of an aggressive external environment.
Sometimes these materials are used for finishing external slopes, which is unacceptable. Fortunately, the external plastic slopes have an excellent alternative - metal exterior slopes.
a source:
http://oknakvadrat.ru

Finishing of slopes of windows is an obligatory condition for their normal operation.
In addition to the decorative functions, which are said about almost all our competitors, the slopes of the windows carry a few even more important functions.
The most important function of the slopes is to protect the installation joints, both from ultraviolet radiation and from moisture.
If you understand what is at issue, then you can skip the next few paragraphs and go directly to the technology of finishing the slopes of windows, if not, then let's understand.
What are slopes and what are they for?
The definition of the term "scaffold" was difficult to find.
In the well-known explanatory dictionaries, in the subject matter in question, it simply does not exist, and those whootkos perform the production and installation of slopes interpret it each in their own way.
The first common definition is the slope - the profile used to finish the side surfaces of the window opening. According to the second definition, the slope is the side part of the window opening formed by the difference in the thickness of the wall and the window block.
Each of these definitions is true, depending on what is being said. But it is worth noting that all so-called professionals say only about window slopes, it is probably implied that there can not be at the doors of slopes.
The main functions of the slopes of the windows are two. The first is decorative, the slopes give the windows an attractive appearance, allow you to harmonize with the surrounding interior.
The second is that the slopes of the windows also serve to protect from the moisture and sunlight of the assembly seams.
Note!
Very often one has to face the conviction that it is not possible to finish the window slopes immediately. This is true in part, you can neglect the finish of only the internal slopes of windows, install the same external slopes immediately.
This is due to the fact that the mounting foam is very sensitive to ultraviolet light, under the influence of sunlight, the foam darkens and becomes brittle. This leads to the fact that a gap is formed quickly between the wall and the window, which should be eliminated, taking into account the fact that the window has already been established is problematic enough.
Increasing the humidity of the mounting foam leads to a sharp decrease in its thermal insulation properties. A change in humidity of only 5% leads to a reduction in thermal protection by 30-50%.
Advantages of plastic internal slopes of windows
Today, plastic slopes are becoming increasingly popular, and for this there are several very significant reasons.
Probably, the impetus for the application of plastic window slopes was that they are made of the same materials with plastic windows and pvc windowsills, so widespread today.
Plastic slopes of windows ideally coincide with the windows both in color and give integrity to the entire window system. Of all the options for finishing slopes, it is the plastic window slopes that are the most practical and durable.
The use of plastic slopes of windows can significantly increase the thermal insulation of the window opening. The most modern materials that are part of the plastic slopes of windows, in contrast to plasterboard or plastering slopes guarantee warmth and comfort in your home or office.
Internal slopes of windows we carry out with the use of sandwich panels. As the filling layer of which we apply Penoplex.
It is a modern material widely used for thermal insulation of even the largest building objects.
To seal seams between the plastic slopes of windows and plastic windows, we use PVC adhesive, among professionals known as "liquid plastic".
The use of "liquid plastic" - an innovative solution for the decoration of plastic slopes of windows, which allows you to get neatly finished seams.
By color and texture completely coincide with the plastic slopes of the windows and the plastic windows themselves. For the final finishing of the plastic slopes of the windows, we use plastic corners, in color completely matching the plastic windows.
Today, more and more popular color plastic windows, we are ready to offer finishing with colored plastic slopes.
Helpful advice!
Application of German laminated films Renolit allows you to finish the plastic slopes of windows with any color palette, which will allow you to fully implement all of your plans for repairs.
a source:
http://oknakazani.com
List of preparatory works
Measurement, installation and adjustment of plastic windows are carried out by specialized teams, which is the key to the correctness of all technological measures and gives the customer the right to warranty service.
But such operations as the installation of the slopes of plastic windows, if desired, can be done on their own. Slopes are of different types, and can differ in color, shape, materials of which are made. The materials used for the production of slopes are:
- drywall
- plastic, mdf, sandwich panel
- cement slurry
- tree
Also, a significant advantage of such slopes is their low cost, durability, high speed of assembly work (3-4 hours), ease of maintenance, the ability to choose any color segment.
So, after the metal-plastic window is installed and not less than 36 hours have elapsed (the period of complete hardening of the mounting foam), it is possible to install the slopes of windows. To begin with, you need to determine the list of necessary materials and tools required for such work.
At first, it is desirable to purchase plastic, and it is best to give preference to high-quality and good products. The initial cost savings when buying a cheap product, will be able to result in additional costs associated with repairing damaged items.
Note!
The thickness of the plastic should not be less than 8 millimeters, and the length of the panels should be equal to the specified dimensions of the opening for height and width. Accordingly, the depth of the slope should not be greater than the width of the plastic panel.
Secondly, such building materials will be required: starting strip, F-shaped profile, mounting foam, cement mix, silicone, small screws (bugs), scotch tape, clips, insulation.
From the tool it is necessary to have a hammer, a drill with a bit for self-tapping screws, a screwdriver, a gun for silicone and assembly foam, a trowel, a spatula, a tape measure, rags. When all the necessary attributes are prepared, you can proceed to the procedure of finishing the slopes of plastic windows.
Technology of manufacturing slopes from plastic
First of all, it will be necessary to remove the conveyor belt from the profile of the metal-plastic window and seal up the slits formed on the side of the street with cement slurry.
This procedure allows you to compact the outer mounting seam and hide the foam from direct sunlight, which has a devastating effect on this material.
The outer slopes of the windows can subsequently be covered with any dye. After that, you can start the internal work.
The starting strip is taken and cut to the size of the window (height, width, height), and then drilled with screws to the profile along the perimeter. This strip will be the base for the plastic panel.
Then it is necessary to prepare directly panels for slopes.
This is done as follows:
First, the upper panel is made, for this purpose, the plastic is cut in the dimensions of the upper part of the opening and is installed in the grooves of the starting strip, and after this two side panels are produced in the same way.
Helpful advice!
The whole installation is best done using a plumb or building level.
The resulting frame must be designed in such a way that the following conditions are met:
- between the plastic and the base base of the opening, a gap of at least 20 millimeters was obtained (to fill with foam);
- the angle of the turn of the lateral slope elements was the same for the left and right sides (measured using a square that is applied to the window profile at the top and bottom of the right and left);
- if the elements of plastic panels overhang over the plane of the opening, then their dimensions are recommended to be adjusted with a mounting knife;
- in the places where the panels are joined (in all corners) it is desirable to mount scraps of the starting profile, which will cover the unevenness of the cuts.

The next stage is the manufacture of edging from the F-shaped profile.
As with plastic, this process must begin with the top element.
The points of joining the F-shaped profile must be cut at 45 degrees to each other.
A very serious stage in the manufacture of slopes from plastic is the foaming of the formed voids.
The difficulty is not to overdo it with this process, so that the foam does not break slopes when hardening.
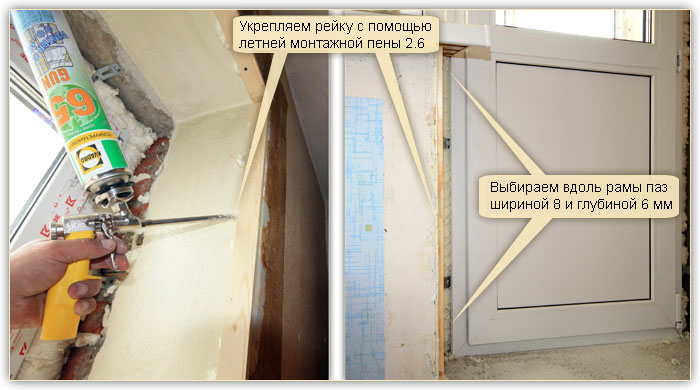
To do this, it is desirable to foam the area around the perimeter of the window at the very base and lay foam between the plastic and the old slope with foam.
Another layer of foam is laid along the angle of the slope, and the prepared F-shaped profiles are installed in the space obtained, and their fixation is best performed using scotch tape.
When the foam solidifies (15-20 minutes), the structure becomes rigid and sufficiently stable. The final stage is the smearing of the slits with a special sealant or silicone.
To ensure that the process of installing plastic slopes does not cause great difficulties for the performer, in the process of performing construction operations it is desirable to adhere to the following recommendations:
- Use PVC panels of good quality, in color, corresponding to the color shade of the window profile;
- Before using the panels, remove from them (cut off) the mounting stud;
- Cutting and cutting PVC panels produced with a knife or jigsaw;
- In order to freeze the panels during foam hardening, a low-expansion foam should be used, and also ensure that the slope elements are locked in the specified position for the pre-setting time of the foam;
- If necessary, in technological gaps between the back part of the PVC panels and the base base of the opening, heat insulation materials can be laid (before the foaming process);
- To quickly remove traces of tape, it is best to use a cotton swab dipped in acetone;
- After the slope is made, plastering part of the aperture under the windowsill should be ensured.
Everything is ready and your slopes will delight you for more than a decade. That is, it became clear that the plastic slopes on the windows with their own hands can be made by almost any person who is little knowledgeable in the construction sector.
source: http://domgvozdem.ru
Which slopes are better?
Plaster slopes - this is one of the simplest and inexpensive types of finishing window openings. To the advantages of plaster finishing window openings is the cheapness and simplicity of the arrangement, and the main shortcoming is short-lived and fragile.
In addition, plastering slopes have low thermal insulation, they can condense moisture and cracking in the connection of the plane of the slope and the profile of the window.
Note!
If violations were made during the construction of the house, the traditional plastering may end in cracks, as it was with us.
Wooden slopes. When installing modern eurowindows from wood, it is recommended to trim the window opening with wood corresponding to the wood of the block. Basically, these are hardwoods: beech, oak, larch, etc.
Wooden slopes are considered an expensive kind of decoration, so they are not very common when renovating or building new cottages.
Plasterboard slopes. After installing a new PVC window unit, the slopes are cleaned of plaster residues, and their alignment is not required. The opening is covered with stripes of plasterboard, which is covered with antifungal primer and shpaklyuetsya.
For final finishing, the window opening is pasted with wallpaper or painted in the desired color. For self-assembly Drywall must have the skills to work with this material.
Cork slopes. Panels for finishing slopes are made from bark of cork oak and are still considered an exotic type of finish. Advantages of cork slopes include their ecological cleanness, a large selection of shades of flowers, pleasant sensations when touched.
Plastic slopes. In our opinion, the most convenient to use and easy to install - plastic slopes. To modern plastic window blocks, slopes from the corresponding material are aesthetically and practically suitable for other types of finishes.
Windows and slopes made of PVC of the same color and texture, have a finished look and look good in the interior of the room. Plastic slopes are immune to the effects of solar radiation, sharp temperature changes, have high heat and sound insulation qualities.
Materials and tools for installing plastic slopes
For self-installation of plastic slopes, the following materials and tools should be prepared:
- plastic panels of the required width
- plastic corners
- hacksaw
- scissors for metal and a sharp knife
- glue "Titan" or liquid nails
- white silicone
source: http://www.diy.ru
Mounting plastic slopes with your own hands
Like all construction works, the installation of plastic slopes begins with a preliminary preparation, during which the materials and tools needed for this work are purchased.
What materials and tools are needed:
- Plastic profiles
- П and F-shaped profiles
- Plastic for slopes with a thickness of at least 8 mm
- П-shaped starting strip made of plastic
- F-shaped plastic profile
- Material for insulation: mineral wool, mounting foam
- Wooden rack
- Drill for self-tapping screws
- Building level
- Roulette
- Putty knife
- Cement solution
- Self-cutters are long - 95 mm, self-cuts-bugs - 4,5 mm
- Paint knife
- Silicone sealant
- Shears for metal
- Building stapler
If during the installation of a metal-plastic window from the side of the street gaps are formed, they must be sealed with cement mortar.
Helpful advice!
This procedure is necessary to close the mounting foam from harmful sun rays and seal the external installation joints.
Stages of installation of slopes from plastic
First of all, wooden slats are installed along the upper and lateral sides of the window openings. They are fixed with long screws (95 mm) and fastened so that their edge does not protrude beyond the wall level. The holes for the screws are drilled with a drill.
Screws initially do not twist to the end. Having formed this way all the sides of the window opening, we check the position of the rails by the building level. This is necessary to create perfectly flat slopes. Then the screws are tightened to the end.
Stage 1
The starting U-shaped strip with the help of self-cut bugs is attached along the outer edge of the window. Joints of U-shaped strips should be smooth and smooth, small protrusions are cut with a paint knife. In the U-shaped profile there is a chute in which a slope of plastic will be inserted.
2 stage
Next, you need to install an F-shaped profile. The installation of this profile must be made in such a way that its groove is installed opposite the groove of the U-shaped starting strip. The groove of the F-shaped profile, located above the window, must be cut off.
The top of this profile is overlapped. After the exact joining, the excess parts of the F-strips are cut with metal scissors. F-profile is attached to the wooden slats using a construction stapler. The part of the end of the profile that is closer to the wooden rack is attached.
Stage 3
Now you can proceed to install plastic slopes in the grooves. But before that it is required to measure with the utmost precision and also precisely cut off the plastic. Simultaneously with the installation of slopes, mineral wool is laid. It is necessary to carefully monitor that the heater is laid flat.
If the joints of the entire structure did not turn out to be perfectly even, you can use it to smooth the defects with a white silicone sealant. Sealing the window joints.
4 stage
When installing plastic windows and slopes, the liquid plastic for the Kosmofen windows will be very useful, which is used for sealing and sealing joints and seams. After carrying out repair work, windows and window sills must be washed. Than better to do it read here.
Stage 5
Sandwich panels for window slopes can be installed and for a slightly different technology. After mounting the starting profile, immediately cut sandwich panels are installed in it, the opposite edge of which is fixed to the wooden slats by diagonal screws.
On this installation of slopes from the sandwich panels with their own hands ends. The result will please you, if at installation of slopes you will observe the following recommendations:
- Begin installing slopes from the top element.
- If it becomes necessary to use a mounting foam, remember that when it hardens, it expands and begins to press on the structure.
- Remove excess silicone sealant with a piece of plastic.
- Choose plastic only with excellent quality indicators.
- Till the end installation of PVC slopes are not recommended to remove the protective film from the window.
- To ensure that the plastic structure is not damaged and has not lost its integrity, leave it alone for 16 hours.
- Carefully study the information on the competent installation of plastic slopes and the sequence of stages.
Installing plastic slopes on the windows with your own hands, without using the starting profile, is another option. To do this, around the perimeter of the window, a small depression is made in the mounting foam, where a sandwich panel is then inserted.

Windows of plastic steel in the modern world are an integral part of our lives. But to mount such windows is only one half of the matter.
After installation, it is necessary to make window slopes. Slopes - is the gap between the plastic window and the inner surface of the wall, that is - the window opening.
Slopes are distinguished, both internal (are inside the room) and external (located on the outside of the window).
Today we will tell you how to make internal slopes with your own hands.
Many people think that if the window is mounted and blocked, then it has excellent insulation.
In fact, this is not entirely true, since the mounting foam, if not protected, can quickly pick up moisture, and deform under severe temperature changes. Therefore installation of slopes should be made in any case.
As they not only hide all the defects in the window opening, but also protect the assembly seams, improve noise and thermal insulation, and also prevent the windows from fogging. But all these positive properties will appear only in the case of a qualitative and correct installation.
When poor installation Through the slopes will leave up to 40% of the heat. From here you can draw an unambiguous conclusion: installation of slopes of plastic windows is important and mandatory!
Mounting according to slope material
Slopes of plaster. If we consider plaster products, you can see that they do not have many advantages, but more shortcomings.
Note!
Over time, the plaster will crack, there will be a loss of color under the influence of the sun, and in case of inevitable shrinkage of the house, it can generally "move away" from the wall structure.
Slopes are plastered in with several layers, and each layer should be allowed to stand and dry. Then they apply a primer and color. It takes the entire process 1-2 weeks.
And besides, when plastering slopes, it is desirable to have certain skills to make them even. These slopes do not imply a thermal insulation device, so for each subcooling condensate will appear on the window panes.
Slopes of plasterboard. Products made of plasterboard are much more durable, their plaster fellows. When insulated with mineral wool, they have good thermal insulation properties.
Slopes of gypsum board also require a certain skill level of the master, as well as the production of a primer and painting. In addition, and the timing of the manufacture of such products do not differ much from plastering.
Plastic slopes. This is the most universal variety of slopes. They are installed quickly, practical, well washed and do not burn out in the sun. Plastic is quite durable and can last you about 15-20 years.
It fits perfectly with the plastic window itself, especially if you precisely match the shade of the material.
As a heater in such structures, mineral wool is usually used, capable of giving a slope a good hydro and thermal insulation, which prevents misting of windows and loss of heat. The installation of plastic slopes is quite demanding on the performance class.
Although, with a good study of technology, I think anyone can install them. Well, I hope we brought enough arguments in favor of plastic slopes. And if you decide to make slopes with your own hands, without the help of professionals, then this review is what you need!
Make sure you have all the tools
To install plastic slopes you will need:
- Six-meter plastic panel with a thickness of 0.8 cm
- П-shaped starting strip of plastic
- F-shaped strip of plastic (F-ka)
- Wooden slats, 1-1,5 cm thick
- Building level
- Building stapler and staples
- Rotary hammer or impact drill
- As a heater, mineral wool
- Quality scissors for metal and sharp knife
- Self-tapping screws 0.95 cm. In quantities of 10pcs
- Self-tapping screws (bugs) 0.45 cm
- Silicone white
Step-by-step instruction:
Helpful advice!
Before the end of the process of "dusty" work, do not rip off the protective film from the plastic windows and window sill, so as not to scratch them.
We beat the slats:
Wooden slats are nailed along the entire perimeter of the slope, using self-cuts of 0.95 cm in length. Make sure that our rack is flush to the wall structure and does not stick out.
Using a perforator or impact drill, fasten the rail directly to the wall structure. An indispensable condition for quality slopes is the exact vertical fastening of wooden slats.
For their alignment, small wooden bars are used. To achieve the ideal vertical, use the building level.
All this work done will give flexible plastic the necessary rigidity, create a frame on which the plastic panel will be mounted.
We fix the starting strip:
We fasten the prepared starting strip along the outer perimeter of the plastic window itself, using self-tapping screws (bugs).
Note!
Before packing our strip, it is necessary to make a marking, for this use a pencil and a level to outline the upper horizontal and the right and left vertical, and along the straight lines, fill the starting strip.
On the starting strip there is a groove in which we will insert the plastic panel.
This concludes the second stage. You can remove the protective film from the plastic window and tackle the wallpapering. Dust works will not be produced anymore!
Fill the F-band:
To begin with, it is necessary to cut it correctly. Make marks exactly on the height of our plastic slope, and cut off the excess part as follows:
The thing is that after the F-ki is filled, an overlap is formed everywhere. Therefore, with his account, you must leave the "launch" when cutting it. After the completion of all the works, our lapping is removed with metal scissors.
Now back to the method of fixing this strip. It is mounted using a stapler to a wooden rack.
The application of this technology is especially good and because it saves you from having to glue around the window opening of the wallpaper. The F-shaped strip will cover the defective area.
Installed plastic slopes and insulated:
Place the plastic panel in the starting strip at the far edge of the opening, place a layer of cotton wool over it and fix the plastic in the F-ke. It should be noted that the plastic panel must be measured quite accurately.
As can be seen, in addition to warming the window itself, we are also creating an environment that ideally preserves construction material walls. As everything turns out quite tightly.
Helpful advice!
Well, finally, a little advice: not perfectly fitted joints of plastic should be covered with a white silicone.
That's all, the installation of plastic slopes is completed, you can enjoy the work done! We hope this article helped to answer the question - how to make slopes with your own hands? Successful to you of repair!
According to fashion trends, in recent years, many people began to change windows with wooden frames on plastic.
Their growing popularity is due to the excellent quality of the materials that good performance properties of products, as well as a long period of their use.
However, when installing such windows, be sure to take care of yourself on the correct attachment of special slopes made of durable plastics.
This can be done with their own hands, without the help of specialists, that will help to save considerably on expenses of money resources.
Why is the decoration of the slopes so important?
After the process of installing a brand new window plastic unit is completed, it is necessary to do the finishing of the window opening.
it necessary operation, because the lateral planes, like the upper part, often have traces of various mechanical damages on the surface.
Special plastic slopes are one of the most popular and functional options, which are intended for high-quality finishing of window openings.
Advantages and disadvantages
Plastic slopes are considered one of the most convenient to use, and also simple enough in the fastening.
If the slopes are made of the same material as the window, and have the same shade of color, then they have a finished and beautiful appearance.
The procedure for installing them takes a minimum amount of time and does not require any "dirty" work.
Besides, the advantages of these elements include:
- Do not deform during sudden changes in air temperature.
- Do not lend themselves to the negative effects of solar radiation.
- Good sound and heat insulation properties.
- It takes a fairly simple care - you just need to wipe the dust regularly.
- Form with a window aesthetic monolithic design.
However, the presence of a rather large number of advantages did not exclude flaws.
The main minus These slopes are that scratches appear on their surfaces very quickly, and in some cases even cracks.
Nevertheless, with proper care and a neat attitude, slopes made of plastic can last for many years.
How to make plastic slopes: step by step instruction
In order for yourself attach slopes of plastic, it is necessary to purchase such tools and materials:
- small plastic corners;
- special plastic panels with a width that is required for a particular case;
- sharp hacksaw;
- sharp knife;
- special scissors for cutting metal;
- liquid nails or building glue;
- silicone is white.
How to properly install the window sill on the PVC window with your own hands?
In case of need, a plastic window sill can be set with your own hands, not resorting to the help of experienced masters.
The execution of this work is quite simple. In addition, the installation does not require special skills and skills.
It is necessary simply increased accuracy when sawing a PVC sheet, because it is necessary to do this without too much pressing, thus eliminating the formation of chips and noticeable scratches in the sawing places.
First of all, it is necessary to make thorough cleaning of the surface, to which the sill will be attached.
Using the so-called level of the horizon, necessary with the help of special beacons to expose the window sill. At the same time, it should be fastened at an oblique angle downwards, which will be 5 mm. Thus, moisture gradually accumulating from the condensate will constantly flow down.
Also need to do protrusion about 60 mm, allowing warm air to freely penetrate the surface of the window sill and dry the inside.
Glue the sill with a building glue or adhesive solution. However, if desired, you can use screws that have a mechanical support.
Free space neatly filled with foam, and after complete drying the remains of this substance must be cut with a special construction knife, without damaging the surface of the window sill.
All cracks and stitches are sealed by special hermetic.
To protect the ends are attached small plugs. A protective film is removed from the window sill.
With the proper execution of the finish on the windows with plastic as a result, you can get a neatly made window. Besides, the surface of the plastic is very easy to clean.
Installation of PVC window sill with your own hands: video instruction.