To mask the joint of the window frame with the opening, as well as for decoration, there are casings (for the outside of the window in the village houses and cottages) and cashiers (for the inner side, the necessary component of the slope design). You can buy ready-made simple and unusual ones to order, but the window frames with their own hands will be unique and unique.
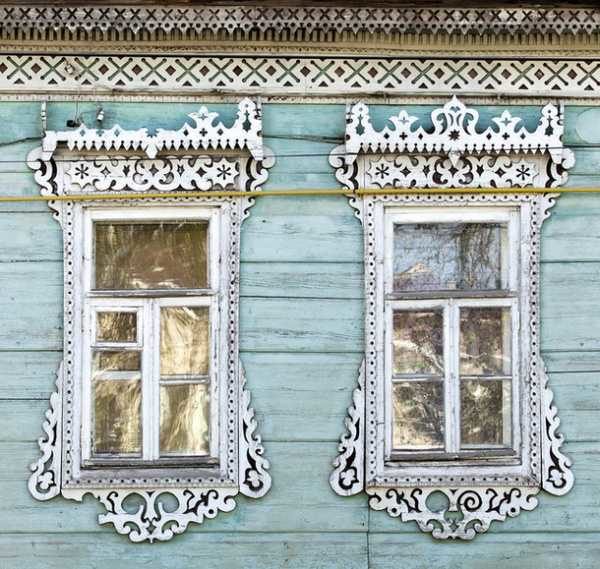
And to this day, such patterns can be seen on the windows of village houses, they perfectly decorate the home. But even in the city on God knows what floor in the apartment the open crack between the box and the niche will look very untidy and create a source of drafts. So platbands are required by all.
The casing (cashier, cashier) for the inside of the window, as a rule, are not made with carved patterns (although this craftsman will not stop it).
Manufacturing
To make the platbands on the windows with their own hands you need a solid wooden frame, narrow enough, semicircular or relief. The form and finish should be combined with the rest of the design decision. Before use, the wooden frame needs to be treated with water-repellent impregnants, painted and / or varnished.
Video "Making clysters on the windows with your own hands":
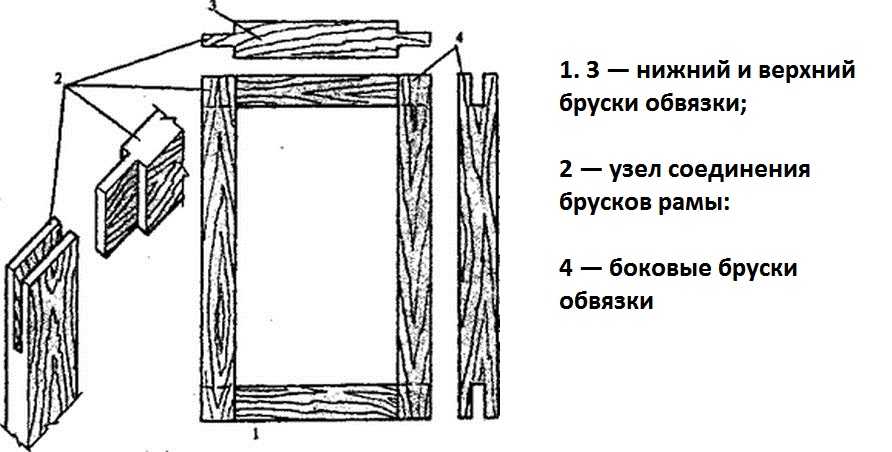
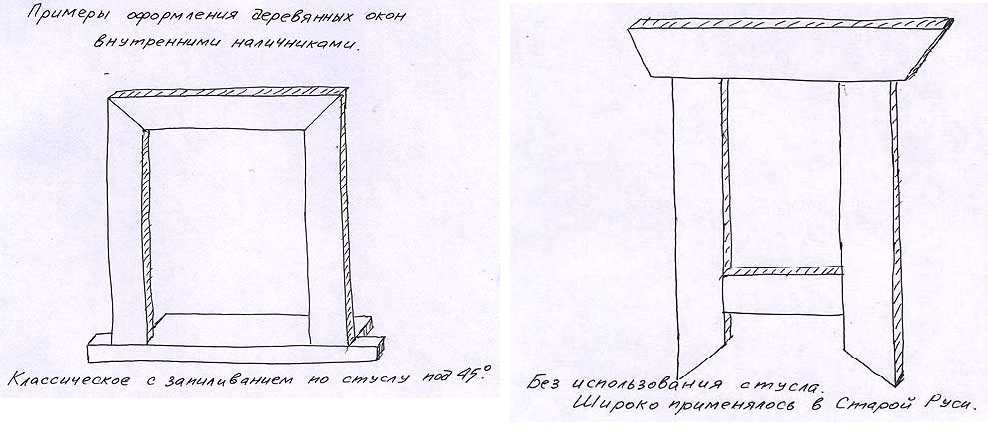
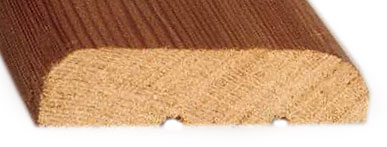
Frame parts are connected with a dull or through thorn. If the thorn is deaf, then the connection does not require additional masking. The hole for the spike is drilled a couple of millimeters longer, the diameter should be such that the spike enters tightly enough, but without additional effort.
Video "Making jigsaws with your own hands with a jig saw":
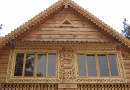
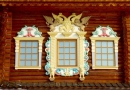
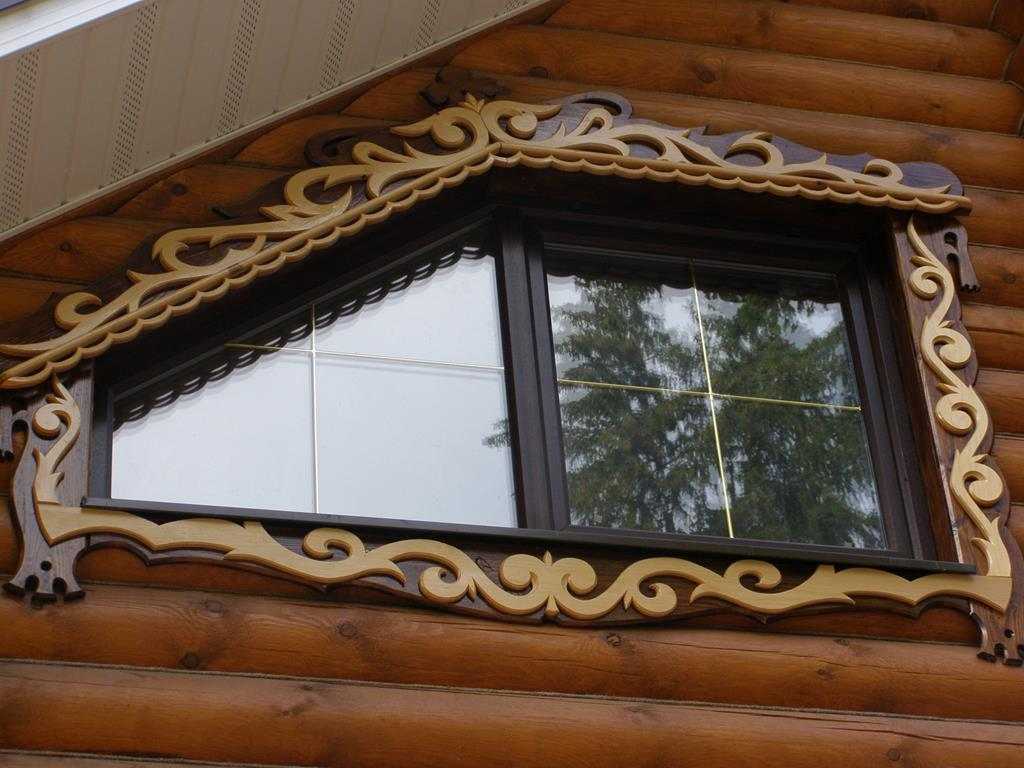
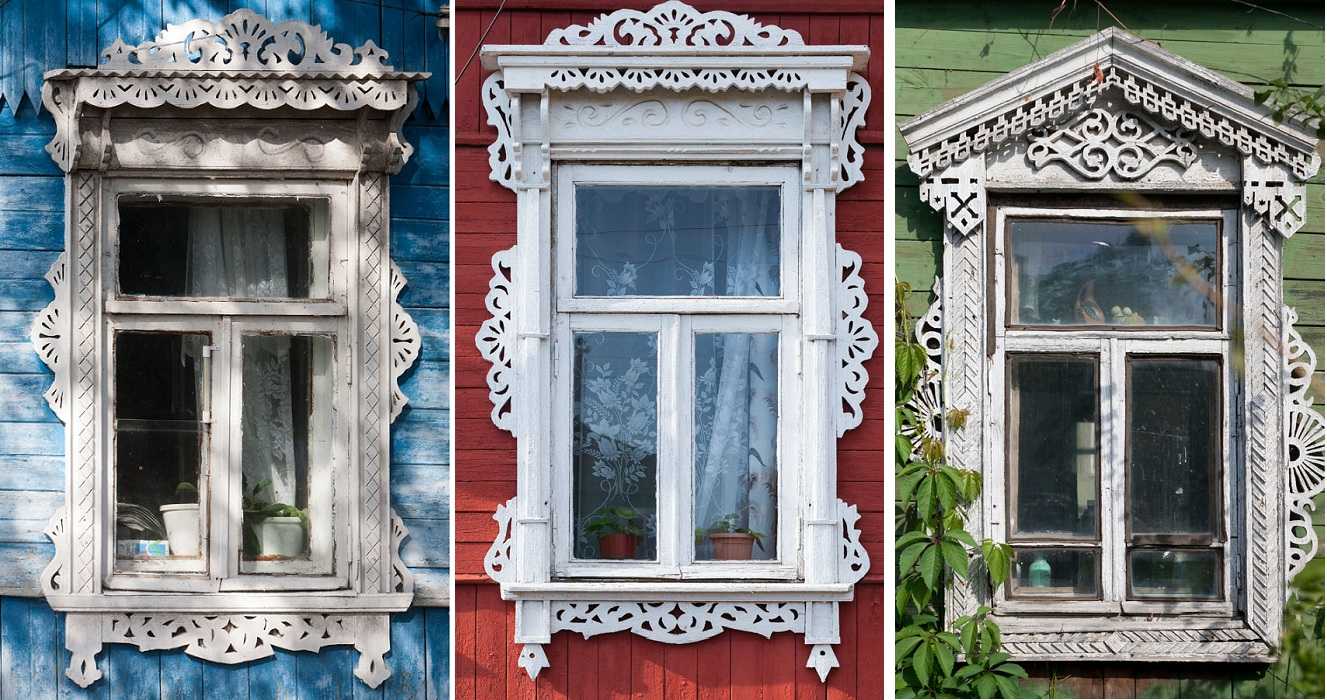
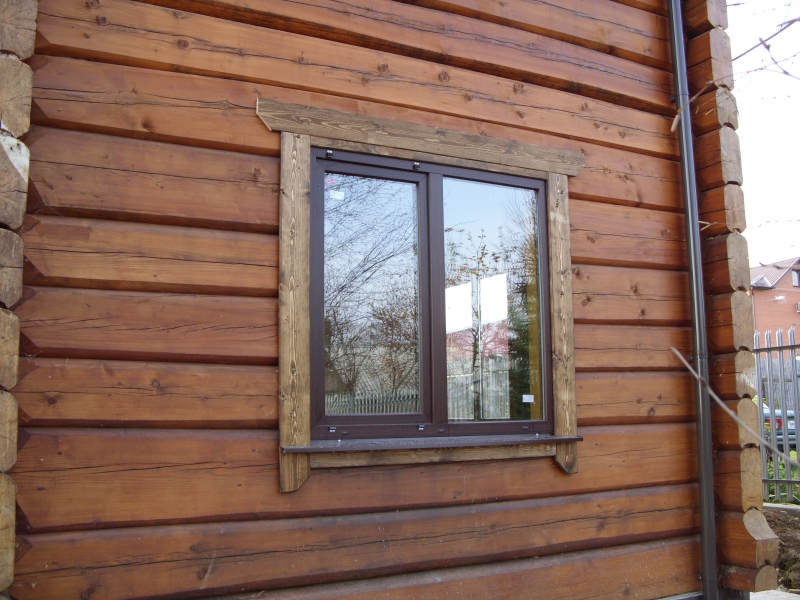
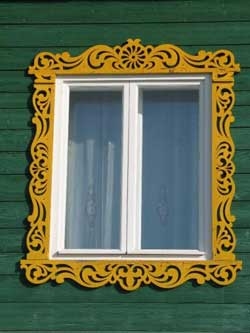
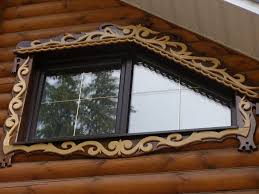
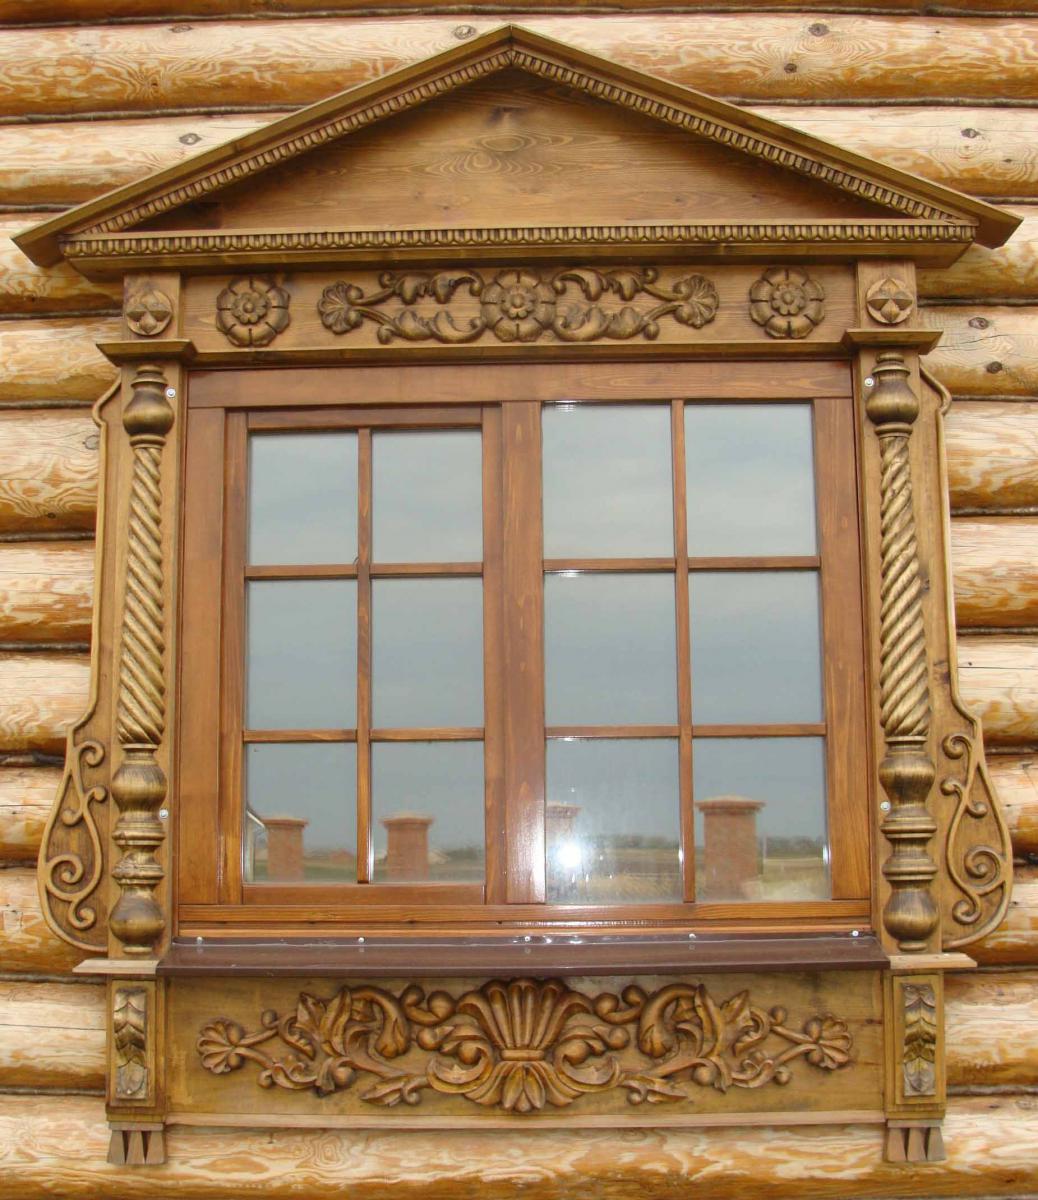
With the exterior design of windows, it is preferable to make carved platbands. Traditionally in the upper part there is a "kokoshnik", and in the lower part - "towels". The lower part becomes beveled for a normal gutter. The thickness of the lower part of the clypeus is somewhat larger than the top.
On the sides of the window, the frame can be straight or curved, its main task is to mask the gap. All the details of the casing are interconnected, after which the frame can be installed on the window and fixed with nails. If desired, the window composition is complemented by shutters.
The clypeus must be made in such a size that it does not interfere with the opening of the window sashes.
Important: it is not advisable to use the adhesive when manufacturing the wooden frame of the casing. The design will not be subjected to such a load that it should be glued, but the atmospheric influences will negatively affect the adhesive fixation.
Decorative design of the clypeus - carving, painting, firing a tree with a blowtorch (a window with tans).
Sketches and patterns
You can execute the external appearance of the window in any style. Usually it's country or folk. But if you do the trim with your own hands, you will certainly add something to your decor, you can adjust the window to any stylistic decision, and most importantly - make it individual and unique.
Photo gallery «Sketches of window frames on windows»:


Just look at the sketches and patterns for the platbands and cut them with a jig saw. To process by impregnation (the best variant is Belinka Baze, then Belinka Toplazur).
Traditionally made casings on the windows with their own hands are decorated with floral ornament. In Russia, the Sun is added to it (located on the kokoshnik), images of birds and animals. In our time, the master is not limited by any canons, can decorate in strict geometric forms or depict an entire plot canvas.
Gallery "Patterns for trimming with a jig saw":
The appearance of the house largely depends on how the windows are decorated. They emphasize, and sometimes, and shape the style of the building. And the main way to make them character - platbands on the windows. Here about them also there will be a speech further.
Purpose and classification
Platbands are narrow long slats that frame windows or doors. This principle distinguishes between window and door. They are usually different in width, but, in order to maintain a single style, they must be made of the same material. In addition, they are made in a similar manner, using repeating elements and painting in one color.
Door and window casings serve not only to give the building / room a finished look, although this is also important. They also close the technological gap, which is formed between the frame of the door or window and the wall. This gap after the installation of windows and doors is filled with a heater, but the view from this does not get better, and water, dust and sound continue to penetrate the room, albeit in a smaller amount. That's thought of once to close that gap with slats, and even decorate them.
In the place of installation, the casings are external and internal. Protective role play, mainly, platbands for outdoor installation. Therefore, they are made of materials resistant to climatic factors (or covered with protective compounds) and the thickness of this material is usually greater. The internal platbands, in general, perform a decorative function. They are used in sparing conditions, therefore the requirements to the properties of the material are different - decorativeness is important, and not resistance to climatic influences.
Materials from which the casings are made for windows
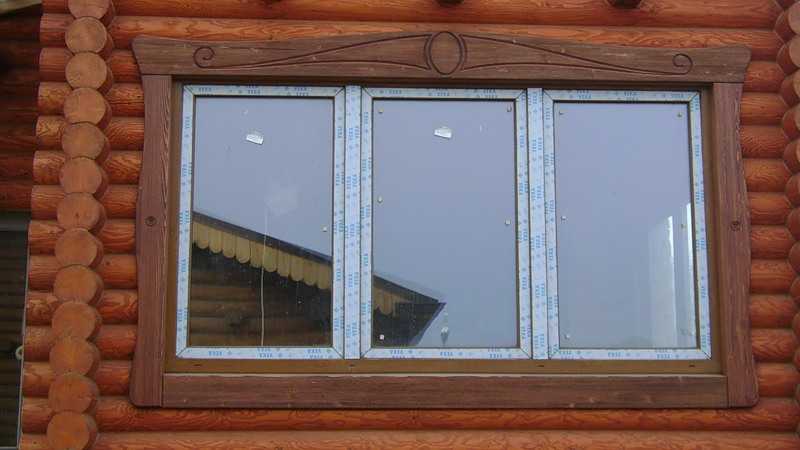
Window trim is selected depending on the overall design of the house. The houses are built and finished in different ways, respectively, and the materials and style of additional decorative elements are chosen different. For brick houses, for example, plastic or metal is best suited, but not a tree (this is if there are casings at all). Windows are also decorated with plastic or metal. For wood, on the contrary, wood is more suitable. But this is not the rule either. The choice of platbands is a private matter for the owner. What they want, such and puts. It is important only to understand all the pros and cons of each material.
Wood
Casing for a wooden house, most often, is made of wood. But any type of wood requires constant care - painting and / or varnishing. Every two or three years, you have to update the coverage. Only in this case the products from it look normal for many years.
![]()
Plus wooden window frames are that they can be carved, with figured elements of various shapes. This gives an almost infinite number of options. There are also very simple models - conventional bars, perhaps with some additional elements. The choice depends on the style of the house.
Wooden platbands are used, both from the side of the street and indoors. Simply by installation will apply different protective impregnations and coloring compounds.
Plastic
If PVC windows are installed in the house, then the platbands are also put plastic. They are good in that all care - periodic wiping from dust and dirt. No other operations are needed.
Do plastic platbands from climatic resistant plastics, adding a dye that is resistant to burning out. Add to the mass components that protect the material from high and low temperatures.

The advantage of plastic platbands is their low price. Minus - a limited choice of models and styles, not too much color. In stock there are usually white, a couple of shades of brown. The rest - can be accessed only by order, and even then not always. And one more minus is all the same artificial material. To put plastic platbands on a wooden house not everyone wants. Even though the wooden ones are not cheap.
The area of use of plastic lintels - indoors or outdoors. If you need external plastic platbands, pay attention to the temperature mode of operation. Plastic must withstand the most severe frost in your region.
MDF
Plinths of MDF - an option for indoor use. You can not put it on the street - it will quickly become unusable. It is a compressed crushed wood fiber, from which the products are molded. Their surface is laminated with a film that can be smooth, colored, simulate the surface of a stone (marble, for example) or wood.

If you do not like the plastic on the windows, the second possible budget option is the MDF trim. In any case, most often it is them. There are even special models - telescopic. They are good in that a special board is cut to the right size, due to which they can change the width and become in any opening. With their help, the doorway is designed quickly and efficiently.
Care of MDF platbands is no more difficult than for plastic ones - wet rubbing. In severe soiling, non-abrasive (liquid) and non-aggressive (without chorus, etc.) detergents can be used.
Metal platbands
This type of casings are usually placed on the street with plastic or metal-plastic windows. This is a thin sheet of galvanized metal, covered with paint, resistant to the effects of climatic factors (usually powder paint).

Metal trim for windows are classified as budget. They do not stand very much. Suitable for private houses decorated in a modern style. Excellent combination of metal platbands with houses, finished with metal and aluminum composites. The second area of application is for industrial and office premises. They are good in that they combine practicality, durability, low price.
Clypeus device
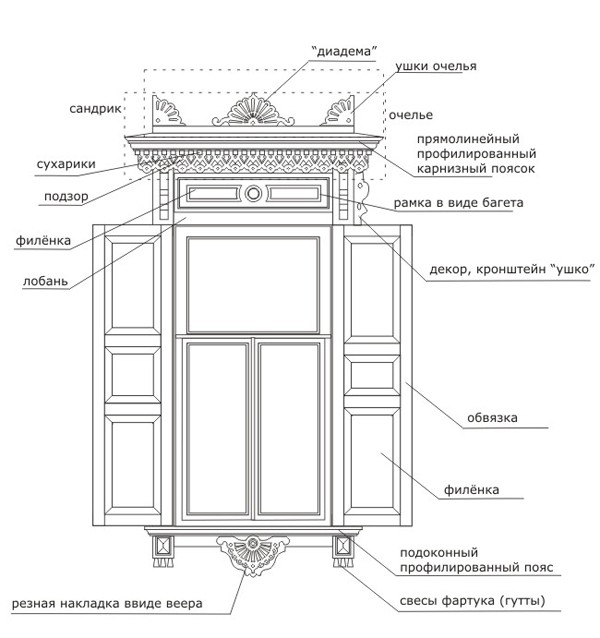
The classic window frames consist of four elements: the upper and lower strapping, the two side panels. They can connect with a single spike (as in the figure). They can connect and butt-off, since they do not carry any load. In this case, just tightly fit the slats one to the other, fixing each element separately.

If the window provides for the presence of a window sill, there is no need for a lower strapping. When installing the first fix the sill, then - the side strips and the last - the upper strapping.

The width of the clypeus is selected individually each time, but is usually in the range -100-250 mm. When choosing a width, proceed from two technical parameters:
- clypeus should go to the frame at least 5-10 mm;
- so as not to interfere with opening the windows, they must retreat from the loops by 10-20 mm (the farther the wider the doors open).
Finally, the width is chosen based on the style of the house. Somewhere narrow strips - 100-130 mm wide will be more suitable, somewhere wide will be required - 200-250 mm. In order not to be mistaken, you can "try on" the bars, pinned them on a pair of nails and watch from afar, which version you like more.
The thickness of the planks for the manufacture of platbands is 20-35 mm. In most cases, a board of 20-25 mm thick is used, since this is the optimal size for independent execution - it is not too difficult to process, but it is quite bulky for obtaining a decorative pitchfork.
Casing in a wooden house
Most questions arise when decorating windows in a wooden house. Most tend to the fact that a wooden house is suitable only platbands made of wood. This has its own reason - the tree with the tree looks the most organic. But to choose a material is far not all in this case. There are several important points to which you should pay attention:
So the choice of the appearance of the platbands is far from the last one, which will have to be solved. It is also necessary to choose the method of wood processing, the method of installation, and the type of clypeus, too.
Types of wooden platbands
Wood - extremely plastic and very beautiful material, because the number of variations in the design of the clypeus tend to infinity ... All of them can be divided into several types: simple and carved. Simple look great on houses in a modern style, carving is good for buildings of ethnic direction.

Simple in form from molding
Industry and private traders sell bars of different cross-sections:

From this molding you can make simple platbands with your own hands. To do this, you need to calculate the amount of material required (based on the results of the window measurements). It should be noted that the length of one bar is 220 cm. You will hardly make composite elements, therefore it is worth considering that there will be a lot of scraps. The most fortunate case, if one of the bars is able to "carve" two elements - usually a sidewall and an upper / lower part.
Planks are joined in two ways - at 90 ° and at 45 °. The appearance is different for the platbands. When the floor is joined to a 45 ° angle, a neat frame is obtained, and for docking at 90 ° - a more expressive design. The protruding edges can be left straight, can be cut at any angle, rounded, cut off figuratively ... Here, as much as you like or what your skills, desires, and fantasies will suffice.
The simplest homemade platbands
The variant differs from the one described above in that we process the primary processing ourselves. Edged and unedged boards are suitable. From the trimmed it turns out a modest finish for the country house or for the house from the planed / glued beams. We grind the board first with coarse sandpaper, then more and more thin. When the surface becomes smooth and even, you can start cutting.
Nothing complicated at all - just well-processed boards
With the unedged board removed the bark, the surface is also ground. There are options. You can achieve smoothness by removing flaws. It is only possible to remove the upper rough layer, leaving all the imperfection of the wood in the future, only to emphasize it during processing.
Carved platbands
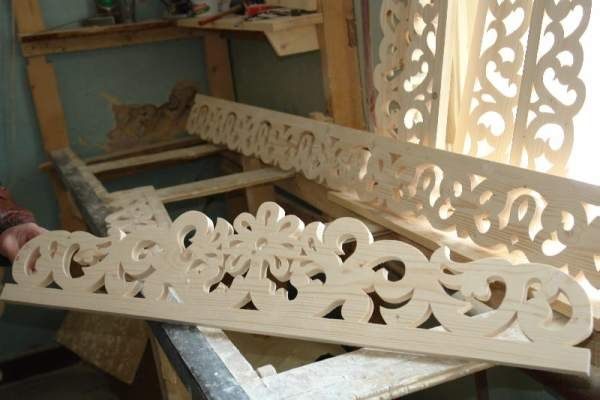
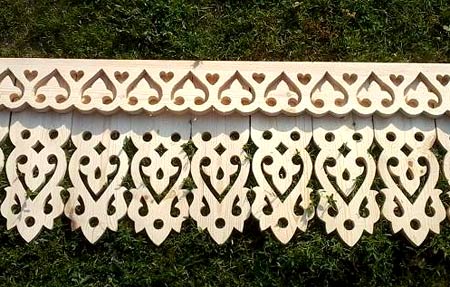
Openwork wooden trim for windows - a beautiful, but expensive option. Expensive - if you order their execution, and laborious if you do it yourself. There are, however, uncomplicated, but spectacular patterns, which, if there is a jigsaw and desire, can be made independently.

There are two types of openwork platbands - with slotted and overhead elements. Proreznye - this is when the holes in the platbands are made through and through them the wall is visible. Overhead - this is when the window is decorated with usual slats, and on top of them are fixed elements of slotted thread or decorative protruding elements (patches in the form of rhombuses, rectangles, etc.).

In the case of overlaid elements, contrasting colors are often used. For example, the bars are painted in a dark color, and the openwork - in a light. But this trick easily passes only at the stage of installation - you can separately paint both parts. Subsequently, it is necessary to apply a different paint with a fine brush.
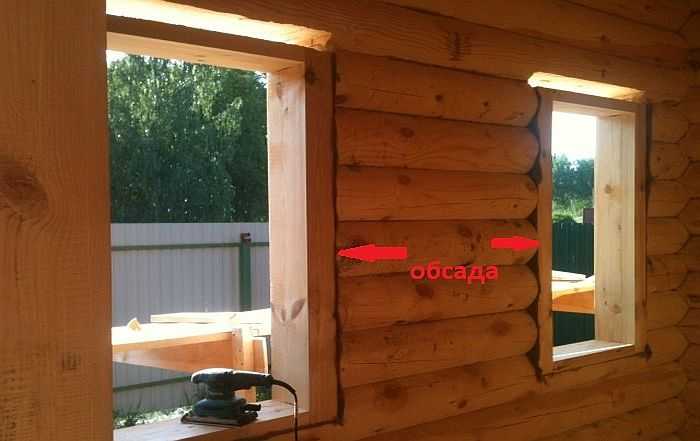
How and what to fix trims in a wooden house
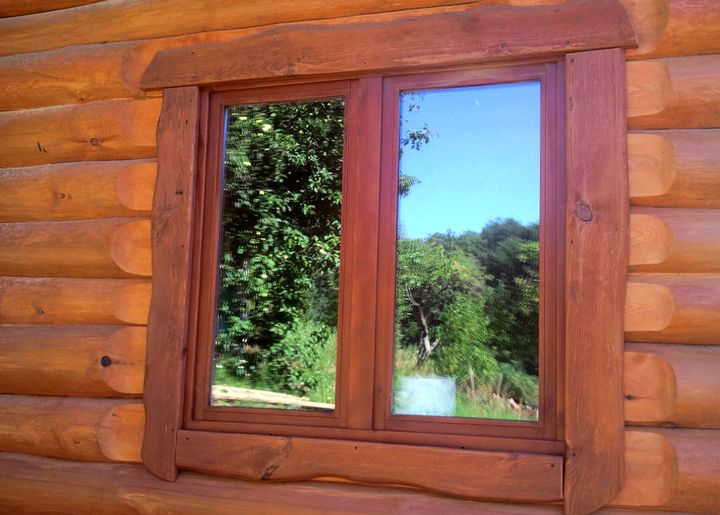
In a timber or log house windows and doors are put on casing - a special framing of the opening made of wood, which is not fixed rigidly to the walls, but is held by frictional force in a lock like a comb / groove. They make casing from a thick wooden beam. Frame window or door is attached to the casing. When installing the clypeus, they are also fastened to the casing. Since there is no load on them, the strips are usually fastened from two sides, retreating 10-15 cm from the edge.
Fasteners can be used in two types:
Fastening on dowels is more labor-consuming, but it is absolutely not visible. If this process is too complicated, use the finishing nails.
How to fix trims to a log wall
When installing the clypees on the ohm of the bar, there are no problems: the surface is flat, easy to attach to it. If the frame is made of logs, everything is more complicated. There are two options:
Which of the ways to choose is your decision. Both are viable and both are not ideal - it is difficult to ensure tightness.
How to prevent moisture from flowing under the platbands
Ensuring airtightness - the main concern when installing clypers on a wooden house. Most questions arise about how to prevent moisture from flowing under the upper bar. Water, flowing down the wall, inevitably falls into the gap between the clypeus and the wall. There are several solutions to the problem, mostly traditional, but using new materials.

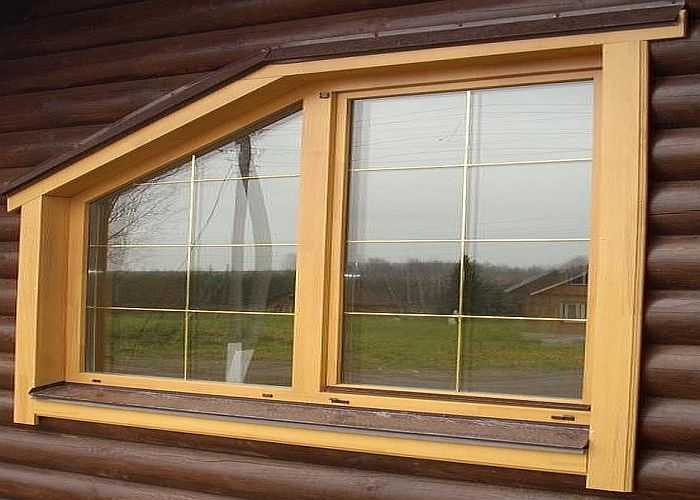
Casing with a wooden "visor"
Similar casings are also called "Finnish", as almost all houses in Finland are framed in this way. In them, in addition to the traditional four bars, they make an additional inclined visor, which supports the cantilevers resting against the side strips. The angle of inclination of the bar should preferably be the same as the angle of inclination of the roof or close to it. Although a minor detail, but it looks more organic.
![]()
When installing, under the visor in a log or beam, you can make a few millimeters of cuts, "drown" the edge of the visor there, seal the remaining gap from below and from above with a sealant (silicone, resistant to frost, adhering to wood).
All are fine Finnish trim, but with a thread they are poorly combined. Style is not the same. They are great for a simpler, laconic design. Although, there are similar options in the Russian style, that's just making them quite difficult.
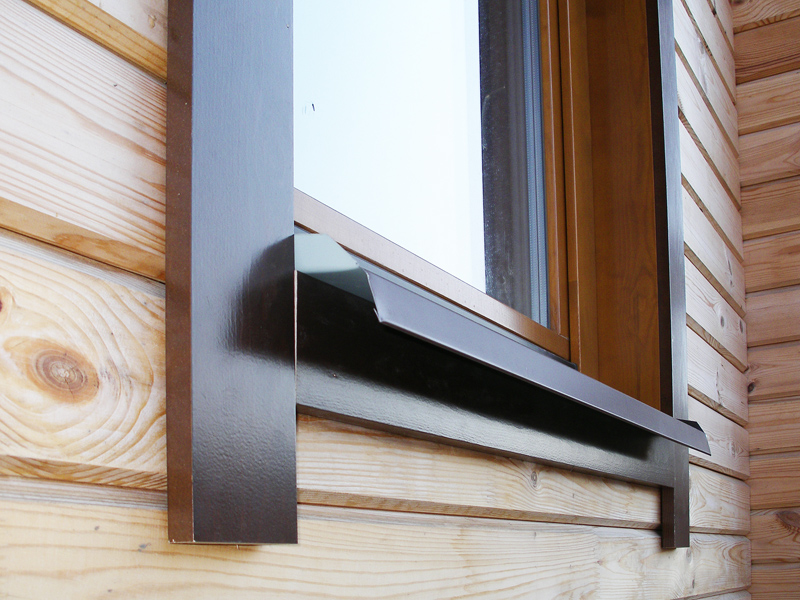
Metal Visor
By the same principle - to divert water from the platbands - this method solves the problem. Only used a metal bar in the form of a letter Z - part of the standard outflow. The color is selected in tone with the walls or with the color of cashing.
The installation method is the same: they make propyl in the wall, only its size is much smaller - the thickness of the bar is several millimeters. The installation is the same as described earlier: one part we put into the groove, we fill the slots with silicone sealant. The only difference is that the free edge can be fixed to the top plank of the platbands (using self-tapping screws).
Installing the bottom strap at an angle
The lower lath of the clypeus washes at the same time to protect against precipitation. To do this, it is installed at an angle. The choice of the angle of inclination is no different - close to the angle of inclination of the roof.

With the installation of this bar, everything is simple. From the bottom it is supported by triangles cut out of wood, fixed on a log. Water will not flow down the wall, but at some distance from it. Here it is already important correctly - that water does not wash away the foundation.
Photo of clypees on windows of different types

Simple platbands with only small carving elements - on a house in the Scandinavian style, they are seen often

Carved overlaid platbands - a gentle carving on a dark background

Shutters and platbands - this can often be found on old houses

The production of carved casings on the windows made of natural wood, as well as decorative carving by the masters of the company "Stavros" is made with the use of selected materials of the highest quality. Basically, for such purposes a glued array of pine grown in the Leningrad Region is used. This material is suitable for platbands and other decorative elements just perfect:
- it is easy to process;
- it can be given absolutely any shape and size;
- for a long time it retains its properties and characteristics;
- not subject to cracking.
The natural tree for the manufacture of clypeus is carefully selected. In this case, the best grades of material are used, which allows you to get really exclusive products with unique characteristics. The use of special processing technology gives finished products strength, durability and makes them resistant to external influences.
Carved platbands for windows: a beautiful home decoration
In our company "Stavros" you can buy carved platbands for windows wholesale and retail at very competitive prices and with a guarantee of quality.
In this collection of house carving "Stavros" exhibited only the most beautiful products with an exclusive appearance. If you want, you can buy carved wooden trim for decorating cottages on the outside and inside. The assortment of decor elements in the collection is extremely extensive. It presents several key product types:
- carved platbands for windows (photo);
- balustrades and stairs;
- decor for the facades of cottages and pediments;
- furniture fittings;
- partitions for zoning rooms from natural wood.
Wooden window frames: trust the craftsmen!
We are ready to offer our customers the most favorable conditions for buying carved platbands - the price of which is the most affordable, and the quality is the highest. House carvings from natural wood from the masters "Stavros" will decorate any home, make it exclusive and comfortable. We can buy wooden platbands for every taste. Experienced and qualified masters of the company will make them in the style that will look as harmonious as possible in the customer's house. All platbands are decorated with carving by hand, always pass quality control, comply with environmental standards.
Carved platbands - a truly exclusive decoration of the window of any building. Exquisite and luxurious accessories give the windows a complete look and protect the space between the frame and the building wall from moisture and pollution.
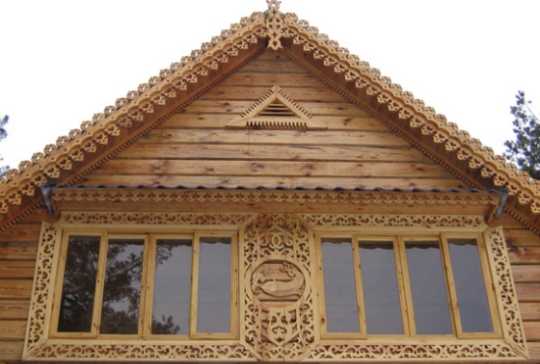
Carved eaves of wood on the roof of the house: exquisite exclusivity
Stylish carved wooden eaves on the roof of the house look especially well on buildings built in the traditional Russian style. Such cornices perform simultaneously two functions - decorative and practical. Our own production facilities and a team of professional specialists allow us to create real masterpieces, individually select cornices for any structure.
HideThe platbands are necessary not only for decorating the window, giving the facade a design look that allows to realize any ideas, but also decorative protection of the seams from freezing and negative effects of natural phenomena. Metal casing is a high-quality, reliable material that can protect window seams well, make them sealed and decorate the window itself.
Clypeus as an ornament
Many saw ancient wooden structures decorated with carved outfits on the outside. Such scenery is made by hand, can have a rather complex drawing, which turns a boring house into a work of art. A piece of a fairy tale can be created using and metal platbands on the windows. They can also be cut out any patterns, but, unlike wood, metal is a more reliable and practical material that can withstand any stress.
If wooden products do not tolerate moisture, need constant care and are not too durable, then metal analogs do not have these drawbacks. It is enough to use stainless steel or regularly paint the product. The plies on the metal windows can completely replace the wooden elements. You can cut the desired pattern yourself using flat metal sheets, while unlike working with wood, you do not need to have the skills of carving on it or have special tools.
With metal sheets, it is much easier to work: they will not require drying, special conditions for this, do not require using a varnish that fades in the sun, due to which you have to constantly update it. After installation, the metal platbands will not need additional care, they will perfectly fit into the facade design. Installation of metal slopes also does not cause any difficulties.
Features of rough material
The thickness of a suitable sheet of iron is from 0.40 to 0.70 mm. Such sheets in factories are produced by rolls up to 50 meters long. The width of the product is 1.25 m, it is not always necessary to paint the sheets, because you can buy the already painted product of the color and shade you need. To ensure that the material is not damaged during transportation, it is protected from scratches by a special film, which can be removed if necessary. The metal is sufficiently durable and flexible, so it does not cause difficulties when working with it.
What if the wall is brick or from a block?
Not always the slopes are mounted on a wooden structure - sometimes the owners want to make a more decorative brick house. For this, metal slopes can also be used. The device of metal slopes in this case does not differ, however from use of nails it is necessary to refuse.
Before installation in the walls, it is necessary to drill the holes for the dowels. Use materials preferably at least 6 cm in length, otherwise there is a risk of falling out of the structure and from the wall. Once the holes are ready, you need to insert plastic blanks in them. In the mounted slopes, holes for the screws are also drilled in advance: make sure that all the holes match exactly.
After everything is ready, the design is put in its place and screwed. Work with slots occurs in a similar way. You can use silicone sealant: colorless will be most convenient, since you do not have to select its shade, but if both the wall and the slopes are white, you can apply white. Mounting foam is not recommended. It can not withstand moisture, requires protection from weather conditions and has no attractive appearance.
You can make decorative and functional platbands for metal windows yourself. To do this, you do not need to have an expensive tool or carpentry skills.
Icer
4533 0 0
Casing for windows in a wooden house - 5 product variants and their features
October 14, 2016
Specialization: a master in the erection of plasterboard structures, finishing works and laying of floor coverings. Installation of door and window blocks, finishing of facades, installation of electricians, plumbing and heating - for all types of work I can give detailed advice.
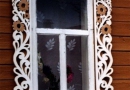
Carved platbands on the windows in a wooden house are the traditional option of decorating houses for several centuries, before they could even be judged on the prosperity of the owners. Nowadays, many modern materials have appeared, but wood products have not lost their relevance and are still popular.
And if you have a wooden house, then the facade should be decorated with a beautiful frame, I'll tell you what kinds it is, and you need to choose the one that fits best.

Types of casings
I will only talk about wooden products, since it's not serious to put plastic trims on the house of wood, it's like hooking cheap stickers on an expensive car: although they are beautiful, but the impression will in any case spoil.
There are several variants of the products, I will not say that some of them are worse or better, each type is suitable for a certain style of the structure and it is important to choose the best solution in each case.
Option 1 - finished products
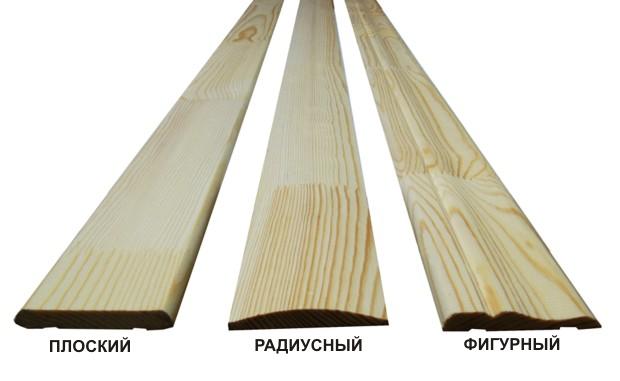
The industry produces standard platbands, the surface of which can be of different configurations:

| The form | Description |
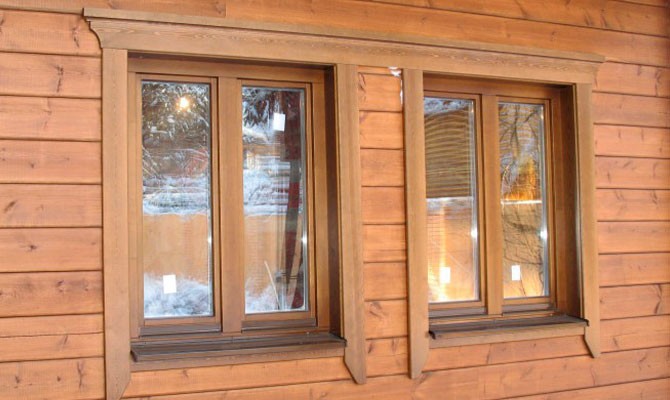
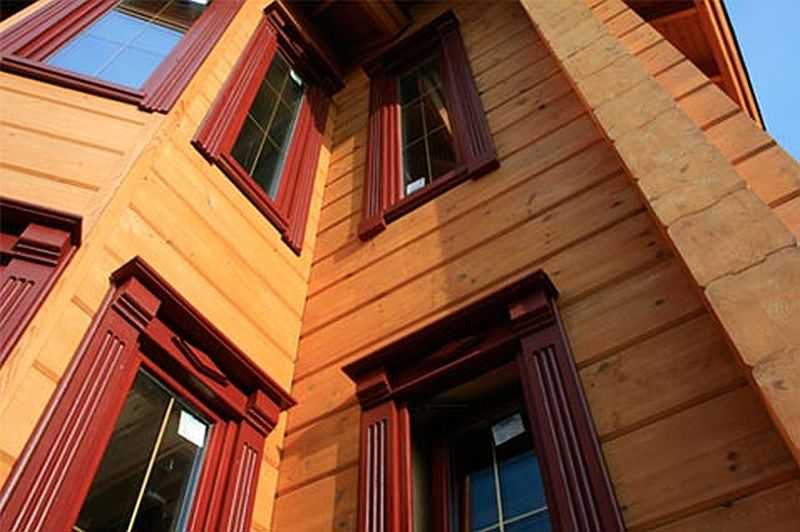
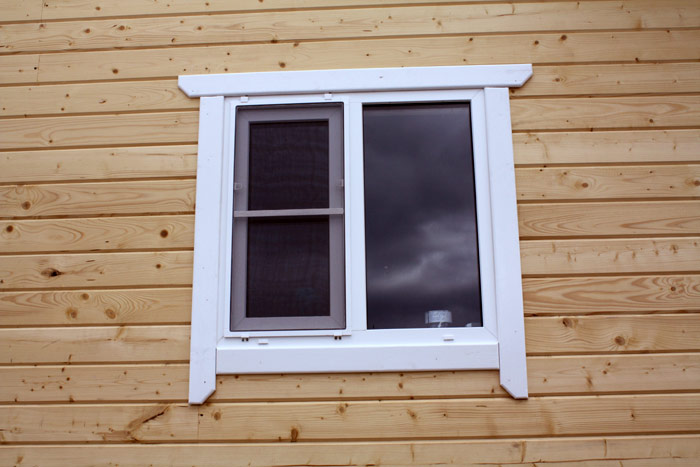
| Straight Straps | The simplest version, which is a qualitatively machined bar with perfectly flat angles. Such products are well suited for wooden houses in a modern style, the clarity of the lines allows you to clearly emphasize the beauty of the tree, and thus the frame does not look out-of-date |
| Elements with rounded edges | Such products are often used inside houses and apartments when decorating doorways, but they can be used outside if they are suitable for decoration. In this case, you just need to determine the optimal width of the elements, so that the casing looked best |
| Semicircular products | This variant differs in that it is a convex surface, which is well suited in cases where it is necessary to simulate a log or a bar. Products should be chosen carefully, as on oval elements all the defects are seen very well. Again, this design is more suitable for modern buildings |
| Figured platbands | The most interesting of the standard options, the surface in this case is not straight, but curly, and the profile can be very different, as well as the width. This is a kind of compromise for those who do not like other products, but the simplicity of smooth elements is also not very like. Another plus - the possibility of making original products on order, their price will be higher, but you will get a non-standard frame |
As for the work process, it is simple, because you buy ready-made products and can immediately start them up. Plus this option is that the clypeus can be used both as an external one and as an internal one, while the rest are intended only for use on facades.
The instruction for carrying out the work is as follows:
- First of all, you need to make measurements to determine how many elements and how long you need. It is better to record all the data, especially if there are a lot of windows, because you can confuse something and eventually it turns out that you do not have enough material or, conversely, it remains too much;
- When buying, keep in mind that the products go to the standard length (usually 2.2 meters), so you need to calculate how many elements are required, because waste inevitably forms waste and sometimes there can be a lot of them. Most often sold products of pine, but if you can finance - look for clypeus of larch, it is much more durable;
When choosing, pay attention to the surface: it should not be damaged, bluish and other rejections. Also, the material should be dry, if it is wet, then the clypeus will deform later.
- The work begins with the preparation of the elements, the dimensions of each are again accurately measured, after which, using a special device called a chair, the clypeus is cut at an angle of 45 degrees. So you get perfectly matching joints, which will significantly improve the appearance of the frame;

- Next, I recommend putting a protective coating on the clypeus, doing it better just before the installation, since you can process the elements from all sides. In addition, you will not be afraid to stain the walls and window, which is also important. You can use both paint and special compounds that will not hide the structure of wood, the main thing is that they are weatherproof;

- The prepared clypeus can be fastened to the place of its installation, this is best done with the help of finishing nails, they are almost invisible and can have different colors in tone to your staining. The products are simply exhibited and nailed to end the nail and do not damage the tree, use a boob.
Option 2 - the simplest self-made platbands
If you need an inexpensive and authentic framing for the country window or you like simplicity and natural lines, then this type of products will come in handy. Such products are made by themselves and can be of the following types:
- The simplest version is an unedged board with one uneven side, the material is cleaned of bark, ground, and unique elements of unusual shape are obtained. It is possible in this way to make the clypeus and from the edging board, carving irregularities from one side in an arbitrary order, as a result, a very authentic and original design for the window will be obtained;
- The second option is even simpler: the board is taken and the frame is framed with the figured ends, they are simply trimmed as shown in the photo below, and you get a stylish frame. To enhance the effect, you can artificially age the material with sandpaper or burn it with a burner, so the products will look more impressive;
- Another interesting solution is to create a stencil and cut one side in a certain way. You can create any profile and transfer it to the material, and then cut with a jigsaw, it's very simple, but you will get an original frame for the windows.
As for the workflow, it consists of the following:

- To begin with, you need to find a board of the size and configuration that suits you, the thickness of the elements can be small, there will be no load on them. Of course, it is best to have processed elements at hand, but a simple board will do, it will have to be grinded by yourself;
- Manufacturing does not take much energy, you need either to draw one side, or even cut out the figured ends. Then the surface is carefully processed by sandpaper, as a result, ideally smooth elements should turn out;
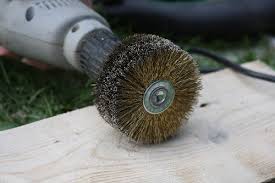
- As for the decorative coating, it can be paints and varnishes, the surface can be aged with a plastic or wire brush, which is put on the drill, it removes the soft layers, leaving the textured surface. Protective compound is better applied in two layers to ensure maximum reliability;
- Fastening is made with the help of finishing nails, their length and quantity depend on the thickness and weight of the elements. The main thing is to choose the right color so that the fixation points are not visible at all after the end of the work.
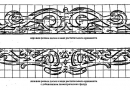
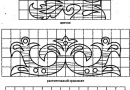
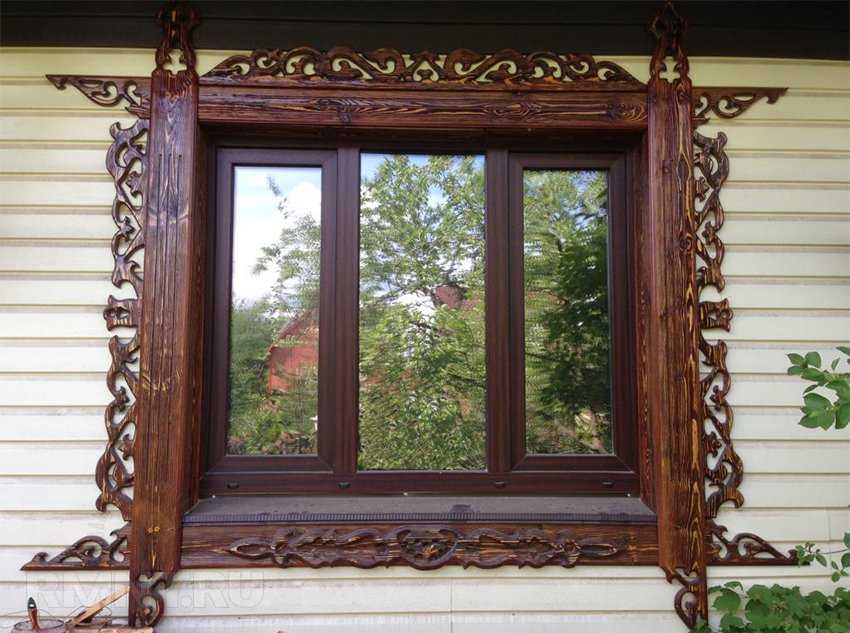
Option 3 - slotted trims
This solution is very different from the two above described both in appearance and in complexity of manufacturing. This option looks at times more interesting and original, this is a traditional solution in the national style, which does not fit any window.

As for this clypeus, I can not help but note a huge variety of options that you can implement, because you can use ready-made templates, and you can draw your own, your imagination is limited only by the complexity of the work. Too fanciful ornaments to realize is much more difficult, remember this.
Let's figure out how to make such skillful products with your own hands. Do not be afraid, for all the seeming pretentiousness, you will cope with the work without much difficulty. The main thing is to have everything you need and have enough patience, the manufacturing process can and is not complicated, but it takes a lot of time.
We need the following:
- The board of the required length and width, it is better to take the already processed options in order to simplify its work;
- Electric jigsaw - this will be our main working tool, in addition to it, stock up with curved cutting blades with a small tooth, so that the quality of the thread is as high as possible;

- We need a drill with a drill in order to drill holes into which a jig saw will be inserted and a figured cutting will be carried out. There are no special requirements, the main thing is that the drill is wider than the jig saw blade;
- To make patterns, we need either ready-made patterns, or self-made variants, they must be of the necessary scale, so you simply transferred them to the material without unnecessary problems.
The workflow looks like this:
- First of all, you need to prepare a workplace, the board should be stably located at a convenient height, so you do not have to work with one hand and use the jig saw, and the other to hold the workpiece. It is possible to use clamps or simply to press an element with something heavy, you decide what is better, proceeding from working conditions;
- Then you need to select a template, you can find ready-made options on the Internet, you can draw them on a computer, zoom in to the desired scale and print. They can be painted on paper, and can be cut from cardboard - if you do many elements, then this option is preferable;
- An important point of the work is the transfer of the pattern to the tree, if you have a cut out pattern, then there is nothing complicated, but if on paper, you need to decide how it is more convenient to mark out. You can put ordinary copy paper under the sheet and just draw a drawing - you will get an accurate marking, and if you do not have a copy at hand, you can pierce the paper in order to draw a pattern on the tree after the points;
- When the markup is finished, you can start working, all the elements that are located along the edge can be cut out as well, but here the patterns inside require a different approach. In a place where you find it convenient to start cutting, holes are drilled, after which a jigsaw blade is inserted and the pattern is cut, the main thing is to observe the accuracy, to monitor the accuracy of the lines and, if necessary, to correct them;

- When the element is completely cut out, it's time to finish the clypeus to perfection. Take the sandpaper, and all the cutouts are polished, the edges are rounded and the surface is leveled. As a result, you should get a finished element, on which there are no sticking fibers of the tree;
- Then I recommend putting a protective coating on the casing, it's best to do it before installing it, and not after. Staining can be either monophonic or multicolored in order to highlight the individual parts of the pattern more clearly;
- Fastening can be carried out both with the help of finishing nails, and on dowels. This option is done like this: take chopiki, under them a hole is drilled in the platband and in the window frame. After that, the dowel is well lubricated with PVA glue, inserted into the frame, then placed on the window frame, as a result the structure is securely fixed and there are no fastenings at all.
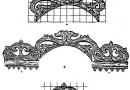
Option 4 - platbands with a false thread
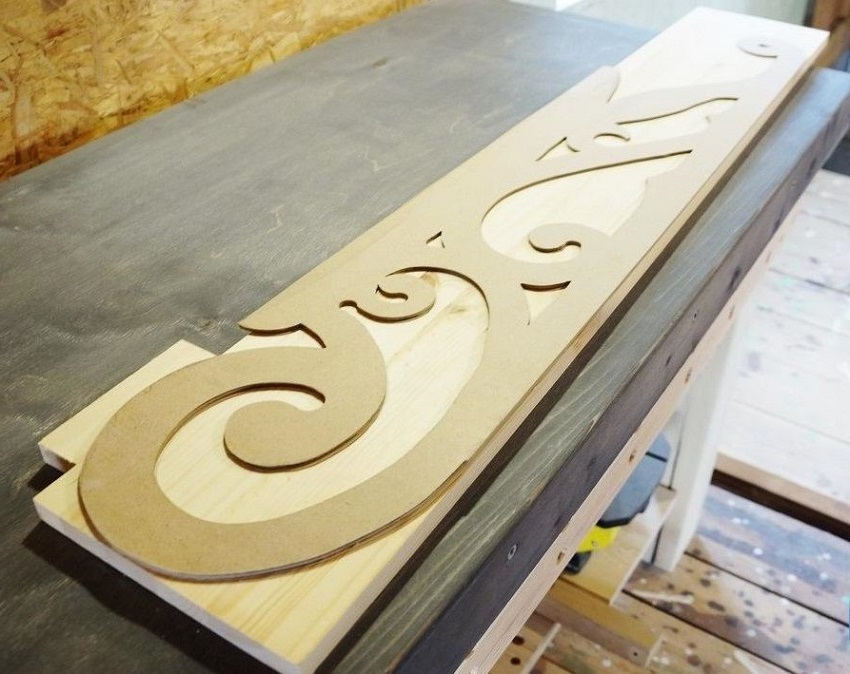
Another traditional solution, which is very popular for more than one century. This type of product has a number of differences from the previous one:
- The product consists of two parts: bases in the form of an even or shaped board and carved elements, which can be located both on the base and on the side of it. This design looks more expressive and voluminous, which is important for those who want to achieve maximum decorative effect;

- When manufacturing, many small elements can be used, which simplifies production. You do not need to cut out the clyster entirely, you can make a composition of several small parts, and in the end get an excellent result;
- You can use different types of wood, if the base is taken pine or a more reliable option, then for the applied elements it is recommended to use apple or cherry. They are easy to process and, under normal processing, last long. The modern solution is the use of plywood for overlays, this option is good because you can save, and at the same time cutting will be much easier;
- Another solution - the arrangement of various carved elements in one product, you get luxurious openwork frames. The only drawback is the laboriousness of the manufacturing process.
Window carved frames of this type are made in much the same way as the above-described option, so I will only mention the differences in the workflow:
- First you need to choose the option that you will do, if the base is flat, then just cut out the board, if carved - do it as usual. The top decor can be cut from a board or plywood of a small thickness, this will greatly simplify the workflow and accelerate it;
If you decide to use plywood, then choose a waterproof version. Ordinary sheets even with a good coating will start to swell and crumble in a couple of years.
- All elements are carefully processed by nazhdachkoy, after which they need to be painted. To achieve the greatest decorative effect, it is recommended to paint the base in a contrasting color to make the pattern even more expressive. Paint the details before assembling, so that you do not gouge and do not glue the surfaces, in such pretentious designs it is very difficult;
- Installation of clypees in a wooden house on windows is made in any convenient way. You can use traditional dowels, you can use the final nails, but you can go the easiest way and apply modern adhesive materials. At one time, I had to glue the clypeus in the suburban area because of the lack of other fasteners, it took about 10 years, everything is just fine.
Option 5 - carved platbands
Without a doubt, this is the most difficult to implement, but also the most luxurious type of window frames. Currently, two main types of products can be distinguished:
- Manufactured manually with the help of incisors, such options are the most expensive, because they are made from the beginning to the end. By their own efforts to make such a clypeus is possible only if there is a certain practice, you will have to master the wood carving to cope with the work;
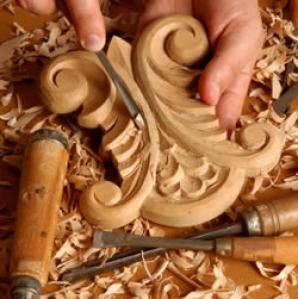
- Platbands made on special machines-mills, look just great. After all, you can create any pattern or composition on the product, you just need to enter the picture into the computer program, and it will realize the idea. Naturally, at home such equipment is available for units, but you can order the clypeus and get it in a matter of days.

As for the work process, there is no point in making a story about making a product, carving is the topic of a separate review or even a whole book. Therefore, we will deal with the installation, since this is an important part of the work and any errors will lead to the damage of expensive decor:
- Most often you get finished items without any coverage. Often the structure of wood is not closed, and high-strength protective compounds are used. Well-suited so-called yacht lacquer, it is resistant to weathering and for a long time retains its strength and reliability. The treatment is better done in two layers to accurately cover all areas of the surface, pay special attention to depressions and bends, the composition should be everywhere;
- When the elements dry, you need to sample them and determine the position of each part. If the structure is assembled, you can drill holes at once and insert dowels in them, then lubricate the ends of the fastening with chalk or something else and gently place it on the surface, there will be points on which you need to drill holes. This kind of layout eliminates errors and errors;
- Lastly, dowels and holes are smeared with joinery glue, after which the clypeus is set in its place and well pressed. This concludes the work.
Conclusion
The video in this article will help you understand some of the important nuances of the topic even better, because once you see, than to read a sheet of text. Choose the optimal solution and implement it, of course, carving on the strength of a few, but other options can be implemented, and without special skills. If you have any questions - write them in the comments under the review.
October 14, 2016If you want to express gratitude, add a clarification or an objection, something to ask the author - add a comment or say thank you!