Stepladder is an instrument on the farm, certainly useful. With its help, you can finish the ceiling and the top of the walls during repairs, remove dust from a high cabinet, wash the windows of the cottage outside and inside, cut trees, etc. This tool is not too expensive. However, if you want to purchase it, you can not spend it at all, but make it yourself. Moreover, the technology of assembly of the ladders is extremely simple.
What are the stepladders
 Most often, stairs of this kind with their own hands are made of a bar or board. The advantage of wooden models is primarily that they are easy to assemble and cost inexpensively.
Quite convenient are such constructions and in use. Metal staircases made even from a corner with a narrow shelfquite a lot of weight. In addition, to build such a ladder you need a welding machine. To produce the same wooden ladder, you will need only the standard carpentry tools available in any farm.
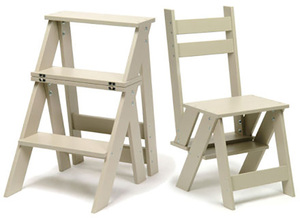
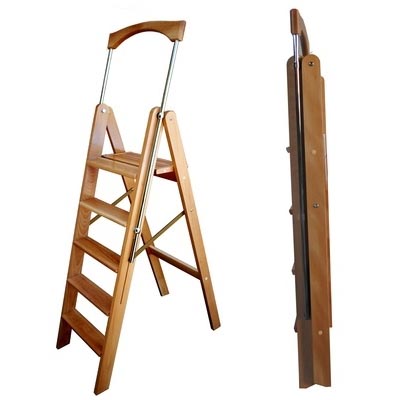
Cantilever folding ladders can differ in design. On the street, large ladders with a support part. For internal premises it is better to make a small ladder-chair. Next, consider how to make a stepladder with their own hands and that and the other species.
How to collect a large stepladder
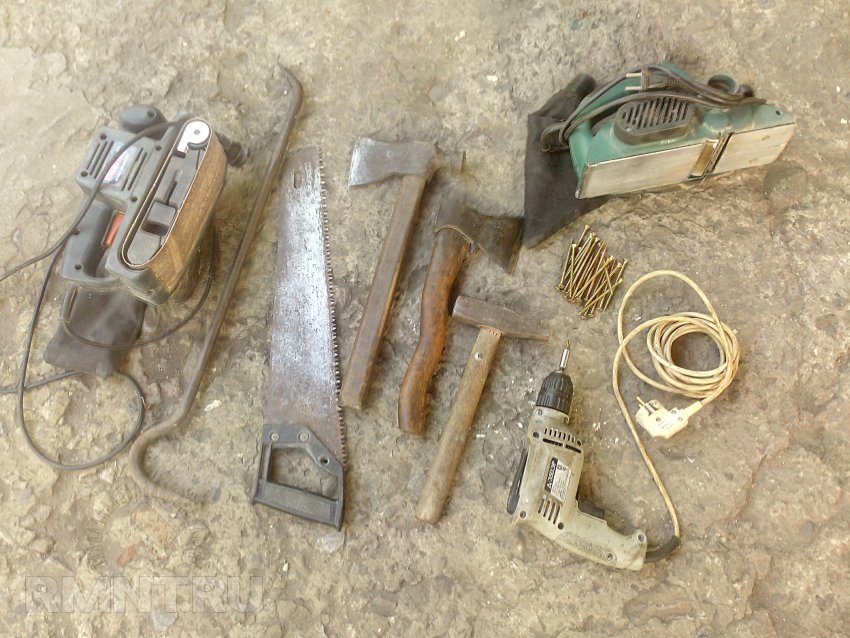
 In order to make a ladder from the board with your own hands, you need to prepare the following tools:
- a hacksaw on wood;
- meter ruler;
- drill;
- a hammer.
From the materials you need a bar 50x30 mm. From it will be made both racks, and steps of a ladder. General information the length of the bar should be about 13-14 m. Specialized companies usually sell lumber of standard length in 6 or 12 m.
Therefore, most likely, you will have to buy three bars in 6 m. But the remains in the future in the economy will certainly be useful. Sometimes wooden ladders are collected not from a bar, but from a board of 25x80 mm. In this case, also have to buy three pieces.
In addition to lumber for the assembly of a wooden ladders with their own hands, you will need to buy all sorts of additional elements (bolts, knitting needles, corners, hinges, glue, etc.). Before starting the work, the beam or board should be thoroughly treated with an antiseptic.
Sketch of a stepladder
 Before you start assembling, of course, you need to develop a drawing of the future folding ladder. It should be taken into account that from above it should already be, and from the bottom - wider. This will give stability to the structure.
You can also not bother with the development of the scheme and find it ready on the Internet. Or use the drawing shown in the figure below. Next, a description of the assembly of such a ladder will be given.
How to make strings and steps
Racks of a wooden ladders with their own hands are made as follows:
- From the beam cut four strings length of 150 mm. Two of them will support the steps, two will go to the support part of the ladder.
- In the two strings are made grooves depth of 2 cm and a height of 2.5 cm over the entire width of the beam. The middle of the first groove on the top should be placed 12.5 cm from the top of the bowstring. Next - with a step of 29 cm.
- In the two pillars designed to support, make three of the same groove for jumpers. One is located at the height of the first future step of the ladder, the second - at the level of the last and the third - in the middle.
Those ends of the racks, which will later be located on top, should be rounded, removing sharp corners. The lower edges should be cut at such an angle that the stepladder in the unfolded form was stable, and then beat with rubber. You can carry out this operation right away, or you can even after assembling the ladder.
Stairs of the ladders are cut according to the drawing. That is, in our case their length will be 37, 42, 47, 52, 57 and 50 cm. In each of the steps it is necessary to make spikes on both sides 2.5 cm thick and 2 cm long.
Assembling the working part
 At the next step the steps are inserted into the grooves of the racks. Preliminary spikes can be smeared with joinery glue. The grooves in the strings must be made in such a way that the spikes of the steps entered into them as tightly as possible. Otherwise, in the future, the ladder can loosen up.
The thorns of the steps are clogged into the grooves of the racks with the help of a hammer. After all the steps have been put in place, they are bolted from the end through the string.
If the stepladder is not going out of the bar, but from the board, you need to act a little differently. To make grooves in this case it does not turn out. To do this, just not enough thickness of the board. On these stepladder steps it is easiest to fix the steel corners with long shelves attached to the strings.
In order for the folding ladder to be as reliable and durable as possible, the strings of the working part can be additionally fastened with knitting needles. In this case holes are drilled under the grooves. After the steps are assembled, spokes are inserted in them and are tightened on both sides with bolts.
Assembly of a ladder
After the support and working parts are assembled they must be connected to each other. Perform this operation using hinges with hinges or brackets. At the final stage, at the bottom of the ladder, a restraining chain is attached. It will not allow the support and working parts to disperse too widely.
How to make a stepladder chair on kosuroh
 Inside a house or apartment, small folding staircases are usually used. Standard step ladder in the event that the ceilings in the premises are low, may not be very convenient.
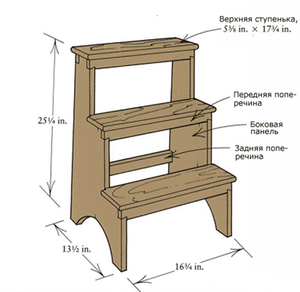
There is a chair-ladder with his own hands a little different from the usual stepladder. Since the dimensions are small, it is not necessary to make it foldable. In fact, this staircase on the kosurah represents an ordinary small ladder with three steps.
The assembly of the chair itself is as follows:
- Two of the boards cut out the wall-kosoury. Their width should be chosen in such a way that the depth of the step is at least 18-19 cm. That is, you need a board width of at least 54 cm. In this case, the stepladder chair will turn out to be safe.
- Further, on the strips are attached two steps from the boards. Their length can be any (for example, 50 cm).
- The same board It is nailed to the upper ends of the oblique walls.
- Behind the wall of the staircase it is necessary to connect a jumper.
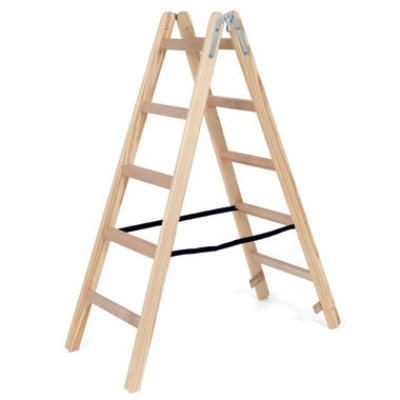
The result should be approximately the same construction as in the figure. In order to make the chair aesthetic and extend its service life, the boards can be covered with varnish or special oil for wood.
Stair stepladder on the strings with their own hands
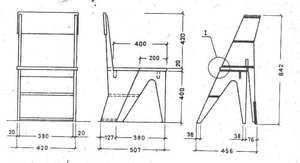
 Of course, if you want, you can make your own and more compact folding chair, stepladder. For example, such as is shown in the drawing below. To make such a design, of course, will be more difficult than a simple model on the Kosovar. However, it will be more convenient to use.
This original model can simultaneously perform two functions - a chair and a stepladder. To make such a design, it's better to take a thick plywood instead of a board. Otherwise it can turn out to be too heavy.
They gather this stepladder chair with their own hands using the following technology:
- From the piece of plywood are cut the walls-bowstring chairs with support under the back. In order to make the curly parts, it is worth using a pre-prepared pattern.
- Each of the two resulting racks is cut at an angle of two parts according to the drawing.
- On both learned parts (support and working) is attached to the step.
- It is fixed back of stool.
- A seat is made from two parts, connected by loops, and fastened to the upper end of each string.
 If the chair is made of wood, the steps are fastened using the same technology as when assembling a large ladder. The seat in this case can be fixed to the screws, and the backrest also to the stud joint. If the plywood is chosen as the material, you will have to fasten the parts to the dowels and PVA glue. In addition, you can use self-tapping screws. After the folding chair is assembled, all its surfaces should be ground. In this case, special attention should be paid to sharp edges. At the final stage, the stepladder, like in the first case, is covered with varnish or oil.
The ladder of the ladder with its own hands is made of wood, metal and other improvised materials. Its assembly is carried out with the help of hardware or welding. And the design itself is characterized by the creation of a one-sided or two-sided ladder. The height of the product is selected individually.
Manufacture of a ladder made of wood
- A regular hacksaw with a small (2.5-3 mm) tooth.
- Narrow chisel.
- Corner.
- Roulette and pencil.
- Screwdriver, electric drill.
- Drills for wood with a section of 3 mm, 12 mm, length 5 cm.
- Sandpaper medium grain.
- A hammer.
In order to correctly solve the problem of how to make a ladder ladder with your own hands, you will need fasteners:
- Self-tapping screws.
- Two bolts M10, length 12 cm.
- 4 nuts and eight washers.
Stages of installation
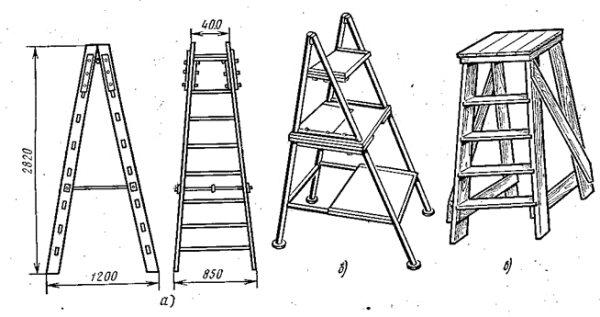
Arrangement of the ladder (march only on one side) is carried out with the help of 2 bars measuring 5 by 5 cm. The length of the structure is 2.6 m. The boards have a thickness of 3 - 4 cm.
The parameters are as follows: the distance between the steps is 30 cm. The parameters from the bottom step to the end of the beam are 60 cm. The section from the upper step to the upper position of the beam is 50 cm. These marks are used for marking the ladders.
Ladder-ladder with own hands made of wood is created after applying the marks:
- From the bottom position at an interval of 60 cm.
- From the top position - 50 cm.
- Between them, marks are created with an interval of 30 cm.
As a result, 2 bars with the same marking are formed.
The reliability of fixing is influenced by the installation of the products in grooves on the uneven bars. Prepare grooves for marking, based on the thickness of the steps. Do not rigidly assemble the beams in grooves.
Attention! A wooden ladder-ladder with its own hands is made using a single nail, which forms a smooth course on an uneven surface.
Rear Support
After manufacturing the ladder, a back support is created. The width of the support is measured by the fact of the structure constructed. In this case, the supporting bars of the structure are placed between the beams of the support. The size of the backup is 2 m. The supports are knocked together by means of boards of a specified length.
At the top of the bars are drilled gaps of 1 cm thick for the bolts. The ladder is connected to the support by means of bolts of 12 cm in length and 1 cm in thickness, with the arrangement of locknuts.
If you are planning a standard ladder-ladder with your own hands, the drawings can be applied from this page. At the same time, it is important to remember that stapling the beams of the support is made "overlapping". For strength, each cross beam is screwed to the stand using two 6.5 cm self-tapping screws.
Ladder-stepladder with their own hands made of metal is made by the same scheme. For this, a galvanized profile is used. Additional reinforcement of the design is provided by metal corners. Before the completion of the stage on the areas adjacent to the rails with posts, the glue is applied (preferably carpentry, in the extreme case PVA).
The upper working platform is created from 2 boards, pinned to the bars 2.5 x 5 cm. The parameters of the site are taken in the range 42x40 cm. The platform to the ladder is not fixed. For decorative finishing, the paint is on an introductory basis or varnish.
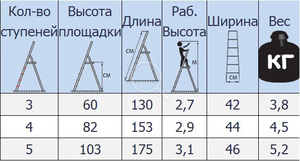
Stepladder - stilts on 5 steps
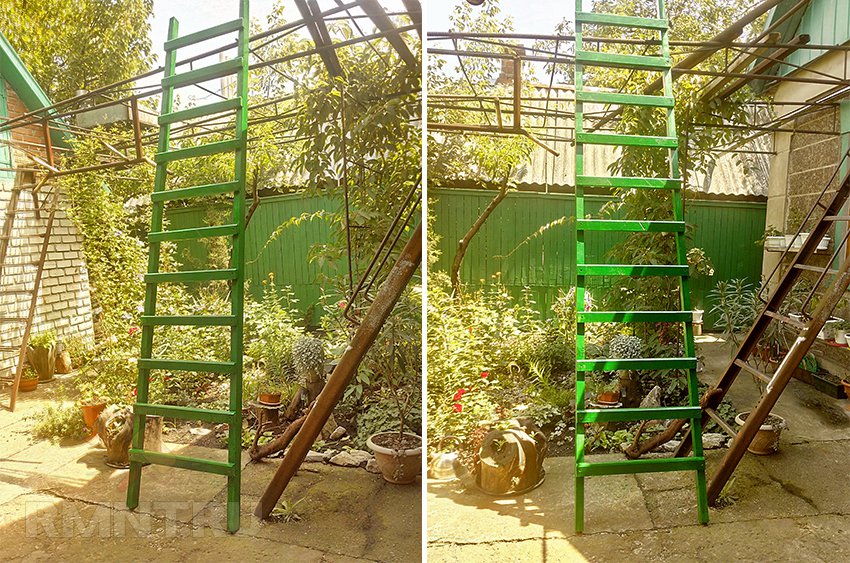
The garden ladder of the stepladder with its own hands is created from a bar. The total number of blanks is 12-13 m linear. The parameters of the walls are 5x3 cm. In addition, needles made of metal with a cross-section of 6-8 mm, washers, nuts, 4 plates of metal and 4 pieces of rubber.
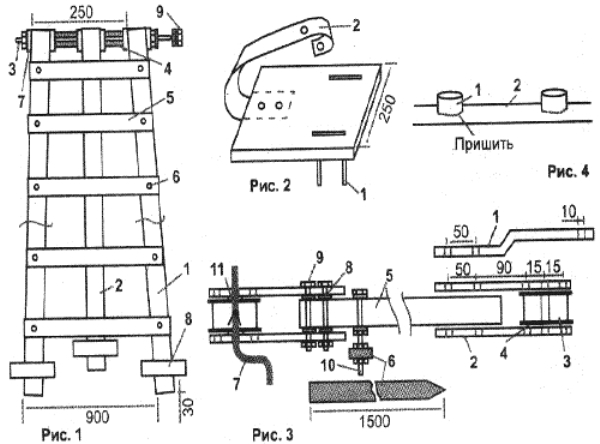
For convenience, you can make an overview of how the ladder of the stepladder is built with your own hands from the tree in the photo.
Stages of manufacture:
- Take 4 bars of 1500 mm and 2 blocks of 570 mm. It is prepared 2 blocks of 520 mm, 2 brusks of 470 mm, 2 brusks of 420 mm, 2 brusks of 370 mm each.
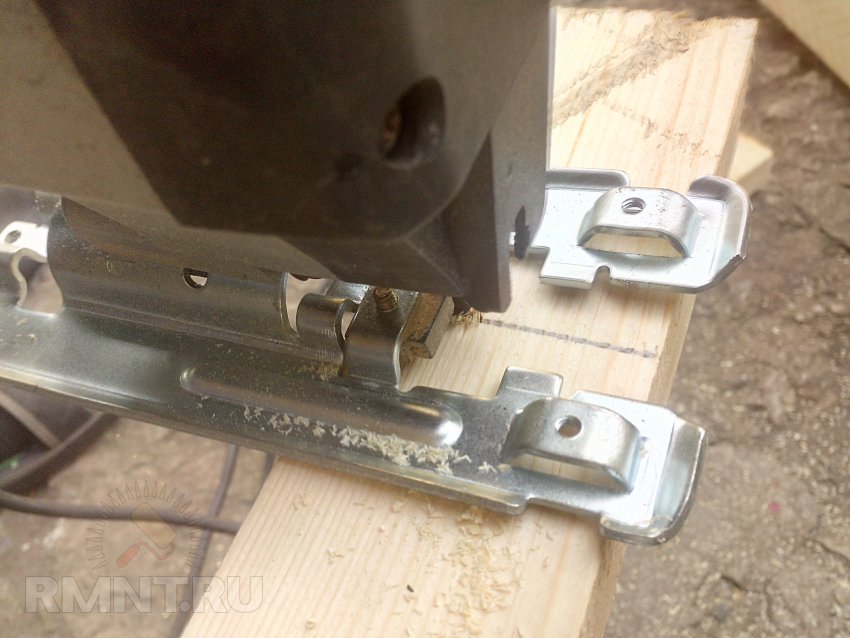
- On two bars symmetrical marking is applied. With the use of a drill-pen, depressions of 150 mm are created. Then, using the chisel, the remaining wood is knocked out. There are 5 depressions, according to the number of steps.
- At the lower end of the workpiece, a rubber heel is fitted and screwed with a screw. It is necessary to resist slipping.
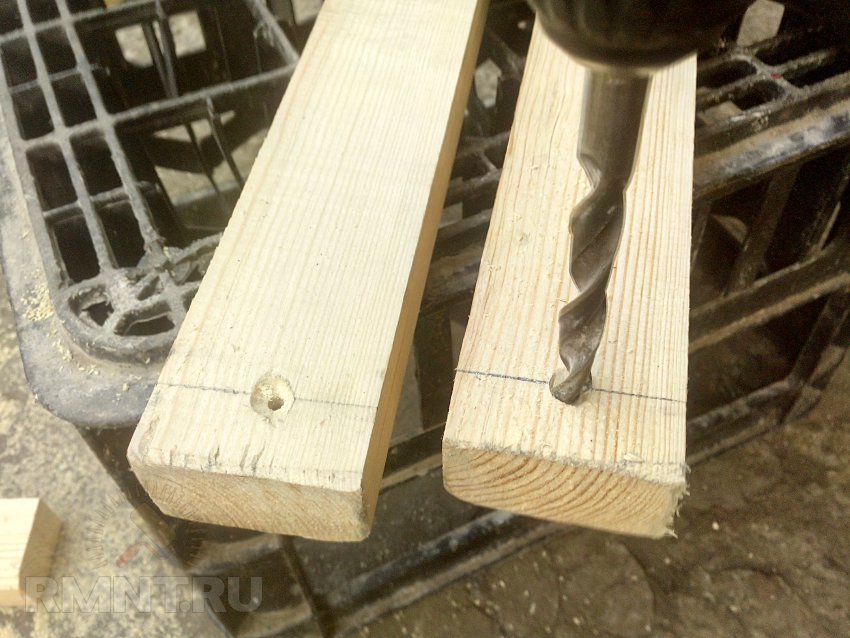
- Under each gap, a hole is pre-drilled for the spoke with an arrangement under the step.
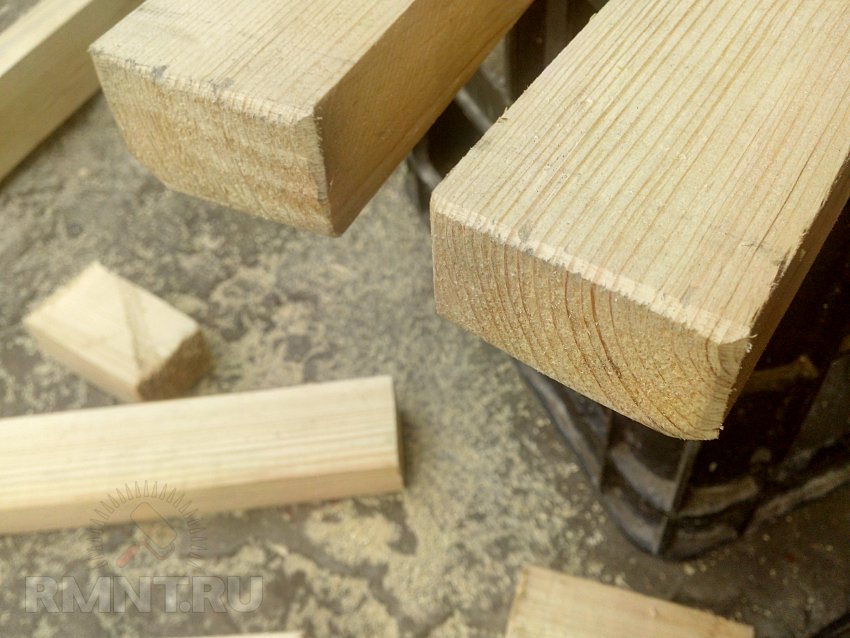
- Stair steps are prepared for the given parameters. By means of the chisel, the ends of the steps are rounded for a dense entry into the gaps on the supports. The length of the oval forms 1.5 cm, which coincides with the depth of the gap
- The ends of the steps are mowed to 3-4 mm. It is important to comply with the parameters in which the long part they enter the lower part of the gap. This provides strength characteristics of the product.
Build the structure
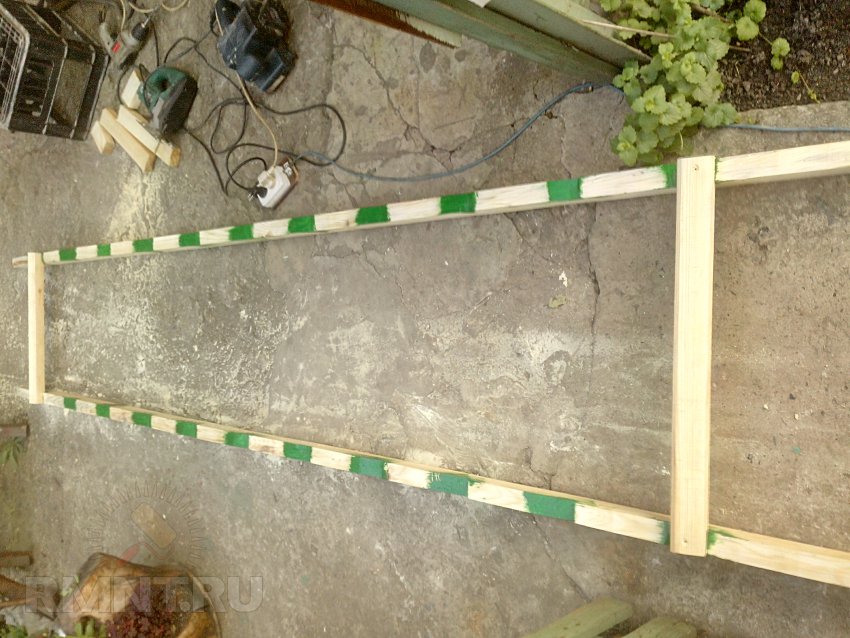
Using a hammer, the steps in the rack are hammered. Then, in the drilled holes, under each step, knitting needles, except for the upper one. At the edges of the spokes are put nuts and tightened with bolts. After connecting the two parts of the march, a sewn tool pocket is placed on the spokes of the upper steps. Its length is 360 mm, and the height is 200 mm.
The assembly of the two parts of the structure is ensured by means of metal plates for the tying cabinet. The upper ears of the plates are cut off.
To connect the plates, the gaps are drilled in the center of the upper elements and are twisted with a bolt and nut. Gaps for the upper spokes are drilled and for fastening the plates to the supports. When applying plates to the rack, a marking is created for drilling. Both elements of the ladder are connected.
The restrictor is any rope or chain, the length is 600 mm. Using screws, the limiter is screwed on both racks, in the center.
Tool holders are made of a plastic pipe 500 mm long, 80-100 mm high. Screw holders to the stairs with screws. After assembling both parts, a pre-sewn tool pocket is put on the spokes of the upper steps. Its length is 360 mm, height - 200 mm.
Metal stepladder
Metal stairs have less weight, in contrast to wooden structures. For the independent construction of the product, you will need aluminum or steel parts that are found in every construction shop.
For self-assembly, the ideal model is the A-shape model. It allows the installation of steel and aluminum structures. Assembly of parts is carried out by welding. However, you can also use bolt fasteners for the possibility of repair.

Materials and equipment
When using a steel profile, you will need tools:
- Welding.
- Bulgarian.
- Electric drill.
- Corner.
- Marker.
- Hammer, measuring device.
Cutting parts from metal is carried out with the help of protective glasses, and welding is accompanied by protection in the form of a mask.
Materials for the work:
- Profile elements.
- Belts preventing unplanned opening.
- Fasteners in the form of hardware.
Drawings are prepared. The height of the structure is determined and 4 equal sections from the profile are cut off. Steel products are cleaned with a drill (brush head). The profile itself forms a rectangular section. Stands of the structure are fixed in pairs by means of two long bolts. This facilitates a free unfolding.
Making crossbeams
Supports are mounted parallel to each other and create a marking for the crossbeams. Here you need a square that allows you to create an angle of 90 gr. From the prepared profile or corners, steps are created. Fastening is carried out by means of spot welding. Fix the lower and upper elements, then the intermediate parts.

With proper installation, welding can be used. If the support does not contain steps, two horizontally placed crossbeams are welded. The additional strap is attached diagonally. This will be required to fix the supports, relative to each other.
The limiting cable in the center of the march is fixed and the profile or corner below is welded to the ends of the supports. Then the structure is treated with a primer and paint.
A stepladder made of wood, made with your own hands, is a necessary adaptation in the household. Of course, you can buy a ready ladder-ladder, it is offered in a wide range of manufacturers.
But, firstly, it is quite expensive, and secondly, it is not always possible to find the size that is needed, which is especially important in the presence of a garden. Make a stepladder with their own hands is not difficult, and such an exercise can be done by any person.
Design Features
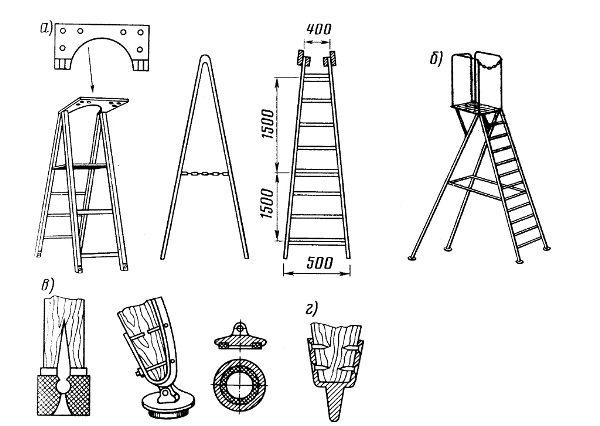
At its core, a wooden stepladder, made by hand, is a portable folding wooden staircase, which does not need additional support, as it itself, sliding apart, provides support. Stability of the structure, as a rule, provides a triangular shape, which arises after the lower part of the main elements, having a swivel joint at the top. In principle, the ladder is an ordinary staircase to which a side support is attached.
The main parameters of such a device are the width of the lower part, which provides the necessary stability, and the height of the structure (in the folded and folded form). The most important requirements for such a ladder are stability, reliability and mechanical strength, ease of operation.
 The homemade stepladder is provided with the necessary stability by extending the legs in the lower part, making the ladder itself with the extension to the bottom and fixing the extended legs in the maximum position. Reliability (strength) of the wooden structure is due to the choice of a sufficiently strong beam, fixing the steps in the grooves, hardening the steps with metal rods. Finally, for convenience, the ladder with its own hands is equipped with an upper platform, and the steps step is chosen to be optimal for lifting.
Staircase Construction
Ladder-ladder with their own hands can be made of different designs: classical, in the form of an isosceles triangle; Telescopic with extension legs to increase the height; a team of several composite elements for the same purpose, etc. The most common use is a simple sliding ladder that forms a triangle in the open state (when viewed from the side).
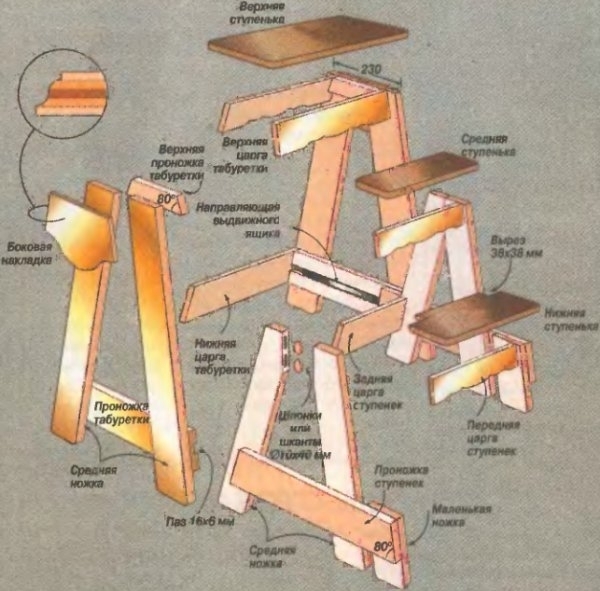
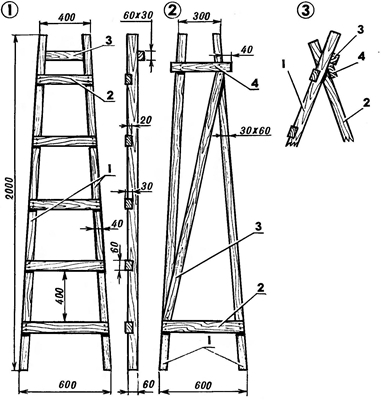
The classical design has the following elements: a ladder with an extension downwards; support similar to the ladder, but without steps (sometimes as a support the second ladder is used - a two-way variant); the upper articulation; the top platform (folding); the maximum expansion lock; hardening rods. To make a stepladder with your own hands, drawings can be used as shown in Fig. 1 (Fig. 1, drawing details of a simple stepladder).
Required Tools
When manufacturing a ladder-ladder made of wood, you will need the following tool by your own hands:
- bulgarian;
- plane;
- screwdriver;
- hacksaw;
- chisel;
- a hammer;
- electric drill;
- wrenches;
- screwdriver;
- knife building;
- roulette;
- the ruler is metal.
The order of manufacturing and assembly of the structure
How to make a ladder from a tree with your own hands? First of all, it is necessary to choose a suitable drawing or independently execute it with detailed elaboration. In general, the question of how to make a ladder is solved in several stages.
Making stairs. The basis of the staircase, with their own hands made of wood, is made up of two lateral bars measuring 60x60 mm and 2 m long each. Stairs are made of the same beam. Stair rails are located so that the bottom between them was a distance of 60 cm, and at the top - 40 cm. The lower step is fixed at a height of 30 cm, and all subsequent - in increments of 30-40 cm.
Figure 1. Drawing of parts of a simple ladder.Manufacture begins with making cuts for fastening steps with a hacksaw and a chisel. Depth of cut is 15-20 mm. Then the steps are successively fixed: first - the lowest, then - the upper, then - the intermediate. Fastening is carried out by screws or nails. Under each step, reinforcing metal rods with a diameter of 15-20 mm are fixed. In the upper part (from the back side in relation to the steps) a bridge is built from a bar 60x60 or 60x30 mm for installation of the upper platform.
Manufacture of a support part. The wooden ladder necessarily has a support in the form of an element similar to a ladder. Two bars of 60x60 cm and a length of 2 m are also used for its production. The bars are fastened with two horizontal bars (30 cm from the top and bottom) and a diagonal bar or board. When making the support, it should be borne in mind that the upper part at the junction should enter between the beams of the ladder. For this, the distance between the beams at the top decreases by two thicknesses of the bar.
Assembling the structure. Assembly of the ladder begins with the combination of the ladder and the support at the top. They should be connected by means of a steel axis with a diameter of at least 20 mm. It is recommended to strengthen the axle location with a metal strip (on the outside of the ladder and inside the support). In the hole of wooden parts, it is better to install metal bushings.
This video shows the process of making a small wooden ladder:
On top of the axis between the beams is installed a wooden platform made of 25x25 mm timber or 25 mm thick boards. Mounting the pad on the axle is done with the help of metal clamps with the possibility of lifting it.
Approximately in the middle part of the ladder is fastened the lock of the maximum extension of the legs. You can use a mounting strap.
Such a clamp is installed on both sides of the structure. The fixing to the beams must be reliable. The lower end of all legs is recommended to be cut at an angle so that when the pedicle is maximally extended the entire area comes into contact with the ground (floor).
This video shows the process of manufacturing a folding ladder:
A wooden stepladder, made with your own hands, is a very necessary and useful device in the household. You can make it yourself, even without the skills in carpentry.
Without a ladder in the farm is difficult: no fruit to take off, nor to climb on the roof. In this master class we will tell in detail how in just a few hours with the help of the simplest tool to make a wooden staircase for household needs: sound, reliable and with a rather aesthetic appearance.
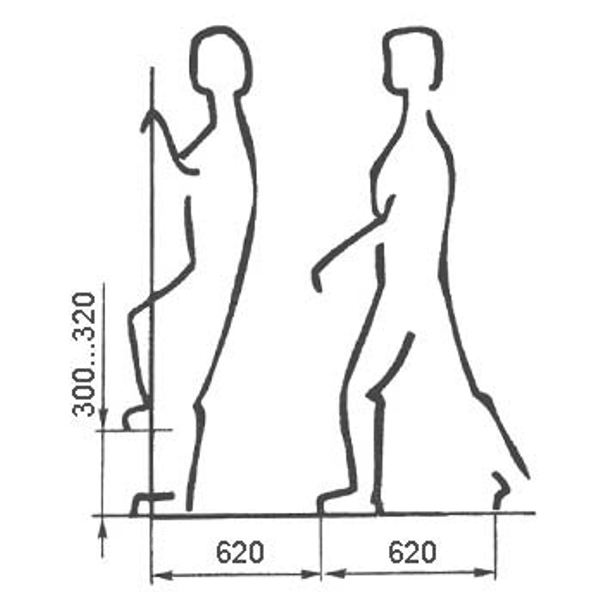
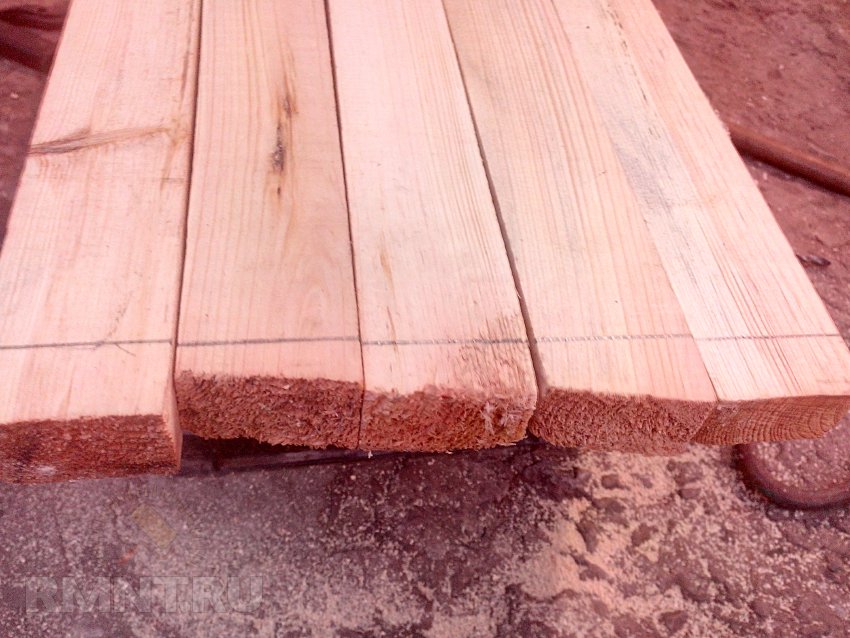
For such a ladder, two 60x40 mm beams are required, which will go to two bow strings. Length choose for yourself, in this case it is 3.6 m. On the crossbar will go a smaller beam - 50x35 mm. To determine the number of steps, divide the length of the ladder into sections equal to the height from floor to foot, when the leg is bent at the knee. In this version, it is 11 steps every 30 cm.
For work you will need a hacksaw, a hammer, mounting, a small hatchet - better carpentry, with a hammer in the form of a hammer. From the power tool - drill, belt grinder, plane and jig saw (instead of hacksaw). Nails can be used as the main fasteners, but self-tapping screws will be safer. Black is not suitable, they can burst under load, so buy ordinary steel with anodized coating and a head under the pot.
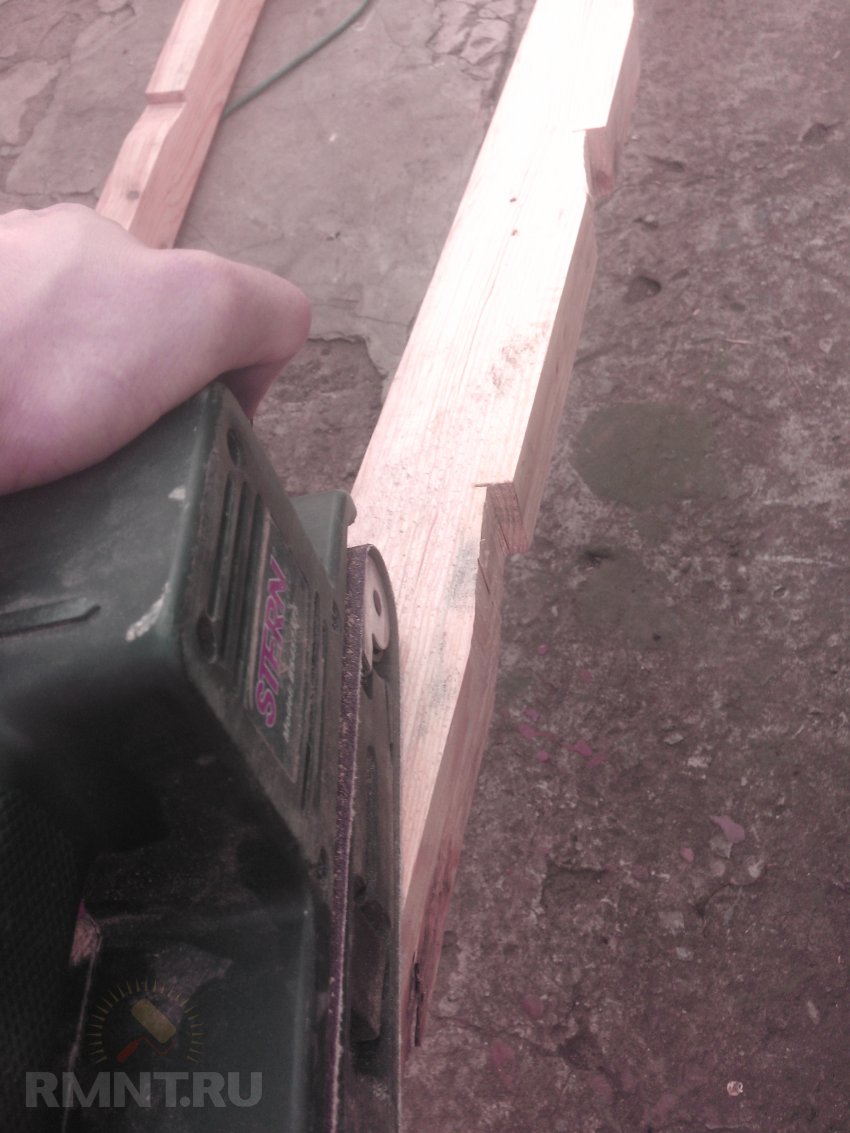
To stairs was more solid, and the upper side of the step when tilted - horizontal, on the short side of the bowstring you need to make nicks. First mark the length of the bar marks in the places where the steps are set, move away from them the width of the bars - 50 mm, and apply the second mark, drawing the edges of the notches to the square. Transfer the marks to the side faces on both sides, at the bottom mark the depth of the notch - 15-20 mm, and make a cut at this depth. Connect the tags together with a slash.

Place the hatchet with the point on the top mark and, tapping on the foot with a hammer, grind the wood.
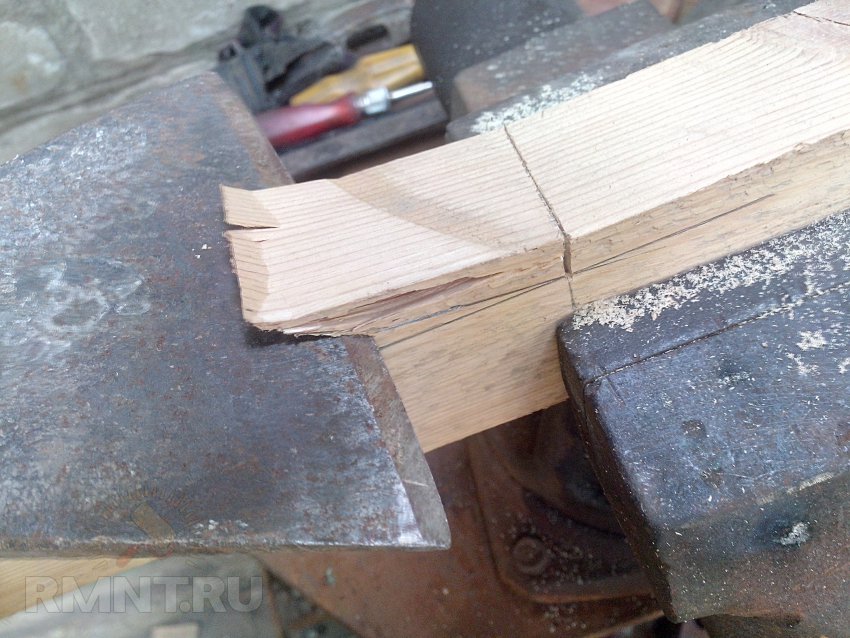
Using the ax like a plane, trim the resulting chamfer.
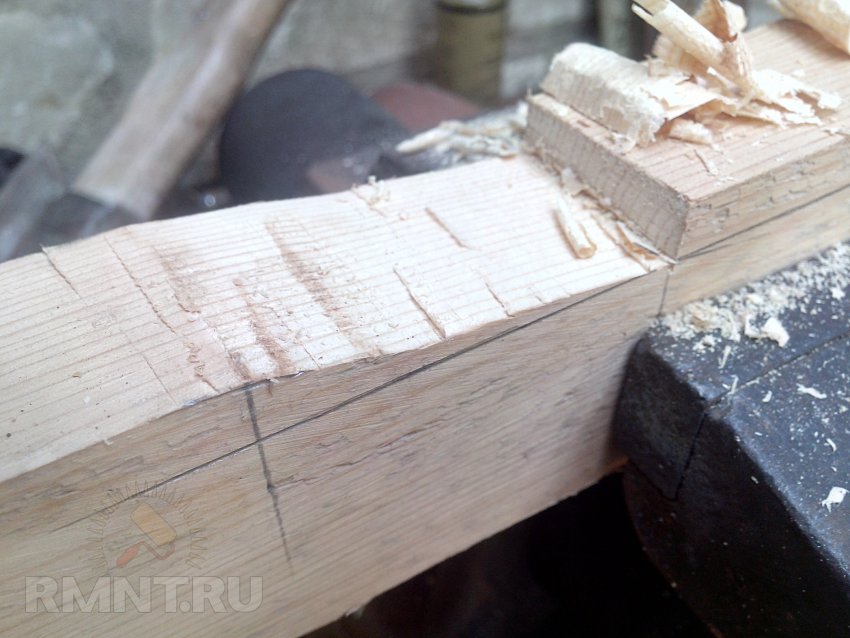
Make nicks on both strings to speed up the process - beat them together with nails.

Bars on the bowstring should be lightened a little, treating the edges with a grinder.
Pay special attention to notches, carefully grind the bevel.

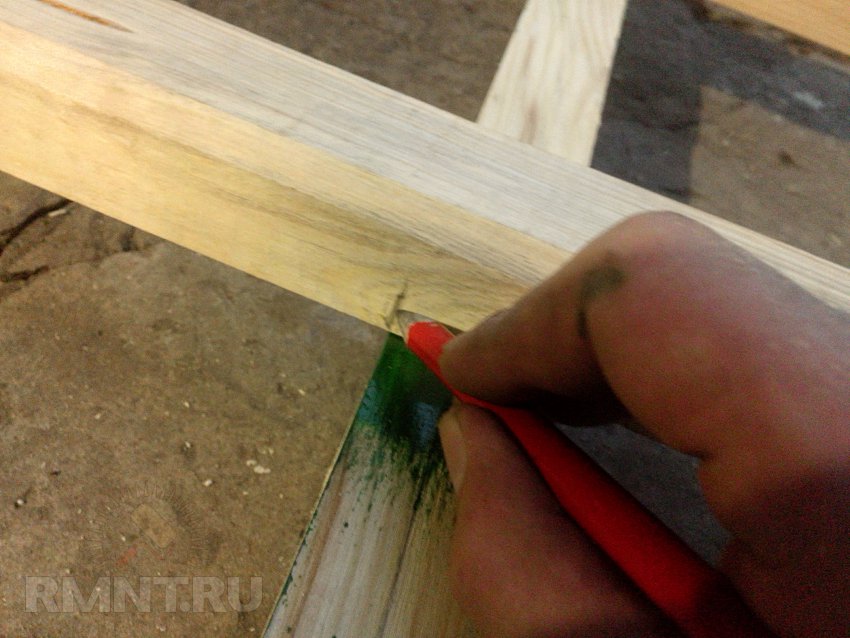
Paint the inner surface of the notch and set it aside for a while.

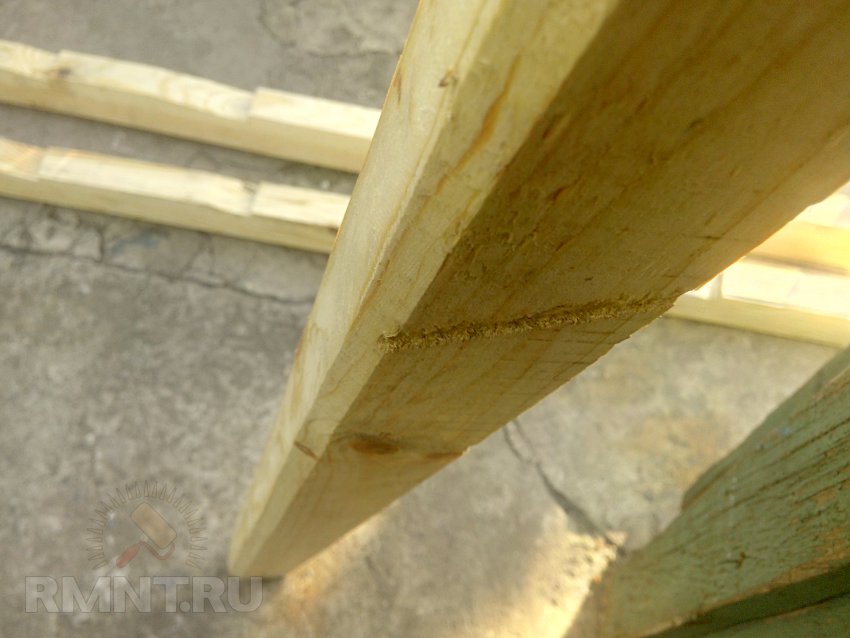
For further work with the stairs, you need to make one end of the base. Draw a mark on one of the ends of the mark under the square.
Saw uneven edges and work the butt grinders , for beauty you can remove a small chamfer. Similarly, the strings slightly lighten the tree and make the surface smooth.
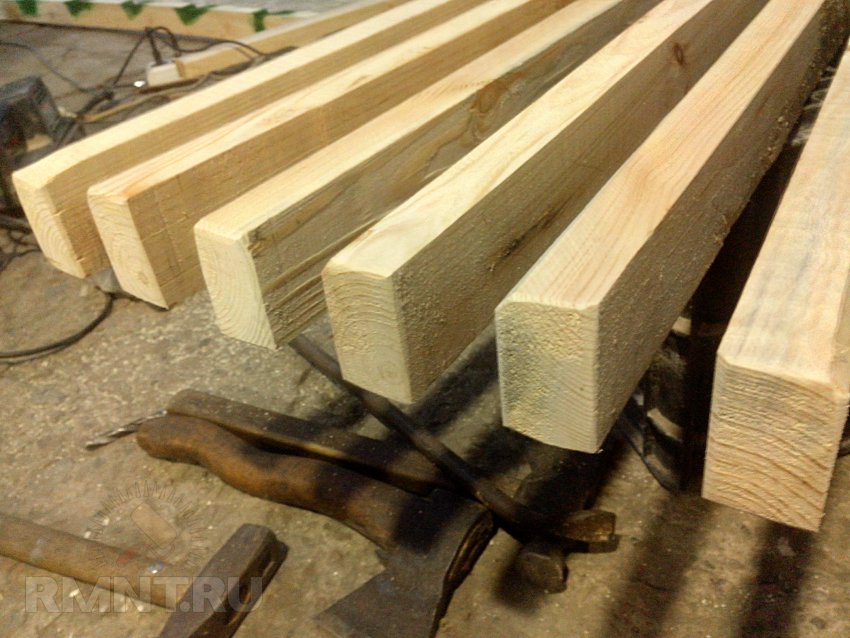
Now you need to make the upper and lower crossbeams. To visually quickly distinguish the top and bottom of the ladder, it is made with a slight narrowing, so the upper crossbar is slightly shorter than the bottom. Choose the width of the staircase, which is convenient, in the above example it is 65 cm below and 55 cm at the top. Note the length using the tape measure.

And draw a line of the cut under the square.

Cut off the excess bar.
And treat the grinder ends.
Draw a line under the square, stepping back from each edge by half the thickness of the bowstring - 20 mm. Mark the center of this line, you get this markup:

On the crosshairs, drill a through hole, so that the threads of the screw can pass freely through it.

Make a small countersink larger.
Set the top and bottom crossbar into notches and align the ladder so that the ends of the steps are flush with the side edges of the string.
Measure the diameter of the thread rod and choose a drill 0.2-0.3 mm smaller. In this case, the diameter of the rod was 2.8 mm, so a 2.5 mm drill was installed in the drill.
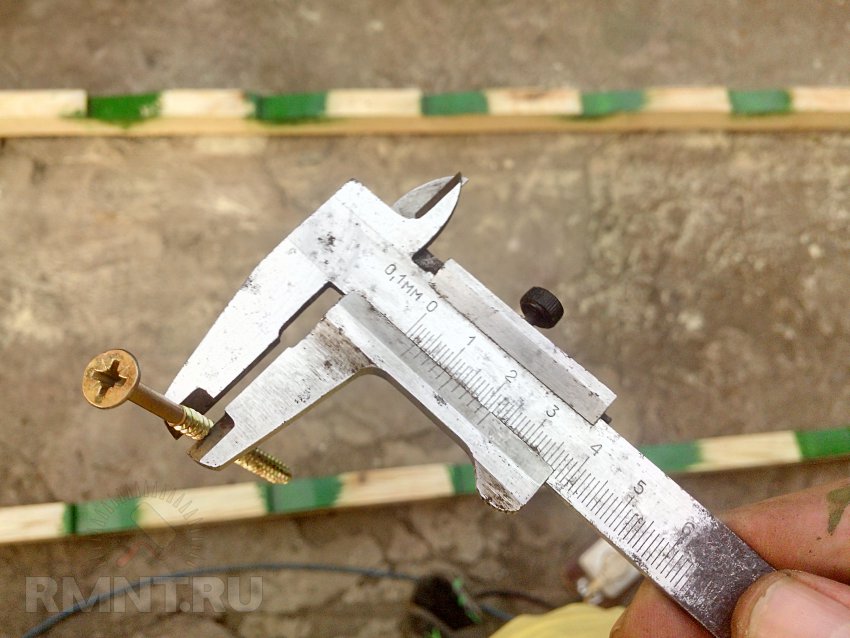
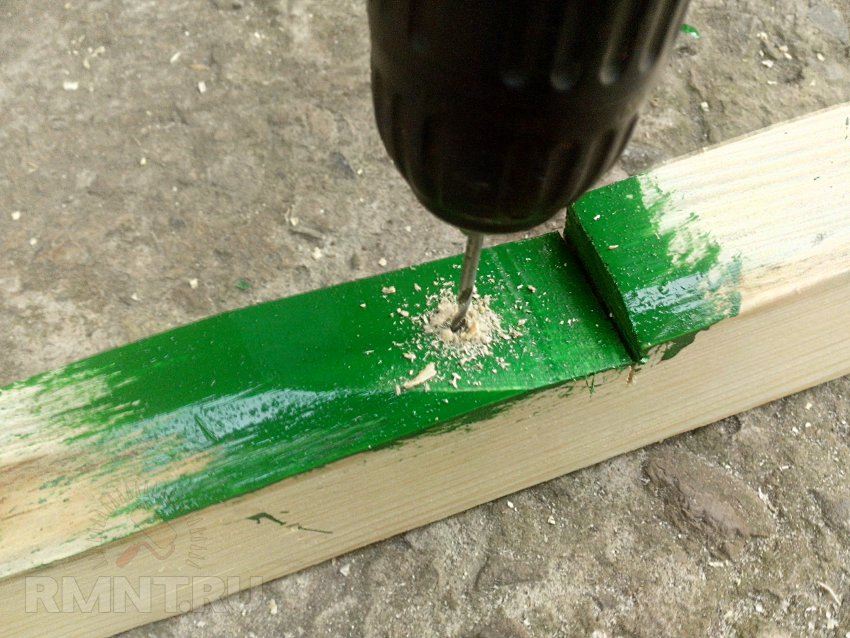
Through the hole in the steps, mark the bevel notch, keeping the position and direction of the drill. Then remove the crossbeams and drill a hole 2/3 of the depth. You need to drill holes for a screwdriver so that it does not split the tree, otherwise the whole work will fail.
Paint the edges of the steps on the back side in the places where they are adjacent to the string. Then return the steps to the place and tighten the screws.

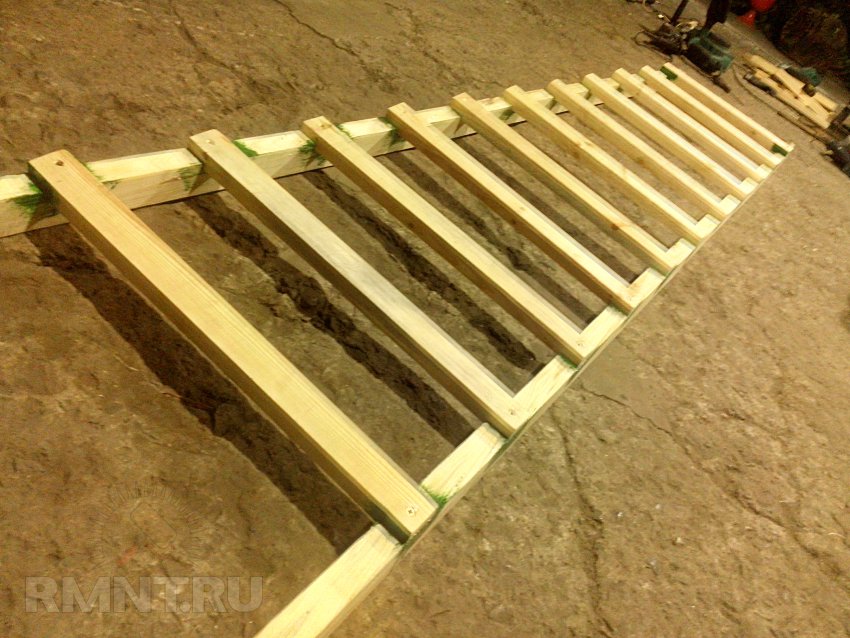
Now the ladder has the necessary dimensions, it remains only to screw the missing steps. Lay out the bars in the notches and set the base edges flush with the side edges of the bowstring.

Mark on the crossbar the desired length on the opposite string.
Prepare and install the steps as the first two: draw the cutting lines under the square, cut off the excess and process the ends with a grinder. Mark the edges for drilling and make holes with a countersink. Then tint the edges and set the steps back into place, first drilling the bow with a small drill.
It's time to paint. There are no special secrets here, but if you want the paint to not score the splines in the head, unscrew the screws for 3-4 turns and tighten them after painting.

If after painting in some places the tree is shone, you need to apply a second layer. Alkyd paint completely hardens for 30 hours, after their passage the stairs can be used.
A good stepladder is needed by every owner, it can be used not only in construction, but also when working in the garden or for solving domestic troubles. To be sure of its reliability, it is better to make a stepladder for the house with your own hands.
To make a ladder, you will need:
- good cork without defects;
- metal spokes;
- drill
- self-tapping screws, nuts, washers;
- plates made of metal for joining halves of a ladder;
- heel for legs of a ladder made of rubber;
- chain metal;
- glue joiner;
- bulgarian
- chisel;
- emery paper;
- a hammer;
- screwdriver;
- roulette.
Billets for ladder-ladder are made thus:
- Cut the beam into pieces of the required length. 4 pieces of 150 cm, 2 pieces - 37, 47, 52, 57 cm.
- The ends of the blanks must be rounded. And if you want, you can attach rubber attachments on one side so that the ladder does not slip on the floor. Screws are fastened with screws.
- On the stalk leg, pull back from the end of 10 cm and make a groove with a chisel. From it to retreat 24 cm and make another depression, to it will be further attached steps. Since the steps will be five pieces, then the grooves should be five. The same thing to do on the second bar. Further, under the indentations, you need to drill a hole for the spokes.
- Using the chisel, cut the ends of the steps so that they are inserted into the recesses. Slightly skew the ends, so that when the staircase is narrowed to the top, the steps are still tight.
- Blanks are first ground, and then processed with an antiseptic.
Assembling a ladder-ladder
When all the workpieces of the parts are completed, you can start assembling the step-ladder:
- Joiner's glue needs to be smeared on the ends of the steps and insert them into the supports, to hammer in with a hammer.
- Insert the spokes under the steps and secure them with nuts and bolts.
- Cut the protruding parts from the plates that connect the ladder. In the center of the wide part of the plate, it is necessary to drill the holes and fix them every two plates with a nut. Then drill the plate where it will be attached to the ladder. To accurately guess the location of the fasteners, you need to attach the plates to the supports and make the markings. The plates are fastened at the top on the legs.
- In order for the ladder not to part ways, its parts are connected with a chain or a cord, the ends are fixed with the help of bolts and nuts.
- If you collect a ladder with your own hands, then create it the one that would be convenient for you. At the top, for example, you can attach hooks for the bucket. You can also make a piece of plastic pipe and fix it with screws on the stairs, and you can add the necessary tool.
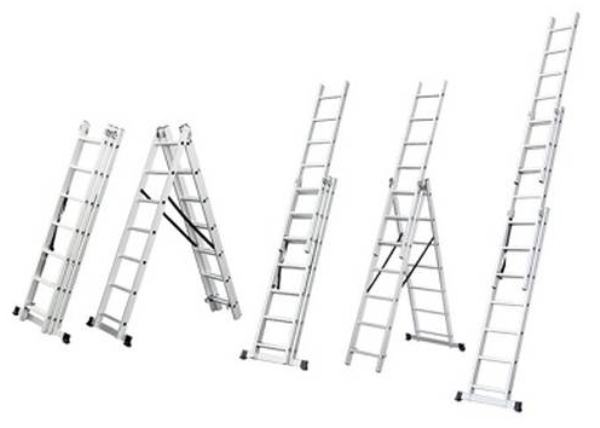
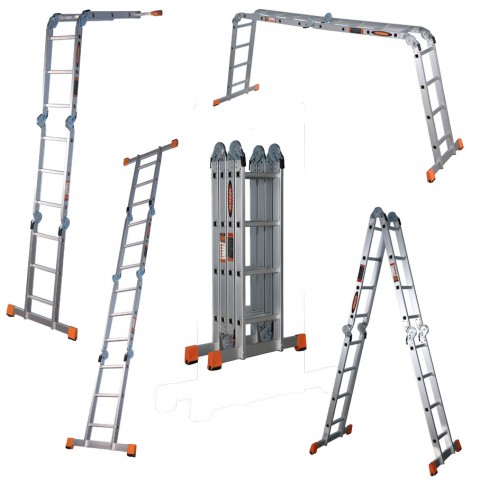
Making a ladder-transformer
- Before you start building, you need to sketch a drawing of a ladder. It will be needed in order to accurately calculate how many materials you will need to create a ladder.
- Step-ladder-transformer can be made of steel or duralumin pipe with thick walls and three centimeters in diameter, 2 and 1.5 meters long. This length will be the stepladder itself. For the steps you can use the same pipe, it will need an eye of three meters. The entire structure is assembled with the help of a welding machine and bolted screed.
- For bolt connection, it is necessary to make through holes on the pipe along the entire length of the ladder, the distance between them is the same as from the end of 30 cm. On the stair pipe, drill holes with the same distance, having deviated from the edge by 1.5 cm.
- To connect all the parts together, you need to make two clamps. On the steel strips, having retreated 1.5 cm from the end, make holes and bend.
- Make clutches closed in oval shape. And weld the ends. Attach the yokes, on the fifth step, starting from the floor.
- Drill through holes 1.5 cm from the end on opposite sides of the pipe. Put on the clutches, insert the clamps into the ends, secure with bolts.
- To assemble the crossbeams, for this purpose the rubber tips are fixed on the legs, it is also possible to use plastic covers for this purpose. To ensure that the sides of the ladder are not parted, you need to install hinges for fixing the wire hook.
- To transform a two-meter staircase into a three-meter ladder, you need to remove the hook, and turn the support part up on the hinges. Couplings give firmness to hardening, they are put on the ends of a 2-meter pipe. If all the work is done correctly, then such a ladder-transformer can withstand a weight of about one hundred kilograms.
This stepladder is not inferior to conventional aluminum, on the contrary, it can be constantly modified, for example, to reduce the number of steps or change the shape of their fasteners.
Ladders test
Before using a stepladder, created by oneself in work, it needs to be thoroughly tested with a load. To do this you need:
- Put the ladder on a flat surface, hang the load on the step of the middle part. If there are several knees at the ladder, then each knee passes the test load separately, in turn. If the second knee is only needed for the stop, then it is possible to hang a smaller weight on it. The weight is hung in the back of the knee on each string.
- The staircase is well inspected for defects or imperfections.
- The sliding ladders should be well extended and retracted, and reliably standing at the given knee height. They should not spontaneously develop in any way.
- Examining the ladders made of metal, make sure that there are no deformations in the knots, and in the metal cracks, the ladder should be smooth, without burrs and sharp corners, fastening the steps to the strings should be without disturbances.

One of the general requirements for working with a stepladder is to check the stability of the base and the support at the top of the structure. By the way, if you need to work at an altitude of more than 1.3 meters, then you need to wear a safety belt, and the ladder itself must be insured by another person.
You can not use a stepladder if it is standing on the step of the march and work is being done at a level that is less than a meter from its top point. It is not allowed to work on a stepladder with electric and pneumatic tools, with welding equipment and power networks. Especially if you use a stepladder alone.
In the presence of materials and tools, a ladder for a house can be made in a matter of hours, and use it for many years.