In the construction of a private house one of the critical stages along with the installation of the foundation is considered the construction of the roofing system. The most common option due to its simplicity and reliability is the installation.
Recently, roofs of different configurations appear, but the gable roof remains a common and generally recognized roofing structure. Advantages and advantages of such a system:
- Economical - do not require large expenditures on building materials.
- It goes well with any structure.
- Due to the correct slope of the skates, precipitation is not collected on it and precipitation is easy.
- Not enough work installation work of this construction.
- Such a roof can be made original and unusual.
- You can deal with work on your own without involving specialists.
What do you need to know and do before designing in the first place? It is necessary to know how to calculate the slope of skates. Let's look at how the slope of an existing roof is calculated, then you will understand how to use it:
If the width of the house, for example, 8 m, and the length of the rafter's foot on the roof is - 10 m:
- A is the angle of inclination;
- c - half the width of the house;
- b - length of rafter.
It is clear that half the width of the house will be 4 meters - with = 8 ÷ 2 = 4. Now we need to calculate the radial measure of the angle - cos A = 4 ÷ 10 = 0.4. To finish and translate the value to degrees, you need the Bradys table (use the Internet), but in this example the slope is 66 °.
The form is selected depending on the size of the house, only after making all the basic calculations, you can start creating drawings and sketches. In construction gable roof own hands all technology is worked out in stages to small nuances. When using any roofing material, the whole sequence of operations remains unchanged.
In the framework of this article, we will describe how to build a double-skinned roof in step-by-step instructions. But first, let us become acquainted with what types of gable roof configurations exist, and what rafter systems are used.
Symmetrical roofing
The most common version of the roofing system due to its simplicity and reliability is quite suitable for construction gable roof with their own hands. Because of the symmetry, a fairly uniform distribution of loads on the main load-bearing walls and the Mauerlat is achieved.
The larger the cross-section of the beam, the greater the load-bearing capacity of the structure. As with the installation of all types of gable roofs, great importance in the design of symmetrical roofing has a slope. It is recommended - in regions with a windy belt and high humidity to arrange a slope of 60 degrees.
A symmetrical roof has a drawback. As is known, the construction is a triangle shape and "blind zones" are formed in the acute corners of the roof, which excludes the construction of a full-height attic floor.
Asymmetric roofing
The design is basically the same symmetrical, but differs in the location of the ridge, so that the sides of the asymmetric roof differ in slope and size. The installation work is quite difficult, mainly because of the skated skate. But such a roof, despite the complexity of the installation, is eventually compensated by the original and beautiful appearance.
Advantages and disadvantages of an asymmetrical gable roof
Undoubtedly, there is an opportunity to significantly increase the living space. But at the same time, the load will be uneven, and requires a thorough preliminary calculation.
Broken construction
It is, in contrast to the usual gable construction, the shape of a pentagon. In the shape of a triangle, it has an upper part, and the main one, conditionally resembling a trapezoid, is located below. Thus, it is divided into two parts, on the lateral lower slopes there is usually no snow, which can not be said about the upper part of the structure.
Advantages of a broken roof construction:
- You can build on any sufficiently strong building.
- By means of the attached storey the additional area is increased.
- Attractive appearance of the building.
- It is possible to build a two-level attic.
- Reducing heat costs, at the expense of the roof, and reducing the cost of heating in the winter.
- You can work without leaving home, and not attracting professionals and special equipment.
Types of rafters
In fact, in principle, there are only two systems: hanging and nylon rafters. They differ among themselves in the use of bases for rafters. But there is also a hybrid option, which includes both rafter systems - this method is especially acceptable when the house is divided by columns, instead of load-bearing walls.
Firstly, they are installed in case the lateral support walls are separated from each other up to 8 meters, and secondly, there must not be a bearing wall between the supports, otherwise a layer system should be erected. In fact, this is the simplest method of installation: the farms are assembled at the bottom, resulting in a hard triangle that can withstand the loads. To ensure that the structure is solid, tightening is applied between the rafters.

In this system, it is considered a positive moment that you can do without the Mauerlat, but for the construction of the attic room it is recommended to use not only the Mauerlat, but also the beams of the ceiling. Therefore, experts do not advise for the construction of the attic to use this species rafter systems.
This structure is usually exactly in the middle set up a vertical stand. The support of the upper edge of the rafters can be the same opposite rafter (spacer) or run (uncontested). Thus, they are divided into discontinuous and irradiated systems of the nylon type.

There are several ways of this type of device, see the diagram. In the first case, the support for the rafters is Mauerlat. The load (bending) is subject to rafter legs, thereby not crushing or breaking the walls.
Layered or hanging - which is more profitable?
In the device of a nylon construction for construction, the rafters - beam comes with a small section, because under it has additional supports.
In the device of the hanging construction, on the contrary, the cross-section of the rafters is larger than in the layered version. Even the cross-section of puffs, experts recommend making similar cross-section rafters. If you do not even install the Mauerlatt, all the same, the economic losses will be greater in the hanging mode.
Drawings and sketches
The difference in the device systems:


Design calculations
To erect gable roof with own hands, it is necessary to calculate the mass of the structure, right angle, the area and even the amount of required material, and this is quite a difficult task. The following important points are taken into account when performing the calculations:
- width and length of the base;
- height of the ridge;
- length of front, rear and side overhangs;
- step rafters, grade wood rafters;
- the kind of material that you want to use for coating;
- thickness of the boards;
- the distance between the boards in the crate;
- type of terrain - region.
It would be possible to turn to the help of specialists, as usually they do - they go to a nearby construction site and find a superintendent, since reliability depends on the correct calculation performed, and therefore the safety of your design. But not everything is complicated. For this, there are online payment services on the Internet.
In our case, the most convenient and reasonable option is the choice of the online calculation service for gable roofs, where only the specified parameters will be left.
Online calculation is instantaneous, but the most important thing is that you will be able to calculate the load, the number of crates, and also required amount material, for example, slate, tile, profile in your area. All calculations for such services are made taking into account SNiP - "Loads and Impacts".
The structures of the described roofs

Asymmetric roof

Installation of a gable roof system with own hands - step by step instruction
- Check the diagonality and the plane of the surface. Disadvantage to eliminate. Some elements, including the Mauerlat, the Leg, the Run, must be strictly horizontal, but you do not need to place them in the same plane.
- Wooden elements need to be treated with an antiseptic.
- Before laying the mauerlat, it is necessary to put a waterproofing, also observing a clear diagonal.
- Mauerlatt is the foundation of the roof and when installing the frame, In addition to fixing by means of skew logs, it is duplicated by brackets and bolts.
- Set the left to the waterproofing. Secure with bolts. Mark the place for the support posts that will hold the run.
- As the horizontality is observed, the racks are prepared in the same size, fastened, the run is installed from the top. We fasten the run, with the help of special metal plates.
- Mark the places where the rafter feet are fastened. Experienced roofers, without complicating the process, use a rod, the length of which is equal to the distance between the rafters.
- Rafters are attached to the Mauerlat, but only after the top to each other or to the run.
- Check the construction simple way, using a rope, pulling, on the one hand, and adjust, if necessary, the position of the rafters.
If you follow this instruction, then you will easily cope with the construction gable roof with their own hands. After the work done, proceed to the crate. The installation of the battens is not a difficult process, but do not forget that the further laying of the roofing material depends on this.
Choose a quality material, for example, raw lumber is deformed after drying, and, therefore, do not fit. Also choose lumber without knots, such material can not withstand the load.
Pay attention, if you are building a crate for slate, then each sheet should have a support of not less than three bars. In this case, even bars should be thicker by 30 mm. This achieves uniformity of load and a dense overlap. Such an important nuance with this fragile building material worth knowing. Good luck in job!
Mounting the roof is a complex, multi-stage process. To independently assemble and install the rafter system, you need to carefully study the ways of connecting the elements, calculate the length of the rafters and the angle of the slope, select the appropriate materials. If there is no necessary experience, it is not necessary to undertake complex designs. The best option for a small apartment house is a two-story roof with your own hands.

A standard roof of this type consists of the following elements:

Mauerlatom is called a bar, laid on top of the walls along the perimeter of the building. It is fixed by means of walled steel rods with thread or anchor bolts. The beam should be made of coniferous wood and have a square section of 100x100 mm or 150x150 mm. Mauerlat takes charge of the rafters and hands it to the outer walls.

Rafter Legs - this is a long board with a section of 50x150 mm or 100x150 mm. They are attached to each other at an angle and give the roof a triangular shape. The construction of their two rafter legs is called a farm. The number of farms depends on the length of the house and the type of roofing. The minimum distance between them is 60 cm, the maximum distance is 120 cm. When calculating the pitch of the rafter legs, one should take into account not only the weight of the coating, but also wind load, as well as the amount of snow in the winter.

It is located at the highest point of the roof and is most often a longitudinal bar connecting both slopes. From the bottom of the beam support vertical posts, and on the sides fasten the ends of the rafters. Sometimes the skate consists of two boards, which are nailed to the top of the rafters on both sides and connected at a certain angle.

Racks - vertical bars with a section of 100x100 mm, located inside each farm and serving to transfer the load from the run of the ridge to the bearing walls inside the house.
The struts are made from scraps of timber and set at an angle between the posts and rafters. The side faces of the truss are strengthened by struts, the bearing capacity of the structure is increased.
Tightening - a beam connecting the lower parts of the rafters, the base of the triangle of the truss. Together with the struts, such a beam serves to strengthen the farm, increases its resistance to loads.
A bench is called a long bar with a section of 100x100 mm, laid along the central bearing wall, on which the vertical racks rest. The use of a ladder for the installation of layered rafters, when the run between the outer walls is more than 10 m.
The lining is a board or bar packed with rafters. The lining is continuous and with gaps, depending on the type of roof. It is always attached perpendicular to the direction of the rafters, most often horizontally.
If there are no more than 10 m between the outer walls and there is no supporting wall in the middle, suspended roofing system. With this system, the upper ends of the adjacent rafters are sawed at an angle and connected with each other using nails, excluding the installation of racks and ridge bars. The lower ends of the rafter feet rest on the outer walls. Due to the lack of racks, the attic space can be used to equip the attic. Very often the function of puffs is performed by the joists. To strengthen the structure, it is recommended to install a top puff at a distance of 50 cm from the ridge.

In the presence of a central support wall, it is more justified to equip nylon truss system. The wall is laid down, the support posts are fastened to it, and the ridge bar is nailed to the posts. This method of installation is quite economical and more simple to perform. If the ceilings in the interior are designed at different levels, the posts are replaced by a brick wall that separates the attic into two halves.
![]()
![]()
The process of installing the roof includes several stages: fixing the mauerlate to the walls, assembling the trusses, installing the rafters on the ceilings, skating device, fixing the crate. All the wooden elements before the beginning of the assembly are carefully treated with any antiseptic compound and dried in air.
For work you will need:
- the beam is 100x10 mm and 150x150 mm;
- boards 50х150 mm;
- board thickness of 30 mm for the crate;
- ruberoid;
- metal studs;
- jigsaw and hacksaw;
- a hammer;
- nails and self-tapping screws;
- gon and building level.
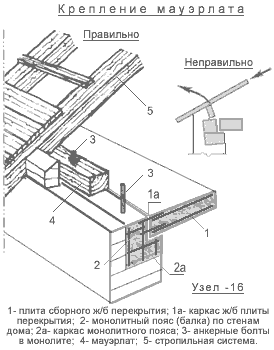
AT wooden houses The functions of the Mauerlat perform the logs of the last row, which greatly simplifies the work process. To install the rafters, it is enough to cut grooves of the appropriate size on the inside of the logs.

In brick houses or buildings from the units, the installation of the Mauerlatt is done as follows:

The bars of the Mauerlat should form a regular rectangle and be in the same horizontal plane. This will facilitate further installation of the roof and provide the necessary stability. Finally, the uneven bars make a marking for the rafters and cut out grooves along the thickness of the timber.

When choosing a hanging rafter system, you need to collect the trusses on the ground, and then install over the slabs. First you need to draw a drawing and calculate the length of the rafter legs and the angle of their connection. Usually the angle of the roof is 35-40 degrees, but on open, strongly swept areas it is reduced to 15-20 degrees. To find out at what angle to join the rafters, follow the angle of the roof slope multiplied by 2.

Knowing the length of the run between outside walls and the angle of the rafters' connection, it is possible to calculate the length of the rafter legs. Most often it is equal to 4-6 m, taking into account the eaves curtain width of 50-60 cm.

The upper ends of the rafters can be fastened in several ways: overlapping, buttock and "in the paw", that is, with the notch grooves. For fixing, use metal pads or bolts. Then mount the lower and upper puffs, and then the finished trusses are lifted up and set over the ceilings.

The first farms are attached to the extreme farms: with a plumb line, the rafters are exposed vertically, the length of the overhang is adjusted and attached to the Mauerlat with bolts or steel plates. So that during the installation the farm does not move, it is strengthened with temporary jibs from the bar. After installation, the outer rafters are exposed to the rest, observing the same distance between them. When all farms are fixed, take a board section of 50x150 mm, which is 20-30 cm longer than the cornice length, and nail it along the upper edge of the ramp. The same is done on the other side of the roof.
Options for fixing the rafters to the Mauerlatu
The first option: on the rafter in the place of abutment to the Mauerlatu cut out a rectangular groove for 1/3 of the width of the beam. Stepping back from the top of the box 15 cm, a steel crutch is driven into the wall. The rafters are exposed to the level, they combine the grooves, then they tie the clamp from the wire on top and draw the bar close to the wall. The ends of the wire are securely fixed on the crutch. The lower edges of the rafters are neatly cut with a circular saw, leaving a 50 cm overhang.

The second option: the upper rows of walls are laid out with a stepped cornice of bricks, and the mauerlat is flush with the inner surface of the wall and cut into it a groove under the rafters. The edge of the rafter's foot is cut in accordance with the level of the upper corner of the cornice. This method is simpler than the others, but the overhang is too narrow.

The third option: beams ceiling ceilings are produced beyond the edge outer wall on 40-50 cm, and trusses are installed on beams. The ends of the rafter legs are cut at an angle and rest against the beams, fixing with metal straps and bolts. This method allows you to slightly increase the width of the attic.
Arrangement of layered rafters

1 shows the cutting of the struts of the rafters into the mold laid along the intermediate supports, and FIG. 2 - Supporting the rafter's foot on the Mauerlat
The order of work when installing a nylon rafter system:

When the main elements are fixed, the surface of the rafters is treated with flame retardants. Now you can start making the battens.

For the battens, a beam of 50x50 mm is suitable, as well as boards 3-4 cm thick and 12 cm wide. Under the crate, usually a waterproofing material is laid to protect the truss system from getting wet. The waterproofing film is covered with horizontal stripes from the eaves to the roof ridge. The material is poured with an allowance of 10-15 cm, after which the joints are fastened with adhesive tape. The lower edges of the film must completely cover the ends of the rafters.

Between the boards and the film it is necessary to leave the ventilation gap, so first the wooden strips are packed with 3-4 cm thick wooden slats, along the rafters.

The next stage is the trimming of the rafter system with boards; they are stuffed perpendicularly to the slats, starting from the eave of the roof. The step of the roofing is affected not only by the shape of the roofing, but also by the angle of the slopes: the larger the angle, the greater the distance between the boards.

After the installation is completed, the crates begin to coat the gables and overhangs. Close gables can be planks, plastic panels, lining, waterproof plywood or corrugated board - everything depends on financial possibilities and personal preferences. The paneling is fastened to the side of the rafters, nails or self-tapping screws are used as fasteners. Overhangs are also sewn with different materials - from wood to siding.
Video - Gable roof with own hands
In order to build a gable roof with your own hands for a utility room, a garage or even a house, in addition to desire, you need the ability to use a carpentry tool. Of course, it is not easy to perform such work, especially for the first time. It is best to have several assistants, as well as to study the features and technological methods of the structure. In this article, we will tell you how to make a gable roof by yourself, what it can be, how to make its elements and how to fix them, and also consider other nuances that must be taken into account.
How to start the construction of a gable roof
First of all, it should be noted that although gable roof and is a fairly simple construction, but its construction requires the availability of certain knowledge, the appropriate tool and the ability to use it. And therefore, in order for this work to be successful, it is necessary:
- Correctly choose its type or the way of building such a roof;
- determine the angle of its inclination;
- calculate and prepare the necessary amount of materials that will be required for all its elements.
There are several ways to build a gable roof and before you start building it with your own hands, you need to choose exactly what kind of view it will be:
- ensure maximum strength and reliability of the entire structure;
- take into account the requirements for attic space, from the point of view of its subsequent operation;
- take into account the structural features of the building.
Selecting the angle of inclination
As for the angle of inclination, the larger it is, the higher the roof, and will provide better protection against atmospheric precipitation, as well as a smaller vertical component of the load from the weight of the roofing material and the same atmospheric precipitation (especially snow) acting on the rafters. But on the other hand, a higher roof is more expensive and requires a higher consumption of materials, both wood and roofing material, and also has a greater "sail". In addition, when choosing the angle of inclination, it is necessary to take into account the features of the selected roofing material. So the recommended angle of inclination for a roof from a corrugated board, a bitumen shingle and rolled materials - not less than 20 °, and for metal, ondulin and asbestos cement sheets (slate) - not less than 25 °. How to calculate the angle of the roof, depending on its height or the length of the rafters, at a certain angle, you can see in the section "question answer".
In order to correctly choose the optimal type of gable roof for your house, garage, bath or utility room, we will consider what the ways of its construction exist, what they differ, what are their advantages and disadvantages.
The construction, types and methods of construction of a gable roof
Any gable roof consists of such basic elements:
- horizontal base, to which the main supporting elements are attached - rafters (rafter legs). This can be either Mauerlates (a bar laid along bearing walls) or existing wooden joists can be used;
- the rafters themselves or the rafters;
- crate, which is attached to the rafters and serves as the basis for fixing the roofing material;
- roof.
In addition, the roof may include additional elements, such as:
- racks, stops, braces - providing, if necessary, additional strength of the structure;
- waterproofing, which can be in the form of a roll material, film or membrane;
- heater;
- controllabel - bar, which nails along the rafters and with which the waterproofing is fixed;
- windshields and abutment strips;
- skating elements;
- drainage system;
- elements for finishing eaves.
As already noted, the main load-bearing elements of any roof are rafters or rafter feet. They perceive the load from the entire roof structure, including the weight of the roofing material, as well as the weight of the precipitation (especially snow), the wind load and transfer it to the bearing walls of the building. Depending on their type, there are two main types of gable roofs:
- with layered rafters, which are supported at the bottom and at the top by supporting structures (walls or horizontal run);
- with suspended rafters, which in the upper part lean against each other and join together, thus forming a truss farm.
It is easier to make a gable roof with stacked rafters with your own hands. But for this purpose, in the construction of the premise over which the roof is to be built, there must be a supporting wall or columns in the middle, on which one can be supported by a "bench" with a ridge horizontal run, and the attic room itself is thus divided by support posts or a wall.
It is more difficult to make a roof with hanging rafters, especially when there is no experience. But you can do this work yourself, having got acquainted with the necessary theoretical information, having made the correct calculations, carefully making all the nodes of the rafter legs (trusses) and performing the correct fixing. Hanging rafters allow you to arrange a roof over a room in which there is no supporting wall in the middle, and the attic room itself becomes free from the "bench", which is especially important if you want to build an attic there, are special for small dimensions of the building.
In addition, the construction of gable roofs, both with layered and hanging rafters, can differ in the way they join and fix their elements, the type of materials used (board, bar), its cross-section and the pitch of the arrangement.
Necessary materials and tools
The necessary amount of materials, their appearance and cross-section depends, both on the size of the building, the width of the span to be covered, and on the type of the future roof, its height (angle of inclination), step of rafters and crates and other factors.
For example, to find out the number of beams for the Mauerlat, you need to measure the perimeter of the building, while making a stock at the junction and waste sites. In principle, the longer the beams for the Mauerlate are, the better: there will be fewer joints and it is easier to set it horizontally along the entire length.
The amount of material for the rafter is determined by the width of the span, the angle of inclination and the pitch with which they will be installed.
The number of boards or planks for the crate can be calculated taking into account the step of its installation (and this depends on the chosen roofing material) and the length of the roof across the ramp, taking into account the side overhangs above the gables (at least 20 cm).
In addition, depending on the chosen type of roof and its dimensions, you will need boards for puffs, braces, lining, "fillets", binder, and also - bar for girders, racks, stops.
In order to make it easier to calculate the total number of materials, it is necessary to compile a simple drawing-diagram of the future roof, with and the image of all its elements and indicating their type and size (length, section).
The cross-section of the main elements of the gable roof can be chosen based on the recommendations given in Tables 1 and 2.
Table 1 Recommendations for the selection of the cross-section of rafters from timber and logs, depending on its length and pitch (the distance between adjacent rafters)
The length of the rafter- |
Step, cm: 100 |
|||
|
th leg, m |
Bar, mm / log |
Bar, mm / log |
Bar, mm / log |
Bar, mm / log |
|
More than 6,0 |
Table 2. Other roof elements
The necessary tools that you may need when building a roof yourself:
- Ax;
- Hammer with a naildriver;
- Hacksaw;
- Benzo or electric saw;
- Roulette;
- Metal ruler and square;
- Building level;
- Plumb bob;
- A manual or electric drill.
In addition to wood and tools, materials will also be needed to connect and fasten the wooden roof elements: nails, staples, anchors, screws, connecting metal plates and corners. Their appearance and quantity will also depend on the size of the roof, its type, the ways of fixing its elements to each other, and the method of fixing and the type of roofing material.
The order of work in the construction of a gable roof
The procedure for the construction of different types of gable roof may differ slightly, depending on the type of rafters chosen, the way they are fastened and the type of foundation to which they will be attached. Therefore, consider several possible options.
As we have already said, the roof with rafters is characterized by the fact that these supporting elements in the upper part are supported by a horizontal ridge run. The latter can be laid on vertical wooden racks, on a brick or stone support wall or lean against pre-built pediments.
Most often, when constructing such a roof, the first option is used. In this case, in the middle of the passage, a so-called "bench" is built of vertical racks, braces and a horizontal ridge span. In this vertical stand can be supported either directly on wooden beams overlapping, or on the lower horizontal run, specially laid for this. In the second case, the step of the racks will not depend on the pitch of the joists. In addition, this method can be used if the overlap is not wooden, but reinforced concrete. The construction of the support wall for laying the ridge run is used much less often and only if it is provided for by the structure of the building.

Fig. 1 Roof rafters resting on the Mauerlat and the ridge run of the "bench": MZP - connecting metal toothed plate.
In the construction of small buildings (baths, garages, farm blocks), a third option is possible, when prefabricated logs, logs or bricks are constructed with gables and they are laid with a ridge run without additional intermediate supports. In this case, the pediments will perform the role of supporting walls and therefore should have the appropriate thickness and strength. This applies to the ridge run. It should be strong enough and installed "on the edge".

Fig. 2 Roof rafters resting on a ridge run without intermediate supports.
The methods of fastening the rafters to the ridge run and to each other can be very different (Fig. 3). The main thing is to ensure connection reliability. For this, bolts, nails or MZP (special connecting plates with teeth) can be used. The docking of the rafters can be carried out both as a butt and as an overlap or as an undercut.

Fig. 3 Options for the solution of the upper assembly of the fastening rafters
At the bottom, the rafter legs rest and fasten either to the Mauerlat or to the wooden beams of the ceiling.
When the support of the rafters is Mauerlat
In this case, the first thing you need to do is lay along the perimeter of the building, on top of the outer walls (on the layer of waterproofing) and fix there the Mauerlat (the bar whose upper plane should lie in one horizontal plane). To the stone or concrete base, the Mauerlat is fastened either with the help of pegs laid down earlier in the axis or with the help of anchors, drilling corresponding holes for them. It is also possible that the Mauerlat is fastened with nails to the wooden beams of the floor. In small wooden houses, instead of Mauerlat, you can use the top crown of a log house or a house of a bar, and in a frame - the bar of the upper strapping.

Fig. 4 Some options for attaching the wall to the wall: a - with the help of anchors; b - with nails to the beams of the ceiling; at - with the help of hairpins, laid down when concreting armopoyasa.
After laying the Mauerlat, we construct a "bench", the upper run of which must also be strictly horizontal and parallel to the Mauerlat. Initially, from the two sides of the overlap, we measure the distance between the axes of the opposite Mauerlates, divide it in half and set it aside in the middle of the span and make marks. Connecting them, we mark the line of position of the axis of the "bench". On it will be laid down the lower run. If the stands of the "bench" are attached directly to the joists, this will be the line on which should be located in the middle of their support. It is most convenient to make a "bench" with the bottom run entirely in a horizontal position, then lift and fix vertically along the axis to the overlap and additionally with temporary braces.
We check the verticality of the pillars and the distance diagonally from the edges of the Mauerlates to the edges of the ridge run. If they are the same, then everything is in order. If not, adjust the position of the "bench".

Fig. 5 "Bench" for layered rafters
The next step will be the fabrication, installation and fixing of the rafter feet. Before you start this work, it's best to make a pattern of a rafter's leg from a board of 25-30 mm, fit it in place and "drive" across the roof slope, checking to see if there are any deviations in size. If such are found, they must be eliminated (if possible) or taken into account when making rafters. In the future, rafter legs are manufactured and their installation is started. First, the outer rafters are mounted and fastened, and when installing the rest, it is controlled that they are in the same plane of the ramp, pulling the cord between the outer rafters. If the building is of the correct form, the Mauerlat and the ridge run are laid horizontally and in parallel, then no problems should arise. The step of the rafters can be different, depending on the cross-section of the material used for the rafters.
After laying and fitting the rafters are attached to the Mauerlat and the ridge run with the help of nails, staples or metal corners.

Fig. 6th Some of the options for attaching the rafter to the Mauerlatta with a boss (thrust bar) or a notch: a - with the help of a metal corner; b - with the help of nails; at - Bracket.
For the formation of the overhang, most often, "rakes" are nailed by "mare" of the required length from the boards of 40-50 mm. It is also possible to create eaves with the release of the lower part of the rafter. But in this case they should have a margin of length.
When rafters are supported by joists
Sometimes, the rafter's feet at the bottom are attached to wooden beams. In this case, the beams are most often released outside, outside the wall, thus forming a overhang. Often this method of attachment is used to increase the attic of small buildings. In this case, the step of the rafters will correspond to the step of laying the joists. In addition, the beams must necessarily be laid along the front (front) walls.

Fig. 7th Variants of fastening of rafters to a wooden beam: 1 - rafter leg; 2 - beam; 3 - nail; 4 - the bracket; 5 - tooth.
Rims
The rim is arranged from a board 30-40 mm thick or a bar, section 40-50x50-60 mm. The cage should protrude beyond the rafters and form a lateral overhang so that it is at least 20 cm, taking into account the thickness of the pediment. Fastening of the crate starts from the bottom. The fixing step depends on the selected roofing material. For some roofing materials, for example, roll or bituminous shingles, the crate is made in the form of a continuous rolling.
If the roof is waterproofed, the waterproofing material is fastened directly to the rafters, across the ramp, with a slight sagging, overlapping 10-15 cm and pre-fastened with a stapler. Above, the hydrobarrier is fastened with a control bar - bars, which are nailed along the rafters. And already on the grating, the crate for the roof is nailed.
After the crate is attached, along its edges, a cord is stretched along the slopes, along which it is checked how even the side overhang is. If necessary, trim the exposed boards or bars.
After that, the installation of the roof, windboards (laths) and filing overhangs is performed.
How to build a roof with hanging rafters

Making the roof with hanging rafters with your own hands is somewhat more difficult, because in this case the rafter legs of the opposite rajids at the top serve as a support for each other and no longer have any support. In order for such a structure to be rigid and sufficiently stable, they must be reliably connected together by tightening (most often, a board with a section of 40-50x200-250 mm). Thus, the so-called rafter trusses are formed. They are made according to the template below and are supplied ready for overlapping, or they are made on the overlap of individual elements prepared according to the template. The second option is possible if there is enough space on the floor to do this.

Fig. 8 Hanging rafters fixed on the Mauerlate.
Particularly important is the tightening, if the support of the rafters are Mauerlats, laid on the wall. It prevents the occurrence of tilt (tipping) loads on the walls. In the event that the rafters are attached to the floor joists, the main part of the load is perceived by them. Although in this case, the tightening at the top of the truss is necessary, to ensure its rigidity.
Before starting the manufacture of trusses, make it a template from a board of 25 mm and check all their future seats. If the building is the right shape, then the template will be equally approachable in any place. If the walls of the building are not parallel (for example, one of the end walls will be wider due to an improper breakdown), then the template will reveal this and when making the farms it will be necessary to make corrections.
Between themselves, the rafter legs can be joined in various ways: lapped, butt-end with a wooden or metal overlay (connecting plate), half a tree, etc.

Fig. 9 Some variants of fastening of hanging rafters (the top unit): a - buttock with a wooden lining; b - butt and metal plate; at - vpolderov and a metal bolt; d - lapped with nails or bolts.
The finished truss farm rises, is exposed on a plumb and fastened to the base (mauerlatu or a wooden beam of overlapping), and also additional bracing (permanent or temporary). The first farms are established and fixed. After that, between them it is necessary to pull a cord or a fishing line, focusing on which the others are mounted. If the base of the regular shape is in the horizontal plane, and the trusses are the same (made according to one pattern), then there will be enough cord stretched on one side at the bottom. If you do this work for the first time and in order to be sure that the installation is correct, after fixing the next farm, it is better to check its position with a cord or line and on the other hand, both below and at the level of its growth. Before fixing the next farm with temporary braces, it is necessary to check its verticality. The bracing is installed so that they do not interfere with the installation of the battens.

Fig. 10 Fastening of suspended rafters on a wooden beam of overlapping.
After all the farms are secured, you can start installing waterproofing and roofing.
When the length of the ramp is long
If the length of the ramp and, correspondingly, of the rafter's leg is more than 4.5 m, additional vertical supports or slots for each rafter should be installed to strengthen the roof structure (see video). At the bottom they can be supported by joists or a horizontal run. You can also arrange support "benches" from vertical racks and horizontal girders, which will be based on rafters or bolts, which act as puffs (as in Fig. 11).

Fig.11 The version of the gable roof system with a long rafters (more than 4.5 m)
How to build a gable roof with your own hands - video:
When building private houses, the roof is often made of a gable roof. There are reasons for this. First, it is reliable. Well cope with wind and snow loads. The second - it is compatible with any roofing. The third is relatively inexpensive. The fourth is an uncomplicated construction, which is difficult to spoil. Fifth - it looks attractive. All this, and the fact that the gable roof with their own hands is built without the availability of special knowledge, determines its popularity.
The assembled gable roof with its own hands is ready for installation of the roofing
Step-by-step installation of a gable roof
As you saw above, there are a lot of rafter systems. Accordingly, when building each has its own characteristics, but in general the order is the same. It is necessary to say about the general step: preliminary drying and processing of wood. This step is mandatory if you bought fresh lumber, not dried.
Use in the construction of a roof of raw wood natural humidity will lead to problems: the beam will bend, they will shrink, the geometry will change. All this will lead to the appearance of stress points and at the slightest signs of overload (a lot of snow, strong wind or rain) negative processes will begin. Their elimination is a complex and costly exercise. Therefore, or buy dry wood (no more than 20%, ideally chamber drying 8-12%), or buy the material for a couple of months, fold into aired stacks. After treatment with the necessary impregnation (from the defeat of fungi and to reduce flammability) and only then use in the installation of the rafter system.

Lumber should be dried in ventilated piles. To do this, they are laid with short pieces of boards. They are put in a meter from the edges and then through a meter. Under the bottom set the required cork
About the main stages of the assembly, how to make a gable roof with our own hands, we will tell in this section.
Mauerlat
The assembly of the gable roof system from the Mauerlat installation begins. It should be set horizontally, therefore, before the installation is started, carefully check the horizontality of the wall to which it is attached, if necessary, it is leveled with cement mortar. Continue work can be after the solution will gain 50% strength.
Depending on the system, it is a bar from 150 * 150 mm or a board measuring 50 * 150 mm. It is attached to the upper row of wall masonry. If the house is wooden, its role is performed by the upper crown. If the walls are made of light building blocks - foam concrete or aerated concrete and others - their rigidity is not enough to redistribute the load. In this case, a reinforced reinforced concrete belt is made on top of the last row of masonry, into which the fixing hardware, wire or studs, is embedded. Then they put a bar or board on them.

There are several ways to connect walls and mauerlat:
- In the masonry (in a ferro-concrete belt) a smooth rolled wire is fastened large diameter (the two ends stick up). In the board, then, holes are made in the necessary places, into which the wire is threaded. It then curls and bends.
- In the wall the studs are not less than 12 mm in diameter. Under them, holes are made in the Mauerlate, the bar / board is inserted) and tightened with nuts with wide washers.
- Aligning the bar or board along the outer or inner edge of the wall, take a 12 mm drill make holes for the anchor bolts. They (the same diameter of 12 mm) are hammered into the very hat, then tightened with a key.
The distance between the studs (wire) should not be more than 120 cm. The wall (belt) under the Mauerlat must be fitted with an isolation waterproofing. It can be in two layers of rolled roofing material or waterproof, it is possible to smear with bituminous mastic.
Installation of rafters
The species of rafter systems of a gable roof are more than one dozen. First of all you need to choose how your will look. Further, in order to work it was easier, from thin boards make a template for all the blanks, cuttings and other similar details. To do this, you may need to collect the first form on the roof, and then on the ready to make templates.

The order of assembly depends on the type of rafter system. If the rafters are layered, they are installed gradually, collecting from the elements directly on the roof. In this case, it is convenient if the beams are overlapped ceiling and, if possible, rough attic floor or attic.
In systems with suspended rafters, a truss is assembled on the ground - a ready triangle of tightening and rafter legs with all the required struts, struts. The required number of farms is assembled at once. Then they are lifted to the roof, they are exposed vertically and fixed to the Mauerlat.
On the one hand, it is convenient to work on the ground easier, with high assembly speed, the accuracy is high: one farm differs little from the other, which simplifies the procedure. But it is difficult to raise ready farms, especially for large buildings. To make this easier, install two sloping boards, which one end against the ground, and the second sticks out slightly above the wall. Farms bring closer to this "lift", one is installed below, tied ropes and tightened on the boards on the roof. In the absence of a winch or a crane, this is the most acceptable method.
Building rafters requires certain knowledge: how and in what order to mount them, how to label and do the cuts. Assembly of one of the schemes with a grandmother, see the video.
The order of assembly of the rafter system

Everything, a gable roof with own hands is assembled and ready for installation of roofing material.
The process of installing rafters raises enough questions, but there are many ways to talk about everything. One of them is in the video. The system is big and went up to the roof in parts, and there it was already assembled into a single structure. For large houses it is convenient.
Features of the installation of the wooden house rafter system
The difference between wooden houses is that the frame shrinks, and this leads to a change in the geometry of the rafter system. If the elements are fixed rigidly, the roof can collapse. Therefore, the fastening is made floating. There are special sliding fasteners, in which case the rafters are fastened to the upper crown and to the purlins, if there are such (see photo).

For rafters to move freely during shrinkage, the longest part of it is attached strictly parallel to its edge, the perforation is placed strictly perpendicular. If necessary, a platform is cut out for it. Mark the mount so that the hook is in the lowest position or near it. Attach to the special screws that come with the kit (the usual do not fit). If the installation is made on a log so that the rafter does not slip on it, a semicircular hole is cut at the bottom to support it.
Such fasteners are sold in any construction market, it is called "skolynka." How to fix a skewer to a bar look in the video.
Video on the assembly and installation of gable roof girders
The two-pitched roof is built with their own hands is not easy: there are a lot of subtleties and nuances, there are different ways of fastening, building up. Describe the words of their work ungrateful. This is the case when it is better to see. Below you will find a selection of videos that you might find useful.
A video report on how to make a gable roof
The story of the owner of the house on the stages of construction. There are interesting technical points that can be useful.
Two types of connection rafters: rigid and sliding
Video about the two most problematic types of connections.
How to determine the angle of the rafters
Full video report on the assembly of the rafter system
This film takes a little less than an hour, but the news process is demonstrated from start to finish with a lot of details. The roof is put on, but when installed on buildings of a different type (except for wooden houses) there is no difference.
The main purpose of this article is to consider the process of independent construction of a gable roof for a country private house. Why gable? The fact is that this form is most convenient both from the point of financial costs and simplicity of installation in comparison with other configurations. Another option - saddle roof, however, for low-rise construction it is almost not suitable and is usually used except for add-ons, garages and other similar structures. However, you can find very successful solutions with saddle roofs.
Building brigades can build the same roof a little differently. Probably, some way can be called more reliable and simpler than presented in this article, but this is a topic for a separate conversation. There are two types of gable trusses gable roofs: in the first case, the rafters are laid on the Mauerlat, in the second - laying the rafters on the floors of the previous floor. This article considers the second option.

Calculations here and further are given for a brick box measuring 8x8 meters and 3 meters in height. As with other options for erecting a roof, the first step is to install the Mauerlat. Mount the Mauerlat on the inside of the walls, and from the outside lay a brick for aesthetic reasons. During installation, make sure that the upper part of the Mauerlat does not protrude by 2-3 cm from the facing brick. This is necessary for the load of the roof to lie exactly on the Mauerlat, otherwise it will be transmitted facing bricks, which is fundamentally wrong.
Beams overlap
The next step is the installation of beam ceilings. First you need to install the edge joists. Their removal will determine the width of the cornice. The width of the cornice, depending on the wishes of the customer, can be 40-50 cm. The beams are special bars, the cross-section of which must be calculated separately, taking into account the different moments (snow load, wind load and other factors).

First of all, we put beams marked with figures 1,2,3,4.
For a given brick box measuring 8x8 meters, the cross-section of the beam is 100x200 mm. When the outer section beams are installed, it is necessary to pull the shoelace along the upper part and expose the other beams. In this case, it is usually required either to groov under them the Mauerlat, or to lay thin veneers. What is noteworthy, this has to be done often, especially considering that the ordered bar can be slightly different in cross-section. If you order a beam of 200 mm, you can bring 190-210. Such is the equipment in our country in sawmills.
Take into account the step of the beams, based on the size of the rafter step, which will be laid down in the future. For example, if you take floorboards 50h150 mm, it will be good to choose a step of 60-70 cm, even better to stop at 60 cm, taking into account that such a width is usually a roofing insulation. After installing long beams, you need to put short ones. The step for them is usually 1 meter.

Nails can be used to attach the beams to the Mauerlat. The nails and metal rafters can sometimes be used. In principle, if builders use different fasteners, then the work becomes easier as a result. The variety of fasteners makes life easier for the inexperienced builder, because you do not need to trouble yourself with creating nicks and blanks.
Flooring boards
The next step is the flooring of the boards. It is acceptable to use inching, as well as floorboards. They do not need to be fixed, they are necessary only so that you can walk normally. Next, you need to install a ridge bar. To do this, first you need to establish a level or plummet of the rack 50x100 mm, strengthen them with temporary spacers. Optimum will choose the step for the racks in the area of 3 meters. The first thing to do is to install the outer racks, then between them stretch the laces, then the intermediate ones.

When the truss is ready, the intermediate racks can be removed and work on the creation of residential premises on the second floor. The height of the racks is necessary depending on the desired shape of the roof. The optimal choice is the height equal to the distance from the ground to the Mauerlat. First you need to install the racks, then put the top and fix the ridge bar with a few self-tapping screws. As the last it is permissible to use a board with a size of 50x200 mm.
Installation of rafters
The first step is to create a template from the board approximately 25x150. You need to attach a board to the end of the ridge beam, then to the beam and draw two lines. Then saw off the board, and here's the template ready. Ideally, lay out the foot of the house you need with high accuracy and mandatory installation of beams overlap. In this case, you can quickly cut the rafters on the template and immediately install them. However, this can be difficult, especially when the roof is updated on the old house.

To start, you need to make the top fill in accordance with the template. After this, you should attach the workpiece to the beam, mark the bottom notch. This will require the installation of all rafters. To load does not lie on the ridge beam, and it does not bend, after installing one rafter, you must immediately put the opposite.

What if the skate near the roof is large enough and the length of the standard 6-meter boards is not enough? You can solve the problem in two ways. First: just order longer boards. Immediately it is worth mentioning that they will cost more by 15-25%. But in this case the installation will be much quicker and it will take less.

The second option is the splicing of two boards. For example, you can sew cuttings at 1.5-2 meters, the main thing is that the sections of the two blanks are the same. The joint is made at the bottom, under it an additional rack should be installed. Attach the rafters to the ridge beam by several nails. Attach the beam to the ceiling with fixing plates, self-tapping screws and a couple of nails. Less often in the course are staples. When working with staples, laymen often make mistakes. It must be ensured that the brace works on stretching.

The next step - the installation of racks and crossbar under all rafters except the extreme ones. During construction mansard roof The racks act as a frame for the side walls, and the crossbars perform the functions of the ceiling beams.

After the strengthening of the truss, you should go to the gables. To begin with, you need to install additional racks that act as a gable frame. The installation can be controlled using a shoelace stretched at the bottom of the rafters. After this, make a window opening. The choice of configuration and size - a wide open space for imagination.


After finishing the work with the frame, it is necessary to sew the gable with an inch.


If you later need to install a drainage system and metal holders, you need to install the latter on the rafters right away. At this stage, it is advisable to sew frontal boards with siding. You can use plastic holders of gutters, which should be attached to the front plates.
Rims
It is necessary to fix the waterproofed film on the rafters using a special construction stapler. It is most convenient to work around the perimeter, if, of course, rafters are already installed. You can put them right away, because this in any case will have to be done when installing the roof, drainage system and sheathing of cornices with siding.
After fixing the film, it is necessary to nail the strap to the rafters. It will be necessary to leave a little space under the overlap of the next part of the waterproofing. After this, you can start making a billet, which you need to cover the entire roof.
At the next stage, it will remain to create a pediment tile with a gable overhang. To begin with, it is necessary to sew the windboard of the gable overhang 25x150 mm to the climbing ends of the crate, insert it and fix it with the help of self-tapping screws of the filly of the gable eaves. It is necessary to observe the distance - about 1 meter between them.


From the bottom to the filly you need to sew two belts.


This concludes the construction work.
