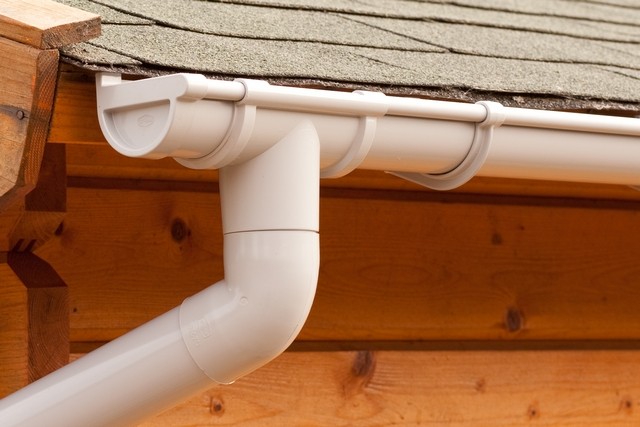
The fixing of the drain is the next stage of the construction work after the roofing. This system is designed to remove rain and melted water from the roofs, this, in turn, helps to avoid the destruction of the foundation and walls of the structure. To do it yourself, you need to have at least some idea of the filling of the structure and the principle of its operation. That's what we're gonna do!
Gutter system provides construction of the house for a longer time of existence.
How does the drain work? Water, draining from the roof, falls first in the gutter, and then from the pipes - into a specially designated place. Most often the system is made of galvanized steel, copper and plastic. Steel drainage structures are advisable to install in houses with a large roof area; plastic suitable for private homes and small buildings, they are light, not corroded, thanks to a diverse palette fit into any design.
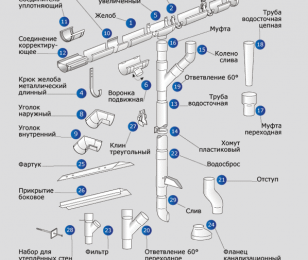
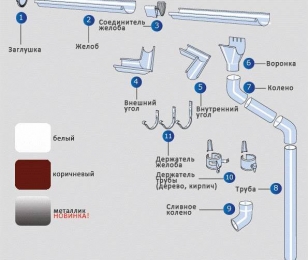
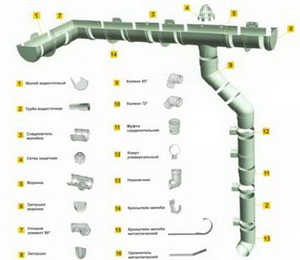
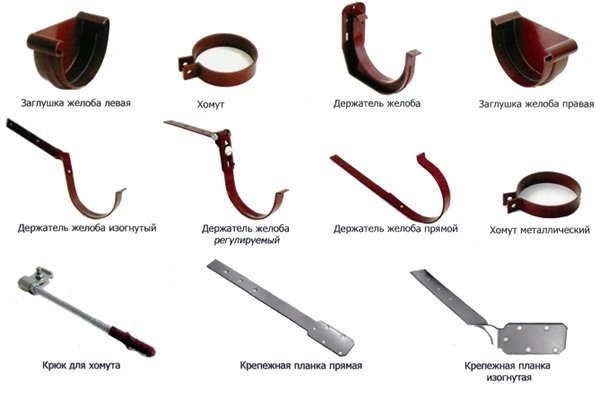
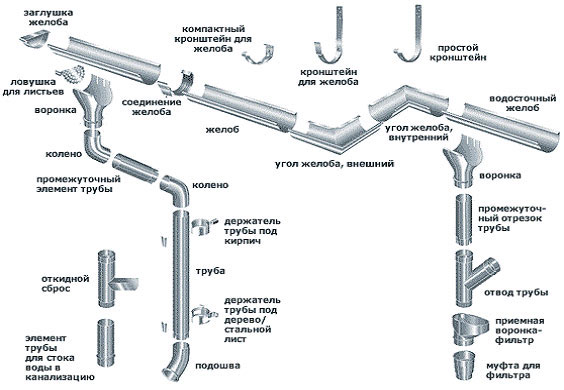
Now let's talk about what drainage systems consist of. The structure is assembled from the following parts:
![]()
- Gutters. These metal elements have a small rim, which gives rigidity to the structure and prevents water from overflowing.
- Funnel. It connects the chute to the pipe, redirects the water to the pipes. This simple mechanism can connect several troughs at once. When buying this system, pay attention to its splitters, they must be strong.
- Coupling. This part of the design is needed to connect the parts.
- Brackets - the devices necessary for fixing parts of the device.
- The plugs prevent the water from escaping.
Materials for systems: plastic or steel
Modern gutter designs produce, as a rule, steel (here we will refer its alloys) or plastic. The drainage from the galvanized steel is a classic of the genre and the choice of thousands of Russians. In recent years, systems have been gaining popularity from metal (with polymer coating), minus they have one - the price: they are usually more expensive than standard products in 2-3 times, plus - a long service life. Drain from zinc-titanium alloy or copper is already an elite category of goods, they have the highest performance characteristics. Plastic - another option, it is practical, inexpensive, it is quite simple to mount, the products are not corroded and serve for a long time with proper operation.
Gutter mounting: mounting steps
The installation of the system consists of four actions:
- Install the drainage hardware. Make sure that the gutters are under a certain slope (the angle is specified in the instructions).
- Install the plugs and funnels of each gutter.
- Connect the individual elements of the chute to one common construction.
- Set the drainpipe.
Now let's talk about how to fix the gutter.
Fasteners and their application
To install the gutter, special brackets are used. These parts are made from various building materials in any necessary configuration. There are four main ways of fixing the brackets:
On the frontal board of the roof. The method can be used if all work with the roof has already been completed. It is worth noting that this is an ideal option for fixing plastic products.
- If there is no frontal board, fasten the brackets to the rafter feet.
- If the second method does not suit you for some reason (for example, the roof is already covered with roofing material), hammer metal pins into the wall of the structure, then install the trough with adjustable pins.
- The following variant of installation of brackets means fastening on the bottom part of a flooring or on a roofing crate.
For the installation of drain pipes use special clamps. Most often builders prefer metal fasteners. The clamp should not fit snugly against the drainpipe (especially with PVC structures), under the influence of the temperature drop the material can somewhat change its size and shape, rigid fixation will lead to the formation of cracks.
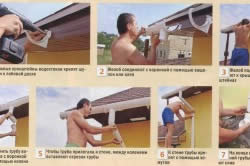
Mark the place where the overflow funnel should be located. Note that its inlet should be placed 1 cm below the drip. Install the mounting brackets. Do not forget about the slope of the gutter. Set the hook (it will be in the highest position), after - the bracket (it will be lower than the other elements), between these parts, pull the rope (focusing on it, fasten the remaining brackets). After installing all the fasteners, place the chute on them, fix the system. It's up to the vertical parts!
In the pipe installation, observe the following rules:
Pipes must be installed from the bottom up.
- To fix the pins on which the clamps will be fastened, make holes in the wall.
- On the two lower clamps, fix the mark.
- Install all remaining drainpipe links.
- The optimum distance between the yokes is 180 cm.
Today, modern spillway systems are usually sold immediately with the necessary details. Each manufacturer has its own standards, which is why it is important to carefully read the instructions attached to the product, a specific part may have individual rules of attachment. Do all the work qualitatively, because a fallen pipe or a fallen trough can cause considerable financial damage.
The appointment of a roof over the house is not necessary to explain. One of the functions is to protect the attic or attic from precipitation, i.e. from water leakage. But, draining over the slopes of the roof, water inevitably falls on the walls and foundation. As a result, the load-bearing elements of the building structure are destroyed very quickly.
Avoid the destructive effect of water can be by installing a roof drainage system. Before we proceed to the master class on the installation of gutters, a bit of theory.
Types of drainage systems
The drainage system has two signs of classification, which determine the technology of its installation:
1. By the way of manufacturing - homemade, industrial.
Handicraft production, i.е. homemade drain from the roof. In favor of this system speak such facts as the opportunity to make a beautiful and unusual gully with their own hands. The manufacture of a self-made system is not costly. In addition, it can be mounted on a user-friendly scheme. An unconditional lack of the need for constant maintenance, since the gutters are usually made of galvanized steel, which quickly rot. Among the conventional drawbacks - the complexity of docking individual elements and a mediocre appearance.
Factory production (factory). This method assumes the maintenance of all standards and parameters. Ie, if necessary, you can easily connect different elements from different supplies of one manufacturer.
2. According to the material used - plastic, metal.
By the method of installation, the adhesive system is isolated (installation takes place with the use of glue) and glueless (installation on sealing gums).

Advantages of plastic gutters:
- immunity to ultraviolet radiation. A quality plastic gutter system will not burn out during the entire service life;
- not subject to corrosion;
- the adhesive system does not require care, since the "cold welding" method is used during which the joining of elements occurs at the molecular level;
- strength;
- low weight;
- operating temperature -40 ° C + 70 ° C;
- simplicity of installation;
- different color gamut;
- a wide variety of components allows the creation of a drain system of the desired configuration, which makes it indispensable for installation on broken roofs.
Disadvantages of gutters made of PVC:
- plastic can break down from mechanical impact. Therefore, such systems should not be installed on high-rise buildings. Gutter system of plastic is mounted only on a low-rise private house;
- repair incapacity. The destroyed element can not be restored;
- plastic drainage system with rubber bands requires periodic replacement of seals, which entails disassembly / assembly of elements;
- high coefficient of linear expansion.
Gutter system of metal profile has several varieties: galvanized, copper, galvanized with a polymer coating (painted). The main difference between them: the cost and duration of operation. Appearance is presented in the photo.
Advantages of metal gutters:
- strength;
- reliability;
- they withstand significant snow loads and other environmental influences;
- do not support burning;
- operating temperature -60 ° C + 130 ° C;
- dimensional stability.
Disadvantages of gutters made of metal:
- high price;
- significant weight of the whole system;
- complexity of installation;
- small selection of colors;
- the appearance of rust in the event of damage to the protective layer (exception - a drainage system made of copper);
- a small number of elements makes it suitable only for mounting on roofs having angles of 90 °.
Which drainage system is better, plastic or metal, it is difficult to answer unequivocally, it all depends on the specific operating conditions and other factors. In any case, the choice of drainage system should be based on quality indicators, not prices.
From the standpoint of this classification, we will consider how to properly mount a drainage system with our own hands.
Installation of drainage system - instruction
Like any construction process, the technology of gutter installation includes the selection of the system, material and calculations.
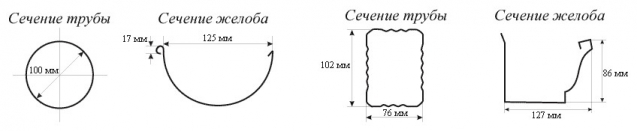
There are several options for drainage systems, depending on their throughput. For example, 100/75, 125/90, 150/110. This marking shows the ratio between the diameter of the pipe and the chute. The system of circular cross-section 125/100 and square section is clearly visible in the photo.
Council. Each manufacturer has its own dimensions of gutters, pipes. Their configuration is also different. Therefore, do not even try to dock the systems of different manufacturers.
Such a variety of systems is needed so that each user can choose one that suits his needs.
Choosing a drainage system
In order to properly select the water drainage system you need:
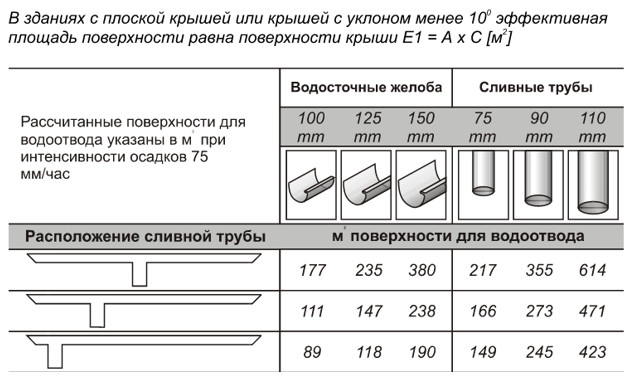
- to know the maximum level of precipitation in your region;
- calculate the area of the ramp (S). Not all, but the largest in size. It is its size that will be decisive for choosing a chute
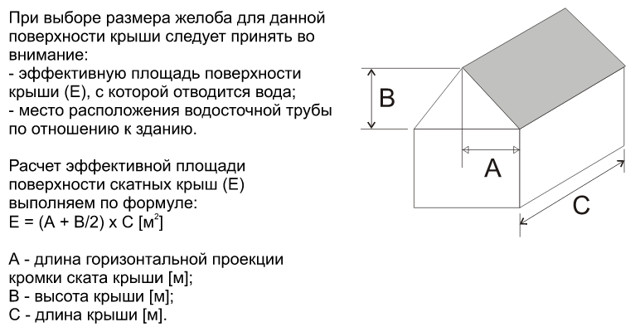
S = (A + B / 2) x C
Nuance. For flat roofs (the slope angle does not exceed 10 °) the formula takes the form
S = A × C
Based on these measurements, select the desired system in the table.
Once the system is selected, you need to define the view and calculate the amount of material. To do this, prepare the drawings or diagrams of planes with dimensions. They will simplify the calculation and then the installation of a drainage system.
Calculation of the drainage system
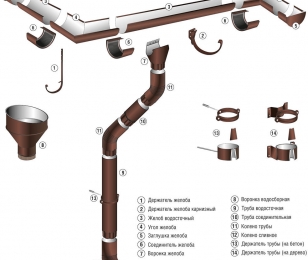
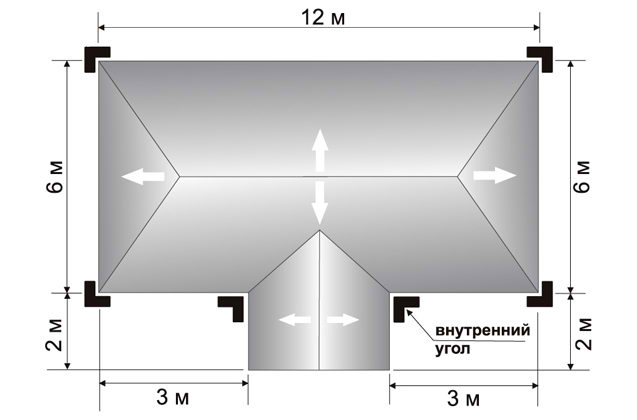
Let's illustrate the example of a house, how to calculate the amount of materials for a drainage system.
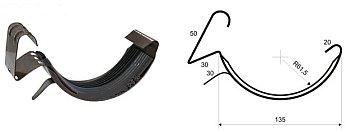
Gutter gutter - semicircular (semicircular section) and rectangular (rectangular section).
It is designed to collect precipitation (rain and meltwater) from the roof.
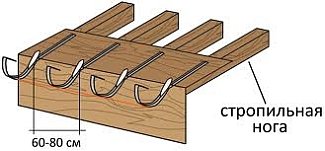
 The length of the gutter is 3-4 m. It is fixed with the help of hooks and brackets, which are set at a pitch of 60-90 cm with the slope of the gutter gutter not less than 1 cm for every 3-4 meters.
Their number in meters of linear is equal to the perimeter of the base of the roof. That is, the length of all surfaces on which the gutter will be mounted. Dimensions gutter - sold individually by 3 and 4 m.
For a house the size of our example will require 3-meter troughs - 10 pcs. 4 meters - 1 pc.
Nuance. All dimensions are rounded to the whole length of the gutter. The fewer connections, the simpler, more reliable and cheaper it will be to install.
The corners of the gutter gutter (external (external) and internal, 90 and 135 degrees).
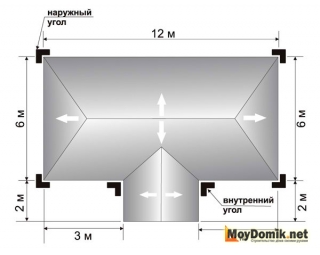 The angled trough is designed to change the direction (distribution) of water flows. Mounting method: fixed to the outer and inner corners of the roof.
We need 4 outside corners and 2 internal corners, all with a 90 degree angle.
If a house or a cottage has sharp or obtuse angles, you need to choose the system in which such angles exist.
Council. From the plastic trough, various angles can be made by cutting out a part of the trough and connecting the halves at the desired angle. Connect parts using glue - cold welding.
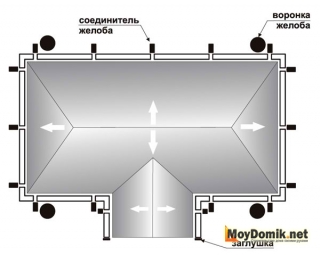
Gutters, connectors, gutter plugs.
For our example - 4 funnels, 2 stubs. Connectors can be - 5 or 17. Depending on the particular installation of a particular system. In most drainage systems, the corners are fixed directly to the gutter. But in some - with the use of a connector.
 In drainage systems, where the installation is performed with the use of adhesive, it is necessary to use conventional connectors and compensating connectors.
Compensating is installed with a roof length of more than 8 m. Its installation is done without the use of glue. Such a connector is designed to compensate for linear expansion of the trough when heated / cooled. For our example, we would need 4 conventional connectors and one compensation connector.
Council. One funnel receives water with 10 mp. gutters. If the length of the wall is more - you need to put two funnels. In our example, we did so. The distance between two adjacent funnels can not exceed 20 m.
Hooks attaching the chute.
 Hooks can be long and short. The first are intended for suspension of the gutter on the rafters and are fixed prior to installation roofing material. The second (short) is used to attach the gutter to the frontal board, respectively, it is possible to install on the finished roof, i.e. covered with roofing material.
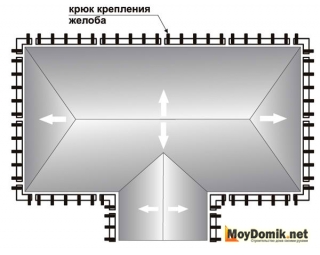
The hook of fixing the gutter is installed with an interval of 60 cm. At the same time, it is obligatory to install near the corners, funnels, plugs and in the junction points. In our example - 68 hooks.
Gutters (for vertical drainage), fasteners / pipe brackets.
The pipe can be round and rectangular. Designed for vertical water flow.
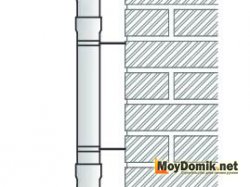
The pipe bracket is designed to fix the pipe to the wall. According to the method of installation, they are distinguished "on a stone" (for fixing on a brick, stone or concrete wall, fixing by means of hardware) and "on a tree" (for fastening on wooden walls (beam, log, OSB).
The number of pipes is determined by the number of funnels. In our example, funnel 4, means the pipe installation places are also 4. In m. their length is equal to the total length of all the walls along which the installation is planned. Pipes are also sold in lengths of 3 and 4 m. Rounding should be done to the big side, since joints on the pipe are also undesirable. Those. if you have a house height of 3.5 m, you need to buy a 4 m pipe. 0,5 will go to waste or for other needs.
 The pipe fastening is installed through each meter. At the same time, their installation is mandatory near the knees.
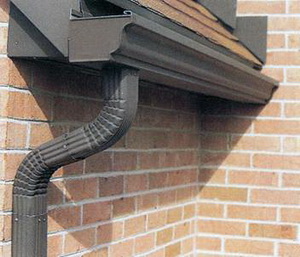
Knee pipe, drain (knee drain).
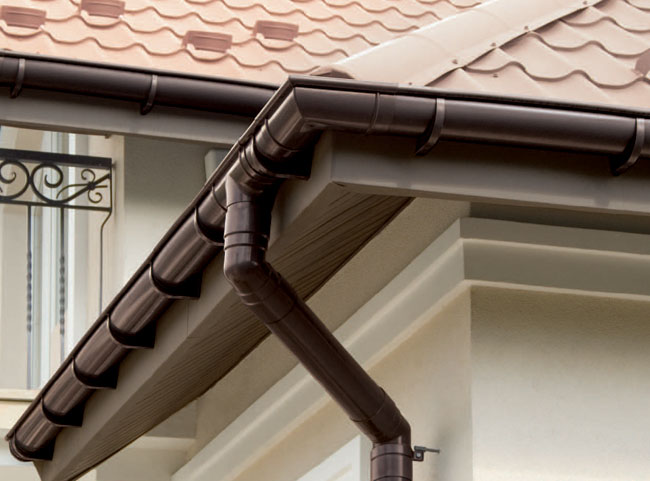
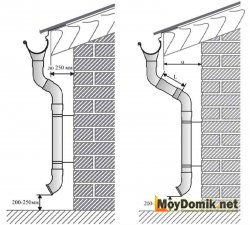 If the design of the house is similar to the one shown in the photo, then for each riser (we have 4) we need two universal knees (total 8) and one drain (total 4).
 The distance L is measured as shown in the figure.
Material prepared for site www.site
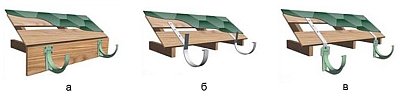
Nuance. makes some adjustments to the calculation of the drainage system. The height of the attic wall affects the number and installation of gutters. The diagrams below show what needs to be taken into account in the calculation.

Installation of drainage system made of plastic (PVC)
 1. Installation of funnels rainwater (roofing, storm, water intake) on the roof.
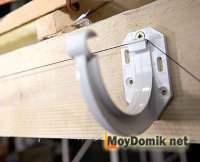
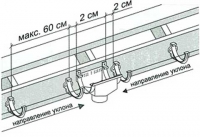 The hooks attached to the funnel nearest to the funnel are installed at a distance of 2 cm from it. They serve as holders.
Council. The angle of inclination with respect to the funnel is 2 ° or 3-4 mm. on 1 m. To check up a slope conveniently with the help kapron thread.
With a wall length of 10 to 20 meters, it is more expedient to install the trough in the following ways:
- Simple slope (straight) - the funnel is installed at the end of the ramp.
- Double bias: "from the middle" or "to the middle".
In the first case, the middle trough is at the highest point, and water moves to the funnels located at the corners of the building. In the second case, at the highest point there are two extreme gutters and water moves to the funnel, located in the middle between them. If the gutter length exceeds 22 meters, three funnels or a more powerful system are installed.
The fixing of the drain is the next stage of the construction work after the roofing. Gutter system allows you to avoid the destruction of the foundation and walls of the building. To install a drain with your own hands, you need to have at least some idea of the filling of the structure and the principle of its operation.
Stages of installation of the drainage system- Install the fasteners of gutters, not forgetting that the trough should be under a certain slope.
- Install funnels and gutter plugs;
- Lay the drainage gutter from the roof to the place;
- Connect the individual elements of the gutter to the common system;
- Install a drain pipe.
Special brackets are used to install and hold the chute. These parts are produced in different configurations and from various materials.
As a rule, the material of the brackets is selected in accordance with the material of the gutter and other parts of the drainage system.
1. On the frontal board of the roof. This method is used when installing the wastewater system on the roof already prepared or during the repair. Most often, this method is used when installing gutters from plastic.
And how to fix gutters, if there is no frontal board in the roof structure? In this case, the brackets are fastened to the rafter feet.
If this is not possible (for example, the roof is already covered with roofing material), then metal pins are hammered into the wall of the house, which is fixed by means of height-adjustable studs.
2. fixing to the roofing crate or to the bottom of the solid flooring.
In order to implement the fastening of drain pipes, special clamps are used. The shape of these parts and the system of their attachment to the wall may differ from different manufacturers.
Most often, use metal clamps, reinforced with a single long hardware or plastic clips that have two attachment points.
When choosing a type of clamp, you need to consider the following nuances:Depth of fastening of hardware (it should be not less than 50-70 mm);
The distance between the pipe and the facade wall (it is forbidden to fasten the pipe close to the wall).
In no case can the clamp be strengthened so that its hardware will be in the layer of thermal insulation, since such fastening is extremely unreliable.
The clamp should not fit excessively tightly down the drainpipe, especially if PVC pipes are used. The fact is that under the influence of temperature changes the material slightly changes its linear dimensions and rigid fixation can lead to the formation of cracks.
The following types of fixing elements are used for fixing the gutters:
Brackets. Allow to fix the gutters. The size and shape of the brackets depends on the shape and overall dimensions of the troughs used.
Clamps. They are attached to the walls and allow to fix the drain pipe. For different types of walls (wooden and brick) different clamps are used. The shape and size of the clamps depends on the type of drain pipes used.
The most commonly used metal clamps, fastened with a single, and long, hardware. Clamps made of plastic have 2 attachment points.
The installation of the system consists of four actions:- Install the drainage hardware. Make sure that the gutters are under a certain slope (the angle is specified in the instructions).
- Install the plugs and funnels of each gutter.
- Connect the individual elements of the chute to one common construction.
- Set the drainpipe.
- Now let's talk about how to fix the gutter.
Scheme of fixing the drainpipe
As a rule, the gutter is fixed during the laying of walls, but this work can be done later, after the completion of work on the roof.
During installation, the following recommendations should be adhered to:
Installation of the pipe is made from the bottom up.
To fix the pins on which the clamps are fastened, it is necessary to make holes in the wall.
On the lower yoke (or the two lower yokes), the mark is attached - the part of the pipe with the cut off corner. Instead of this part, you can install a conventional pipe link and connect it to the entrance to the storm sewer.
Then all the other links that make up the drainpipe are assembled. Each link should be fixed with a separate clamp, and in the event that the length of the link is 2 meters or more, then in the middle part of the pipe it is necessary to install an additional fastening.
The optimal pitch of the clamps is -1.8 meters.
Fastening of horizontal parts - gutters and sinks
Scheme of fixing gutters
At the first stage of work, horizontal parts of the system are installed. The works are carried out in the following order:
The length of the cornices is measured and, based on the result obtained, the total length of the gutter is determined. Counting the number of fasteners, taking into account that the step of the brackets should be 0.6 meters.
Mark the location of the spillway. It should be noted that the inlet of the funnel should be located 10 mm below the drip on the cornice overhang.
To fix the gutter, it is necessary to install the mounting brackets. When installing the hooks, remember to observe the slope of the gutter. To facilitate the task, first strengthen the hook, which will be located in the highest position. Then mount the bracket, which will be located below all. Between these two parts pull the rope and on it the other brackets are already installed.
After the installation of the brackets is complete, a gutter with rainwater funnels is laid on them and fixed.
Types of drains
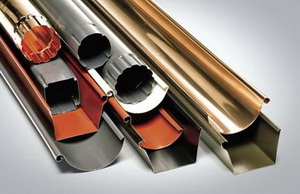
Gutters can be divided into 2 main groups: plastic and metal gutters (steel galvanized gutters and gutters made of galvanized steel with a polymer coating, as well as copper gutters).
When choosing a drainage, it is necessary to take into account the material of the roofing. For example, for a roof made of metal, it is better to install metal gutters made of galvanized steel with a polymer coating made of plastisol. All the details of this gutter have a coating and a color on both sides, in this connection a high corrosion resistance and durability of the weir. Drainage from steel at temperature differences allows you not to use special expansion elements.
Gutters come in different types, for example:
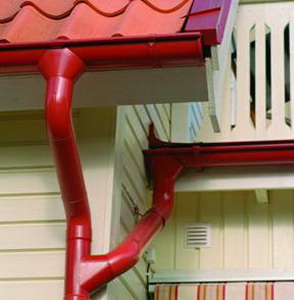
Decorative drains
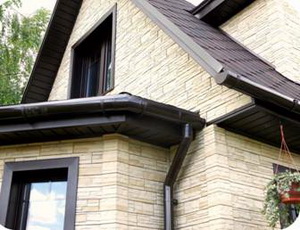
The house with a drain looks stylish. Gutter system by color is better to choose in a tone metal socle and window outflow. The most popular colors are white and brown. Now it is possible to pick up a drain not only of a round shape, but also of a rectangular shape.

Metal gutters
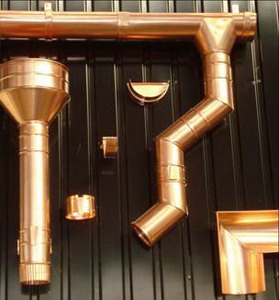
The most reliable and durable metal gutters are copper gutters. The secret of their durability lies in the fact that over time on the surface of copper formed oxide film, which reliably protects the metal from any environmental influences. The main disadvantage of copper gutters is a high price.
Metal gutters have affordable, and high performance. Gutters made of galvanized steel with a polymer coating - the best choice for a drainage system, although they are more expensive than conventional metal gutters made of galvanized metal. Polymer coating of the metal gutter gives it protective functions, reduces the risk of corrosion, increases frost resistance and durability of the gutter.
Elements of metal gutters:- flute pipes
- water intake funnels
- knee
- fasteners for gutters and vertical pipes.
Installation of such a system requires special care and accuracy, as well as a professional approach. If the work is done poorly, then there is a possibility of leakage and leakage into the building, destruction of the foundation, roofing, and this in turn will lead to costly and expensive repairs.
Such a system consists of installed metal gutters, consisting of:- external drainpipes of different or equal diameters;
- system of gutters of different diameters (gutters are installed at an incline to ensure the outflow of water from the surfaces of the building);
- fastening systems, brackets, which fix the structure.
Thanks to the system of drains, consisting of external pipes, the shape of which can be round or square, water is channeled through gutters to a safe place for your building.
For the production of pipes a metal sheet is used, the thickness of which reaches 0.7 mm. For durability of the construction, plastisol or pural is applied to both sides of the pipe, which protects the drainage system from sudden temperature changes, which allows to operate the pipes in all weather conditions.
Metal gutter costs more than plastic, but the difference in price fully pays off its performance characteristics. Such gutters will be more reliable due to metal brackets-gutters, which will be stronger than plastic ones. They are more resistant to deformation, which is important in the conditions of the Russian winter. Also, the metal with a polymer coating will be more color-resistant. Once invested in the purchase of a metal gutter, you will permanently get rid of many problems.
Particular attention in the construction of the roof should be given to the diversion of water, with the purpose of which the drainage system is installed. Its main purpose is to protect the roof, facade and foundation from excessive water ingress. The fixing of the gutter system is carried out with the help of clamps, which are fixed in the wall by dowels. In most cases, the pitched roof of the building is equipped with a drainage system. It consists of the following components:
- gutters;
- drain pipes;
- funnels;
- additional accessories.
Gutters are classified according to the shape and material of manufacture. The shape of the gutter is distinguished:
- rectangular;
- trapezoidal;
- semicircular.
According to the material of manufacture:
- plastic;
- metal.
In addition, they can have a very wide variety of colors, which allows you to choose the most harmonious option in each individual case. During the calculations, it is necessary to take into account the shape of the gutter, as it determines the useful area and, accordingly, the throughput. In addition, the material from which it is made is taken into account, plastic elements are very fragile and unreliable when used in cold conditions. For this reason, the choice of these parameters should be approached very competently.
Features of installation of the water drainage system
The gutter is attached to the building and roof using special brackets. As a rule, the rule is adopted, according to which the fixing of the gutter is carried out through each meter. When calculating downpipe pipes, take into account the fact that every 10 meters of the gutter should be equipped with one drain pipe with a diameter of 100 mm. It is very useful to know the roof area, and even better, its projection. This is due to the fact that a roof with an area of 100 m2 at a slope of 30 ° will perceive more precipitation than a roof with a slope of 45 °. Specialists in the construction industry have long established that every 100 m 2 of the roof projections must be equipped with one drain pipe with a diameter of 100 mm.
The fixing of the drainpipes is also carried out with clamps, only slightly different than for gutters. Very often, buildings and structures have a complex roof structure, requiring additional installation of downspouts. In this connection, specialists take into account the presence of pediments, ledges, bay windows and other architectural features.
One of the cheapest options of modern drainage system - a system of galvanized steel. They have good operational properties and a long service life. The main advantage, which distinguishes them from plastic systems, is the preservation of all mechanical characteristics regardless of the ambient air temperature. Another important advantage is their low price and ease of installation. This makes it possible, even for people with average incomes, to self-equip themselves with a qualitative and inexpensive water disposal system.
Especially often there is a question, how to fix a gutter from the galvanizing to the building. This can be done very simply with the help of special galvanized clamps and brackets available on a free sale. One of the features of the design of galvanized systems is the presence of a protective polymer layer under the paint. When this polymer coating is deformed, corrosion will spread very quickly over the entire damaged area. In this regard, when operating and installing galvanized elements, use sharp objects and tools, as well as excessive bends and other operations that are hazardous to polymer coatings, is prohibited.
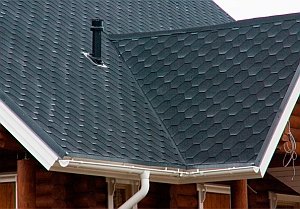 When choosing the color and texture of the drain special attention give the color of the roof and the facade of the building. Gutter system should harmoniously fit into the design of the structure and not spoil its appearance of the facade. Otherwise, the drain should be hidden from the back of the house, which will be the best solution if you can not choose the right color. When using soft shingles, experts recommend installing a plastic drainage system. This is due to the presence of a layer of mineral crumbs with abrasive properties. With large flows of water, it is washed into the drain, scratching the surface of the gutter, funnel and pipes, and this, accordingly, can lead to damage to the polymer coating and the development of corrosion.
Mounting brackets
The correct answer to the question of how to properly fix the gutters depends entirely on the type of system and the properties of the building itself. When constructing a drainage system, the following installation options are used:
- Mounting brackets in the horizontal plane on the roofing board is used when using plastic troughs.
- In the absence of a frontal board, a gutter trough is attached to the rafter feet. In the case of impossibility to implement this method, use special brackets, adjustable for the height of the studs.
- Quite often, they are assembled with fastening to the bottom of the flooring or the roof crate.
- Fastening of the drainpipe to the wall is carried out using clamps (plastic or galvanized).
The choice of fixing clamps is carried out taking into account the following requirements:
- the clamp should be fastened to the wall with metalware with a working length of at least 50 mm;
- the depth of fastening should be selected taking into account the thermal insulation layer of the wall;
- between the wall and the pipe there must necessarily be a gap.
It should be noted that when tightening the clamps, it is necessary to leave a gap of 1 millimeter for possible thermal expansion of the drainpipe due to differences in the ambient air temperature.
Installation of gutters
For the installation of gutters gutter system consistently perform the following actions:
- according to the results of measuring the total length of the cornice, calculate the need for troughs;
- the need for consumables is calculated in order to make the drainage to the roof;
- produce markings for installation of fasteners of drainage elements;
- fix the brackets to the pre-designated places, taking into account the necessary slope of the gutters towards the funnels;
- they fix the gutters to the roof using pre-installed brackets.
It is important to know that for the implementation of qualitative marking, you need to have the following tool: a roulette measuring at least 3 meters long, a skein of threads, a level, a pencil.
Using optional accessories
As additional accessories in the drainage system apply:
- plugs;
- knees (45 ° or 90 °);
- taps (two or three streams);
- rubber seals (for plastic systems);
- compensators (elimination of the consequences of thermal expansion).
Blanks are used for both plastic and galvanized drainage systems of any shape. They are designed to close the deadlock branch of the gutter, which does not lead to the side of the funnel. The knee serves to change the direction of the drain pipes to a certain degree. This makes it possible to bypass various architectural features or hide the drain from the back. Taps for several flows allow draining from all existing downspouts into one outlet pipe, thus saving time and money, since there is no need to additionally construct sewage plums for each funnel. Rubber seals are used when connecting gutters and downpipes, which serve both as a waterproofing gap and an additional fastening factor. Compensators are modern elements of drainage system, designed to prevent deformations during thermal expansion.
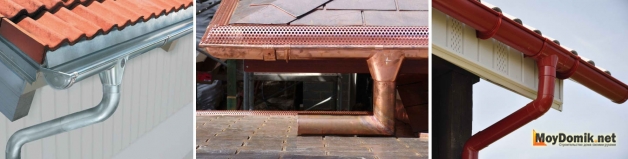
When running rainwater systems, very often there are difficulties that were not observed during installation. Often this is due to clogging of the drainage system, violation of its integrity or mechanical damage. So, after the autumn period of the year, almost all the troughs must be cleaned of the foliage that has accumulated there for the whole year. An exit in this situation can be the installation of a protective mesh superimposed on top of the gutter and having a perforated surface. This makes it possible for unimpeded passage of water into the drainage system while simultaneously restraining the leaves.
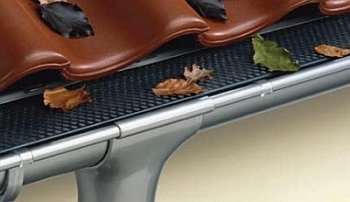
It is important to know that, despite the installation of a protective mesh, it is necessary to periodically clean the gutters of debris and leaves.
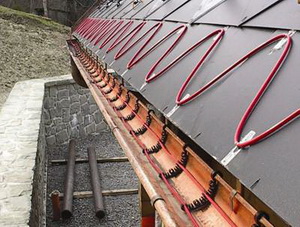
Another common case is the damage to plastic drainage systems due to their freezing. To avoid this, an anti-icing system is used, consisting of heating cables and a control panel.
Author Pavlov Yuri
Nikolayevich
Installation of gutters for the roof - an integral part of the construction and repair of the roof.
Water spreads from the roof in a chaotic direction on the walls, destroys them, and reaching the foundation, it also erodes it.
To avoid these problems, a qualitative water disposal system is envisaged.
Before you start the installation of a roof gutter with your own hands, you need to familiarize yourself with all the necessary information about the system, its structure and how to make gutters.
Types of drainage systems
The technology of installing the roof drainage system depends on its type. The water outlets are divided according to the method of manufacture and the material from which they are made.
By the method of manufacture there are homemade and factory gutters. The positive aspect of the homemade system is that the drainage system will be unique and beautiful, if you apply fantasy and interesting design solutions to it.
In addition, the installation of all elements will be done solely on the idea of the owner of the house.
The author's sewage system is in most cases made of galvanized metal.
There may be a problem with how to fix gutters to the roof with the presence of complex elements that require special care and skills - this is a kind of minus self-made system.
The factory system of drains is made according to certain rules and parameters, due to which all parts of the drainage system of one manufacturer will perfectly match each other, therefore it will not be difficult to install gutters on the roof.
According to the material of manufacture, drains can be made of metal and plastic. The drainage system made of metal is extremely popular, since it has been used since ancient times and has proved itself in the construction world.
Basically there are rounded and rectangular forms of drains. They are made by pressing the steel, the production of which was added zinc.
Metal drainage systems have gained wide popularity due to such positive moments as:
- strength and reliability;
- cope with a large volume of water, snow and many external mechanical influences;
- not subject to combustion;
- wide temperature range, at which deformation of the system is excluded;
- good resistance to corrosion. This is achieved by adding zinc steel to the alloy to increase the strength properties of the metal.
Along with the positive sides, it is worth noting the downsides of the metal gutters:
- high cost of system elements;
- large weight of the whole structure;
- complexity of installation;
- narrow color range;
The system of drainage from polyvinylchloride (PVC) - these days is quite a common option.
Plastic drainage systems have a different fastening system and mandatory presence of rubber seals.
Their advantages:
- rotting and other reactions of the material to water are excluded;
- light weight;
- a wide range of colors;
- strength;
- simple installation;
- affordable price;
- a wide range of accessories for the installation of gutters of various layouts;
- absolute tightness of the connection points.
Design features of drains
The drainage system from the roofs helps to remove excess water. It is necessary for every house and should be provided at the design stage of the building.
The calculation of the gutter for the roof, its appearance, material and methods of attachment depend on the type rafter systems roofs.
For example, with a single-sided system, the rafters will only rush into one direction, so that the roofs of such roofs will be loaded more, unlike other roofs with several skates.
The arrangement of gutters from the roof is a combination of pipes and fixtures. The presence of many elements depends on the material from which the system is made.
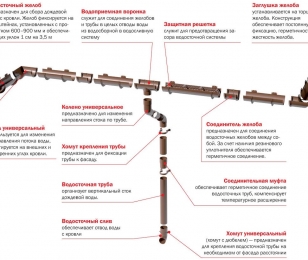
Metal gutters consist of:
- gutter - the main part of the drainage, made of semicircular pipe. Gutters are installed along the perimeter of the building to receive water draining from the roof;
- the connector of the gutter is a peculiar clutch, designed to secure two troughs between each other;
- corners - external and internal. Two troughs welded at the right angle, serving to bypass angular parts of the structure;
- funnel - is installed on the gutters, in which preliminary holes must be made to divert water down the pipe;
- drain - a vertical pipe, through which water from the gutter through the funnel enters the sewer. Mounting the gutter to the roof provides the placement of funnels and sinks in several places of the system for effective removal of water. Their installation should always be strictly above the sewer grids, so that the water gets directly into them, without harming the foundation of the building;
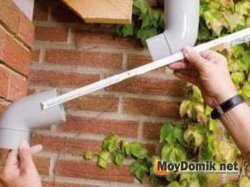
- knee - drain, having a bend, installed to bypass the problem areas of the facade and create a distance between the sink and the wall of the structure, if necessary;
- brackets and clamps - hanging and supporting fasteners, which are responsible for the strength and reliability of the system;
- a plug on the chute, the installation of which is necessary for draining along the edges of the gutters to limit the path to water.
Plastic roof gutters in the structure have the same elements, but due to the properties of the material, many additional components are already added to them: grids and filters, joints at different angles, aprons, covers, transitional branches, couplings, hooks for different purposes, wedges, e.
When installing the system, it is worthwhile to note that all necessary connections are equipped with rubber seals for best sealing.
Due to a large selection of connections, plastic systems are ideal for thinking about the design of a drainage system from pitched roofs of non-standard shapes.
Calculation of the drainage system
Before installing the drains, you need to draw up a diagram and calculate all the necessary materials.
Thanks to this installation of drains by their own hands will pass with the least expenditure of materials and with the greatest accuracy.
Prepare all data on materials can be carried out in a certain sequence.
First you need to figure out how to correctly determine the number of gutters required.
To do this, the length of each side of the house must be divided into equal parts, but not more than four meters. This is due to the fact that gutters are most often found in lengths of 3 and 4 meters.
When calculating you need to build on this. Accordingly, the total number of gutters of the required length can be found by dividing the lengths of the sides in meters by the length of the trough.
Internal and external angles are calculated in accordance with the number and configuration of the corners of the building.
Brackets and hooks go in increments of 50-60 centimeters for metal and 30 centimeters for plastic systems, having an installation with a slope of a gutter of 1 cm for every 3-4 meters.
In the place where a funnel trough is installed, the brackets are fixed at a distance of at least 15 cm from the funnel, corners, plugs and junctions. In the standard gable roof just enough two end caps around the edges of the system.
The number of necessary funnels depends on the length of the roof. One funnel is capable of receiving water from 10 meters of the trough.
If the roof is longer, then you need to install two funnels on opposite edges. But the distance between them should not exceed 20 meters.
The number of connectors depends on the type of system selected. Sometimes the angles are attached to the trough by means of a connector, but basically this happens directly.
Gutter drain is installed with the help of brackets-clamps to the wall of the building. The number of places for installing drain pipes corresponds to the number of funnels.
Pipes for drainage also exist in lengths of 3 and 4 meters. Their number depends on the height of the wall. The height value is rounded into a large staircase and divided into equal parts.
Plums are attached every 100 cm, with the addition of knees and joints.
The knee is used in some cases. For example, if the rafter structure of the roof provides a overhang, the edge of which considerably extends beyond the walls.
In this case, with the help of a knee, the drain is brought to the wall.
Installing the weir system
Installation of the drainage system is performed depending on the material selected.
Mounting gutters better done before laying the roofing. In this case, the brackets are attached to the last two boards of the crate.
Also, there are options for fixing to the cornice after installing the roofing material and fixing the gutters on the lower part of the ramp directly to the roof, which is highly discouraged.
Regardless of where the brackets will be fastened, their location is calculated so that all the water flowing from the roof rushes into the gutters.
The installation technique includes several actions. The first stage is the installation of brackets.
They are attached at a certain distance from each other, depending on the material of the selected system.
The plastic system is less stable, therefore it requires mounting the fasteners twice as often.
Brackets are installed in such a way that the roof overhang would go 1/3 of the width of the bracket. The remaining 2/3 will take over the entire volume of the falling water.
When observing the slope for the drain, first fix the first and last brackets with the difference in height.
Then between them stretches the construction cord and determines the line of installation of the other fasteners. After that, the other brackets are attached.
In some trenches holes for funnels are prepared, with their subsequent fastening.
The next step is put and the gutter is collected taking into account funnels, which are installed in pre-calculated locations.

Installation of the drain by one's own hands implies overlapping of the gutters overlapping. If purchased ready-made system, then docking is carried out by means of connectors.
In the case of a lapped version, it is recommended to cover the edge of one of the grooves with a sealing rubber for better sealing. Further, the installed drain channel along the edges is closed by plugs.
The chute is fixed by means of a groove on its edge, which comes to the protrusion of the bracket. Then drain pipes and knees join the funnels.
Fixation of their joints is carried out with the help of metal clamps. Mounting to the wall is also done with their help.
If drainage is provided in the ground, then a drain pipe should end 30 to 35 centimeters from the ground.
If the perimeter of the house is present storm water drain, it is better to connect the drainage directly to the sewage grate.
When the installation of gutters was done by hand, it is recommended to install a plastic mesh in the gutters, which after installation will not allow the system to clog.
As a rule, not many people think about this nuance. In the purchased system for this case, a grid is introduced, which is introduced into the funnel.
Installation of rainwater system on the roof - a painstaking and an important process. The type of system is chosen taking into account financial, constructive and design capabilities.
But there is always the opportunity to choose the system to your taste. Homemade option is suitable for fans to work independently and for those who prefer to save money.
But at the same time it is always worth remembering the important points of calculation, installation of the system and safety in this case.