Everything that is well built is never lost and is quickly located. To this folk wisdom you can add that the proper storage of things saves space and decorates the interior.
All these arguments are an excellent occasion for making a self-made shelving and giving a decisive battle to home chaos and disorder. Its design is so simple that it will not become a stumbling block for a beginner. A pair of vertical frame-racks with cross-beams, shelves of boards, plywood or chipboard - that's all the elements of a standard racking system.
Since there are plenty of places for installing shelving (in a house, a basement, a veranda, a garage), many variants of their constructions have been developed.
In our review, we will consider the most interesting of them and give practical advice On how quickly and with minimum cost to produce a similar structure.
Original variants of shelving constructions
Anyone who believes that the rack is a rough frame with shelves is deeply mistaken. Indeed, for the basement and the garage can not particularly fantasize. Strength, durability and functionality - this is the main slogan for these premises.
For the home interior, on the contrary, I want to do something special and non-trivial. Therefore, the master-do-it-yourselfers spare no time and energy to impress our imagination. A pair of oak boards and a few glass bottles - that's all you need to create an original design.
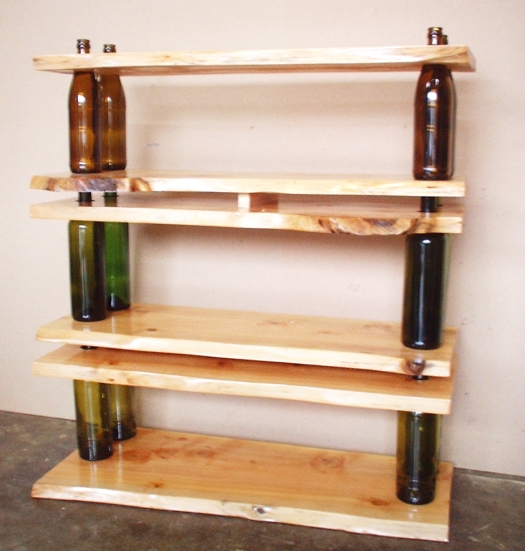
Despite the simplicity, the strength of such a rack is quite high. On it you can store not only books, but also use for layout of wine collection.
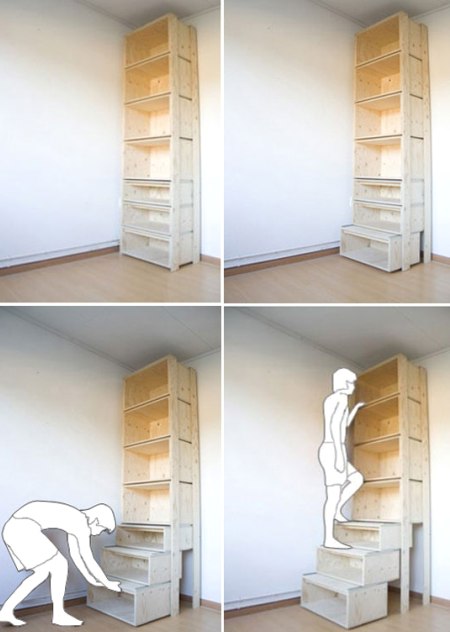
Anyone who has dealt with high shelf designs knows that without a good ladder it's impossible to get to their upper tier. And why not use the shelves as steps - thought the resourceful man and created here such an original system.
The classic frame rack rests on the floor, and for the installation of rope only two hooks in the wall are needed. Of course, heavy cans with preservation can not be stored on it, but for books, photographs and souvenirs it will perfectly suit.

Make a shelf by yourself so that others can appreciate your creative nature by using steel water pipes and fittings. Such a design looks ideal in an interior, sustained in an industrial style. In addition, it is quite appropriate in an ordinary apartment.
Pay attention to the original way of mounting the shelves. They are put on the racks on the principle of the children's "pyramid" tier by tier.

There are no rear support racks for this rack. High rigidity of steel pipe, reinforced with tees, allows you to abandon them. This design can be placed anywhere: in an apartment, on a veranda, in an attic or cellar.

The algorithm for manufacturing such a rack consists of the following operations:
- We cut a bar for racks and cross bars according to the dimensions of the drawing.
- Laying up the racks on a flat horizontal surface, we connect them with cross-bars (use a hammer and nails or a screwdriver and screws).
- We fix the received support frames to the walls of the room through metal plates.
- We cut the shelves from the OSB plate.
- We mount the shelves in the frame and fix them with screws.
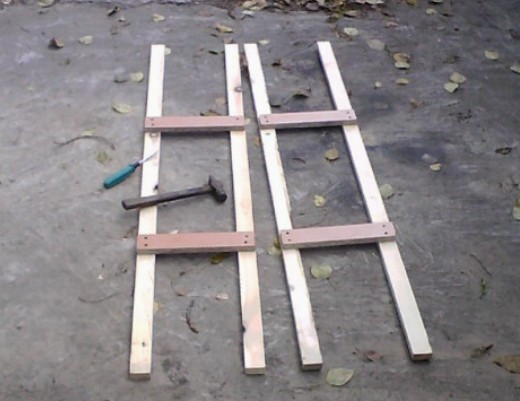
The easiest way to assemble the sidewall of the rack is on photo # 8. We note at once that the nailing connection is not the most reliable, since it does not hold the wood as firmly as self-tapping screws or confirmations.
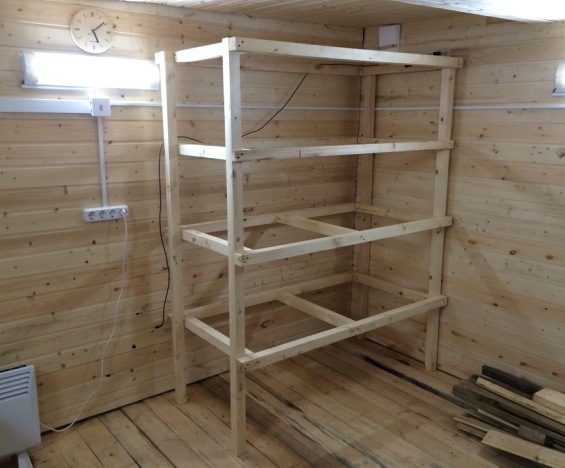
Photo # 9 A small wooden rack, consisting of two sidewalls
The author of the design depicted in photo # 9 refused the intermediate frame. Instead, he strengthened the frame of the shelf with a transverse bar.
The frame of the rack looks more aesthetically pleasing, with the cross-beams flush with the posts, as in the wiring diagram No. 3.
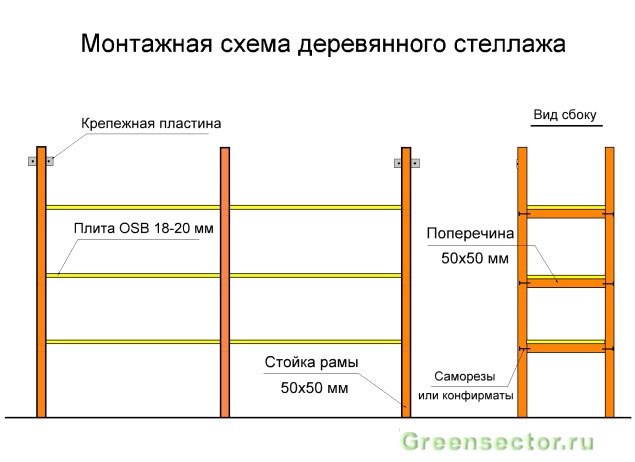
If the pitch of the support frames is small (50-60 cm), then you can do without installing a longitudinal bar. It will be fully replaced by an OSB plate 18-20 mm thick. On a small span of rigidity, it's enough to withstand a lot of weight without sagging.
If you bought a thin slab or three-ply plywood, then the longitudinal bar on each tier of the rack should be installed. He will connect the frames and will serve as a lateral support for the shelves. To increase the spatial rigidity of such a structure, several diagonal screeds from the bars can be fixed to its rear wall.
if you have welding machine, then make a rack of metal profile, it will be easier than wood. If there is no welding, then you will have to take an electric drill, drill bits for metal, stock up with bolts and nuts.
The sequence of manufacturing a metal rack from a corner or a profile pipe is not fundamentally different from the installation of a wooden frame. Here, too, frames are first produced, which are then leveled in a vertical plane and fixed to the wall. When using a thick chipboard board or 30-40 mm thick boards for shelves, the rack can not be connected with a longitudinal profile.
In this case, the shelves are supported directly on the cross-members of the frames and fixed to them with metal screws. If the construction will carry a serious load, then the longitudinal stiffness belt under the shelves will not be superfluous.
Note that working with a profile pipe is more convenient and easier than with a corner. Consider this when buying a metal. Optimum in price and strength section size for a square tubular profile - 25x25 mm, wall 2 mm. The corner is better to buy an equal-sized 40x40 mm.

A lightweight version of the structure can be manufactured using metal support brackets. They are fastened with dowels to the wall, and from above put shelves from a board or OSB plate.
This solution allows you to save space under the rack for installation of large-sized items.
Racks at all times were of great interest. This is quite a convenient thing that can be used to store various things, books. You can also put on high racks and pots with stunted plants, which will look pretty nice.
Drawing 1. Drawing of a wooden rack.
It is not so difficult and practically possible to make a wooden rack by yourself. You just need to prepare everything you need to work in advance. To date, there are many options for racks, different in design. But below we will consider one of the simplest and most practical options.
Materials and tools for work
Before you start the process of making a wooden rack with your own hands, you need to choose the right materials and tools.
As a basic material, it is advisable to choose boards from natural wood. For this purpose, oak, pine or mahogany is best. It is not recommended to use boards based on wood chips, as they will not be particularly longevous and practical. At the same time, make sure that the moisture content of the wood does not exceed 12%. Also, before work, the tree is treated with antiseptics and special impregnations, after which they give him a couple of days to lie in a warm room. In addition to boards, for the rack you will need:

- roulette and pencil for marking;
- self-tapping screws;
- grinder;
- electric jig saw;
- varnish for wood;
- a hammer;
- joiner glue;
- metal corners;
- drill;
- plywood;
- furniture legs on wheels;
- varnish and brush;
- wooden bars for transverse fixation of shelves;
- holders for shelves.
Preparation of the base, walls and shelves
We begin by selecting the bottom base. As such, take a thick board (the thickness should be such that a 3-cm-long self-cutter can enter freely). In this case, its length is equal to the maximum length of the rack, and the width to its maximum width, which you choose yourself. At the bottom of the bottom, it is advisable to nail down transverse bars, each equal to the width of the base, through each meter of the length of the rack. They will provide an additional fortress.
Now go to work on the sideboards. If you have limited material resources, you can use thick plywood instead of natural wood. At once mark it so that width was equal to width of the basis, and height of boards thus is selected independently. Next, cut carefully the sides of the right size. Immediately do on their inside the markings for shelves. At the same time, it should not be forgotten that the optimum figures for shelving height are 21 and 42 cm. These two heights can be combined. So you get shelves at the same time and roomy, and pretty neat.

Now go on to cut out the shelves from the tree. Their length is measured from the inside of the rack so that they simultaneously and freely and densely fit in the rack. The width is equal to the depth of the cabinet itself. The thickness of the shelves ideally should not be less than 2.5 cm. BUT, it is still better to fix them with transverse bars from below. Bars can be nailed with ordinary small studs.
Then it's time to tackle the back wall. As a rule, if you are satisfied with the color and texture of the wall, which is adjacent to the cabinet, then the rear wall can not be mounted. But if it is necessary, then from the usual plywood the wall is cut out, proceeding from the sizes of length and height of the rack.
Assembling the shelves with your own hands
So, all the necessary structural elements prepared. Now the most important thing is to assemble the wooden rack into a single structure. In this case, it is best to use several different types of fasteners: self-tapping screws, carpenter's glue, nails, and metal corners, if necessary.
Shelf mounting options
First, take the lowest shelf for the base, to which the back wall of the rack is attached using self-tapping screws. If such a wall is not provided for you, then immediately start working with the side walls. On the inside, you have already made markings for the shelves.
So now on each of the markers parallel to each other it is necessary to fix special metal or plastic (depending on the expected load for the shelves) holders on which it will be possible to put wooden shelves. Further, these sidewalls are mounted to the bottom base with self-tapping screws. In doing so, do not forget to observe the evenness of all angles. For reliability, it is even better to use metal corners as fixing elements.
But this was the first version of the shelves. There is also another - a solid fixation. Here you do not need to make holders. In this case, the shelves will be directly connected to the sides. To make everything right, first attach the side walls to the base with screws, after which one person should hold the shelf inside the rack, and the other - with the outer side of the sides fix it with screws. From beneath the bottom of the shelf, it is advisable to additionally fix all the same corners of metal. But keep in mind that this method is a little more complicated, since it requires ideal measurements of the length of the inner shelves, as well as more time and care for work. Any distortions can spoil the rack. Therefore, immediately use the construction level as well.
So, the main part is ready. Now it remains to fix the top of the rack from above, which will give the rack a finished look and protect the uppermost shelf from getting dust on it. Fastening is carried out with the help of the same self-tapping screws.
Making the rack (in particular, in the process of assembly) will be more reliable, if after drilling the holes under the screws you will paint them inside with joinery glue. This will provide additional reliability. As the legs for the rack is best to use the furniture legs on the wheels. So moving the structure in case of need will be much more convenient, and it can withstand any loads, without provoking distortions.
A wooden rack with your own hands is ready! To look at its main part will be approximately, as in Fig. 1. This simple and practical design at the same time is suitable for any room: for the kitchen, bedroom, hall. Now you just have to cover the shelves with wood varnish and allow to dry properly.
Very often when installing furniture in any room, we shorten the expensive space with not very necessary large furniture, while forgetting the simplest solution to this problem, this manufacturing of wooden shelving to order. And how not to twist exactly this kind of furniture is the most ideal solution combining compactness and full functionality. Proof of all of the above is the fact that the racks are used in the office for a huge number of papers, in which it will be very easy to find the document you need. Manufacturing of wooden shelving to order for office or apartment or for a country house, will significantly help to systematize all the important documentation for you and accurately arrange all the papers in one convenient place to search. Do not forget that the rack is not only very functional, but also make it possible to be a beautiful decorative element of your furniture.
The huge advantage of wooden shelving becomes visible to the customer not only in office premises, but also in a country house, because how not to twist the best solution for layout of your huge collections of books, expensive trinkets for you, various gifts and memorable photos. Making racks for a country house will necessarily create the comfort and order that you need. Manufacture of wooden shelving in our company Plotniks passes with full observance of all available standards and taking into account ecological safety for the client. In the end result, after your racks are ready, you get a natural part of the interior that does not negatively affect your health.
To ensure that the "good" in the garage does not interfere with the movement, it is required to somehow organize its storage. The most convenient shelving for the garage. If there is enough space, they can be made on the whole wall or even on several walls. If there is no place below, you will have to move upstairs - to make shelves under the ceiling. Not the best option, but sometimes the only one. And yet the racks in the garage standing on the floor are safer, especially if they are securely attached to the wall (to avoid unpleasant situations).
Which rack is better: welded or bolted
Racks for the garage are made of wood and metal. Wooden mostly undivided - on nails and screws. They are usually fixed, fixed to the wall. Metal shelves can be welded. Then they are not foldable. There are racks on the bolted joints. These structures are mobile, can be disassembled if necessary. Their lack - insufficient rigidity, since always in such a connection there is some play. To make the construction more stable, it is fastened to the walls. For this, metal plates with an aperture can be welded to the outriggers (bolted). In this hole drive a crutch (pre-drilling in the wall a little bit smaller diameter).
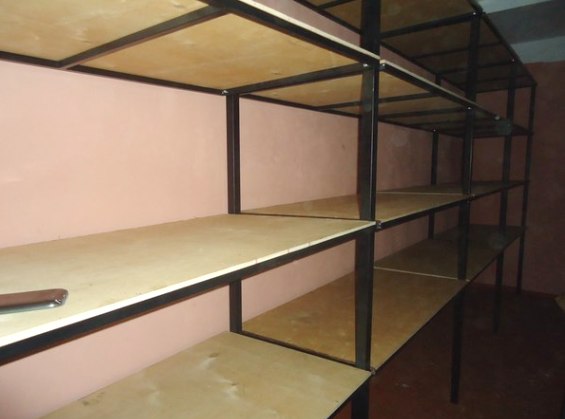
One of the options is a frame made of a profile pipe and a plywood shelf
Both welded and bolt racks for the garage regularly serve, but more often there are welded structures. The collapsible variant is chosen in two cases. The first one is the possibility of moving to another garage and all equipment will have to be transported, but the construction weighs hundreds of kilograms, so it's completely problematic to move it. The second - there is no possibility or desire to use welding (if the racks for the garage do by one's own hands). The rest usually prefer welded - they are more stable and with the experience of welding going faster.
On sale still there are metal racks from the perforated corners. They are also mobile and can be disassembled, but they are connected by hooks (on crossbars) and grooves (on racks). Such storage systems are convenient - you can rearrange the shelves to the desired height. Their minus is expensive.
Constructions and dimensions
Structurally, the shelving for the garage consists of racks, rails and shelves. Sometimes, in order to increase the rigidity, on the back side there are also transversal puffs - two steel strips welded / bolted to the outermost racks diagonally. They compensate for side loads increasing overall stability and reliability.
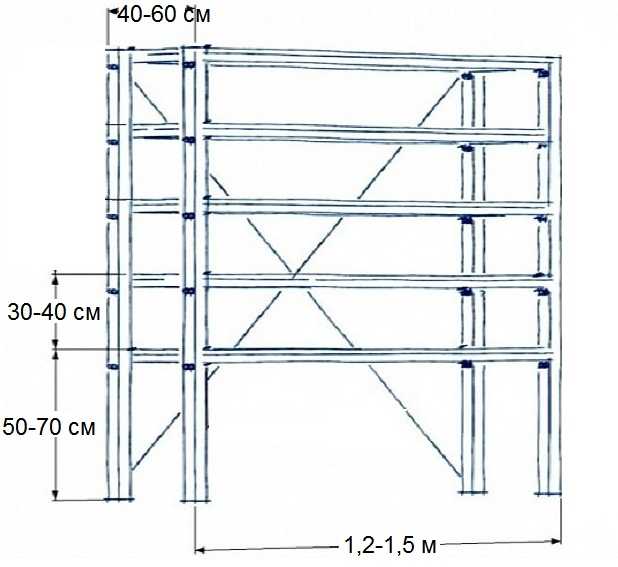
Dimensions - height and depth of shelves - are chosen almost arbitrarily - depending on what you expect to store. The only thing that must be selected carefully - the length of the span - the distance between the racks in one section. It depends on the stiffness of the material that you decide to use: the shelves should not bend even under full load. For heavy objects / items, the length of the span is about 1.5 meters, if the load is not too large, the distance can be increased to 2 meters, but it is not worth doing more. If you need a rack for a longer garage, put intermediate racks, the distance between which still can not be more than 2 meters.
A few words about the height of shelves in the rack. The lowest shelf can be raised from the floor level by 50-70 cm (even more if desired). This is usually put the heaviest items. The rest of the shelves can be made at different heights, 30 cm - it's uncomfortable and impractical. In general, the optimum should be a 1.5 liter plastic bottle on the shelf, and this is 35-37 cm. This distance is convenient for use.
Of what do
As already mentioned, racks for the garage are made of wood and metal. Wood is lighter in weight, with wood it is easier to work, but they do not withstand such large loads. Metal is heavier (heavier at times), but you can also put an elephant on them.
There is still a price issue. Metal rolling now is not at all cheap. If you buy everything on the market or in a store, at a price you will have one rack (together with consumables) that will cost almost the same amount as the finished one. The only real way to save money is to buy metal at the metal warehouse with whole whips (there are 6 m and 12 m), and then cut into lengths of the required length. Cutting can be directly on the base, you will have to pay extra for the services, but the amounts are quite small. In this case, you will be able to cut costs by about 20-30%.

Lumber compared with metal is less. But do not think that the costs will be small: you will have to buy varietal wood without knots, and this is the class of "elite" or "premium" with the corresponding price tag. So it's not very cheap.
Of wood
The operating conditions in the garage are far from the best - high humidity, frost, alternate dimensioning / freezing, at times - heat. Not very good for wood. Therefore, all the material before work must be treated with antibacterial and protective compounds. Take funds for wood for outdoor work, as the conditions in the unheated garage are more like them. You can choose a tool that simultaneously tones the surface to be treated and your product can not be painted. After processing, the materials are dried and only then work begins.
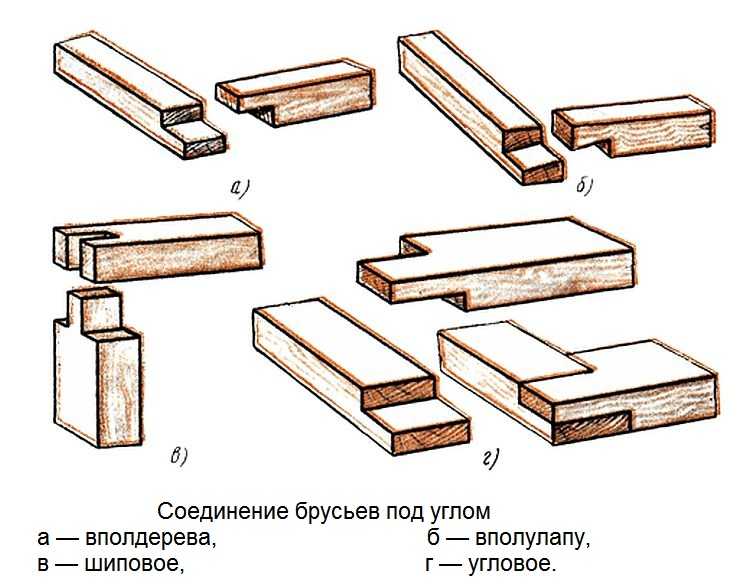
When connecting parts of a wooden rack, you can use standard methods for carpenters - a quarter or half a dozen. If this is difficult for you, you can nail and butt, and to strengthen the connections use metal corners and / or patch plates.
Another point: to connect better on nails, rather than self-tapping screws. More steadily it turns out, less than the connection is "blended". If you choose a version with reinforcement plates, they can be attached to self-tapping screws.

Now in the sizes: for racks use a beam of 50 * 50 mm, for rails it is possible to use the same bar or slightly thinner - 50 * 30 mm. Flooring is made from:
- boards with a thickness of at least 21 mm;
- moisture resistant plywood with a thickness of 10 mm;
- laminated chipboard;
The cheapest - board and plywood. Laminated chipboard is much more expensive, but it should not be painted, and this is a good plus. In order not to spend a lot, you can take the first and last sheets in a pack at the bases - they are scratched and are much cheaper.
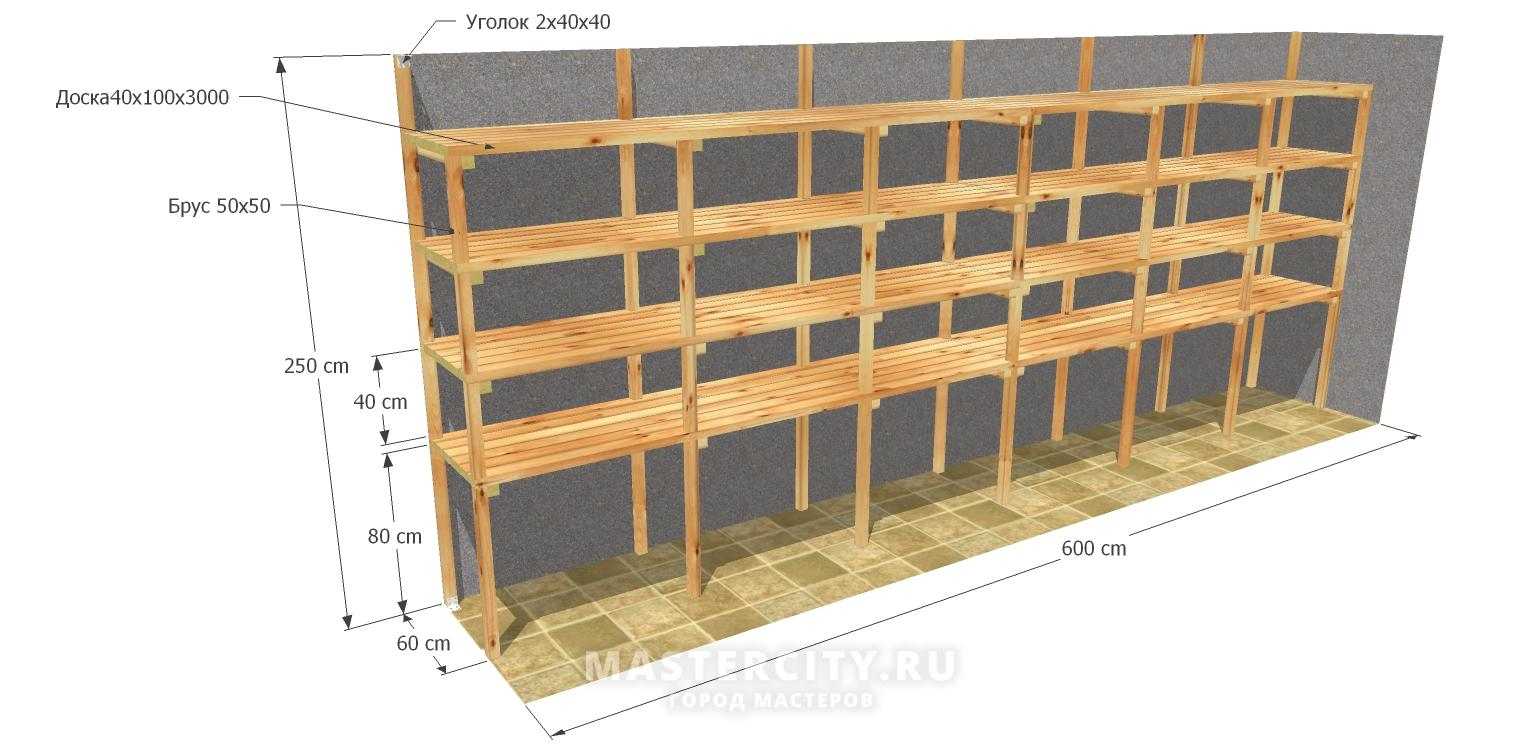
Wooden shelving in the garage - drawing with dimensions
Another point: the side of the chipboard shelves remains open side cut. If it is not treated, when the humidity rises, the chips will swell, the shelf will warp. To prevent this from happening, lubricate the edges with silicone. With this processing, nothing happens with the DSP.
Metal
If you decide to make metal racks for a garage, the choice of materials is wider - there are two options for metal rolling, plus standard solutions for storage spaces (perforated corners). Also, metal parts intended for other purposes can be used - for example, steel cable racks or cable channels that are used in communication.

Cable channels and shelves - convenient and not very expensive
So, from what do the frame of the metal rack in the garage:
- From a metal corner with a thickness of metal from 3-4 mm. The width of the corner of the corner is 25-45 cm - depending on the planned loads. Durable, but metal-consuming material, weighs a lot, is expensive.
- Profile pipe (rectangular in cross section). With a smaller metal capacity (the thickness of the walls is smaller), in comparison with the metal corner has better elasticity characteristics (more difficult to bend), more resistant to torsion. Approximate dimensions for the racks are 50 * 50 mm or 40 * 40 mm, on cross-pieces 50 * 25 mm or 40 * 25 mm respectively.
- Racks are made from proftruby, and cross-pieces from a corner. The thickness of the metal is 2-3 mm, the width of the shelf is 25 mm and more. Unfold the corner so that the laid flooring is like in the "nest".

Decking on the shelves is made from the same materials as for the wooden rack (board, plywood, OSB, particleboard), only occasionally non-standard variants are added, which are used with a wooden frame sharply because of the high mass - sheet metal.
Optimal for most regions remains a board - a reliable, not very expensive material. You need to take sexual, without knots (with a minimum of knots) with a thickness of 21 mm. Treat with antiseptics, then dye.
Plus metal shelves - high reliability with a small thickness, minuses - price, weight and "loudness". They also need to be painted, only first cleaned of rust, then walk through the rust converter and ground, then paint and preferably in two layers. Also, by the way, we need to process the metal frame. Then the rack in the garage will not rust.
Features of assembly of metal racks
Shelving from metal can be welded or assembled on bolts. Welding does not usually raise questions. If you use a corner, you can overlap - a difference of 3-5 mm when stacking shelves is invisible. If desired, you can cut out too much in one of the shelves, butt weld, but it takes a lot of time to cut, but you still will not see a big difference.

With the assembly of the frame for the rack on bolts, the order is as follows: first, the squares of the side walls and shelves are separately assembled, then they are twisted together. For each connection, preferably at least two bolts - for greater rigidity (less backlash).
If you yourself are going to shelving for the garage of the profile pipe, the order of work is different. First collect sidewalls, to them fasten short cross-members. Two rectangles with crossbeams are obtained. Then they are joined by cross bars.
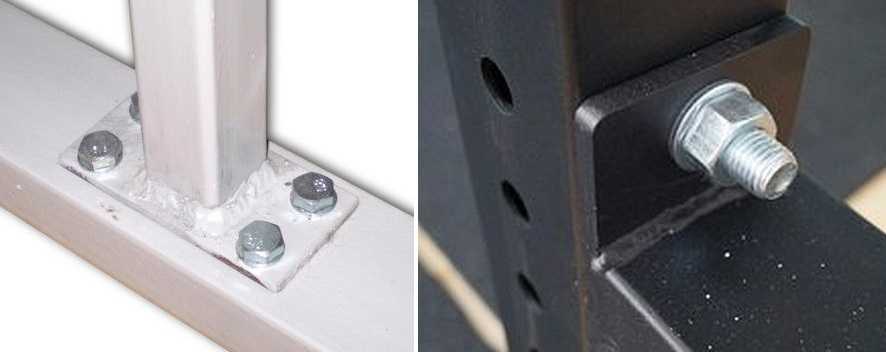
How can I make the connection, look at the photo. In one case, welding is still needed - to weld the "podpyatnik", in the other you can do without it - cut the "ears", bend and cling to them.
There is another way - special crab systems. These are metal plates with cavities formed under the profile. The pipes are laid in the grooves, then the two plates are tightened with bolts.
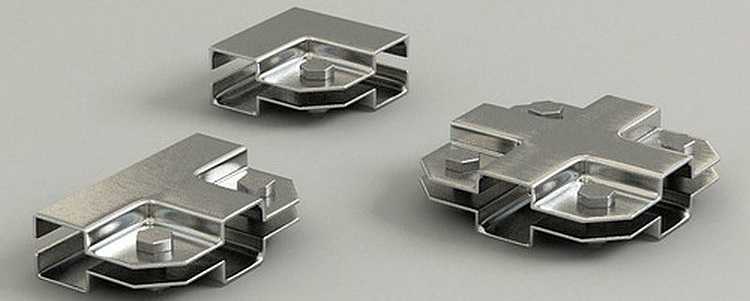
Very large loads such a connection is unlikely to survive, but there is no doubt plus - do not have to drill a bunch of holes in the metal. In a profiled pipe this is certainly easier than in a thick wall, but still takes a lot of time and effort.
By the way, bolts are used M8 or M6, respectively, they require large holes. It is easier to drill first with a thin drill, then expand to the desired size thick. But even with this order you will need a solid amount of drills. To make them less overheated and less likely to break down, put a jar of water next to it, lower the drill periodically.
Layout, diagrams, drawings, ideas
In the garage you need not only a rack, but you also need a workbench and a stand for a hand tool - all kinds of keys and other small things, which is a lot hard to come up with any particular convenient storage space.
The workbench can be made in the center of the rack. It's convenient - everything you need is at hand, you do not have to constantly walk to the shelves.

The workbench can be a part of the system, and you can make two separate modules, between which to establish the desired table. If this arrangement is not pleasant, you can change the configuration - at least put an angle.
As for the stand for the instrument. There is a factory option - a perforated sheet of metal with holders attached to it. The idea is very good, except for the price.

As usual, there are a few homemade (what kind of garage without them) on the same topic. The ideas are simple in execution, maybe not so elegant, but comfortable:
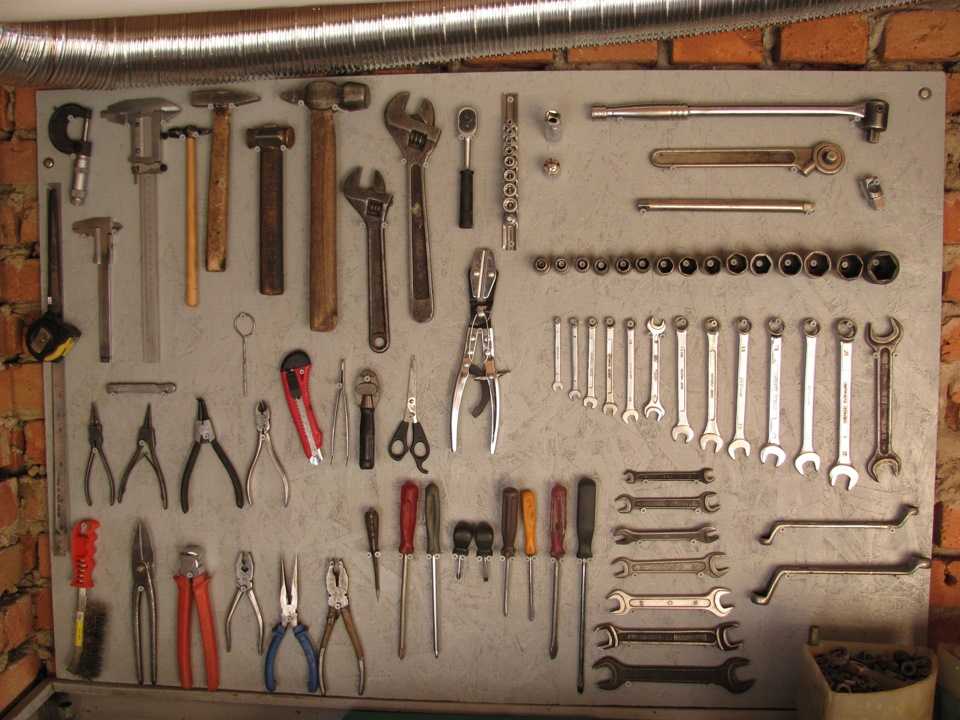
And if you want, all this can be put on the wheels - make the stand for the tool mobile. This is the case, if in the warm season you prefer to work with a car on the street.
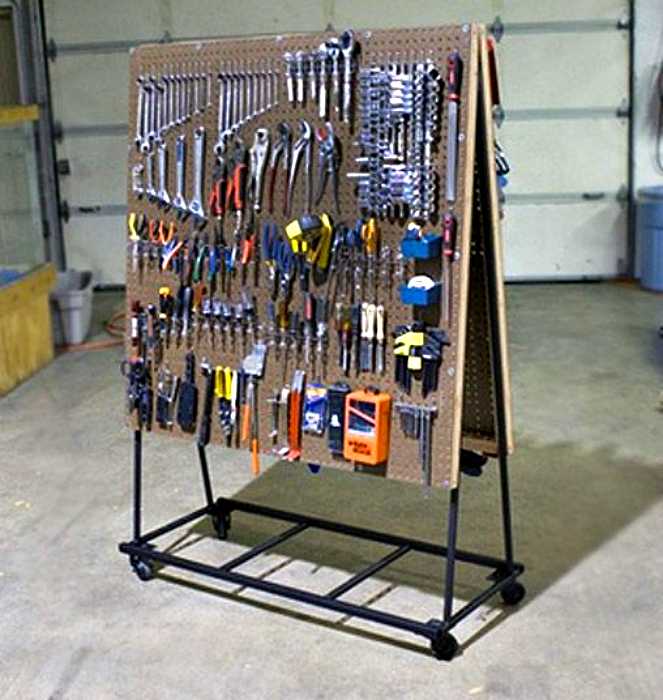
Well, and for inspiration ... so that in general all the tools were in place))

A lot of people make a log cabin from the bar, this is perhaps the most common option. There will be no need for welding and the tool can be found in almost any owner. Also the price of components is not high. Today we will tell you how the racks are made from a bar and that this will have to be taken into account.
There is a generally accepted classification of shelves made of wood:
- Suspended shelving is a collection of several shelves, which are a single design. This solution allows the most rational use of available space.
- Rotating shelving It is intended mainly for things of small size, which are used every day. It can be both personal items and kitchen utensils.
- Ideal for people who have not definitively decided on the location of this structure. The presence of wheels allows you to move the rack without first unloading its contents.
- Stationary shelving is a vertical rack with transverse bars and fixed shelves on them. To add extra strength, the structure can be attached to the wall.
Manufacture of wooden shelving
Preliminary preparation of the drawing plays an important role in the construction of a structure that is comfortable and durable.

So:
- First of all, you need to determine the location of the rack and make the appropriate measurements. If its purpose is limited to the storage of various tools, books, cans with conservation, the task is greatly simplified: it is only necessary to calculate the height of the future design.
- If the rack will be used in the garage (see), then the best choice is its height to the ceiling. The width of the shelves is selected taking into account the nature of the items that will be stored on them.
- For storing small items, a width of up to 25 cm is sufficient. Large shelves are suitable for various kinds of tools.
Attention: The length of the rack is calculated depending on the weight of the objects that will later be located on it.
- For lightweight objects one and a half meters will be enough. As for bookshelves, their maximum length should not exceed 90 cm. Otherwise, they can deform or break.
- To store sufficiently heavy tools, additional reinforcement of the frame with a profile made of metal will be required.
Designing a drawing requires the following rules:
- The width of the free space at the wall determines the width of the future rack. Subtraction of the resulting size of 5-10 cm provides additional convenience in the installation process.
- Shelf length not exceeding 1.5 m, will prevent their possible violation of the integrity or deformation of the wood.
- The optimal width should not exceed 50 cm. Shelves of greater depth can cause difficulty when trying to get objects from far corners.
- It is recommended that the height of shelves be chosen from a range of 30-60 cm. To store more oversized things, you should use the shelf in the lower part of the rack, having first raised it by several centimeters.
If the racking structure is located in any of the rooms visited by guests most often, try to place special emphasis on the shape and method of finishing the rack.
Manufacture of rack construction
Independently to construct a rack by force almost to each person, it is necessary to have at the order the drawing of the future design, the demanded wood, fastenings and tools.
How to choose the right material
Natural wood is the most suitable material for the manufacture of racks of various types. When they are designed, it is preferable to opt for pine, oak or mahogany.
Attention: The use of wood chipboards is undesirable, because for them the proper level of reliability is uncharacteristic.
When choosing wood, you should pay attention to its humidity. Standard indicators usually do not exceed 10-15%. Before proceeding with the assembly of the rack, it is necessary to conduct antiseptic processing of the material, after which it should be kept in a warm room for several days.
For assembly of the rack, the following tools are mandatory:
- Pencil;
- Measuring tape;
- Electric jigsaw;
- Machine for grinding the surface of the rack;
- A hammer;
- Drill.
With regard to the material used, it is limited to the following items:
- Plywood slab;
- Wooden beams;
- Brackets;
- Metal corners;
- Self-tapping screws;
- Furniture legs with a small tooth.
In order to fasten individual parts of the rack structure, glue is often used. The last stage of the construction of the rack is the coating of its surface with lacquer.
Preparing the main elements for the assembly
The work should begin with the manufacture of the base of the rack. To do this, you must use a thick board.
- The length of the base must be equal to the length of the entire structure. Cross bars are nailed to the bottom surface of the board, which will strengthen the structure, making it more stable and durable.
- For the production of side details, it is recommended to use multi-ply or natural wood.
- The next step is marking. On the sidewalls, it is necessary to note the levels at which the shelves will be fixed in width corresponding to the depth of the rack.
- For the manufacture of shelves should choose a board thickness of at least 25 mm.
- To further strengthen the design, some masters recommend using cross bars, attaching them to the underside of the shelves.
Attention: If desired or necessary, it is possible to mount a rear wall made of a fibreboard or plywood made with regard to the dimensions of the rack.
Assembling structural elements
There are various ways to fasten individual elements of the rack into a single structure. Most often, brackets, metal corners, nails, self-tapping screws are used for this. Some masters use ordinary joinery glue.
One of the options for assembling involves initially connecting the back wall and the base with self-tapping screws. After that, the side walls are fixed.
Then, in the marking areas for shelves, special brackets are attached to which the shelves are mounted. Another variant of the assembly involves fixing the shelves directly to the side walls with self-tapping screws without the use of brackets.
It consists in consistently following the stages:
- With the help of screws, the shelves are attached to the sidewalls, and the entire structure, in turn, is fixed to the base. It is recommended that the holes for self-tapping screws be treated with joinery glue. This procedure allows you to achieve greater reliability of fastening.
- It is necessary to ensure a high level of strength of the rack structure by additional installation of metal corners.
- To avoid deformation of the structure during construction, the building corner and level are used.
- After manufacturing the main part of the rack, the so-called "roof" should be fixed above the top shelf. Its presence allows you to protect the shelf from the accumulation of dust on things that are stored on it.
- Attached legs with castors allow the movement of the rack structure without first unloading the objects in it.
- To complete the work, you should cover the entire surface of the rack with varnish.
It is quite easy to make a shelf of bars. Surfaces of the rack can be polished with a special machine, painted in a certain color or covered with a bright lacquer.
Some craftsmen prefer decoupage and painting on wood. The main condition for finishing the rack construction is to maintain a common style in the interior of the apartments in order to make this piece of furniture look harmonious. You can watch the video in this article and choose the right option, and the instruction will help you not to make mistakes.