Welding is one of the rather complex but highly demanded technologies for working with metals. Where you do not throw a look - it is necessary to use welded joints. Without this process, not one industrial production, a construction company, a repair or service enterprise can do. Indispensable is welding and in the construction and improvement of their own housing.
But here's the problem - welded work requires a certain preparedness. You can, of course, if necessary, refer to the masters of welders on ads, or to their acquaintances who own the necessary skills. But it is better to ask the question - how to learn how to work with electric welding yourself, not to be dependent on anyone. Today, when home welding equipment has ceased to be a problem, the ability to conduct such work, especially for the owner of individual housing, is an invaluable plus, since many problems simply cease to exist.
But first of all it is necessary to understand the basic concepts of electric welding and to acquire the necessary equipment and equipment. Welding is such a technological process, where the quality of work depends directly on the equipment of the workplace.
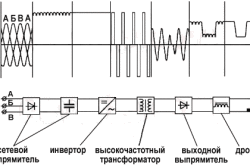
The very essence of electric welding is as follows. The power plant generates a powerful welding current, which is supplied to the work station via cables. Between the electrode and the surface of the weld metal, an electric arc is created - a stable discharge characterized by the highest temperature characteristics. This leads to melting of the metal and filler material. A so-called weld pool is formed - the area of the melt, controlling and guiding which the welder forms a seam. After removing the arc, crystallization of the molten metal occurs and a solid monolithic connection of the parts is created.
This very simplified scheme described is realized in several welding technologies:
- The most common is a manual arc welding, which, according to the existing terminology, has the abbreviation MMA (from the English name " Manual Metal Ars"). The main feature is the use of fusible electrodes with special coating. Advantages - no particularly complicated technical support, gas-cylinder equipment is required. Disadvantage - the possibility of welding only with ferrous metals or stainless steel.
In the overwhelming number of cases, when welding at household level is considered, then this technology is meant.
- Welding with TIG technology allows working with alloy steels and some non-ferrous metals. The term " Tungsten Inert Gs"Speaks for itself: tungsten and inert gas. In this case, the arc is created between the welded surface and the non-melting tungsten electrode, and as filling, a filler rod of one type or another is introduced. At the same time, a protective inert gas is constantly fed through the welding torch with a heat-resistant ceramic nozzle, which ensures the cleanliness of the seam.
Welding on this technology has a lot of advantages, but it requires special equipment and high qualification of the employee.
- Matal Inert Gаs - Metal Active Gs) - one of the most advanced modern technologies, which is increasingly used by domestic craftsmen. The process of cooking also takes place in the environment of inert or active gases with automatic feeding of filler material (welding wire) which plays the role of an electrode.
This technology allows to perform high quality seams in any plane and with very high productivity. To some extent, it is even easier than MMA, but it requires complicated and rather bulky equipment - the welding machine itself, the wire feed mechanism, the gas cylinder device, the burner with a special sleeve, through which wire and protective gas are fed.
- There is also a spot electric welding - SPOT, which finds the widest application in particular, on the body sections of car service enterprises. It, too, will require special sophisticated equipment, and at home it is practically not used.
Manual arc welding MMA - what will it take to work?
Any beginner always starts with mastering the techniques of manual arc welding (MMA), so all the questions discussed below will be devoted to it.
To start practicing independently, it is necessary to prepare certain equipment, equipment and consumables.
Welding machine for arc welding
For conducting welding operations using MMA technology, one of three types of apparatus is used:
- Welding transformer is one of the simplest types of equipment. The principle of operation is elementary - the mains voltage of 220 V (or 380 for a three-phase network) is converted to a lower one, of the order of 25 to 50 V, but due to this the value of the current strength increases dramatically. The advantages of such a scheme are its simplicity, high reliability and ease of maintenance , high power ratings. Such devices are inexpensive, which, in many ways, predetermines their prevalence.
The disadvantages of the transformer are much greater - the welding arc from AC is not stable, it is not uncommon for electrodes to stick, large spatter of metal, seams are not very accurate. In addition, special electrodes will be needed just for "change". Welding transformers are very dependent on mains voltage, and they themselves can seriously "drain" the network during operation. They do not differ in compactness and ease. In a word, it is undesirable to start training with such equipment. Typically, to work on such devices will require good skills.
- Welding MMA-rectifiers differ from transformers in that they give a constant current at the output. Working with them is much easier, because the "constant" arc is much more stable, and the seams are more accurate.
But, deficiencies remain - the same massiveness and dimensionality, even more than welding transformers, dependence on supply voltage and a large load on the network. At a price they are more expensive than transformer devices.
- Without exaggeration, we can say that literally the revolution in welding technologies was made by devices operating on an inverter circuit. A network variable voltage of 220 V with a frequency of 50 Hz passes a whole cascade of frequency and amplitude transformations, and the input produces the required constant current with the highest degree of stabilization. All processes are controlled by microprocessor assembly, which allows to carry out the required adjustments with a high degree of accuracy.
The most modern solution is a welding inverter
All this gives a whole "bouquet" of the advantages of such a device:
- The equipment tolerates quite serious fluctuations m = mains voltage, which is especially important in suburban settlements where such problems are very frequent.
"At the same time, inverters, in comparison with other devices, have minimal energy consumption - they practically do not overload the network.
- The stabilized current and the possibility of its precise adjustment allow you to perform accurate and accurate seams. There is practically no spraying.
- The device is compact and light in weight.
A wide range of such devices is available - from inverters of household class to professional equipment. For novice welders - this the most optimal The prices for quality inverters are quite high, but, first, they tend to decrease, and secondly, such a one-time purchase will fully justify itself. And there were quite a few inexpensive and very doubtful assembling devices available for sale. Therefore, it is very important to approach the problem correctly inverter selection - It is necessary to pay attention to a number of important nuances:
- The maximum welding current. If the device is planned to be used in a household, then, as a rule, stop on models with a value of 150 - 200 A. this is quite enough to work with electrodes of diameters up to 4 mm.
- Stability of the electronic circuit to voltage drops. Quality inverters must withstand fluctuations within ± 20 ÷ 25%.
- The inverter must have a forced cooling system that operates continuously when the power is on, or equipped with an automatic system that starts the ventilation at a certain temperature value of the radiators.
- Do not forget about the power consumption of the device - it can be of the order of 2 ÷ 3 kW for small models, but it can reach even more significant values for devices semi-professional or professional class.
- What about m Many people simply do not know: the parameter that determines the permissible duration of the welding process - the duration of the switch-on (PV). No apparatus can work without interruptions, and the parameters necessarily indicate the PT, expressed as a percentage of the total operation time of the equipment. In household-class models, this usually amounts to about 40% - there's nothing to be done, this is the price for the compactness of the device. In practice this means that the "rest" period, in this case, is 1.5 times longer than the welding time, for example, 1 minute of continuous operation will then require at least one and a half minute pause.
- For novice welders will be very convenient, if in the circuit of the device some useful functions are realized:
- "NotStar" significantly facilitates the initial ignition of the welding arc. The electronics automatically pulse increases the current value at the time of ignition.
- "ArcForce" will help to cope with the eternal problem of newcomers - sticking the electrode to the metal surface. As the required gap between the electrode and the metal decreases, the current rises, preventing this trouble.
- "AntiStick" - a function that will prevent overheating of the machine, if sticking to avoid all the same failed. In this case, the power will automatically turn off.
One more important advice. The Achilles' heel of the inverters is a certain difficulty in carrying out repair work in the event of failure of the circuit. When choosing a device, it is better to give preference to models with a multi-board layout of the electronic circuit. Such devices are slightly more expensive, but the diagnosis of breakdowns becomes easier, maintainability is much higher.
Video: how to choose a welding inverter
Welding wires, electrode holder, clamp
Welding inverters, as a rule, are already equipped with wires, electrode holder and mass clamp. However, when buying these items, too, it is worth paying close attention - sometimes you can run into poor-quality products.
- Welding wires must be in flexible rubber insulation, have reliable brass contact plugs, suitable for the connectors of a particular device. The cross-section of the cable must be at least 16 mm² if the unit is rated for current up to 150 A, 25 mm² at 200 A and even 35 mm² if operation with currents of 250 A and higher is supposed. Do not run after a long wire length or extend them yourself - this can lead to an overload of the electronics and the inverter out of order.
- The electrode holder is the most important element of the welder's equipment, since it is the master who manipulates them in the process of work. Do not use homemade plugs for work - it's quite dangerous in terms of getting light eye burns or electric shock. The most common and convenient for today are holders of pliers - "clothespins". Some are convenient, make it possible to easily and quickly replace the electrode, are well insulated from all sides and ensure proper safety.
One of the most common - holders - "clothes pegs" pliers
The holder should have a reliable clip for the electrodes, allowing to place from not only perpendicular, but also at an angle of 45 º. It is necessary not to be too lazy and check the material of the contact part - there should be copper or brass, but not copper plated steel. This is a clear sign cheap forgery, which is easy to identify with a small magnet. It is necessary to check the reliability of fixing the electrodes, especially small diameter (2 mm) - this is often a problem with poor-quality pliers.
An important factor is the comfort of the holder, its balance, "weighting" - working with it should not cause rapid fatigue of the hands. It should have a fairly long handle, allowing you to take the most comfortable position of the hand, a rippled surface, to exclude slipping in the palm, clad in a glove. We also do not forget that the maximum value of the welding current is also determined for the holders.
- The clamp for connecting the mass must have a powerful spring, a reliable connection to the wire, brass contacts for crimping the metal workpiece, connected by a copper bus.
Welder equipment
- First of all, for welding, you will need a mask or flap. Shields often come with a set of inverters, but they have an inconvenience - you need to hold it with your free hand, which is not always possible. It is better to buy a full-fledged mask.
This item of equipment protects the eyes from light burns, covers the face from splashing metal or sparks, and breathing organs, to a certain extent, from rising gases. At the same time, the light filter should ensure good visibility of the overlapping seam when the arc is ignited - the selection is made individually. The filter should be covered with a protective glass.
The mask itself is made of heat-resistant plastic. It should not be heavy and cumbersome, causing rapid fatigue. It is necessary to check the convenience of the headrest and its fixation in the desired position, the possibility of adjusting to the required size.
Masks became popular - chameleons, equipped with special liquid crystal filters, instantly changing light conductivity at the time of ignition of the arc. Convenience is unquestionable - there is no need to constantly throw away the mask for visual control of the executed seam, the process of ignition of the arc is simplified. Such masks have certain degrees of adjustment of the speed of operation and the degree of dimming - this is another significant advantage. The disadvantage of them - a fairly high price.
- To work will require special clothing, sewn their strong dense tanyi, excluding instant penetration or burned when sparks hit (for example, tarpaulins) Categorically prohibited patch pockets on the jacket or pants.
Shoes should be leather, completely closed, its top should be securely covered with trousers. Hands should be protected with leather or dense canvas gloves or gloves with long cuffs that completely cover the area of the wrist.
- For the production of welding work, in addition, you will need a special hammer for chipping slag - bumper, iron brush for cleaning the metal surface. Cutting blanks and cutting parts (chamfering, etc.) will require a "grinder" with a cutting and grinding wheel.
What electrodes to use?
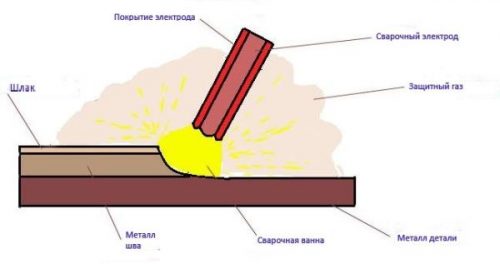
Electrode represents a steel rod, covered with a layer of coating. The rod is both a conductor for the welding current, and a filler material. Coating at high temperatures creates a protective layer of slag and gas, protecting the weld from instant oxidation with oxygen and nitrogen.
It is very important to choose the correct electrodes
There are situations when the equipment is good, and everything is done according to the rules, but the weld does not work. Perhaps the reason lies in the wrong selection of electrodes. Alas, many novice masters select them, focusing only on the thickness of the cross-section of the rod, leaving out the remaining characteristics. And yet, the classification of electrodes is quite complex and diverse. Of course, you can get advice when buying, of course, if the seller himself understands this. But you can try to deal with some of the issues yourself.
For example, an electrode E42 A-U OHI-13 / 45- 3,0-UD (GOST 9966-75) or E-432 (5) - B 1 0 (GOST 9967-75). What can tell numbers and letters?
- E42 A- a special designation, which speaks about the mechanical and strength properties of the welded seam. The characteristic that is more required for engineering calculations.
- UOHI-13/45 - here the product brand is encrypted. which is assigned to him by the manufacturer.
- 3,0 – the diameter of the metal rod is 3 mm.
- Letter "U" says that it is designed for welding carbonaceous or low-alloy steels - what is most often required at home. Notation "L", "T", "B" Are electrodes for doped and in technological steels of various types, and "N" - to create a surfacing layer on the metal surface.
- Letter "D" in this example it speaks of a thick coating. A thin layer will be indicated "M" , average - "FROM" and very thick - "G". Preference should be given to thick coating.
According to the following GOST the decoding is as follows:
- E-432 (5) - information for specialists on the physico-chemical properties of the deposited additive.
"B" Is the classification of the coating coating. In the example above, the main one. Besides you can find the following notation:
- "A" - an acidic coating, suitable for constants, and for a change, for any types of seams, but gives a strong spray.
- "B" - basic, it is used for welding of thick thick parts with the use of reverse polarity.
- "R" - Rutile coating - one of the most common, it is perfect for a beginner welder and for work at home.
- "C" - coating with cellulose component. It is very convenient for large scale works, but requires special qualification of the welder, since it does not suffer overheating.
- "RC", "RCG" — combination type. The letter "F", in addition, says about the inclusion in the composition of iron powder. It is mainly used by qualified specialists for a particular type of work.
- The next figure indicates the spatial location of the seams, which can be performed by this electrode.
— "1" - universal;
- «2» - all but vertical top down;
— «3» - "ceiling" and vertical are inadmissible, as well as in point 2;
- "4" - the electrode can only perform the lower seams.
- The last digit of the marking is the index, which refers to the parameters of the required welding current. The data are summarized in a special table, taking into account both the type of current, and the magnitude of the idling voltage of the apparatus, and the required polarity. In order not to delve into the details - just a few words about what needs to be taken into account. A total of ten grades, from «0» before "9" . Any other can be used for alternating current «0» . With "persistent", the polarity of the connection will not matter for the indexes "1", "4", "7" . Electrodes «2», «5» and "8" - exclusively for direct polarity, and "0", "3", "6" , and "9" - only for the return.
The diameter of the electrodes is selected depending on the thickness of the parts to be welded. you can simplify the following parameters:
- For workpieces up to 2 mm thick - Ø 1.5 ÷ 2.5 mm
- 3 mm - Ø 3.0;
- 4 ÷ 5 mm - Ø 3.0 ÷ 4.0
- 6 ÷ 12 mm - Ø 4.0 ÷ 5.0
- over 12 mm - Ø 5.0.
Video: classification of electrodes for manual arc welding
Preparation of the workplace
To begin practical training, you need to prepare a workplace for yourself:
- Work best in the fresh air and open space - eliminates the possibility of fire building structures, less exposure to toxic fumes.
- Near the workplace, there should be no flammable materials or liquids.
- In case of fire, fire fighting equipment should be prepared - water, a hard-to-ignite cloak of dense fabric, sand. In this case, you can use water to extinguish the flame only when the apparatus is completely de-energized.
Optimum solution - metal welding workbench
- Work best on a metal workbench. It is necessary to think over the issue of fixing blanks (vice, clamps, etc. )
- The extension cable must have a cable cross-section corresponding to the peak power consumption of the welding machine.
- Before starting work, it is necessary to provide for measures to exclude the appearance of strangers, especially children.
First practical steps
If everything is ready, you can proceed to practical actions. To begin with, it is best to prepare a sheet of metal, cleaned from dirt and rust - the first steps are better to work on it, without hurrying to immediately weld any details.
To start training is best with electrodes Ø 3 mm - with them it is easier to "fill your hand". The value of the welding current in this case will be of the order of 80-100 A. The electrode is inserted into the holder, the reliability of its fastening is checked.
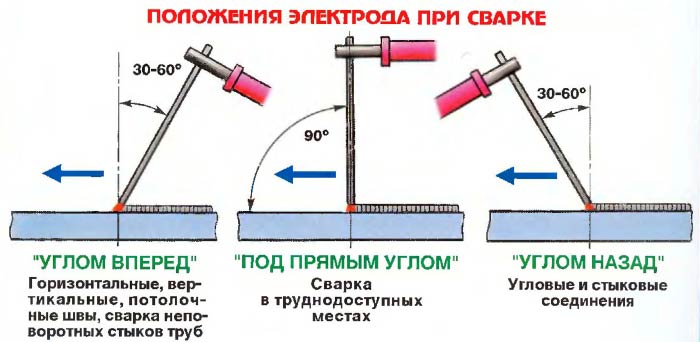
- The first "exercise" will be the ignition and retention of the welding arc. To do this, after turning on the device and lowering the mask, you either need to strike the electrode on the surface of the metal, or several times knock on one place. A spark must necessarily appear, and now the most important thing is to keep the arc burning. For this, the gap between the electrode and the metal surface must be strictly maintained. The electrode position is approximately 30 º from the perpendicular to the surface.
A normal gap is one that is approximately equal to the thickness of the electrode rod - this is called a short arc. When inverter welding using high-quality and dry electrodes, usually with stability of the arc problems do not arise. When the gap is increased to 4 - 5 mm, a long arc is obtained, which already does not give a qualitative weld. Excessive approach of the electrode to the surface can result in its sticking. In this case, you should immediately swing the holder to the side, until the overheating of the rod has started.
When maintaining the arc, remember that the electrode is constantly burned out, and you need to adjust its position relative to the surface of the metal.
- Now we need to clearly understand the structure of the melted metal in the arc region. At the beginning of the heating, a red liquid spot appears - this is not yet a metal, but a molten coating of the electrode that created the protective layer. After 2-3 seconds in the center of this spot there will be a bright orange or even a whitish drop with a slight tremor or ripples on its surface - this is the weld pool, the area of molten metal. It is important to learn to clearly distinguish between liquid slag and the bath itself - this will also determine the quality of the superimposed seam.
- Once the bath has formed, we begin to try to move it, smoothly moving the electrode, without changing the gap. A drop of metal always moves to an area of elevated temperature, so the bath will aspire beyond the arc. For its part, the pressure of the arc somewhat repels the bath in the opposite direction. Having worked practically and having understood this principle, it is possible to try to form a roller of welded metal on the surface of a sheet.
- For some complication of the task, it is best to mark a line on the surface of the metal that can be sustained when creating a welded roller. The electrode will move along the line with small oscillations to the sides - as shown in the diagram.
After applying this "seam" it is necessary to allow it to cool down, and then to break down a layer of slag in order to visually assess the quality. It may be necessary to adjust the amperage. This, for example, will be noticeable over unprocessed areas - the current is clearly insufficient. Increased value can lead to burning the sheet. All this is determined only experimentally, it is difficult to give any clear recommendations.
The first exercise - the creation of smooth rollers
It is not allowed to porosity of seams, inclusion of slag particles in the metal structure - this connection is not distinguished by strength.
In the course of practice, it will be possible to determine which direction of welding will be most convenient - on yourself or from yourself, stretching the bath behind the electrode or vice versa, pushing it forward. Many masters advise nevertheless to carry out welding if equal and qualitative platens have started to turn out, it is possible to pass to a following stage - welding of two preparations.
- First you should learn how to apply single-layer seams on thin, 3-4 mm billets. More complex options, with root provarkoy and filling, can be mastered, years with the simplest techniques will be achieved sustainable skills.
Do not be afraid of these first failures - the experience will definitely come
In short, everything else will depend only on the diligence and regular practical training of a novice welder. It is good, if there will be an opportunity to address to the expert that he could estimate received results. If not, you can compare the results of your work with the videos shown on the Internet with master classes on arc welding. Experience, hardness of the hand, the ability to correctly choose the parameters and confidence in their forces will definitely come.
Video: master-class on manual arc welding
Comments:
Comments:
- How to cook inverters metal sheets of small thickness?
Inverters are the best apparatus for welding. You should be aware that old transformers have a lot of weight and it's quite difficult to use them. Any person can work with the inverter. To do this, you only need to know the basic principles of metal welding with this device.
The inverter welding machine has a low weight and high power, which makes it possible to produce complex welding works even for a novice welder.
First of all, merits inverter apparatus for welding are its light weight and great features. Thanks to this, with the help of this device you can perform work that was previously performed only by complex devices. Electric energy, which is consumed by this small apparatus, will be directed only at the work of the arc, with the help of which the welding process itself is made.
How to learn how to weld metal, what you need to know before performing the welding process?
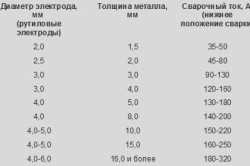
Table matching the diameter of the electrode and welding current.
The inverter for welding is an economical device that is convenient to use. With the help of it, even beginners can learn to weld metal. Before welding, it is important to learn about the operation of this device. The inverter is an electronic device for welding, so the main load will be on the mains. When the old welding machines are connected to the mains, a strong and maximum possible impact of electrical energy occurs. In this connection, the power supply of the whole district is cut off. In the inverter there are storage capacitors that are capable of accumulating electrical energy, as a result of which an uninterrupted operation of the electric network can be ensured. In this case, the electric arc of the device will be kindled gently.
It should be noted that the larger the diameter of the electrodes, the more electrical energy it uses. Therefore, if there is a desire to check the welding machine in operation, it will be necessary to calculate how much electrical energy approximately will consume the device. This is necessary in order not to burn household appliances of their neighbors.
For each of the electrode diameters, the minimum current is shown. Therefore, if you want to reduce the current, then the seam will not work. If you want to experiment and increase the current, the seam can be made, but the electrode will burn out quickly enough, as a result of which the work will not be comfortable.
To be able to properly install the welded metal workpieces, you should use clamps or vise.
Back to contents
How to weld metal inverter correctly?

First of all, you will need to know what elements will be needed for protection when working with a welding inverter. You need to buy the following:
- Gloves made of leather.
- Helmet for protection.
- Jacket from a dense fabric.
- Brush for metal.
It will be necessary to adjust the welding current and select the electrode. In order to cook with a welding inverter, it will be necessary to use electrodes from 2 to 6 mm. The welding current is set depending on the thickness of the elements of the apparatus and the material that is welded. In most cases, the body of the device has information about what kind of current strength should be. Do not need to bring the electrode to the base for welding quickly. If this is done, then sticking can occur.
The welding process must begin with arc arcing. It is necessary to bring the electrode at a slight angle to the part that is welded, then touch the welding base several times to enable the electrode to be welded. The electrode is held by several elements from the workpiece, which is welded. In most cases, this distance equals the diameter of the existing electrode.
The result is a weld seam. Ocalin (scum of metal in the upper part of the seam) is removed with a small hammer. You can use some other strong object that has a lot of weight.
Back to contents
How to control the arc gap?

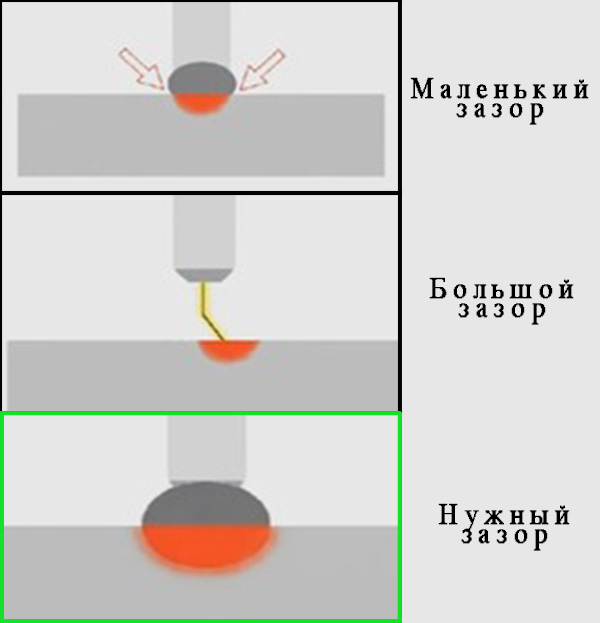
Figure 1. An arc gap of suitable dimensions will help to form a good seam.
The arc gap is the gap that appears during welding between the metal workpiece and the electrode. It is important to continuously monitor and maintain the same amount of this gap.
- If there is a gap of small dimensions, this can lead to the fact that the seam will be convex and not fused along the sides due to the fact that the main metal can not quickly warm up.
- If there is a gap of large sizes, it will not work to weld the part, and the arc will jump. As a result, the metal that melts will fit crookedly.
- It is important to provide the necessary clearance. This is necessary in order to be able to form a normal suture, which has a good provar. Visually the clearance of suitable dimensions can be seen in Fig. 1.
If you learn how to control the arc length, it will be possible to get the best result. The arc will pass through the gap and melt the main metal. As a result, a weld pool is formed. Arc can also ensure the transfer of metal, which melts into the bath.
Back to contents
How to make a welding seam inverter correctly?

Figure 2. Direct polarity creates a narrow and deep melting zone.
If the electrode during the welding will move quickly, you will get a seam with defects. The bath line is located lower than the base metal base. If the arc quickly and deeply penetrates into the main metal, it can push the bath back, resulting in a seam. During welding, make sure that the seam is at the level of the metal. To make the ideal seam it is possible, if to use arc and zigzag movements. During the execution of the circular movements, you need to control the level of the seam, placing the bath evenly around the circle. In the process of movements in the different directions the same weld will be formed, therefore it is necessary to control the appearance of the seam during welding first of all from one edge, then in the upper part of the bath, and at the end on the other side and so on.
The bath will follow the heat - this is important to remember by changing the direction during welding work. The undercut will occur when the metal of the electrode starts to be missed to fully fill the bath during transverse movements. In order to prevent the appearance of such a side groove, you need to monitor the outer boundaries, regularly monitor the bathroom. If there is a need, you can make it thinner. To manipulate the bath you need to use the force of the arc, which is located on the end of the electrode. In the process of tilting the electrode, the bath will be pushed, but it will not drag. Consequently, the more vertical position the electrode will take during welding, the less convex will be the seam. When the electrode is placed in an upright position, all heat will concentrate under it and the bath will press down, it will fuse well and spread around.
When the electrode is slightly tilted, the entire force will be directed back, causing the seam to rise (pop up).
When the electrode tilts too much during welding, the force will be applied in the direction of the seam, and this will not allow the bath to be fully controlled.
If you need to make a flat seam or move the bath back, use the electrode tilts at different angles.
The work needs to start from 45 ° to 90 °, because such angles make it possible to observe the bath and easily weld.
Back to contents
What do you need to know about direct and reverse polarity?

Figure 3. With reversed polarity, the melting zone will be wide and not deep.
In the case of direct polarity, there will be a reduced input of heat into the workpiece, the melting zone will be narrow and deep. Visually, the process can be seen in Fig. 2.
In the case of reverse polarity, there will be a reduced input of heat into the workpiece, the melting zone will be wide, but its depth will be small. It is possible to obtain a cathode cleaning effect of the base, which is welded. Visually, the process can be seen in Fig. 3.
- Preparing for welding
- Arc ignition at the beginning of welding
- Welded bath and weld seam
- How do I move the electrode during welding?
Welding inverter - a device that allows you to make the connection of the metal by welding. In comparison with a rectifier or a transformer, inverter welding is easier, easier and more affordable.How to learn how to weld a metal inverter?
Inverter welding: sequence of operations
The welding technology consists of a series of sequential actions. Their correct execution ensures a qualitative result - a solid solid connection of two metal surfaces. How to properly weld metal inverter, what to look for when learning welding?
Back to contents
Preparing for welding
- Preparation of a place for welding. The space in the radius of the meter is freed from wooden, paper, plastic objects. They can ignite from a hot electrode or spark. The inverter is installed on the ground (concrete floor) and connected to the electrical network. Two wires (wires with terminals "+" and "-") are strengthened as follows: the positive terminal is attached to one of the welded metal surfaces, the electrode is inserted into the minus terminal (this connection is called direct polarity, it is the most common). The welder's body is closed with protective clothing (trousers, jacket, gloves), put on the face with a dark glass shield (light filter).
- We pick up the terminal with the electrode. Turn on the inverter (toggle switch) - there is a small hum. We set the value of the welding current (the regulator on the front panel). A traditional electrode with a diameter of 3 mm requires a welding current of 100 A. We lower the face mask (Figure 1).
Back to contents
Arc ignition at the beginning of welding
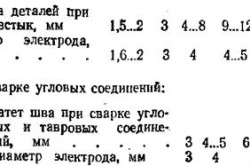
Figure 1. Dependence of diameter on the thickness of parts.
- We proceed to welding. In the beginning it is necessary to kindle an arc. With experience, this will be easy. For a novice welder, ignition of the arc is the first difficulty. Before starting the ignition, the electrode is taped against the surface of the metal to remove the coating from its end. For ignition of an arc on cold metal (at the beginning of welding), the method of tweaking is used. It looks like the match's ignition. The electrode is carried over the metal, slightly touching the surface of the workpiece to be welded. In an inexperienced novice welder, the rod often sticks (glued to the metal). To mold it, you must sharply tilt the terminal with the electrode in the other direction (break off the rod from the part). If it does not work, turn off the inverter power. When the current supply stops, the sticking will disappear.
- We chirp until an electric arc is formed. It is very bright, you can only look at it through a light filter.
- To maintain the arc, fix the end of the electrode in 3-5 mm from the metal. At the beginning of training it will be difficult to maintain the required distance. If the electrode is too close, a short circuit will occur and it will stick to the part. If you delete, the arc is lost, and it will be necessary to kindle it again. In the process of welding, the electrode is consumed, its coating burns out, and the base metal fills the seam between the welded surfaces. Therefore, the hand with the terminal is gradually lowered down.
Back to contents
Welded bath and weld seam
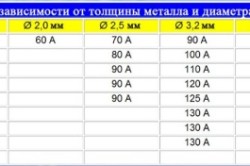
Figure 2. Dependence of diameter on the thickness of parts.
- When the arc is ignited, a liquid pool of molten metal is formed. This is a welded bath. To connect metal parts over the entire contact surface, the electrode slowly moves along the interface. A welded bath (zone of liquid metal) moves next to it. The end of the rod oscillates (back and forth, right-left) relative to the seam between the two parts. This ensures the quality of the connection.
- If the arc was lost (the electrode was too far from welding), re-ignition is easier. To ignite the arc, it is sufficient to bring the end of the rod closer to a distance of several millimeters.
- A bright electric arc and a less bright welded bath are clearly visible in the welded shield. The contacting welded surfaces in the welding zone are less visible. However, it is impossible to remove the shield and peek at welding without a protective filter. At best, it will be unpleasant to scratch your eyelids (a feeling of sand in your eyes). At worst, one can lose sight without being able to restore it.
- When the rod is shortened to 5-6 cm, the welding is stopped, the inverter is turned off and the electrode is changed in the terminal.
- At the end of welding, the frozen metal seam is taped with a hammer to remove the slag layer. The seam cleared of the slag has a shiny surface.
This is the welding technology of the inverter as a whole. And now we will dwell in more detail on how to choose the electrode and the welding current.
Back to contents
What electrodes should I use to weld metal?
The electrode is a metal rod covered with a coating of the outside. The coating agent is a slag mixture that, when welding, also melts, rises to the surface of the welded bath (it is lighter than metal) and protects the liquid metal from oxidation and nitrogen saturation (Fig. 2). In some cases, gassing additives are introduced into the coating composition to ensure gas evolution during electrode melting.

The composition of the inner rod is determined by the type of metals to be welded (low-carbon and low-alloy steels, brass and bronze, magnesium alloys, titanium alloys). To weld the metal of ordinary carbon steel, the electrodes of the UONI brand are used. They are also used for corrosion-resistant steels. Welding of the SSSI is performed only by direct current.
More universal are the rods marking ANE. They are suitable for both direct and reverse current of any polarity.
Electrodes are distinguished not only by the composition of the coating and the core, but also by the diameter. Dimensions of the rod in the coating vary from 1.6 mm to 5 mm in diameter. The thicker the welded parts, the larger the diameter of the electrode is needed to fuse them. There are mathematical formulas for calculating the diameter for a given thickness of metal parts. It is easier for a novice welder to use tables.
Secondary factors influencing on is the type of joining of parts (horizontal, vertical or overhanging welding, butt or corner weld). It can be seen from the data in the table that the diameter of the electrode for a corner joint is slightly different from the diameter for butt welding of parts.
In this case, welding rods are not used for welding overhanging surfaces large diameter. For the ceiling their dimensions are limited to a diameter of 4 mm.
Varying the diameter of the rod, while retaining all other parameters, may increase or weaken the specific welding current (current per unit cross-section of the electrode). This will affect the depth of penetration and the thickness of the weld. If the electrode is thinner, the current strength is concentrated and melts deeper, the weld seam is narrow. If the electrode is thicker, the specific value of the current intensity decreases, and the depth of penetration becomes smaller, and the width of the seam becomes larger.
Back to contents
How to choose the value of the welding current and its polarity?
The current strength determines the depth of penetration of the metal. The stronger the current, the more powerful the arc, the deeper the metal melts. The current strength is directly proportional to the diameter of the electrode and the thickness of the welding. It can be determined by calculations by formulas or by using ready-made tables.
The strength of the current is influenced by the location of the welded seam. The maximum current is used to penetrate horizontal surfaces. In order to weld vertical seams, current strength is less by 15%, for overhead (ceiling) connections - less by 20%.
The household inverter has a current scale of up to 200 A. In semi-professional models, the scale value is graduated higher, up to 250 A.
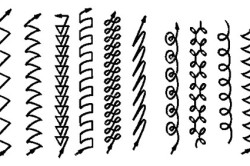
Figure 3. Motion of the electrode during welding.
Polarity is the direction of current flow. The inverter makes it possible to change the direction of the current. How is this done and why is polarity reversal necessary?
The flow of electrons (current moves from minus to plus) in welding by the inverter moves from the terminal "-" to the terminal "+". That terminal, on which the electrons ("+") come, warms up more. This fact is used to ensure high-quality welding on different metals, with different thickness of elements. If the parts are massive, the "+" terminal is attached to their metal surface (to one of the parts). This connection is called direct polarity, it is more often used in welding operations.
If a thin sheet of steel is melted or a high alloy alloy is prone to burnout of alloying elements, then a "-" terminal is connected to them. The resulting polarity is called the inverse. With this current flow, the maximum heating occurs in the electrode, and the base metal warms up less.
The reverse polarity is characterized by greater stability of the arc, it is easier to ignite and maintain its burning.
Today in the home workshop there are more and more modern welding inverters, when using which you can put a quality seam. Even a beginner can quickly learn the basics of how to properly weld welding.
In this article, you will be able to analyze the questions of the beginning welder. What welding fundamentals need to know and what can be needed? And also to understand the value of the current strength in this kind of work.
Types of welding machines
At home, two types are used: transformer and inverter. What is the difference between them and what are the disadvantages and advantages in these types?
Transformer
Based on the name, you can understand that the principle of operation of such devices is built on a transformer. Electric current is supplied to the device and during its operation its power increases. The welding unit itself does not convert electricity and operates on AC power in the network.
This complicates the training and welding process for the beginner. In the network, the voltage constantly jumps and to put a quality weld, the welder needs to control his movements and the arc in particular.
But the big advantage of such devices will be their unpretentiousness and survivability, as well as their cheapness.
Inverters
The welding inverter is much more complicated than the transformer. It converts an electric current from a variable to a constant one. And again in the variable, increasing its frequency.
Welding training is better to start with such a device, it is more preferable. Additional functions (such as anti-adherence and hot start) allow you to quickly learn how to ignite the arc and keep the seam. In this case, the addition in the form of a synergic control equalizes the electric current and the welder does not need to constantly monitor the electrode distance from the welded surface.
Comparison of advantages and disadvantages of transformers and inverters can be considered in the table.
Based on the table, it can be understood that modern inverters are more suitable for a lesson on welding for beginners.
What electrodes to use
Often in self-made transformer aggregates there is not enough power to use electrodes above the third number.
What you need to know for a beginner
The entire welding process can be carried out according to the following algorithm:
- Surface preparation of welded parts.
- Welding machine and mass connection.
- Ignition of the arc.
- Welding.
It is worth knowing that there are three main types of welding seams:
- Horizontal. It results from welding parts in a horizontal position. The simplest seam and with it is worth starting training.
- Vertical. The details are arranged vertically.
- Ceiling. The most difficult of the options and should be carefully trained before conducting such welding work.
So, how to use welding machine?
Preparation
Two parts need to be well cleaned of dirt and rust. Also it is necessary to adjust the required size in advance.
Be sure to pay attention to clothing. Welding works are fraught with spatter and sparks. Best of all, this is a welder's fireproof suit, but for lack of such, you can use dense non-synthetic clothing and gloves.
It is necessary to have a good protective mask, hammer for knocking down slag, and eye protection glasses.
Connectivity
Modern inverters work from the household network. To do this, just insert the plug into the socket.
The cable must be secured to one of the parts to be welded. The place where the clamp will be attached, it is desirable to clean from any contamination to the metal.
The electrode must be inserted with a bare end into the holder. Be sure to set the current on the device. For cooking with a third electrode, the optimum value is 70 Amperes. But it can vary. Too high current will cut the metal, and low - does not contribute to the formation of a qualitative arc.
Ignition
In welding operations, arc ignition can be done in two ways: by chirruping over the metal surface or by tapping it normally.
When chirking, at the place where the welding seam begins, the end of the electrode should be held several times according to the principle of firing a match.
Tapping with a tip is heard at the point where the welding begins.
If the arc does not ignite, it is more likely that the weight cable is not connected properly to the part. Also for a quick ignition, you can clean the tip of the electrode from the pliers with pliers.
With constant sticking, you need to increase the current, but without much fanaticism.
 Convenience of electric welding is that the seam can be put in different positions: from yourself, to yourself, from left to right. Depends on how convenient.
But, if there is welding of vertical parts, the seam necessarily leads from the bottom up.
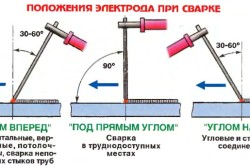
After ignition of the arc, the electrode is conducted at an angle of 30-60 degrees to the surface. The distance depends on the weld pool formed during melting, usually 2-3 millimeters.
When moving the electrode you need to monitor several parameters:
- Gradually lead the seam while maintaining the distance from the welded surface.
- Watch the welding bath and speed up or slow down the seam.
- The electrode must be moved by an indirect trajectory, and, for example, in the form of a "Christmas tree".
- Follow the direction of the welding seam.
To better conduct the seam, it is best to mark the place for welding with chalk.
When the process is completed, you need to knock down the slag and inspect the place of welding for slagging the seam or passes.
What errors can there be?
To understand how to properly use the welding machine, you must also know the basic errors allowed during welding.
- If an uneven seam was formed, the movement of the electrode was too fast.
- In the case of the formation of burns (holes) in the metal - there was too slow speed of the seam.
- If the seam turned out to be flat and uneven, the electrode angle to the surface was not properly aligned (in such a case, the inclination angle was almost 90 degrees at the optimum 30-60).
- When it was found that when the slag was brought down, it turned out that the metal was not cooked, then there was too little gap between the electrode and the surface. Such a defect is formed from the "surfacing" of the seam.
- As in the previous version, if the gap is too large, the parts are also not welded and the seam will be unstable.
The above is just the basics. They can be quickly mastered, especially when using for inverter training.
They, with the functions of straightening and controlling the welding process, allow, with minimal skills, to put a quality seam.
To weld thin-walled parts or profile pipes, a more thorough approach to the matter will be needed. Very fine details can be welded by applying a rod of the electrode, cleaned of the coating, and cooking directly on it. But here you need experience, because you can simply melt the metal on top of the parts and not provide sufficient fastening.
Welding works on aluminum or other non-ferrous metals and alloys require the use of special electrodes. As a rule, such work is carried out using a protective medium (argon or carbon dioxide). Today you can buy universal welding machines with the ability to brew such materials.
Apart from the usual welding work, semi-automatic machines are used to work with thin-walled parts. Here the process of connection is due to the melting of solid wire.
Vertical and overhead seams are also more complex.
For self-study, you can use videos and other materials. It is best that welding lessons are given by an experienced welder who will show different types of seams.
Welding inverters (at a low price of 7-10 thousand) forms quality seams, even if they are in the hands of newcomers. Of course, the work is good, if you follow simple rules. All of them are described in the article. However, before working for beginners, it is necessary to read the instructions to the device. There are usually several useful advice, and also safety precautions. Remember, everyone can learn how to weld metal.
How does the welding inverter work?
Welding inverter - a tool for welding metal. Its name is due to the fact that it converts an alternating current into a constant one. And although the efficiency of the inverter is about 90%, its power consumption is low, so you do not have to worry about big electricity bills.
Most often, the welding inverter operates from a 220 volt network, some types from 380. At the same time, it is possible to work at a lower voltage: an electrode of 3 mm, for example, can be used at 170 volts.
Welding inverter, in comparison with a transformer or rectifier, is much easier. In addition, even the beginner will be able to hold the arc. That's why most people learn the art of welding on it.
Preparation for work
What electrodes to use
The electrode is a rod made of metal, which is covered with a special coating - slag mixture. Sometimes gassing substances are added to it. The coating will protect the molten metal from oxidation.
The rod is selected depending on the type of metal to be welded. For example, in order to work with carbon or corrosion-resistant steel, a brand of the SSSR electrode will be required. There are also universal electrodes. These include the brand ANO. They are used for reverse and forward currents of any polarity.
The electrodes are also divided in diameter, which varies from 1.6 mm to 5 mm. The size is selected depending on the thickness of the metal to be welded: the larger it is, the larger the diameter. A table can be useful in working with a welding machine.
The thicker the rod, the more powerful the inverter welding machine should have. Therefore, for beginners, a diameter of no more than 4 mm; thin metal can be welded by an electrode and 2 mm.
Polarity and the value of the welding current
The thickness to which metal can melt directly depends on the set current. The arc power is also determined by this indicator. The size of the electrode sets the required current.
Depending on the surface, the value of the welding current is selected. On horizontal surfaces it is maximum, on vertical surfaces - less by about 15%, on overhanging - by 20%.
A household type welding machine can produce up to 200 amperes. On a professional instrument, the values reach 250 or higher. The direction in which the current will move will determine the polarity. On the inverter, it is possible to change the polarity.
As you know, the current moves from negative to positive. Therefore, the "+" terminal gets hotter. This feature allows for high-quality welding of metal. In the event that the welded parts are thicker, a positive terminal is connected to one of the parts. This method is called direct polarity.
For thin products, a negative terminal is attached. This method of connection is called reverse polarity.

Welding instructions
Welding Basics
Before proceeding directly to welding of metal products, it is necessary to study the basic design features of an inverter welding machine. They are presented in the diagram.

The inverter itself has an average weight of up to 7-8 kg. A quality tool has a side grill on the metal casing that does not allow the transformer to overheat.
On the back panel there is an on / off button. On the front side there are two connectors: "+" and "-". They connect a cable with an electrode on one end and a clip on the other end. The cables themselves should be of sufficient length and be flexible.
Step-by-step instructions on how to properly invert the inverter.
- Inverter welding begins with the preparation of protective equipment. At your disposal is a welding mask, a dense jacket, coarse, but not rubber gloves.
- Select the electrode. If you are a beginner, then do not use a rod thicker than 4 mm. On the front panel, adjust the required current. Wait a little; if you bring the electrode directly to the metal, then there will be sticking.
- We attach the clamp (it is also called the mass terminal) to the metal surface.
- The arc is ignited. Then we bring the electrode to the metal and touch it a couple of times. Thus, the rod is "activated". The distance on which the electrode is held is usually equal to its diameter.
- The welding rod can move in such a scheme.

Arc ignition at the beginning of welding + (Video)
The arc ignition is the first stage, and with it beginners have problems. First, the rod is tapping a bit on the metal, so that the grease is removed from it. Then a method similar to that of a match is applied. Electrode is driven over the surface of the product and slightly touches it. If suddenly the rod sticks to the metal, it is either sharply removed from the side or the inverter is completely disconnected.
You need to shirk before the appearance of a bright arc. To prevent the arc from escaping, keep the electrode 4 mm away from the metal.
How to move the electrode during welding + (Video)
The electrode can only move along certain trajectories. They have already been shown. If the electrode is moved only straight, the seam will break out. The speed of its movement affects the properties of the seam. If you move quickly, the seam will be narrow and not convex, if slowly - wide and convex. In the place where the seam will end, the electrode is delayed for 3-4 seconds.
How to form a welding seam and avoid defects + (Video)
Uneven seam, most often, is formed when the electrode moves too fast. Speaking about the creation of a smooth and high-quality weld, it is necessary to introduce the concept of a welding bath. Welding bath - this is the part of the metal, which when welding is in a liquid state. Additive material enters this part. The appearance of a bath is a good sign, meaning that the welding is proceeding correctly.
The outline of the bath is below the surface of the metal part. The bath makes a good seam, if the welding arc is smooth and deep into the product. It is necessary to watch, that the seam did not leave downwards, and remained at a level of a surface. A good connection is easier if you make circular motions with the electrode. In this case, the bath should be distributed in a circle.
When making a seam on the corners, remember that the bath moves for heat. To control the size of the baths, adjust the arc force.

The seam does not get too prominent if you keep the electrode close to the vertical position. If you tilt the rod (for example, at 45 °), the seam will begin to float. And when the electrode is very close to the horizontal position, the bath begins to diverge, and the seam is bent. Therefore, the optimal angle of inclination is from 45˚ to 90˚.
Checking the arc gap
The arc gap is the distance between the metal surface and the electrode. The gap at each stage should be the same, so that welding is qualitative and without defects.
If the gap is small, then the weld will be too convex, and the material itself will melt badly. This is due to the fact that the product can not heat up. With a large gap, the welding arc will walk from side to side, and the seam will come out curved and fragile. The necessary clearance, shown in the figure, will give a good provencer and a smooth seam.
How to weld thin metal sheets + (Video)
To weld a thin metal, it is preferable to use a reverse connection of the inverter, i.e. "-" is attached to the sheet. At the same time, the current must be at average values. The electrode is better to choose one that will have a long melting time. The MT-2 model is suitable. It has been used by welders for a long time, therefore it has proved itself well.
The rod, in the case of thin metal, you can tilt by about 35˚. First, you carefully approach it to the metal, then wait for the appearance of a red spot turning into a drop. Smoothly move the electrode so that the drop remains the same size. So the seam will be even.
Safety precautions
A welding inverter is considered a safe tool, since all parts that can be shocked are hidden in a secure box. However, there are other possible dangers. That they did not happen, observe the rules.
- Do not work at negative temperatures;
- Do not allow moisture to enter the apparatus;
- Weld only in a complete set of protective clothing;
- Prepare a bucket of water near the workplace. (1 estimates, average: 5,00 of 5)