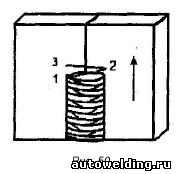
Welding single rollers from bottom to top.
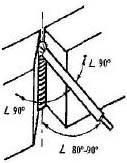
Welding of vertical seams is carried out only on a short arc. Welding current is basically minimal or medium, allowing continuous welding without breaking off the arc, without leakage of weld metal. The angle of inclination of the electrode to the vertical plane is 80 ° -90 °, which contributes to a more direct effect of the welding arc on the product and makes it easy to control the welding process (Fig. 1). When welding the electrode at an angle of 45 ° -60 ° (Figure 2), an artificial "visor" (uneven melting of the coating) is artificially created, which hinders the control of the welding process. It is necessary to manipulate the electrode by the width of the roller in 2-4 diameters of the coated electrode.
Related pages Welding of vertical seams:
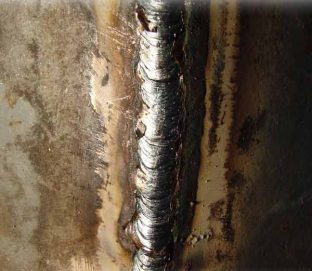
Figure 3.
As the welding bath is filled with electrode metal, it is necessary to lift with each transition from point 1 to position 2 and back to position 3, delaying at the junction points. The delay in time should be such as to fill the crater with an electrode metal and smoothly return to the opposite side no later than the weld metal crystallizes there. This contributes to the formation of a "normal" roller without undercutting and with a smooth transition to the base metal and minimal differences between the scales. Therefore, the moment of transition is very important. He left earlier - he received a cut and a "convex" roller. Overexposed - the influx and rough scales.
Many welders in the welding of vertical seams use the manipulation of the electrode "arc back", which leads to excessive convexity of the seam. This is due to the fact that most of the liquid weld metal flows into the center of the weld pool, because In the center of the seam a higher temperature than at the edges of the roller. Using the "arc back" method, descending to the center, we increase the amount of liquid metal in the center of the roller. Such a method when welding vertical seams is excluded.
Welding of the root roller (Figure 4).
 |
 |
|
| Figure 4. | Figure 5. |
Depending on the thickness of the metal, blunting edges, the size of the gap, it is recommended to use three methods of welding the root roller:
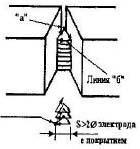
1. Welding with a "triangle" (Figure 5) makes it possible to obtain good penetration with a small gap (2 mm or less) and maximum blunting of the edge (from 1 to 2 mm). In the process of welding, the liquid bath must be at an angle, i.е. the point "a" (the jumper of liquid metal in the gap between the edges) is higher than the "b" line (crystallized scales), which allows the liquid slag to flow downward to close the crystallizing roller and not interfere with the penetration of the edges in the gap. At the end of the electrode, the crater should also be left at an angle. This is necessary for a good ignition of the new electrode. Welding bath at an angle is achieved in the following way: at the beginning of welding, the shelf is recruited, then, lifting the welding arc along the wall to the gap, we melt the blunting of the edges in the gap, then we descend to the right wall, after which we move to the left edge, forming the welding seam. The diameter of the electrode is 3 mm. Welding current in the middle range - 90-100 A with X-shaped cutting and the minimum - 80 ... 90 A with V-shaped cutting.
2. Welding with herringbone (Figure 6) with edge blunting and a gap of 2 to 3 mm allows good penetration. The cross-section of the medium-length roller (less than in the "triangle" welding) makes it possible to form a "normal" roller. The technique of welding vertical seams is as follows: from the gap along one of the edges (as if pressing the electrode to the edge), go down it, feeding the electrode for a small distance of 5-7 mm, then with a small constant rise and the electrode supply from itself back into the gap ; melt the dullness (if necessary, delay) and descend on the other side, performing the same movements, avoiding drips, undercuts, watching the formation of the roller and maintaining the point "a" above the line "b". The diameter of the electrode is 3 mm. Welding current for V-shaped cutting - 60 ... 90 A, for X-shaped cutting - 90 ... 100 A.

Figure 6.
Welding of vertical seams
"herringbone":
3. Welding of vertical seams The "ladder" method (Fig. 7) is used with a maximum gap of more than 2 mm and minimal blunting of the edges (or without blunting), which provides good penetration, formation of a reverse roller. The transition from the edge to the edge is done in a straight line with a constant minimum lift. Welding is carried out in a short arc, but without resting on the "visor" of the coating. Delay at the edges - maximum, transition - faster, but smooth; the cross section of the roller is small ("light" roller). The diameter of the electrode is 3 mm. The welding current is a minimum of 80 A ± 5 A for the V-shaped cutting of the edges and an average of 90-100 A for the X-shaped. Welding process is continuous (exception - electrode replacement and welding of thin metal).

Figure 7.
Ignition of the arc is of great importance for the quality of the welded seam. It is recommended to start the arc ignition in the lower part of the frozen crater, on the side or in the center of the seam where there is access to the sample (Fig. 8). The first pass (from position 1 to position 2) should be made quickly.
This is necessary to carry out a more "flat" roller, which allows the slag to flow downward and avoid slagging when returning between the first and second pass, since the arc has not yet stabilized, and the bath has not reached a certain temperature. When returning through the ignition position (position 3), a short delay should be made to penetrate the welding start, and only after stable ignition of the arc and the heating of the bath, without allowing slag to flow into the gap, it is necessary to move the electrode center into the gap (to position 4). At point 4, you must make a delay. The arc is short, burning mainly from the reverse side of the cutting, melting the frozen slag from the back side and a metal jumper, which makes it possible to form a reverse roller without "dimples" at the place of electrode joining. As soon as the arc begins to burn mainly from the front side and the liquid metal comes out on the front side of the cutting, it is necessary to descend the electrode along one of the edges (or at the center of the seam, depending on the location of the slag) and, passing the arc of liquid slag, pass along the previous pass.
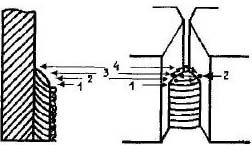
Figure 8.
With a small-section root roller ("staircase" welding) after the first pass along the edge of the crater, it is necessary to immediately move the electrode to point 4 (into the gap) (not allowing slagging in the gap).
The second root roller.
The second root roller on the back side with X-shaped cutting is performed by an electrode with a diameter of 3 mm at an average or maximum current of 100-110A. Increased welding current is necessary for good penetration of the back side of the root of the seam. Preliminary it is necessary to carry out a sweep from the slag, and if necessary - a mechanical sample.
Depending on the completeness of the first or second root roller, the welding of the third is performed with the following manipulation:
a) when the root roller is light (small section) - option 2 or 3 - manipulation is carried out with a "ladder", melting the root shaft and the edges along the edges, while it is obligatory to reach the edge of the previous roller by manipulating and make a delay;
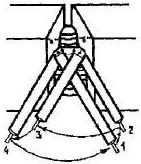
Figure 9.
B) when the full-length root roller (version 1), in addition to manipulating the electrode to form a "normal" or "concave" second subsequent third roller, helps in the welding process to turn the electrode toward the melted wall (plane). This is achieved by turning the hand. In Fig. 9 shows at what point it is more convenient to change the angle of the electrode. In position 1, the arc burns in the "a" plane of the previous roller, the center of the arc pointing to the edge of the roller. The electrode is located approximately parallel to the "b" plane. Filling the crater with electrode metal and not changing the position of the electrode, smoothly go to position 2 until the electrode touches the plane "b", and arc to the edge of the roller. Having felt the support, make a turn of the hand (not hands) so that the electrode takes position 3 (parallel to the "a" plane) and melted the edge of the previous roller and the wall "b" at the center of the arc. Filling the crater with electric earth and not changing the angle of the electrode, go to position 4, melting the arc with the previous roller. Touching the electrode of the "a" plane, rotate the brush and electrode to position 1, etc. With each transition, raise the electrode, depending on the formation of the roller, width and completeness (the recruited bath). With minimal lifting and insufficient speed of manipulation, there may be streaks (flowing) of the liquid weld metal onto the crystallized seam. In case of excessive lifting and high speed of the transition from one edge to the other, there appear sagging, omissions and undercuts on the wall in the seam zone, at the edge and in the middle of the roller. It is not recommended to rotate the brush and electrode at the time of transition from one edge to the other. In this case, it is difficult to form a roller in the center of the seam without cuts, incrustations, and gaps between the seam scales.
Multi-layer and multi-pass welding vertical seams.
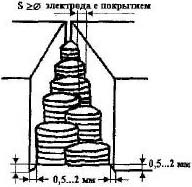
When welding large thicknesses, multi-layer, multi-pass welding is used (Fig. 10). After the root roller, the second and third layer are cooked with an electrode of 3 mm diameter or 4 mm (depending on the thickness of the base metal and the width of the previous roller) in one pass, each roller being "concave" or "normal" welding of subsequent rollers. In the following layers, when changing over to two, three or more passes, the rollers are made with a small reinforcement of an electrode with a diameter of 4 mm. Between the penultimate roller of each layer and the cutting edge, leave a distance of at least the diameter of the coated electrode.
The penultimate layer should not go beyond the cutting. It is recommended to leave an unfilled cut from 0.5 mm to 2 mm, which makes it easier to form a qualitative face layer.
 |
 |
|
| Figure 10. | Figure 11. |
Width of the face layer.
The width of the face layer is equal to the width of the cut plus half the diameter of the electrode on each side (Figure 11). It is recommended to use the manipulation of the electrode "ladder" or "arc forward".
Welding of vertical seams is more complicated in technological terms than working in a horizontal plane. Molten metal is very fluid and under the influence of gravity it simply dries down.
In this article, we will review the basic techniques for cooking vertical seams, and also tell you which equipment is easier to perform such work.
Problems of vertical welding
The welding process consists in melting the metal parts, which are connected together after cooling. With horizontal types of welding, everything is simple, most importantly - learn how to set fire to the arc and properly conduct the seam. But what about vertical species? Under the influence of attraction, metal flows constantly and it is very difficult to control the welding bath. As a result, uneven joints are formed, formed by droplets and streaks.
When welding in an upright position, problems such as non-weld metal or, conversely, trimming, are possible. They arise due to the choice of a current that is not equal in strength. With a non-welded metal, the melt is sprayed around and spreads over the surface. Trimming is formed in the form of a groove in the seam, when a too powerful arc cuts material from the weld zone.
Another problem of the vertical seam is formed with a long delay of the arc at one point. The welding bath seems to fall out, forming burns in the workpieces.
How can you avoid marriage in a joint with vertical welding and what kind of tricks are suitable in this case?
Inverter or semi-automatic
The inverter with MMA function is the same manual arc welding, but operates on a different principle, unlike the transformer one. A covered melting electrode is used.
Semiautomatic cooks by melting the wire fed into the welding zone. These devices allow you to create better seams, since there is no spray of molten metal, and the impulse, in fact, drives every point into the connection.
So what is the best way to make a vertical stitch?
In any case, a novice welder will need to practice with one of these devices. Without experience, it's not likely to make a quality connection at once.
Inverter manual welding requires more attention to the process and control of the movement of the electrode. If the position of the holder and the angle of inclination are incorrectly selected, a fault will occur. You need to cook with a margin, creating an effect. In this case, the metal will spray and spread over the surface of the product. Only if there is a lot of practice will it get a quality seam.
Semi-automatic also requires careful monitoring of the welding process. Here, the chosen positions of the holder and the welding technique are also important. When using protective gas in semi-automatic welding, the amount of splashes and streaks is reduced, but this connection will be more expensive at cost price.
The main advantage is that it is possible to reduce the wire feed speed, and thus slow the process of metal overheating. As a result, with proper practice with a semi-automatic welding machine, it is possible to reduce the flow of the melt downward. For a similar effect with the use of manual welding, special electrodes are used that accelerate the crystallization of the metal.
Many welders recommend using a semi-automatic machine when welding vertical seams, which allows obtaining a quality connection. But, in the absence of such a device, using the proper technique of work, it is possible to obtain a qualitative fastening in strength and with the usual manual welding.
Welding technology for vertical seams
The main rule is that vertical seams are most appropriate to be applied from the bottom up! In this position, the arc will somehow push the welding bath and not let it drain down. And also this position contributes to the abutment of a drop of molten metal in the lower, already frozen, seam.
Features of manual welding
When working with manual welding, you need to fulfill some special requirements.
- When welding works with vertical seams you need to set the current a little lower than usual. This contributes to the formation of less heat, and, therefore, the metal will not flow so quickly.
- In order to avoid the intensive drainage of the melt downwards, it is necessary to withstand a shorter arc.
- The holder with the electrode is positioned so that the tip of the rod looks up and slightly to the side.
- The seam leads gradually with transverse translational movements. It is best to move in a zigzag or herringbone.
- The most qualitative one is the welded joint. When the electrode is removed and brought closer to the surface of the article.
If you have little experience in this kind of work, it is best to experiment separately from the product, choosing the optimal current and the speed of the seam, and only then proceed to the main work.
Semiautomatic welding
- If the metal thickness of the product is up to 3 millimeters, welding is best done from the top down.
- For details with walls from 3 mm or more, the seam is reversed, from the bottom up.
- The semi-automatic burner is positioned at an angle of 45 degrees to the surface.
- The current should be reduced, as well as the wire feed speed (the melting process occurs faster than with manual cooking).
When welding vertical seams with a semi-automatic machine, you need to follow three main rules: to maintain the desired arc length (shorter), to ensure uniform movement of the holder and to set the desired angle to the welded surfaces.
Safety during vertical welding
Welding equipment is quite traumatic, but, in addition to the general rules for safe operation (eye protection, electrical safety and others), there are some requirements when performing various types of joints.
The safety of welding vertical seams, due to the fact that the metal flows down and splashes down, special attention gives protection from this factor.
To avoid getting hot material on clothes, you need to choose the right position, best of all - a little away from the danger zone. Also, do not work lying under the place of welding.
Be sure to carefully approach the equipment. For welding, use fire resistant gloves to cover your hands. And, of course, to ensure complete protection of the whole body from the ingress of the melt onto the skin.
Often vertical seams have to be cooked in a limited space (for example, under the car), in which case it is necessary to ensure reliable ventilation and fresh air. Especially if a protective gas (argon or carbon dioxide) is used.
Also do not forget about electrical safety.
And what can you add to the material of this article. Share your experience of welding vertical seams. What is the best way to use, in your opinion: semi-automatic or manual welding? Leave your comments in the discussion block of this material.
Comments:
Comments:
- Basics of the method of electric welding
- Welding of vertical seam
- Completion of work
Very often it is necessary to weld various metal parts and fragments of parts. There are several methods that will help to achieve the task, but much more often the rest is used for electric welding.
Basics of the method of electric welding
This method is based on the formation of an electric arc. The arc in the place of contact with the metal forms a depression. This cavity is filled with molten metal resulting from the combustion of the electrode. As it moves along the surface to be welded, its edges are heated and melted, forming a single structure with the electrode metal.
The important factor in electric welding is the current. If it does not have sufficient parameters, then the arc will go out all the time, and the electrode will stick to the surface to be welded. The required amperage must depend on the device used. If used inverter apparatus, then the required index should vary in the range from 80-100 A. With the use of a transformer-type apparatus, the range should be within 35-55 A.
Electrodes for work should be selected taking into account their chemical structure and the structure of the treatment surface. There are several types of such metal: steel, stainless steel, aluminum. All electrodes have the appropriate marking, which allows them to be properly selected. When used in electrical work welding machine It should be remembered that the diameter of the electrodes should be selected relative to the thickness of the material being processed.
Back to contents
Welding of vertical seam
Before starting work, you need to decide which joint is required. There are several basic types of joints:
- Welding of flat sheet joints.
- Vertical seam.
- Angle welding connection.
- Welding of tubular joints.
During the vertical welding and obtaining a clear and smooth weld, the process diagram must be followed. For this, the prepared parts must be clearly fixed. With the help of potholes, it is necessary to fasten them around the edges in 3-4 places. The parts need to be secured with a clamp. The slope of the electrode should be 70-75 ° relative to the surface.
In order to correctly weld the vertical seam by electric welding, it is necessary to periodically rotate, which will help rake the melting metal at the junction point of the 2 parts. The end of the electrode should be exactly in the middle of the seam. The welding process should be carried from the bottom up, sticking a drop by drop. This will help gradually fill the gap with a molten electrode wire.
Available in stock!
High performance, convenience, ease of management and reliability in operation.
Welding screens and protective curtains - in stock!
Protection against radiation in welding and cutting. Big choice.
Delivery all over Russia!
Welding single rollers from bottom to top
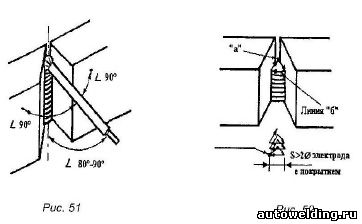
When welding vertical seams, only a short arc is used. Welding current is basically minimal or medium, allowing continuous welding without breaking off the arc, without leakage of weld metal. The angle of inclination of the electrode to the vertical plane is 80 ° -90 °, which contributes to a more direct effect of the welding arc on the product and makes it easy to control the welding process (Figure 48). When welding the electrode at an angle of 45 ° -60 ° (Figure 49), an artificial "visor" (uneven melting of the coating) is artificially created, which hinders the control of the welding process. It is necessary to manipulate the electrode by the width of the roller in 2-4 diameters of the coated electrode.
As the welding bath is filled with electrode metal, it is necessary to lift with each transition from point 1 to position 2 and back to position 3, delaying at the junction points. The delay in time should be such as to fill the crater with an electrode metal and smoothly return to the opposite side no later than the weld metal crystallizes there. This contributes to the formation of a "normal" roller without undercutting and with a smooth transition to the base metal and minimal differences between the scales. Therefore, the moment of transition is very important. He left earlier - he received a cut and a "convex" roller. Overexposed - the influx and rough scales.
Many welders in the welding of vertical seams use the manipulation of the electrode "arc back", which leads to excessive convexity of the seam. This is due to the fact that most of the liquid weld metal flows into the center of the weld pool, because In the center of the seam a higher temperature than at the edges of the roller. Using the "arc back" method, descending to the center, we increase the amount of liquid metal in the center of the roller. Such a method when welding vertical seams is excluded.
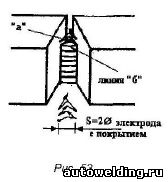
Welding of the root roller (Figure 51)
Depending on the thickness of the metal, blunting edges, the size of the gap, it is recommended to use three methods of welding the root roller:
1. Welding with a "triangle" (Figure 52) makes it possible to obtain good penetration with a small gap (2 mm or less) and a maximum edge blunting (from 1 to 2 mm). In the process of welding, the liquid bath must be at an angle, i.е. the point "a" (the jumper of liquid metal in the gap between the edges) is higher than the "b" line (crystallized scales), which allows the liquid slag to flow downward to close the crystallizing roller and not interfere with the penetration of the edges in the gap. At the end of the electrode, the crater should also be left at an angle. This is necessary for a good ignition of the new electrode. Welding bath at an angle is achieved in the following way: at the beginning of welding, the shelf is recruited, then, lifting the welding arc along the wall to the gap, we melt the blunting of the edges in the gap, then we descend to the right wall, after which we move to the left edge, forming the welding seam. The diameter of the electrode is 3 mm. Welding current in the middle range - 90-100 A with X-shaped cutting and the minimum - 80 ... 90 A with V-shaped cutting.
2. Welding with herringbone (Figure 53) with edge blunting and a gap of 2 to 3 mm allows good penetration. The cross-section of the medium-length roller (less than in the "triangle" welding) makes it possible to form a "normal" roller. The welding technique is as follows: from the gap along one of the edges (as if pressing the electrode to the edge), go down it, feeding the electrode for a small distance of 5-7 mm, then with a small constant rise and return the electrode from itself back into the gap; melt the dullness (if necessary, delay) and descend on the other side, performing the same movements, avoiding drips, undercuts, watching the formation of the roller and maintaining the point "a" above the line "b". The diameter of the electrode is 3 mm. Welding current for V-shaped cutting - 60 ... 90 A, for X-shaped cutting - 90 ... 100 A.
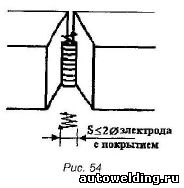
3. Welding using the "ladder" method (Fig. 54) is applied with a maximum gap of more than 2 mm and minimal blunting of the edges (or without blunting), which provides good penetration, formation of a reverse roller. The transition from the edge to the edge is done in a straight line with a constant minimum lift. Welding is carried out in a short arc, but without resting on the "visor" of the coating. Delay at the edges - maximum, transition - faster, but smooth; the cross section of the roller is small ("light" roller). The diameter of the electrode is 3 mm. The welding current is a minimum of 80 A ± 5 A for the V-shaped cutting of the edges and an average of 90-100 A for the X-shaped. Welding process is continuous (exception - electrode replacement and welding of thin metal).
Ignition of the arc is of great importance for the quality of the welded seam. It is recommended to start the arc ignition in the lower part of the frozen crater, on the side or in the center of the seam where there is access to the sample (Figure 55). The first pass (from position 1 to position 2) should be made quickly.
This is necessary to carry out a more "flat" roller, which allows the slag to flow downward and avoid slagging when returning between the first and second pass, since the arc has not yet stabilized, and the bath has not reached a certain temperature. When returning through the ignition position (position 3), a short delay should be made to penetrate the welding start, and only after stable ignition of the arc and the heating of the bath, without allowing slag to flow into the gap, it is necessary to move the electrode center into the gap (to position 4). At point 4, you must make a delay. The arc is short, burning mainly from the reverse side of the cutting, melting the frozen slag from the back side and a metal jumper, which makes it possible to form a reverse roller without "dimples" at the place of electrode joining. As soon as the arc begins to burn mainly from the front side and the liquid metal comes out on the front side of the cutting, it is necessary to descend the electrode along one of the edges (or at the center of the seam, depending on the location of the slag) and, passing the arc of liquid slag, pass along the previous pass.
With a small-section root roller ("staircase" welding) after the first pass along the edge of the crater, it is necessary to immediately move the electrode to point 4 (into the gap) (not allowing slagging in the gap).
The second root roller
The second root roller on the back side with X-shaped cutting is performed by an electrode with a diameter of 3 mm at an average or maximum current of 100-110A. Increased welding current is necessary for good penetration of the back side of the root of the seam. Preliminary it is necessary to carry out a sweep from the slag, and if necessary - a mechanical sample.
Depending on the completeness of the first or second root roller, the welding of the third is performed with the following manipulation:
a) when the root roller is light (small section) - option 2 or 3 - manipulation is carried out with a "ladder", melting the root shaft and the edges along the edges, while it is obligatory to reach the edge of the previous roller by manipulating and make a delay;
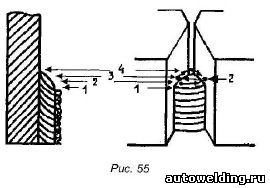
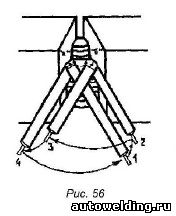
b) when the full-length root roller (version 1), in addition to manipulating the electrode to form a "normal" or "concave" second subsequent third roller, helps in the welding process to turn the electrode toward the melted wall (plane). This is achieved by turning the hand. In Fig. 56 shows at what point it is more convenient to make a change in the angle of the electrode. In position 1, the arc burns in the "a" plane of the previous roller, the center of the arc pointing to the edge of the roller. The electrode is located approximately parallel to the "b" plane. Filling the crater with electrode metal and not changing the position of the electrode, smoothly go to position 2 until the electrode touches the plane "b", and arc to the edge of the roller. Having felt the support, make a turn of the hand (not hands) so that the electrode takes position 3 (parallel to the "a" plane) and melted the edge of the previous roller and the wall "b" at the center of the arc. Filling the crater with electric earth and not changing the angle of the electrode, go to position 4, melting the arc with the previous roller. Touching the electrode of the "a" plane, rotate the brush and electrode to position 1, etc. With each transition, raise the electrode, depending on the formation of the roller, width and completeness (the recruited bath). With minimal lifting and insufficient speed of manipulation, there may be streaks (flowing) of the liquid weld metal onto the crystallized seam. In case of excessive lifting and high speed of the transition from one edge to the other, there appear sagging, omissions and undercuts on the wall in the seam zone, at the edge and in the middle of the roller. It is not recommended to rotate the brush and electrode at the time of transition from one edge to the other. In this case, it is difficult to form a roller in the center of the seam without cuts, incrustations, and gaps between the seam scales.
Multi-layer and multi-pass welding
When welding large thicknesses, multi-layer, multi-pass welding is used (Figure 57). After the root roller, the second and third layer are cooked with an electrode of 3 mm diameter or 4 mm (depending on the thickness of the base metal and the width of the previous roller) in one pass, each roller being "concave" or "normal" welding of subsequent rollers. In the following layers, when changing over to two, three or more passes, the rollers are made with a small reinforcement of an electrode with a diameter of 4 mm. Between the penultimate roller of each layer and the cutting edge, leave a distance of at least the diameter of the coated electrode.
The penultimate layer should not go beyond the cutting. It is recommended to leave an unfilled cut from 0.5 mm to 2 mm, which makes it easier to form a qualitative face layer.
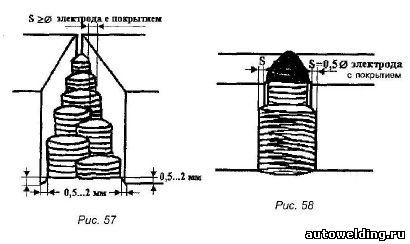
Width of the face layer
The width of the face layer is equal to the width of the cut, plus half the diameter of the electrode on each side (Figure 58). It is recommended to use the manipulation of the electrode "ladder" or "arc forward".
In the process of welding metals are often faced with situations where it is necessary to connect two blanks located in different planes. This complicates the process itself, because the joint of the two parts is located either at an angle, or vertically, or in the ceiling plane. Welding of vertical seams (ceiling and inclined) is not an easy task. It is due to the fact that even a molten metal located between two metal blanks is subject to the law of universal gravitation, that is, it pulls all the time down. Hence the difficulty of welding.
Therefore, there are two important principles for welding vertical joints:
- The molten metal in the welding zone should crystallize faster than at the usual lower position. And this will be possible if the droplets of molten metal will be small in size. This can be achieved only by reducing the length of the arc, and by welding with an inverter or semiautomatic device, the electrode must be moved inward and outward by short and rapid movements. The movement of the holder will be similar to tapping the electrode over the welded surface.
- Welding of vertical seam by alternating current is made from below upwards. Filling the crater of the seam, it is filled from below. Thus, the metal located below, will serve as a kind of metal stand that fills the weld pool above.
However, not always the technology from below upwards is applicable for welding of a vertical seam. There are many situations when you have to weld the seam and from the top down. To prevent the molten metal droplets from falling off, certain welding conditions must be adhered to.
- The arc should be short.
- The electrode at the start of the burn should be perpendicular to the plane of joining the two blanks.
- When cooking, it tilts down from the side of the holder, that is, the electrode itself should be placed at an acute angle with respect to the welding seam. At the same time, he must support the metal drops with an arc so that they do not run down.
- If the runoff can not be stopped, then it is necessary to increase the current and increase the displacement of the electrode downward. It is also recommended to increase the width of the welding seam, by moving the consumable from side to side.
This technology of joining welded workpieces with a vertical seam is much easier than from the bottom up. But the quality of the seam is much worse.
How to properly brew a vertical stitch
Before welding a vertical seam by electric welding with a semiautomatic device or inverter, it is necessary to choose the welding technology. This depends on the thickness of the workpieces to be welded, the distance between their edges, and the shape of the edge blunting.
- Welding technology in a triangle. It is usually used if parts with a thickness of no more than 2 mm are joined together. In this case, the maximum blunting of the edges is used. This technology is based on the principle of welding from the bottom up, while the liquid metal is located on top of the solidifying. It gradually drips down, closing a crystallizing metal suture roller. In this case, the downward slag does not interfere with the melting of the metal edges, because it moves along the already hardened bath. In fact, the bath is obtained at a certain angle, this is the basis of technology in a triangle. Because the appearance of the welded bath is similar to this shape. It is important to properly move the electrode to completely fill the joint. Therefore, first the shelf is recruited in the lower position of the gap, after which the electrode moves, for example, to the left edge where the filling is made, then to the right. Thus, the seam is filled. For this arc welding technology, it is better to use an electrode with a diameter of 3 mm, a current of 80-100 amperes.
- Herringbone. This type of welding of vertical joints is optimal for gaps between workpieces of 2-3 mm. Here, rather complex electrode displacements are used. Welding must begin from the plane of one of the edges. That is, along the wall of the edge from the depth to itself, an electrode needs to be welded to the metal in the entire thickness of the workpiece. Then, without stopping, you need to lower the electrode to the very depth of the gap. Here, linger, so that a melting occurred, after which you do all the same manipulations along the other edge. And thus, continue from the bottom to the top of the welding seam. This achieves uniform distribution of the molten metal in the gap space. The most important thing is not to allow the formation of undercut cuts and metal stains.
- Stairs. This method of welding vertical seams is used at the maximum gap between the metal blanks to be joined and with minimal blunting of the edges (or complete absence of blunting). The welding process itself is a transition from one edge to the other with a minimum rise in the electrode. That is, the welding is carried out in a zigzag motion from the edge to the edge from the bottom up. In this case, the electrode stops for a long time at the edges, and the transition must, on the contrary, be carried out quickly. With this technology, the roller will have a small cross section, so welders call it "light".
All technologies can be produced by inverter or semiautomatic device. Welding can be made with a thickness of up to 4 mm.
Arc Ignition
For the quality of welding vertical seams, it is very important to properly light the arc. And it does not matter, you cook with an inverter, transformer or semi-automatic. If the electrode is over, then it needs to be changed quickly, because the delay is a decrease in the temperature in the bath.
But even in this case, it is necessary to start the ignition from the highest point of the crater. By the way, this could be the center of the crater or on the side, it all depends on where the welding was completed before. The first pass to the depth should be done quickly. This way you can avoid slagging the gap. Because the arc is still unstable, and the bath temperature is not at the required level. After raising the electrode, it is necessary to linger on the melting point of the beginning of welding, where the arc is stabilized, and the bath will gain the necessary temperature. After that, you can go down deep into the gap.
Cooking vertical seam is difficult. No wonder so many options are offered. Novice welders will have to spend a lot of time to learn this. Therefore, we offer to watch the video - how to properly weld with electric welding vertical seam.