The smoothness of gipsokartonnyh sheets sometimes allows a person, who started repair in the house, to doubt the necessity of their puttying. However, the professional master does not even have this issue, since plasterboard plastering helps to avoid problems in the subsequent finishing of the room. After all, the subsequent painting of walls or gluing them with wallpaper, especially light, can show the existing irregularities and roughness. Therefore, all doubts should be swept away, and carefully examine the issue of the correct conduct of such works. By the way, the puttying procedure is not at all complicated, and any person can handle it if desired. It is only necessary to break the entire front of the works into several separate stages.
All sheets of gypsum cardboard are attached to the metal frame with the help of self-tapping screws. Therefore, all the fixing points must be disguised, but before proceeding with the puttying, it is necessary to make sure that the screws are drowned sufficiently in the sheet of plasterboard. To do this, take an ordinary spatula and hold them quickly on the wall. If this tool does not stall anywhere, it means that all fasteners are screwed to a sufficient depth. Otherwise, a screwdriver or screwdriver is taken and "work on errors" is carried out. Repeated unimpeded holding by a spatula on the sheet allows to proceed to the next step.
Putty is sold in bags and cans
It does not prevent before the puttying process the surface of gypsum cardboard with a priming solution. After the applied primer layer has dried, each self-tapping screw starts to be ground separately, which will then allow the entire wall to be plastered quickly and efficiently, making it perfectly even.
After the work has been completed, sufficient time must be allowed for the putty to dry out. Typically, the label contains information about the value of this time interval. The processing of the attachment points for self-tapping screws ends with the sanding of the plastered sections. When detecting unevennesses made during the work, additionally they are puttyped.
How to putty stitches
Very often in practice, the question arises as to how to putty plasterboard in places where the sheets are joined. The technology of work execution requires the use of additional material in the form of a fiberglass reinforcing mesh, called "serpian" in the building environment. When sealing the seam, observe the sequence of the following steps:
- applying the first layer of the prepared putty all over the seam;
- the application of the Serbian to the fresh layer and its "pressing" with a spatula;
- applying a repetitive layer of putty, covering completely sickle;
- drying and grinding of the putty layer.

Serpchanka-reinforcing tape for seams
Putting putty on internal corners
Also it is necessary to know how to putty the walls of plasterboard in the inner and outer corners correctly. First we consider the situation with internal angles. Putty put on the edge of drywall sheets, located on both sides of the corner. After this, it is necessary to press the serpentine tape carefully, making sure that it does not go far into the space of the corner. After even distribution of reinforcing tape, another layer of putty is applied on top of it.
After a day, the dried layer is treated. In this case, with the help of the sharp side of the spatula, all the irregularities formed are removed, and the ideal evenness is achieved during the sanding process. External corners require the use of a galvanized metal corner, which is also pressed into the applied layer of putty, and then re-covered by it. All other works are carried out by analogy with previous cases.
Plasterboard plastering - video instruction
Various forms of ceilings, made of gypsum board, also require accurate shpaklevki seams. Since the surface of the ceiling attracts increased attention, it is necessary to ensure that the work of its ideal smoothness. Therefore, professionals have a small secret, which is the special processing of gypsum board joints. Before plastering the ceiling from the plasterboard, the cardboard layer is removed along the seams by the width of the reinforcing tape.
Progress:
- With the help of a knife, the cardboard layer is cut over the seam by the width of the serpentine.
- This strip is wetted with water, which facilitates its removal.
- The surface is primed and allowed to dry.
- After a layer of putty is applied, a sickle is fastened and once again is smeared.
- After some time, the process of puttying the seam is repeated using a spatula-trowel.
- After drying, the surface is ground with a wooden block, to which is attached a fine grinding net or fine-grained sandpaper. In this case, it is necessary to achieve a smooth, imperceptible transition from the weld surface to the plane of the drywall sheet.
Precisely also the areas of fastening of self-tapping screws are processed. After finishing the putty work, the walls and ceilings are ready for finishing. The result will surpass all expectations, if exactly follow the technology of the work. On the features of the ceiling and how to putty plasterboard, we place the video instruction to help the novice masters.
October 29, 2016Specialization: finishing of facades, interior finishing, construction of dachas, garages. Experience lover-gardener and gardener. Also there is an experience of repair of cars and motorcycles. Hobbies: playing a guitar and a lot of other things that do not have enough time :)
Putty plasterboard is an equally important stage of wall finishing than, for example, the installation of the frame and its skin. After all, it depends on it the quality of the surface, i.e. then for what and use GCR. Unfortunately, many masters, when they share the experience of finishing walls with gypsum boards, do not pay enough attention to the filling in their articles, so in this article I decided to tell you as much as possible how to putty the walls of plasterboard.
A few words about the use of drywall on walls
Recently, the use of drywall has become one of the most common methods of finishing the walls. This is due to the fact that this material allows much faster and easier to level the walls than plaster. In addition, under GKL, it is possible to hide communications or even heat-insulating material.

I must say that novice craftsmen are often interested in building forums - how best to level the walls with plasterboard or putty? If there is an opportunity to level the walls with putty, ie. the unevenness of the walls is insignificant, then of course it makes no sense to use drywall, which also requires shpatlevaniya.

However, when deciding on the type of finish, you need to make sure the quality of the substrate. If the plaster begins to exfoliate or there is such a possibility, then it is more advisable to cover the walls with gypsum plasterboard, rather than trying to simply plaster them.
As for the choice between gypsum plasterboard and plaster, then for the reasons outlined above, preference is given to plasterboard. An exception are those cases when walls are supposed to be mounted heavy objects, for example, hinged cabinets.
To make the framework under gypsum board strong, capable of withstanding heavy loads, the profiles can be strengthened with wooden beams located inside them.
Shpatlevaniya technology
In what cases it makes sense to use GKL for wall decoration, we sorted it out. Now consider how to putty the walls of plasterboard.
I note at once that this procedure can be conditionally divided into several stages:

Preparation of tools and materials
First of all, let's figure out what needs to be prepared in order to plaster the walls. So, the inventory for these purposes will need the following:
- set of spatulas - the tool should be in perfect condition. It is desirable that the canvases may slightly bend. However, do not use super flexible fabrics;
- plastic bucket;
- a drill with a nozzle-mixer;
- fuganok with grids from P80 to P150;

- a paint roller with a pallet, as well as a paint brush;
- mounting knife.

As for the materials, then, of course, first of all you will need a putty. To apply the starting (first) layer, as a rule, use plaster filler.
If you plan to paint the surface of the walls, you will have to apply another finishing coat of putty. For these purposes, polymeric compositions - acrylic or latex are best suited.

They are easily applied and leveled due to good elasticity. The only thing is that the price of polymer compounds is several times higher than putty based on gypsum.
Determined with the type of composition, you need to calculate the required amount for filling the walls. The consumption of putty on 1 m2 on average is 1 kg for the starting layer and 0.5 kg for the finish layer. Thus, to find out the required amount of material, you need to multiply these values by the squaring of the walls.
Of course, to buy shpaklevku should be with a margin of about 7-10 percent. As practice shows, this stock is not superfluous.

In addition to putty, you will also need acrylic primer. It improves the adhesion of materials, protects surfaces from fungus, and also performs other useful functions.
In addition, there are perforated corners that are glued to all outside corners and slopes. They will make the corners perfectly even, and also protect them from chips.
Preparation of plasterboard
Before proceeding to the filling of the walls, it is necessary to prepare the surface of the plasterboard. This procedure is performed by yourself as follows:
- first of all you need to remove the chamfers from the joints of the sheets, if they were not cut in the process of cutting GCR. To perform this procedure you will need a sharp mounting or clerical knife;

- further on all joints of sheets it is necessary to paste a grid-serpyanka;

In the photo there is a mesh patch on the joint
- now the surface of drywall should be primed. To do this, immerse the paint roller into a drip tray and squeeze out slightly. Then apply liquid to the wall surface with a uniform thin layer.

After solidification of the first layer, the procedure must be repeated.
Do grinding walls can be at a temperature of not less than ten degrees. Freezing should occur in natural conditions, i.e. without forced heating and drafts.
This completes the preparation of plasterboard for puttying.
Shpatlevanie and grinding
So we came to the main stage of the work. So, plastering of walls on plasterboard is carried out as follows:
- if the putty is purchased as a dry mix, it must be diluted in water, according to the instructions on the package. Approach to this task must be very responsible, so that the composition does not contain small lumps. Otherwise, it will not work properly.

Keep in mind that the putty can be applied within 40 minutes after preparation. At the end of this time, the solution begins to set, accordingly, it becomes unsuitable for work;

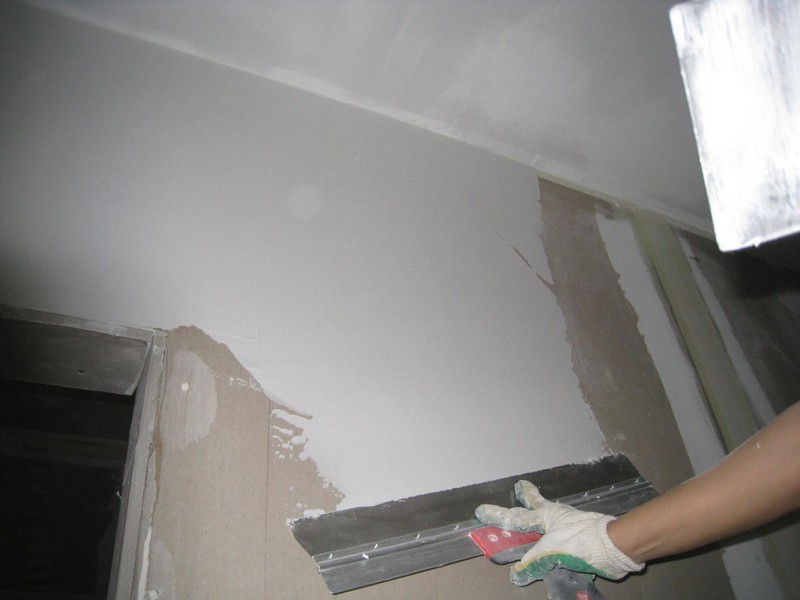
- then you need to zashpaklevt hats self-tapping and joints sheets. To do this, simply slide the spatula with the putty along the joint, holding the tool at an acute angle to the wall, as shown in the photo above. Similarly, the hats of self-tapping screws are shredded.
Try to carry out this work carefully, remove the surplus filler immediately, so that eventually the walls have a continuous smooth surface;

- further it is necessary to cut the perforated corners into pieces of the necessary length, and stick them with the same starting putty to all outer corners;

- now you can proceed to full filling of walls. For this it is necessary to collect the filler on a wide spatula. It should be located in the center of a small lump.

Do not put too much putty on the blade, as it will be more difficult to work, and therefore the quality of the putty will decrease.
The spatula itself should be taken with your hand so that the thumb, as well as the ring finger and little finger, grab the handle, while the middle and index fingers lie on the canvas, as shown above.
In some cases, another grip is more convenient: the finger is put under the handle, and the palm on the canvas is on top. I use such a grip when it is necessary to apply a filler in a thin layer.

Now the spatula needs to be bolted into the walls and tilted in the direction of motion so that an acute angle forms between it and the wall.
- Holding the spatula in this position, you must make a smooth movement along the wall. The pressure on the spatula should be uniform all the time, but the angle of inclination will change.
I must say that the tilt angle of the spatula is an important nuance of puttying, since the thickness of the putty layer depends on it. I will not bring the angles of inclination in degrees, since this moment you must feel with your own hands in the process of work;
![]()
- by this principle, the entire surface of the walls is covered by the starting layer. The only thing, give maximum attention to the inner corners. The simplest way is to make them even with a special corner trowel;

- after the plaster has dried, grind the walls. For these purposes, use a fueller with a net stretched over it with a rough abrasive (P80 - P120). Do not strongly push on the fugankok make and circular movements. In this way, all serious flaws on the surface of the walls should be removed;
- after the grinding of the wall, it is necessary to vacuum or wipe it with a damp cloth, after which it is necessary to primer the method described above.
If you use wallpaper as a finishing material for walls, then work on this can be stopped. For painting, as already mentioned above, it is necessary to perform the finishing shpatlevanie.
Before you coat the walls with a finishing coat, you must carefully clean tools from the old solution.
This procedure is carried out on the same principle as the application of the starting layer. The only thing, the composition should lie much more thin layer (about 2-3 mm). At the same time, try to do the job very carefully, otherwise you will have to spend a lot of time on grinding.

After setting the putty, you can start grinding. For this purpose, a net with a fine abrasive - P150 - is required.

I must say that it is necessary to be engaged in grinding under bright light, so that the existing flaws on the surface can be clearly seen. To assess the quality of grinding, bring it to the wall bright at an acute angle.
Conclusion
Many home masters are afraid to take on their own for plasterboard putty, and ask for help from specialists. Of course, this work contains a number of nuances and subtleties. However, every craftsman is able to cope with it, the only thing is that it is necessary to "fill his hand" a little, therefore it is more expedient to start work from less visible areas.
I recommend to watch the video in this article, devoted to filling plasterboard. If you have any questions or work in the process of difficulties, unsubscribe in the comments, and I'm happy to help you.
New technologies and materials are widely used in finishing premises in residential and public buildings.
Finished slabs of mineral raw materials on a paper base, fixed on a supporting frame, proved to be excellent. How to putty plasterboard under the wallpaper yourself, and what materials are better to use? Here is not a complete list of questions asked by specialists.
The process of plastering walls from gypsum board under wallpaper gluing
Understanding the properties and features of this technology will prove useful to those readers who hire specialists to perform internal work. How to putty plasterboard to get the most smooth and smooth surface? technology is simple enough: it is important to strictly adhere to it and require its compliance with the involved specialists.
Plasterboard description and its features
This material was previously produced under the name "dry plaster". It is two sheets of thick paper, between which is a specially processed filler. The description of drywall will be incomplete, if not to say that its both its surfaces are absolutely smooth. This raises justifiable doubts among many homeowners, but does it need, in general, puttying plasterboard?

Drywall itself is a smooth material
The requirements for the preparation of the surface to be wallpapered are rather rigid. The wall should be smooth, smooth and have a uniform color throughout its area. In addition, the material should be properly prepared so that it has sufficient adhesion to the wallpaper glue. To get a detailed answer to the question: how to putty the walls of gypsum board it is necessary to understand its properties.
There are two main types of plates: normal and moisture resistant, the material also differs in thickness. For decoration of walls, twelve-millimeter gypsum board is used, and for lining ceilings - nine millimeters. Differences are also found in the color of the plates, which depends on the manufacturer and product category. What kind of putty is best for gypsum plasterboard? To obtain an accurate answer it is necessary to understand its properties and the conditions for subsequent use of premises.
Selection criteria for putty
For sale there are two types of finishing materials: dry mixes and finished compounds. What putty putty plasterboard? Manufacturers of panels usually produce the materials necessary for their finishing. So, the German company Knauf offers consumers a wide range of putty for joints and other surfaces of the sheet. There are relatively inexpensive analogues in building stores.

Correctly choose shpatlevku for gypsum cardboard from various types
The owner of the housing may have doubts, but is it worth overpaying for the firm. Indeed: the more it is better to put plasterboard with expensive branded materials or their analogues. The final choice is always for the client, but remember that the branded putty has the best characteristics and has all the necessary certificates and sanitary certificates.
When carrying out work, it should be remembered that joints between sheets both direct and forming an internal or external angle, it is better to trim with a specialized composition. The opinion of most experts in the matter, than to putty the gypsum board seams unambiguously. The best quality is the dry mix of Fugenfuller from Knauf.
Good advice: given that this putty is made on a gypsum base and quickly hardens. When preparing it, one should mix up such quantity of the composition that will be used for 25-35 minutes maximum.
Technology of applying putty on drywall
The process of finishing works is relatively simple, but it requires some skill. Acquaintance with the step-by-step guide will give an idea of how to properly drywall drywall to prevent the most common mistakes.

The process of applying the putty by the spatula yourself, requires minimal skills
High quality of work is provided by a number of factors:
- careful preparation of surfaces;
- using a professional tool;
- use of quality mixtures and compliance with instructions for their preparation.
Correctly seal the joints and the rest of the panel surface only if there are no gross errors or misalignments during installation. The instruction prescribes, when turning the screws, to heat them into an array, while preventing the paper from breaking. Destruction of the cardboard base leads to a weakening of the fasteners, which can cause destruction of the structure.
Tools for work execution
If you plan to fill plasterboard with your own hands without involving specialists, then you should take care of preparing everything you need.

In the figure, the various options, how you can apply the putty on the drywall yourself
To perform this type of finishing work will require:
- container for mixture preparation;
- electric drill with a special nozzle for mixing putty;
- a set of spatulas for straight and special - for processing external and internal angles;
- grinding machine or device for manual trowelling.
You will also need protective equipment for the skin of the hands, usually work gloves with threaded rubber fingers. In order to obtain a good even coating, the materials and tools used must be sufficiently high-quality.
Surface preparation for finishing
Before you start plastering walls of plasterboard, you should carefully prepare the surface. For this, a number of operations are performed, including the priming of walls with special penetrating preparations. Its purpose is to strengthen the outer layer of gypsum board and to form a sheet for better setting of putty. The primer can be applied with a roller, brush or spray.

So look prepared walls for shpaklevku
The main stages of finishing are the more quickly and qualitatively they will be performed, the better they managed to prepare the basis for them. Internal work in the premises is carried out only after the glazing of the light apertures and the installation of doors. In this case, the occurrence of drafts should be avoided, which can lead to cracking of the composition previously applied.
Calculation of the required amount of material
Approximate consumption of putty on 1m2 of plasterboard is determined from the standard indicators, which are given in a special table on the package. The indicator depends on which layer of the finished mixture is applied when making the finish and density of the mixture. The surface of drywall does not have large irregularities, which ensures minimal consumption of the finished mixture.
The amount of mixture per unit area of the wall surface depends also on the artist's experience. Correctly organized process of applying putty excludes its unproductive consumption, associated with excessive thickening or drying. An experienced master prepares exactly as much mixture as he uses in a certain period of time.
Execution of finishing works
The puttying is carried out in a certain order, and should begin with the seams. To perform the work in the tank, the required amount of the mixture is prepared. In the absence of practical experience, it's better to see how the plasterboard joints on the pictures or video shpak.

Using a putty and spatula, you can seal the seams between the sheets of gypsum plasterboard
The order of finishing works:
- A small amount of the mixture is captured by a small spatula and evenly distributed along the edge of the working surface of the second one.
- The tool is pressed against the surface of the sheet at an angle and a slight movement is made by pressing the mixture of the joint. Excesses of puttying compound are removed with a spatula and discarded in a container.
- The next stage of finishing work is the processing of indirect joints. How to putty the corners of drywall and do it right? When this operation is carried out and the joint is strengthened, the technology provides for the use of special materials.
Puttying of corners of plasterboard external or internal is made with the use of reinforcing tape or steel perforation:
- A small amount of the mixture is applied to the corners.
- A reinforcement element is superimposed on top.
- The rest of the composition is removed with a spatula.
As a result, a qualitative and lasting seam is obtained, which will not be destroyed even with significant impacts.

The process of independent plastering of gypsum board walls
In order to answer the question what kind of putty is best for gypsum board, you should pay attention to its composition. In a dry mix there should not be large particles, components of materials for finishing finishing are made fine-dispersed. Putting putty on the main surface of the wall is done through a wide tool with a layer of minimum thickness.
As shpakkuetsya gypsum cardboard under the wallpaper professionals can watch the video. To achieve the maximum quality of work can be done with minimal skills. Flaws of the dried surface can be easily corrected with a grinder or manually with a special mesh fixed on the holder.
This stage is final, now after the filler is completely dry, it is possible to start to glue the walls with wallpaper.
Video: how to plaster the walls of plasterboard with your own hands
The mistake of many repairmen is the reluctance to putty plasterboard - only joints are sealed, and everything else is so smooth and putty, in their opinion, this is a cost overrun. At the root of the wrong approach, which is fraught with a lot of consequences, which we will discuss in this article, and at the same time we will learn the correct technology of plasterboard putty.
Despite the fact that many masters claim the opposite, puttying plasterboard is always, well, or almost always. Exceptions are unless the cases with its pasting of tiles or panels - in all other situations need putty. Ask, why, if the gypsum is so smooth? The point here is not at all - plasterboard plaster surfaces need for several reasons. Firstly, in order to obtain a complete surface without any visible differences, which is necessary for painting. Secondly, in order to avoid cracking of seams during the operation of these surfaces. Third, to ensure the necessary surface qualities - it is the adhesion to the required extent. Those who tried to tear off the wallpaper from the unplug plasterboard, understand what is at stake. So, how to putty drywall? But this is what the conversation will be about on this page of the Dream House website.
How to put plaster on drywall photo
How to putty plasterboard: properly sealed joint does not crack
This is a very important job, especially if you are talking about puttying walls for painting. One wrong move - and cracks in the places where the individual sheets of plasterboard are docked to you are guaranteed. It is for this reason that it is very important to fully comply with the technological process. It looks like this.

Before the direct process of puttying plasterboard, the sealed joint is processed by a vibration grinder and well ground. This way all the influxes that can create problems in the process of solving the problem are eliminated, how to apply the filler to the drywall?
Finishing plasterboard putty: how to be with the outer and inner corners
Seal the seams between the sheets of drywall - this, so to speak, do only half the case for preparing gypsum cardboard putty. The second half of this case is the processing of corners - the outer and inner corner joints of gypsum board are prepared in different ways.

Almost exactly the same is done and installation of arched contraurs - the only thing that can be added here is to say a few words about its fastening. Some masters fasten it to a gypsum cardboard stapler or worse than screws - this is fundamentally wrong. In this way, you will never get a smooth arc - the arched contrasul takes its position. From you it is required only one - to press into a glue or putty and slightly to correct a spatula. In the sense that when you remove excess glue, it will take its proper position.
Technology of plasterboard plastering: application features
To tell how correctly to put shpaklevku spatula on gypsum cardboard, probably, even the most refined master of a feather can not be - this process needs to be seen and felt. In general, until you try it yourself, you will not understand what is happening - in some ways it is a creative work that will require you to see all surface irregularities that, strange as it may seem to you, is on the drywall. A sign of their presence are traces of a spatula - if one and the same place is held several times in the same direction by the same tool, and at the same time there will be some kind of ripples along the edges of the spatula, which means that this is an unevenness. It is in the elimination of such influxes and lies the essence of putty - if you use a spatula in any direction in any place of the wall and there will be no
it is possible to assert about the evenness of the surface.
How to putty plasterboard photo
Achieve the ideal is quite difficult - you can not try to do this from a single approach. This technique is not available even for professionals. As a rule, the surfaces shpakkuyutsya in several approaches - the more curvatures, the more layers putty will have to be applied. If we talk only about drywall, then at least two calls will have to be done - ceiling under painting it is better to putty in three layers. Also, do not apply thick layers of putty - everything should be done gradually. The main thing is to understand one simple rule - do not harm yourself. That is, do not put more filler than necessary - repackage is much more difficult, and to amuse yourself with the idea that the humps can be sanded with an abrasive mesh, do not. You can clean small influxes, but not big bumps.
What else you need to know about the issue of plasterboard putty, so it's about the tools and the putty itself. With the tools all more or less clear - it uses a spatula, with a wide spatula. A narrow tool you can capture only a small section of drywall - that is, significant curvature with a small trowel align will not work. As for the driest mixture, as a rule, for finishing gypsum board it is used finishing putty - it is a dry mix and not acrylic and other finishing compounds, the purpose of which is to super fine surface finishing before painting. Acrylic putties are suitable for the ceiling, but on the walls they will be redundant.
And in conclusion of the topic, how to putty plasterboard, I will say a few words about the preparation of a dry construction mix. This is a very important point - improperly prepared putty "draws" (grooves remain after the spatula) and generally falls badly on the surface of the wall. The principle of preparation of the putty is standard - the powder is poured into the water and thoroughly mixed, after which the putty is left alone for swelling. Minutes 5-10 it should stand, then again thoroughly mixing with a construction mixer. After that, add a dry mixture into the putty is not worth it - there will be lumps. So with a density is better to be determined during the first mixing - you need a consistency of thick cream. This is for the first layer - for the second layer putty is better prepared less often. The rule is simple - the thinner the layer of putty, the less often you need to mix the mixture.
Putty is one of the most common types of work. To make repairs correctly, first you need to decide on the materials. This is one of the most important stages. After all, the result depends on the right choice. And especially this applies to finishing works. Therefore, it is so important to decide what to putty plasterboard.
Putty - a universal compound, which is designed for leveling surfaces, as well as to give them adhesive properties that increase the level of adhesion with other elements. It has strength and high pouring rate. In most finishing works this material is indispensable.
Putties for glyc are in several variants. The type of coating and the thickness of the layer are selected depending on the drywall surface and the conditions of the room.
How and what can plaster drywall.
To date, the stores offer a huge number of options. Spackling mixtures are distinguished as follows:
- the mold;
- purpose;
- the conscription.
To understand which shpaklevki for drywall to choose, you should focus on the temperature and humidity in the room. And already proceeding from this select the required characteristics like strength, elasticity and drying speed.
Form and purpose of putties
Now we can distinguish two basic forms of putties:
- Ready. Creamy mixture of gray or white. It is sold in sealed packaging and can be stored for a long time. Use immediately after opening.
- Dry. This mixture is sold in powder form, which is then diluted in water. The mixture is prepared exactly according to the instructions. It requires a certain skill, since such a composition quickly dries up and falls on the surface with lumps.
In this case, the kind of putty for gypsum board is not critical, and which one to choose depends solely on the skills and personal preferences.
With regard to the designation of putty mixes, there are 3 types:
- Leveling. It is useful in the event that the wall has various defects, such as cracks, seams or chips. Such a putty has high masking properties and is applied during the primary surface treatment. There are different grain sizes. Therefore, it should be borne in mind that it is desirable to select fine-grained coatings for certain types of decorative materials. For example, under thin wallpaper. And no matter how good quality plaster for plasterboard was, the best solution is how to be more responsible in approaching this task.
- Finishing. Used at the last stages of the work: before painting, wallpapering, etc. Can hide the smallest error. Most often white. Usually sold in finished form. If the coating is final, then what is the composition is not so important? It is better to choose a filler for gypsum board, based on such characteristics as granularity and adhesiveness. After all, the final mix is designed to mask small defects. Apply a thin layer to the surface. This will be more than enough, the main thing is to coat the glycl neatly.
- Universal. Can be used as an equalization, and as a finish for the glycine. Unlike the finish putty mixture has a more pronounced granularity. Therefore, as an end, it is more suitable for tiles or textured wallpaper. Otherwise, such a putty can spoil the external effect. In other cases, this variety is recommended for alignment.

Composition of putty mixes
The composition is divided into 3 main types of putty, used for drywall. And which option is best, depends more on this indicator.
- Gypsum. As the name implies, all such mixtures are made on the basis of gypsum. This is a fairly high-quality option. However, it is absolutely not suitable as a finishing coat and does not lend itself to scum. Also one of the significant drawbacks is low moisture resistance.
- Cement. It is considered the best option for rooms that have a high level of humidity. There are different types, which basically differ in composition. For example, if it includes elements such as marshalite, microcalcite or limestone flour, then this mixture will be more suitable for the finish coat than for the primary coating. Drywall plasterboard in 1-2 layers.
- Polymer. Usually used for finishing works. There are also different kinds. It is desirable to apply a thin layer, as otherwise shrinkage is possible.
To finally determine what type of putty is the best, each composition should be considered in more detail.

Spackling mixture based on gypsum
It is mainly used for sealing joints and cracks.
The main advantages of such mixtures are strength and high drying speed. This is achieved through special additives. Therefore, sometimes it does not hurt to ask what kind of fillers have putty, and what is better for drywall.
Also among the features can be identified the following:
- high plasticity (resistance to cracks);
- vapor permeability;
- durable and durable coating;
- high adhesiveness.
In addition, such mixtures are not subject to shrinkage, and they are easier to apply to gypsum cardboard than others, and puttying is more convenient.
After the composition dries, a certain film forms on the surface, which helps to save other facing materials.
However, it should be remembered that because of its high vapor permeability, such a putty is poorly resistant to moisture. So for wet rooms this compound will not work. It is more reasonable to give preference to other options.
Cement-based mortar mix
Cement putty can be 2 varieties: starting and finishing.
Starting is perfect for sealing large cracks and other shortcomings. The granularity of such a mixture varies from 0.5 to 0.8 mm.
Finishing has a fine granularity, which does not exceed 0.2 mm. After all, the smaller it is, the better it will be to coat the drywall with the final stages of the work.
Because of this difference in the grain size of the material, before you buy it, you need to determine the required layer thickness and mixture flow rate. It is also useful to know the temperature at which it is recommended to apply the putty.
In addition, putty on the basis of cement can be several colors. It depends on the composition, which can give white, gray and yellowish shades.
The moisture resistance level of this mixture is quite high. Therefore, for wet rooms this species is considered the best. Such plaster for plasterboard is ideal for a bathroom or kitchen.
Other advantages of this composition:
- excellent tolerance of low and high temperatures;
- high strength;
- good drying speed (from 2 to 3 hours);
- relatively low cost;
- absence of smell;
- plastic;
- ease of application;
- good covering qualities.
Polymer based filler mixture
There are two types: latex and polymer putty. For drywall it is desirable to give preference to the first. Although the second is also suitable. But it, as a rule, is used for finishing the facades of the building.
If you plan to use the filler as a finish, it is recommended to pay attention to the composition. There must be chalk and talc.

Compared with the two previous types, this type of coverage is considered better in almost all indicators. Therefore, when choosing which shpaklevkoy shpaklevat gypsum cardboard, you can safely buy it is polymer. Perhaps its only drawback is a high price.
The main qualities of the composition are as follows:
- quick drying;
- thin and neat layer;
- excellent moisture resistance;
- low shrinkage probability;
- high strength.
Thus, based on the above characteristics, you can quickly decide what to choose plaster for drywall. Each putty mixture has both advantages and disadvantages.
On the shelves of building stores there is a huge amount of putty from different manufacturers. Therefore, in order to accelerate your choice, the main thing is to correctly determine the conditions of the room and the type of the surface of the glyc.
Date: February 9, 2016