It would be very convenient if all the rooms in the apartment had smooth, strictly vertical walls, then there were no problems with sticking. Take and glue all-inclusive, bending the lines in the corners and moving to the next wall. But the main part of our houses is not built the best, but because not in the most even way. And what to do if there are problems? How to glue wallpapers in corners: video, tips and photos today in our article.
Internal corners
We will perform this process at least four times.
Now, understanding how to paste wallpaper in the corner, you can safely proceed to repair. The advantage of this method is that it can be used for both thin and heavy fabrics.
Now you know how to glue the corners with wallpaper - the video in this article will show the sequence of the process.
External corners
Finishing of slopes
Ironically, similar protrusions are found in many rooms and rooms. Among these are the slopes. If you are lucky, and they turned out to be even, you can paste them, tightly wrapping the sheet.
Sequence of work
Glue the wallpaper in the corners with significant unevenness is necessary with a slight overlap.
We paste on one of the walls of the strip so that the end is wrapped on the ledge for 3-4 cm.
Room with external and not internal projections
We press this edge to the surface, but we try to make it lie flat. If this creates difficulties, you can make several cuts. Now cut the wrapped end vertically, while leaving only a thin edge, inconspicuous through the second cloth.
Using a tape measure and a plumb, we define and mark the line of gluing the edge that is far from the projection, all this is done before pasting the second sheet.
The distance from this contour to the bent edge of the first sheet should be 5-6 mm less than the width of the strip for gluing.
We should form a small overlap.
Advice! If you glue a fleece-based fabric having a sufficient thickness, use a transparent adhesive.
Summing up
We hope that our article was useful to you. In order to more accurately understand the technological and practical issues, our website provides a detailed photo and video instruction, in which you will find useful information on this issue.
One of the most popular types of interior decoration - wallpapering. But in order to make the result happy, you need to know how to glue the wallpaper properly. There are enough nuances that affect the quality of the finish.
Preparatory stage
At first, everything that can be removed is removed in the room, including the casing of doors and plinth, if possible. Also, remove the sockets and switches, closing the boxes with wires stubs - plastic or wooden.
Disconnect the electrical outlets
When working with an electrician, the room is de-energized and until we finish, do not turn it on. It is advisable to carry out all work, including wallpapering, with the power turned off. The work is "wet", and water or glue can get on the wires and short-circuit. If the wiring is done according to all the rules and there are safety gadgets, this is intrepid. They just cut down the food and that's it.
If the wiring is done as before, it can be dangerous. Worst of all, in this case, it is often not possible to turn off the power in a separate room. Only in the whole apartment or, at best, in its half. Then the output is to remove the power wires from the outlets and switches (with the power turned off, naturally) and carefully insulate the ends, then hide them under the plugs. Then they have to unwind and put in place, but it will be so safe.
Lighting during work makes temporary - pull extension cords from other rooms and include portable lights. After you sorted out the electricity, you can move on.
Filling irregularities
Then you first have to assess the condition of the walls. First you need to pull out all the nails, screws, remove chips and crack the cracks. Then inspect the results. If the walls are more or less even, there are only small defects, you can dispense with occasional alignment. Only the cracks, dents, chips are closed up. They can be glazed with finishing putty. Only before leveling the wall, finally clean the dust and pieces of wallpaper, and then cover with a primer (wall roller and brush in the corners).
If the wall after the "processing" puncher, without full plastering the entire wall can not do. Basically, today they use gypsum putty. First, a layer of the primary or the starting layer is applied. It is with a coarser grain and the layer can be up to 3-5 mm. This composition aligns the main irregularities, trying to achieve an even surface. After drying, they pass a special net, removing irregularities and rushes, which can be.
After using the final putty. It is very plastic and is applied in a thin layer - up to 1-2 mm. Hereafter, the wall becomes smooth (after the irregularities are smoothed with a grid, only with a smaller cell).
Wall priming
The second layer of the primer is applied after puttying. It forms a film on the surface, which reduces the absorbency of the adhesive, and also improves adhesion. For the case of pasting wallpaper as a primer, you can use a more liquid adhesive for wallpaper. On each pack there is a table in which the amount of water for pasting and priming is indicated. We spread the glue in the required proportion, we wait for its readiness (also is on the package) and cover with the composition of the wall. The technique of the primer is the same: first pass the corners with a brush, then with smooth surfaces.
In the video, the use of primary putty for some reason is called plaster, but otherwise the sequence of actions is correct.
Rules for gluing
When pasting wallpaper, there are several rules that must be adhered to. The technique varies depending on the type of wallpaper, as well as the glue that is needed for a quality result. The difference is mainly when and where to apply glue. You do not need to guess. Everything is on the liner, which is available on every roll of wallpaper. There it is depicted in a graphic form, and in some it is written which of the parts must be smeared with glue: only a wall or only wallpaper, or maybe both at once.
But some things remain unchanged. For example, applying the starting strip.
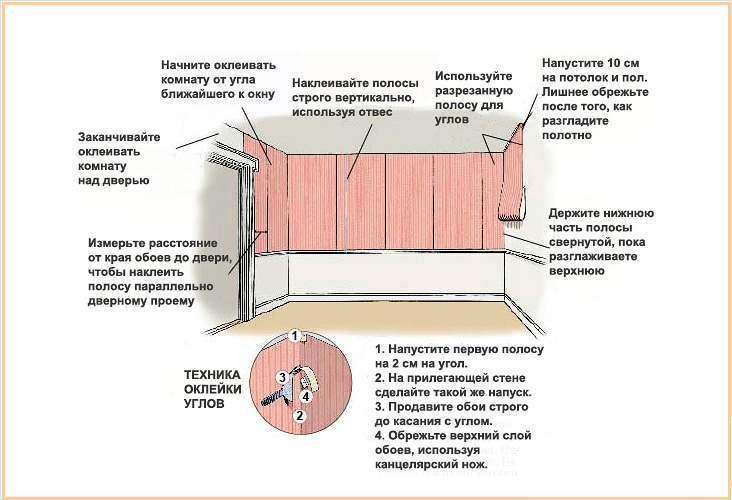
Where to start
In fact, the starting point is not so important. It is important that the first strip is glued strictly vertically. Because the choice is yours.
If the room has an excellent angle: flat and exactly vertical, you can start from it. If there are doors with perfectly aligned jamb, you can use them as a guide. If there is nothing like that, draw yourself a landmark yourself.
Take the building level, mark a point on the wall and through it conduct a precisely vertical line. Inexpensive building levels of the household class, which we usually use for repairs, sometimes give a solid error. And since it is important for us to stick the first strip strictly vertically, check the accuracy of the line with a plumb line. He never lies, pointing down. If everything is ok, you will align the edge of the strip on this line.
If you still do not decide where to start gluing the wallpaper and this is your first experience in this area, start with the wall that is the least visible. For example, the one along which there is a cabinet. A couple of the first bands will be difficult for you, and then you will better understand what's what and flaws will be less.
How to glue wallpaper on the wall
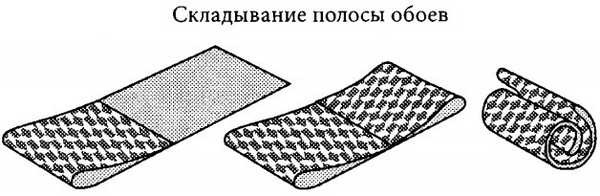
If the glue, at the request of the manufacturers, is applied to the cut piece, the smeared strip is folded so that the overshot side is inside. To do this, wrap the edges to the middle, then fold several times. Places of folds do not press. Let them remain rounded. It is necessary that all layers are impregnated and the fabric is well laid on the wall, and also stuck without bubbles.
If you want to apply glue on the wall, smear the area a little more than the width of the wallpaper. The area under the ceiling, in the corner and near the floor, is smeared with a brush. Then the rules are common.
Take the cut off strip, climb the ladder. The upper edge of a few centimeters enter the ceiling, then level one of the edges along the drawn line of "start". Since the wallpaper today glue butt, which of the edges - it does not matter.
Strictly applying a side edge to the line, moving from this line to the other edge, glue the wallpaper around the ceiling. Then, gradually moving down, you go down a little lower.
The extra centimeters on the ceiling are cut off. It is more convenient to do this with a paper knife and a large spatula. Well press the paper to the corner, holding his hand. Then apply a spatula. On its edge, conduct the blade of the knife.
Pruning under the ceiling and near the plinth
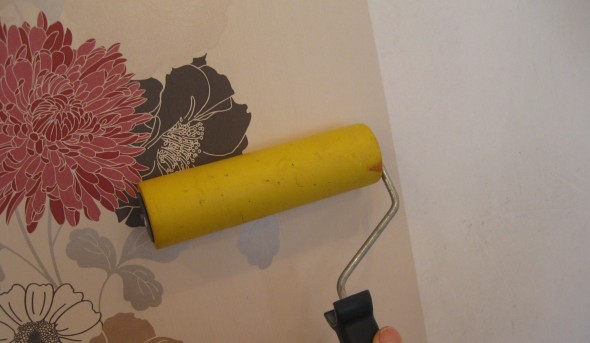
By gluing the canvas, the movements are made from the center of the strip to the side and slightly downward, expelling the air that gets to the edges. Previously, this was done with a rag, but it is better and faster to get a roller with an elastic nozzle (it is usually yellow). When working with it, there are practically no bubbles. But if the wallpaper is structural, with an extruded pattern, the roller can be crumpled. Then take a wallpaper brush. It is wide and flat, with a strong pile.
Coating brush for quick stickers
Having reached the point where the strip is not glued yet, unfold the remainder is dense and act according to the same scheme. First you expose the edge, then using a roller or rag, you expel the air, achieving an even surface.
The second strip is pasted the same way, with the only difference being that the existing canvas on the wall serves as a guide for gluing the edge. That's why it's important to stick it evenly, otherwise all the others will also mow.
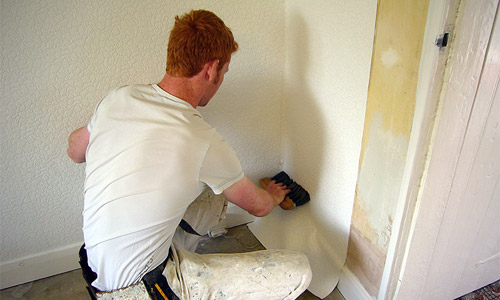
Secrets of pasting corners
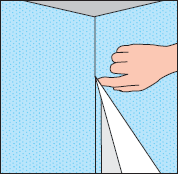
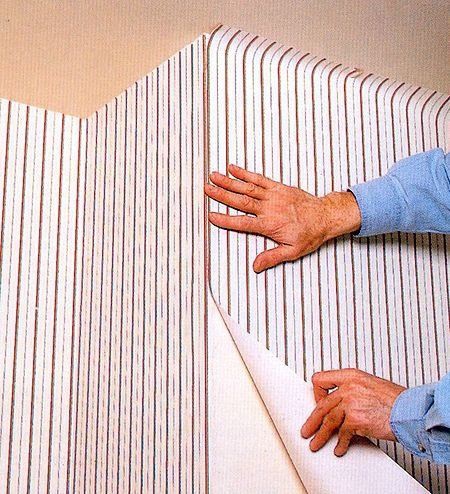
The most difficult thing is to glue the wallpaper in the corners. But this is only as long as you do not know the secret. First you can try to make it simple. One of the parts to wrap on the adjacent wall for 1-2 cm, and cut the second in the corner.
It's easy to make, it looks good. But on some wallpaper this strip is very visible. There is another way for such a case. Glue the canvas on both sides of the corner so that they are at least slightly wrapped on the other side (2-3 cm is enough). Well press them to fit. to the walls and the corner.

Then take a special cutter or a large spatula. Press it in the corner, along its edge, cut the wallpaper with a sharp knife. It is necessary at the same time to cut both cloths, so that the force may need to be considerable. To make the cutting turned out to be continuous, you do not tear off the knife. Stopping, move the spatula, which rests against the blade and then continue the cut.
Cut off everything, remove both cut strips, and the remaining canvases are joined in a corner. If the wallpaper before pruning was well pressed, the match is perfect, without any discrepancies.
How to glue wallpaper on the outer corners? Practically in the same ways. In the first case, one of the bands is wrapped around the corner by one to two centimeters (for thicker wallpaper it's better 2 cm, for thin ones - 1 cm is enough). The second strip is glued strictly along the corner. If this overlap is visible (usually on a fleece-based wallpaper), it will be necessary to cut along the entire strip. In this case, wrap more and cut vertically with the same spatula and knife. Cut off the cut off, and glue the joint.
Metro wallpaper in the corners glue just like the narrower. It happens that a narrow strip is needed in the corner, and the rest is cut off. If the wallpaper without a picture, it can be used somewhere at least in another corner. With patterned canvases, they also sometimes get somewhere to attach, but to make it more difficult. That's why they take figured people with a decent stock: just for such cases.
How to glue vinyl wallpaper on a paper base, how to kick out the imperfect corners in this video.
How to glue wallpaper near the door and window
If the door or window is at the same level with the plane of the wall, problems usually do not arise. The wallpaper is cut along the door frame or along the edge of the casing. The canvas is cut to an angle of the clypeus or frame at an angle of about 45 °. The cut pieces are wrapped along the opening, bent and then cut off with scissors or a knife. More smoothly and faster is obtained with the use of a knife and spatula.

How to glue near the door
More difficulty is caused by the option, when it is necessary to cover the slope of the door or window. When using paper wallpaper, the principle is again simple: glue the strip on a slope, putting it 1 cm onto the wall. From the top we glue a piece exactly on the cut of the window opening.
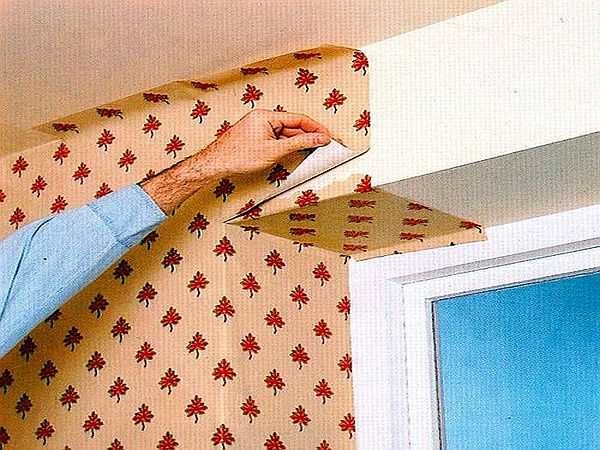
But with the wallpaper on the nonwoven, this method will not work: too "overlaps" are visible. In this case, the strip is cut along the window opening with a small margin. Above with overlap paste another fragment, cutting them evenly on the cut of the window opening. The pasted piece is wrapped inside, on a slope. Continue to dock as before.
Explain in words is difficult. It is more accessible in video. In it, by the way, and about the design of wallpaper arched openings there is a plot.
How to make joints invisible
The fact that the joints of the canvases were imperceptible should be taken care of during gluing. You need to connect the canvases so that there is no gap between them, but also so that they do not go one by one even by a millimeter. It is necessary to achieve an ideal coincidence.
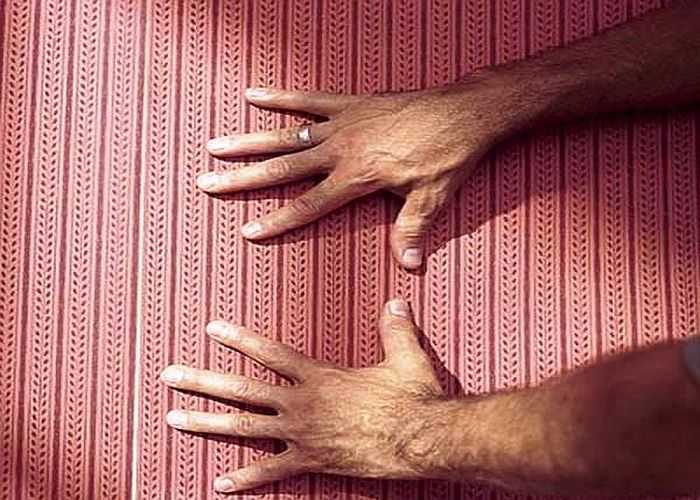
Since perfectly smooth walls we meet, alas, infrequently, it turns out that the seam then creeps a bit, then diverges. Your task is to move the canvases so that it becomes perfect and inconspicuous. You can move the canvas with your hands - they can be slightly stretched and compressed. Due to this, you achieve the required coincidence. If the drawback is too great and the shifts can not be achieved, strip the strip to this place and, adjusting as necessary, glue it again. Sometimes, if the seam sticks out a little, rolling with a special tapered roller can help.
With this technique it turns out that the edge is first glued, which is joined, and then, from it begin to smooth the rest of the surface of the canvas. If you inspected the seam and were satisfied with the result, take a clean rag and wipe it off the excess glue that could come out with all these actions.
On how to glue a meter vinyl wallpaper on a non-woven base and how to make the joint invisible, look in the video.
Eliminate disadvantages
With a lack of experience, it may happen that after or during drying, bubbles appeared on the walls. You can remove them with simple actions. Take a large syringe, type glue into it, pierce the bubble and insert into it some amount of glue. Vinyl wallpaper, acrylic, paper - the upper part is not important at the same time. Actions vary depending on the basis. If wallpaper on a paper basis, wait five to seven minutes, if the nonwoven - acting immediately.
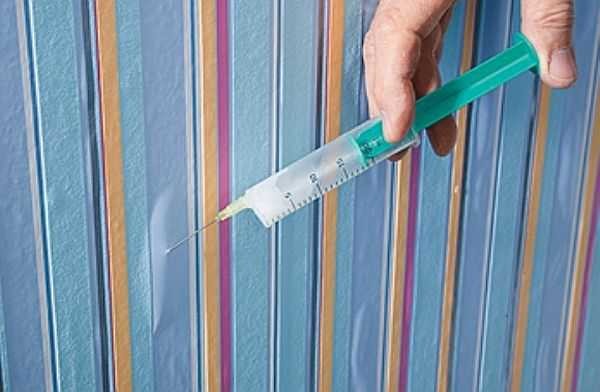
How to remove bubbles on wallpaper
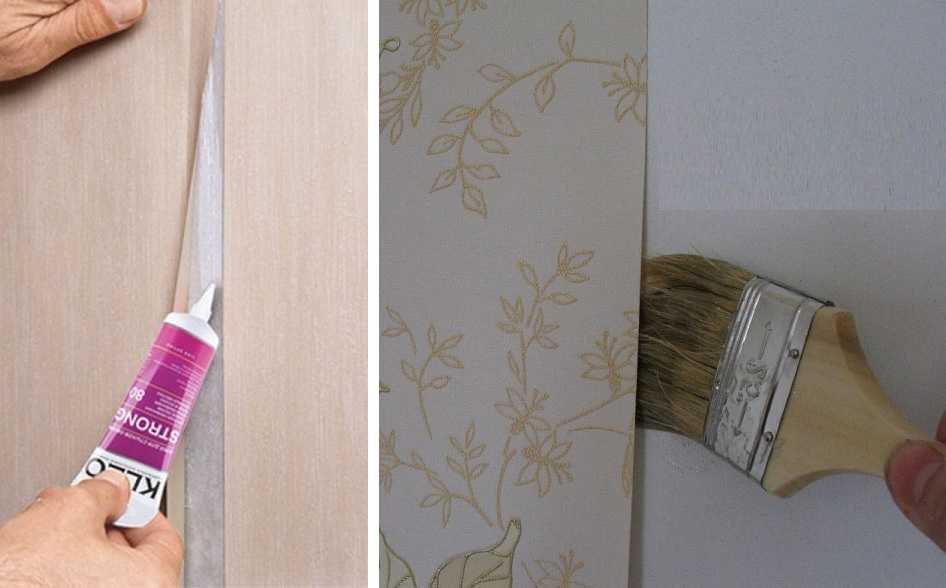
Quite often the seams diverge. The wallpaper may lag along the stream or plinth. There are two ways to glue them. Use a brush and glue residues or buy a special one for seams. It is in a tube and is applied pointwise. Again, the order of actions depends on the basis. After wetting the paper one, we wait for a while, then we paste it, watching the matching of the edges.
A lot of people who decided to make repairs in an apartment or a house with their own hands, believe that high-quality wallpapering will not be very difficult for them. Yes, to some extent this finishing material is quite practical, but only on flat sections of the walls, which can not be said about corners. And how to glue the wallpaper in the corners? That's the question facing people who have begun repair without professional help.
It is in the corners that the sticking is a laborious process, this makes it difficult and calls into question the rapid completion of the repair. So you should approach this issue with all seriousness and study with scrupulousness all the nuances of such an operation, because bad wallpapering in the corners in general can spoil the whole look.
How to glue wallpapers in corners
Wallpaper is and remains the most popular material for finishing any type of premises, whether it is a room in an apartment, an office, or a beauty salon. The quality of the wallpaper varies, and can be met absolutely for every taste, color gamut and value.
Sometimes cheap, nondescript wallpaper transforms the room so much that it does not seem to be much worse than expensive ones, ie the assortment of wallpapers is different now on the construction market, and there is a quality and cheap material - two in one.
Today, to paste wallpaper, you do not need to have professional skills, but you need to know the system of gluing. The walls must first be leveled around the perimeter, in the corners, and hence the problems for non-professionals begin.
Sticky wallpaper in the corner
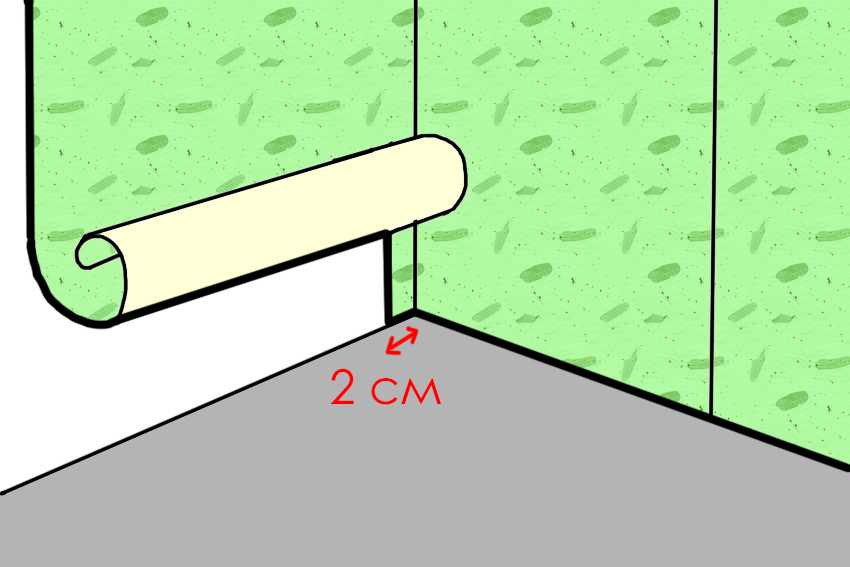
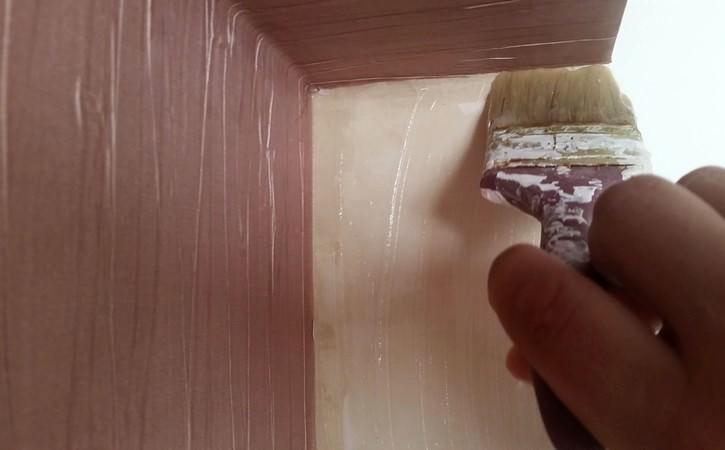
It is not recommended to glue the whole strip of material. In the presence of uneven angles, the strip lies folded and does not converge with the other. We recommend to leave the ledge around the corner for 1.5 or 2 centimeters and then the strip will lie flat. Choosing a high-density wallpaper, use a plumb line. Glue a piece of trimmed wallpaper with a small overlap on the adjacent wall so that it is as vertical as possible.
If there are switches or sockets in the corners or proximity to them, turn off the electricity supply and remove the covers before gluing and any construction work. Fully paste the material on the convex parts, and then carefully cut out, making small incisions.
When proceeding to pasting a wall near the door, it is important to know that the strip of wallpaper should be cut vertically to the beginning of the frame. Then it is attached along the edge of the wall. Protrude the wallpaper protrusions.
Flizeline wallpaper - how to glue wallpaper in the corner
Wall Preparation
Wallpaper gluing should be done according to the existing technology, observing the sequence of processes, as regards not only the angles, but in general the entire procedure for gluing walls with the obloids.
The list of the stages of finishing work for wallpaper gluing:
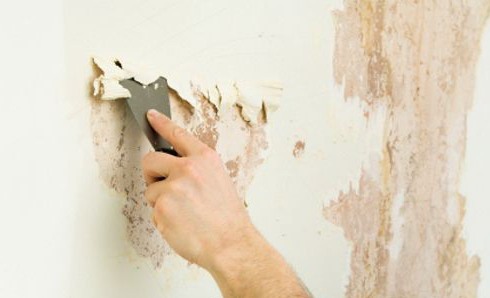
- Clean the walls of the oil paint;
- If there is whitewash, then cleanse it;
- Remove deep irregularities, especially in corners;
- Carry out the preparatory work. Priming the surface.
Primer surface is better to produce professional products that are sold in packagings of different prices, but can also be primed and diluted with glue, but not particularly welcome. To primer surface you will help a special roller or a wide brush. Because of the fact that in the corners of the pasting is especially difficult, there is a place to be such a nuisance as the displacement of the picture. On the walls, the geometry of the picture is preserved, but in the corners everything has gone and now spoils the general background. Therefore, the most responsible approach is to inspect the corners, if there are unevennesses, eliminate them in case of presence.
Preparation of walls for wallpaper gluing
Stage of aligning the corners of the wall
After you have pasted all the smooth surfaces of the walls, you have to go to the corners. Now look around, and noticing the irregularities, proceed to grinding - carefully oshpatlev. After the filler has completely dried, the whole surface must be cleaned with sandpaper to achieve an ideal smooth surface so that the wallpaper does not come off in the future.
Now you need to cover the corners with the primer. If you do not have the shpatlevanie skill, then there is an exit, just buy the same wallpaper, or with a simple drawing that does not require further docking (paper). So part of the question of how to glue the wallpaper in the corners can be considered open.
Stage of applying glue in the corners
After leveling the surface in the corners, we move on to applying the glue, it needs to be spread with all the care in the height of the walls, and in the corners most conscientiously, because in these places the wallpaper is most often peeled off. Roller spread the glue along the entire length and brush in hard-to-reach places.
Application of glue on wallpaper and on walls
How to glue wallpaper in corners
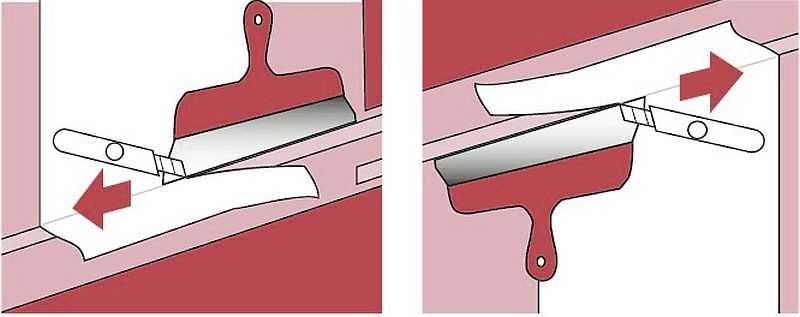
Finally, we moved on to an important part of the issue of sticking in the corners. The pros of this case recommend to glue a piece of cloth in the corners, even if the whole piece is perfectly straight. This can be explained by the fact that there is a high probability of distortions in the corners, and the subsequent sheet does not dock at all, and after drying, creases can be found. Professional room decorating advise the wallpaper to cut off the wallpaper so that the next side of the side moved to 50 mm. Below is a picture of wallpaper gluing in the outer and inner corners.
Do you know: it's a nuisance for beginners in this matter - the curvature of the sites of gluing. Such a defect in the eye surface can not always be detected, so a list of tools will come to the aid: a plumb line and a building level. They measure the angles before gluing the wallpaper.
If there is a serious "blockage", then it is better to come to the method of "cutting" in these places. This method is used for dense wallpaper - vinyl.
According to this method, the material is passed through 50 mm to the adjacent wall by the angle, and the next sheet is glued.
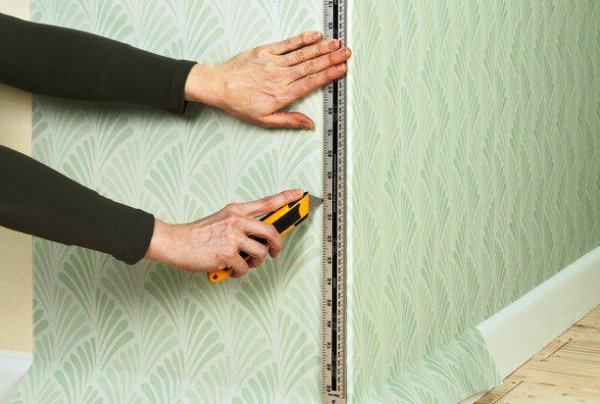
The next step: in the middle of the corner, a vertical cut through the two layers of wallpaper is performed with a special construction knife under the level or ruler in the direction from top to bottom.

The scheme of gluing wallpaper in the corners
During the whole process, the iron ruler must fit snugly against the corner and be pressed hard, so that there is not the slightest movement. Otherwise, a shear along the cut canvas is provided. Masters recommend using a long metal ruler, a construction level, which has more weight and a wonderful press that interferes with the movement.
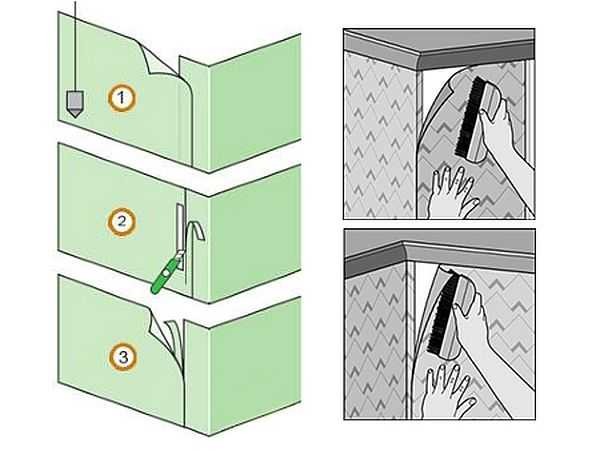
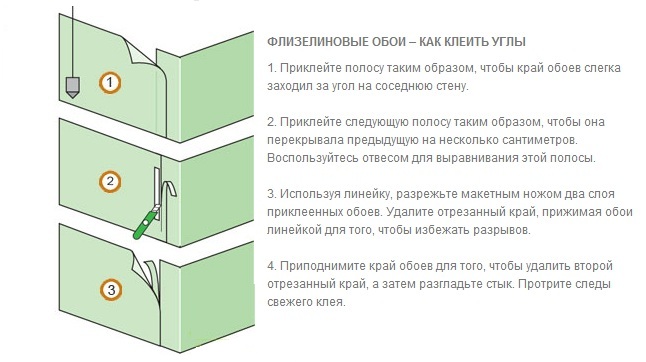
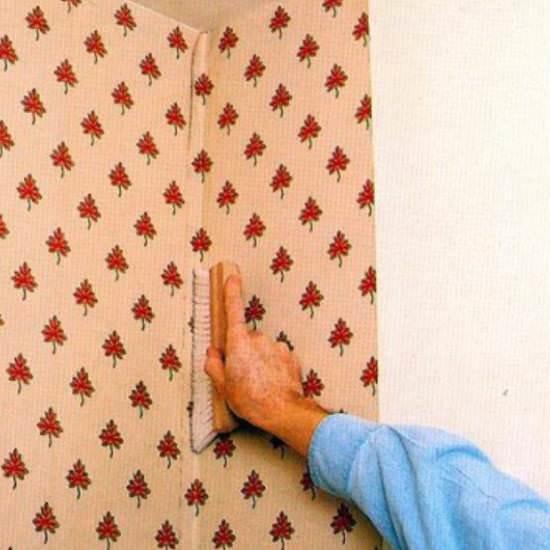
We glue wallpapers in the inner corners
In order to avoid the appearance of folds in the inner corners, it is necessary to divide these cloths into two parts prior to the beginning of the wallpaper gluing. The first thing is to glue the material to the corner of the room, then you need to accurately measure the distance from the last glued piece of wallpaper to the angular bend, and to the resulting figure add the docking 10-12 mm. Next, one prepared piece is glued to the wall with a cut edge at an adjacent angle. Adjust the edges as usual, be it top or bottom.
Now, using a brush or rag wallpaper, press into the inner corner of the room. If irregularities occur, such as warpage of the material, then take a special knife and cut it, while pushing the wallpaper into the wall. Then apply the next part overlapping to the pasted material, densely pushing it against the wall with a brush. Finally, cut off the remains at the bend with the same knife.
Tip: If you have a corner inner and middle parts have small bulges, and the bottom is littered slightly inward - it is better to press the cropped edges overlap. When gluing the room with dense (vinyl) wallpaper, the best option is to use glue with a transparent base at the junctions, such glue is suitable for dense materials.
Methodology of pasting out the outer corners of the room
Pasting the outer corners of the room requires pre-calculating the length of the wallpaper, and so that the canvas is not what is enough, and he was able to bend the convex part of the wall from 21 to 25 mm. When glue dense quality wallpaper, know by making light cuts, for a smooth laying strip.
How to glue wallpaper in corners correctly
So, on dense wallpaper using an iron ruler and scissors cut off excess strips of material, leaving a minimum of edges, the visibility of which will not be visible under the subsequent cloth. Top of all glue the next strip with overlap of 5-6 mm. If you chose a smooth wallpaper, then immediately iron them with a platen, and with a convex pattern, the volume can be completely lightly covered with a rag.
Sticky wallpaper with a pattern in the corners
Vertical drawing of the wallpaper makes it difficult to glue in the corners, because in these places there are particularly noticeable distortions. A pattern with a horizontal position is not an exception, for example, after gluing it can completely skew. In order to avoid such incidents, it is necessary to make a small overlap on the wall in the neighborhood and hide the joint in the top of the corner.
Tip: The difficulty of pasting corners with the wallpaper is to observe the rule - the edge of the plumb went flat, and the other should be trimmed along the edge of the corner.
Pokleit wallpaper and at the same time without shifting the pattern without experience, not a professional will not succeed. The main thing to make it less noticeable, using the instructions provided above.
Repair of an apartment, house or office takes a lot of time and energy, as well as money, if you decide to ask for help from hired workers. But thanks to the instructions given to you above and following them accurately, you can start self-decoration, paying attention and time to study the wallpapering in the corners. Pay attention to the presence of defects, whether you have even walls, and carry out preparatory work to remove irregularities. In addition, in the corners often pass the batteries and pipes that interfere with the process of pasting, turning repair into a hassle.
If you approach responsibly to this task, taking into account all the recommendations and rules, then you will have quite a remarkable result, no worse than if the professional team of masters performed the sticking. Completing your own hands on the finishing work, you will significantly save money. Good luck, and a good repair in your home!
How to glue wallpapers in a corner - video review
Flizeline wallpaper - this wallpaper, the manufacture of which uses a non-woven cellulose fabric nonwoven. Unlike paper analogues, these wallpapers are beautifully washed, they allow you to hide even quite noticeable wall irregularities and for a long time retain an attractive appearance. And the process of gluing non-woven wallpaper is quite simple - the material is quite obedient, it does not "contract" either horizontally or vertically and practically does not give "bubbles". And even in such "problem" places. as external and internal corners, non-woven wallpaper are glued without any problems - for this when sticking it is enough to observe a few simple rules.
How to glue non-woven wallpaper on the inside corners
The first thing to say about the gluing of non-woven wallpaper in the corners (both external and internal) You can not try to cover the corner with a whole cloth wallpaper. In other words, do not try to cover both walls adjacent to the corner with one cloth. Otherwise, the probability is quite high that the wallpaper "will lead" in the corner, and the folds that have been formed will be almost impossible to smooth without cutting, which will certainly damage the appearance of the wallpaper. But even if this does not happen, the curvature of the corner (and unfortunately most of the corners in our apartments curves) will affect the layout of the canvas, and since non-woven wallpaper is glued "to the butt", all the following canvases will also have to be glued not in level.
The correct technology for gluing non-woven wallpaper to internal corners is as follows:
- We measure the distance from the edge of the last pasted cloth to the corner and add to it 5 centimeters. A panel of exactly this width will need to be prepared for a sticker in the corner.
We measure the distance from the edge of the last pasted sheet to the corner
Since the angle can be a curve, it is better to measure the distance at three points: the bottom, the middle and the top of the wall. For calculations, naturally, we need to take the largest of the resulting values.
- When the panel of necessary width is ready carefully we cover the wall and corner with glue for non-woven wallpaper. Note that when gluing non-woven wallpaper, glue is applied only to the walls.
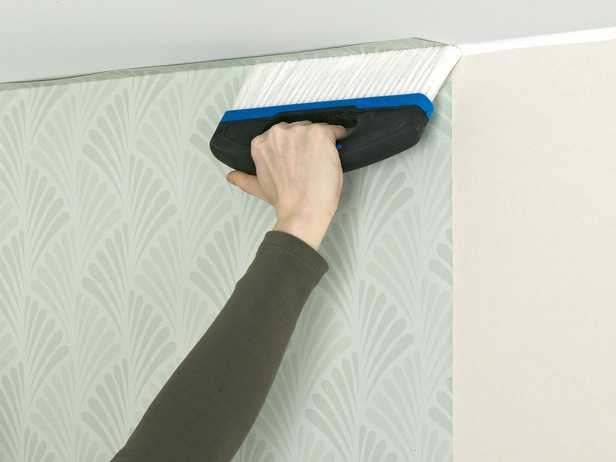
- After the sheet is pasted, you should very carefully use a rubber roller or a dry cloth to smooth the wallpaper in the corner and on the next wall.
With a rubber roller or a dry rag, smooth the wallpaper in the corner and on the next wall
If the wallpaper "frowns" in some places, you can make several horizontal notches at a distance of 5-10 centimeters from each other.

Please note that gluing this canvas is necessary "overlap" on the previous canvas.
- When both canvases are glued, it remains to use the wallpaper knife and the metal ruler of the paint trowel to make a "trimming of the seam". More details with the technology of "angled trimming" can be found by watching the next video.
Video about the angled cropping of wallpaper
It is very important to cut both wallpaper at the same time, as otherwise there may be discrepancies in the cutting line.
In order for the cut to be smooth and the wallpaper under the knife "did not stretch"? It is necessary to periodically break off the blunt tip of the wallpaper knife by specially marked on the blade marks.
- After trimming, it remains to remove excess wallpaper. The top layer can be removed without problems, and the bottom - slightly turning away a small part of the upper panel.
If you have done everything correctly, then the panels form a practically imperceptible joint, which will be carefully smoothed with a rubber roller.
We glue on external corners
External or external corners are not found in all rooms, but, nevertheless, they can be met quite often. The technology of sticking the non-woven wallpaper on such angles is practically the same as the method of pasting the corners of the interior.
The technology of gluing the outer corner is almost the same as the method of pasting the corners of the internal
First of all, measure the distance to the corner from the extreme panel and prepare a new sheet of wallpaper in such a way that after the label they "wrapped" around the corner no more than 5 centimeters. From the point closest to the corner, we measure the distance for gluing the next cloth (roll width minus 1 centimeter). Glue the canvas "overlap" on the formed curl, after which we make a trimming of the seam with a wallpaper knife and removal of unnecessary parts of the wallpaper.
If the outer corner is fairly level (you can determine it with a plumb line), you can try to cover it with "one sheet". But keep in mind that the level difference in this case should not exceed 0.2-0.4 centimeters. Otherwise, it is better to glue the non-woven wallpaper according to the technology described above.
As you can see, in the pasting of corners with flizelin wallpaper there is nothing complicated, so after a little practice you can perfectly cope with this work. Successful repair to you!
Pasting walls with wallpaper will help create a cozy home atmosphere in the kitchen. Thanks to modern developments, this finishing material, and in particular - non-woven wallpaper, for strength and durability can compete with plastic. At the same time, they are more environmentally friendly, allow air to circulate and it is easier to work with them. The only thing that you have to tinker with - to figure out how to glue the wallpaper in the corners.
Choosing the right wallpaper for the kitchen
Correctly matched wallpaper - already half the success. Having saved on quality, you can lose a lot in durability, and you'll have to repair again in a year or two.
Non-woven bases are more convenient when there is a need to change the wallpaper. To do this, you just need to remove the vinyl layer, and a new cloth can be glued to the old finish.
Consider what kinds of wallpaper can be, and whether they can paste the kitchen:
- Paper wallpapers - not the right option for the kitchen. In conditions of temperature changes, high humidity or dryness, the paper deteriorates, and the pattern burns out. Making a kitchen paper wallpaper, in this microclimate do not have to rely on their long life.
- Vinyl on paper basis - more durable material. They can be washed and pasted for painting. Such wallpaper does not fade under the sun's rays and is resistant to moisture. The technology of gluing is the same as paper. But since vinyl makes the canvas heavier, glue is chosen for heavy wallpaper. It should also be borne in mind that not every vinyl coating is breathable.
- Vinyl on non-woven basis - are distinguished by their high strength due to non-woven linen as a lining. Do not be afraid that they will tear or shrink. Such wallpaper glue butt. Due to the fact that the adhesive is applied only to the wall, in the process of repair, the forces are saved and time is saved.
- Fluffy wallpaper - thanks to its dense structure, it perfectly masks irregularities and cracks. Good air is let through without turning the kitchen into a "greenhouse". Perfectly fit as a base for painting. In the process of gluing do not stretch and do not tear. Easy to clean, they can be washed and vacuumed.
Necessary materials and tools
To properly paste the wallpaper and not be in the process of being caught off guard by the absence of the necessary tools, before repairing, check that you have everything you need.
You will need:
- wallpaper,
- glue,
- mounting knife,
- scissors,
- putty knife,
- plaster,
- building level,
- plumb bob,
- sponge,
- rubber roller,
- ruler,
- pencil,
- brush.
Subtlety of pasting corners
Wallpaper gluing is a simple task, but it also has its own subtleties. Typically, the difficulties arise if you do not know how to glue the wallpaper in the corners. When at least one corner turns out to be crooked, as the wall is glued along the wall, there will be an increasing misalignment of the canvas relative to the surface of the floor and the windows of the kitchen or the ceiling.
Do not focus on the doorway as the starting point of pasting walls with wallpaper. Check with a plumb line whether it is really perpendicular to the floor. Chances are great that the frames are also installed with an error that will lead to a skew, and the angle will be swollen.
The tradition to start decorating walls with wallpaper from door and window openings has its origin from the need to glue the paper wallpapers overlap, so that the latter is less noticeable. With the advent of vinyl and nonwoven materials such a need has disappeared, since the sheet is glued to butt.

Before you start working with wallpaper, it would be correct with the building level to level each corner with plaster. With minor irregularities, you can cope with a small overlap or cut off an extra piece of cloth.
Trimming the wallpaper in the corners (video)
Pasting with interior wall corners
Correctly covered with wallpaper the corner does not frown, the edges of the canvas do not diverge, forming a gap. To achieve such a thorough performance of repair, resort to some tricks.
For this:
- A layer of glue is applied to the wall. If the wallpaper is non-woven, do not apply glue on their back side.
- The edge of the canvas is planted on the adjacent wall by an allowance of 1-2 cm.
- I'm pressed firmly against the wall with a sponge. If the canvas is wrinkled, scissors make incisions towards blisters and straighten the material.
- After this, they begin to open the canvas, which will fall into a corner from the top. With the help of a ruler and a pencil on the reverse side, the overlap in the mirror image that overlaps the adjacent wall is cut off and this excess is cut off.
- The glued canvas is glued so that the cut edge ends up in the corner.
Pasting of external corners with wallpaper
Often the design of the kitchen is made in such a way that in the doorways it is necessary to glue and protruding the outer corner.
For this:
- Perform measurements from the top and bottom starting points for the wallpaper to an angle of plus 3 cm to wrap it.
- Cut out the wallpaper on the required size.
- Brush glue on the walls.
- The edges are tightly pressed against the wall, performing incisions where wrinkles are formed.
- If the pasting is done by the material on a non-woven base, the top layer along the corner is cut and the narrow strip is neatly removed.
- A new sheet on the adjacent wall on the other side of the corner is glued over the flizeline edge.
- At the joints are passed by a rubber roller.
That's all the tricks, how to glue the wallpaper in the corners. Knowing these subtleties, difficulties with the design of the kitchen should not arise. Such simple solutions will help create a cozy kitchen interior.
How to glue wallpapers in corners (video)
Attention, only TODAY!