There are a lot of different types of sealants, but not all of them can be used in such premises as the bathroom, because in the process of using it a special microclimate is created. High humidity, contributing to the development of mold and, as well as the availability of modern plumbing fixtures made of different materials, require a special approach to sealing joints. Here you need a special sealant for the bathroom. It is about him that will be discussed in this article from the site website in which we will tell all about this material and teach them how to use it correctly.
Which sealant is best for the bathroom
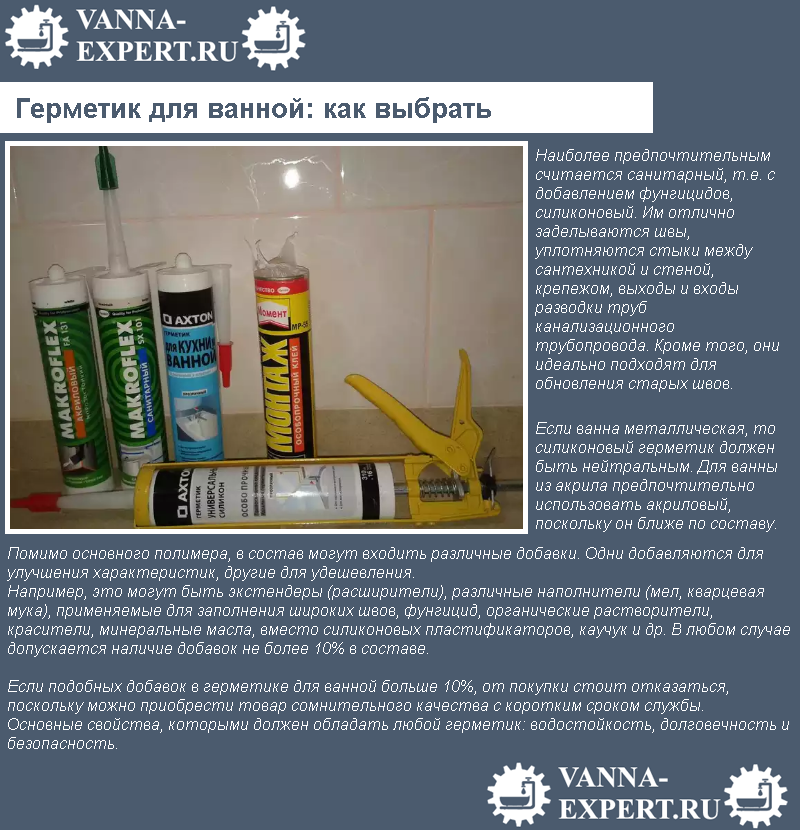
Hermetic for the bathroom: how not to be mistaken with the choice
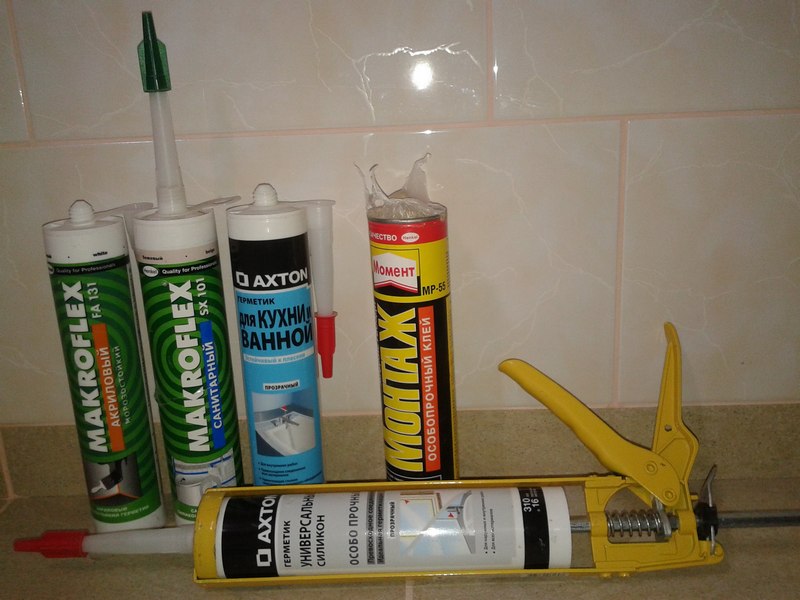
In principle, all modern sealants, convenient for use in the bathroom, can be counted on the fingers - it's acrylic, silicone, acrylic-silicone and polyurethane sealant. Of all the above, the best for the bathroom is a silicone sealant, and if it is still labeled "sanitary", then it is generally the most suitable compound for sealing joints in the bathroom. Why? But with this we will understand, studying its properties and characteristics.
- Sanitary silicone is produced without impurities and all kinds of fillers that can change the properties of silicone for the worse. And this indicates that after drying, this sealant has the lowest shrinkage factor, which is only 2%. What does it give? Firstly, it is the durability of the sealed silicone seam, and secondly, it is an opportunity to use it to seal the movable joints and, thirdly, such a low shrinkage factor allows it to be used to create linings for sanitary ware. For example, under the floor or - put on the perimeter of the base silicone allows you to compensate for the disadvantages of factory casting.
- Special modernizing additives - they do not affect the main characteristics of this sealant, but, on the contrary, give it additional useful qualities. The most common additives are fungicides - antibacterial and antifungal substances.
- Neutrality. Acquiring sanitary sealant for the bathroom, it is necessary to understand and another important difference between these materials - silicone sealant can be acid and neutral. The first differs sharply pronounced smell of vinegar - it is not worth using it to seal joints between metal products, as it corrodes them. Neutral sealant does not possess such properties - in this respect it can be called universal.
- Resistance to temperature changes, which in the bathroom can be quite high. Typically, the silicone sealant for the bathroom can withstand temperatures from -50˚C to +200˚C.
Hermetic for bathroom photo
And this is not all the properties that the sealant for the bathroom possesses, made on the basis of silicone - we will not deal with them, since we already answered the basic question of which sealant is better for the bathroom. Undoubtedly, this is specially designed for these premises sanitary silicone!
Hermetic sanitary for bathroom photo
How to apply the sealant for the bathroom: the sequence of works
The question of how to apply sealant in the bathroom, is not very simple, and it is due, above all, to the accuracy of sealing joints. You should understand that this work should be carried out to the same degree qualitatively and accurately. Any sealant is able to spoil the appearance of both the sealable product itself and the room as a whole. It is for this reason that in the process of sealing the seam should adhere to certain rules, which we will describe in the process of describing the sequence of work.
That's all, now it remains to wait until the sealant thoroughly dry, and this is at least 8 hours, after which the penetration of water into the seam can not survive.
The video shows how to correctly apply silicone sealant for the bathroom.
How to clean the sealant from the bath and from other surfaces
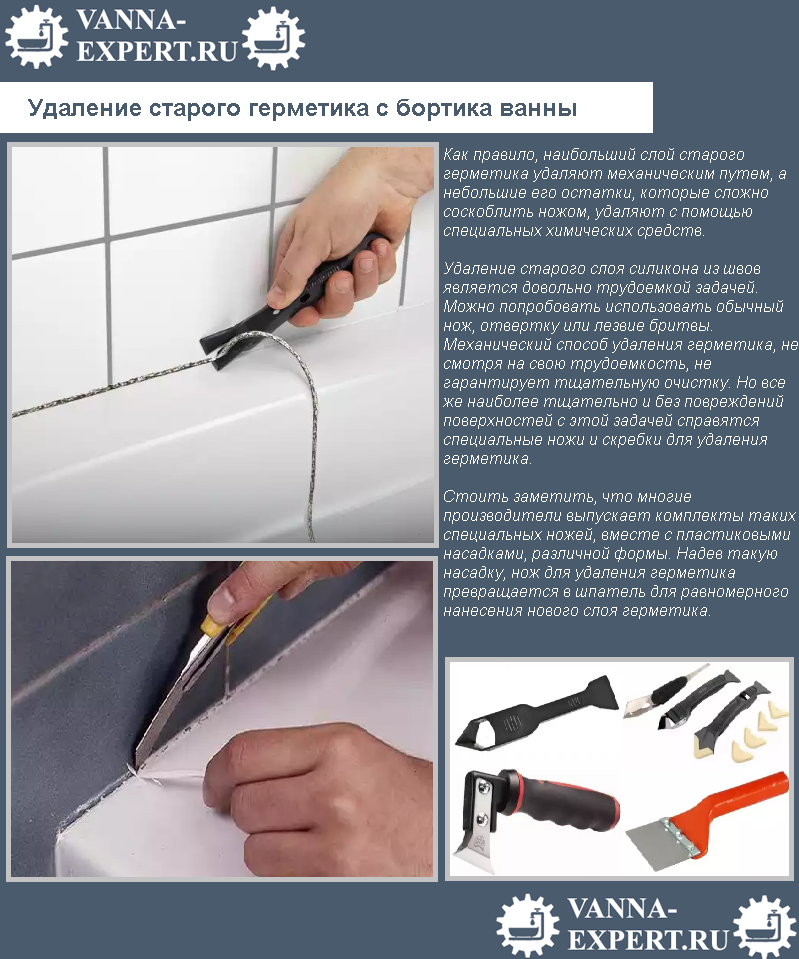
Silicone sealant, despite its elasticity, creates a fairly strong connection and firmly adheres to the surface. Have you ever tried to dismantle installed by all the rules? No? Then I'll tell you - tearing the screen glued to the silicone with sliding doors is not so simple. The silicone has to be cut through by inserting a thin and sharp knife blade between the surfaces. I say this to the fact that it's best to do everything neatly, as described above and do not ask then the question, how to remove the sealant from the bath or from some other surface? Believe me, this is not easy, especially after it freezes.
If we are talking about a thick layer of silicone sealant, then remove it will not be difficult - it just needs a little poddet and just tear off the surface. Another thing - thin layers of inaccurately smeared on the surface of silicone - remove them much more difficult, especially if it is necessary to maintain the tightness of the connection. In this situation, it is advisable to gently separate the removed part from the one that needs to be preserved unscathed - cut it in the necessary place with a sharp blade and simply roll up unnecessary remains. This method is excellent for a relatively fresh silicone, which has not yet had time to gain its full strength. And what about the old silicone sealant? It can be removed only with the help of special chemical softeners.
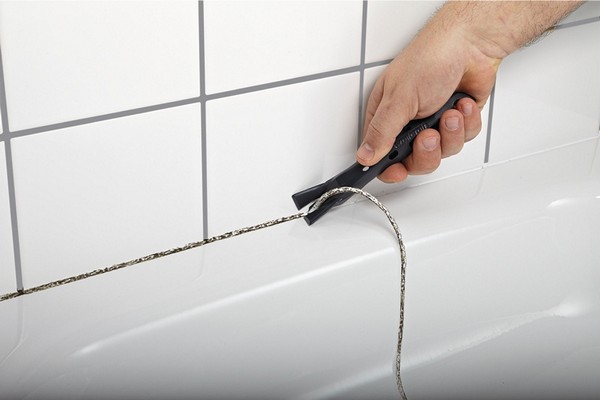
How to remove the sealant from the bath photo
There are a number of liquids that are able to easily cope with the task of removing the old silicone - there are a lot of them, so we list only the main ones. For example, the so-called "Silicone Remover" or a preparation of the Dutch company Den Braven called "Sili-kill", which allows you to simply wipe the silicone contamination with a paper towel after use. Permaloid® 7799 was also excellent for removing silicone from painted and metal surfaces and Permaloid® 7010 for cleaning plastic surfaces from silicone, including. In general, it is possible to list such products of modern chemistry for a long time, and almost all of them you can find in specialized construction stores.
In conclusion, I want to say one thing - no matter which bathroom sealant you choose, try to work with it carefully and protect the surface in time - only with this approach you can make a beautiful and high-quality seam. And yet - modern plumbing in most cases is white, so silicone is better to choose the same color.
The sealing of the joint between the bathroom and the wall can be carried out in various ways: using ceramic or plastic decorative corners, using special mixtures based on cement and synthetic sealants. The latter method is considered universal, the easiest, cheapest and reliable. Modern technologies allow to produce materials with high adhesion to surfaces, resistant to moisture, depressing the development of microorganisms.
Varieties of sealants
| A type | Brief operational characteristics |
|---|---|
| They are the most popular, they have high adhesion to polymers, natural enamel, ceramic tile and other building materials. Can be acid and neutral. Acidic is not recommended for use in living quarters, neutral for bathrooms. Sealants withstand temperatures in the range of + 500 ° C -50 ° C. The disadvantage is very mild. |
| At the cost of the cheapest, do not have an odor, are allowed to use without restrictions. Do not be afraid of direct contact with water. Disadvantage - with time plasticity decreases. As a consequence - as a result of temperature expansion, microcracks appear, in which dirt accumulates, leaks may appear. Requires periodic maintenance or replacement. |
| Made of silicone and acrylic, which improved their physical properties. Preserved all the positive qualities of the constituent materials. Do not be afraid of the effects of water, compensate for thermal stretching, have an extended life. Can be used to seal joints in both open spaces and outdoors. Do not react to hard ultraviolet radiation. |
| The most modern sealants have excellent adhesion values, they are leading in stability and durability. Quickly harden under the influence of moisture in the air. Polyurethane sealants are used not only to seal the baths, but also to fix various decorative elements, during the construction and repair of plumbing work. |


The most famous manufacturers
The quality of the sealant depends not only on the constituent parts, but also on the manufacturer's firm. The higher its technological equipment, the more responsible the employees, the better the quality of its products. We will list several companies that have a positive reputation among numerous consumers.
| Name | Approximate cost | Physical and operational characteristics |
|---|---|---|
| 150 rubles | The most famous brand on the European continent, the company has its own scientific laboratory, produces a wide range of sealants for various purposes. In the composition of the mixture, in addition to silicones, antifungal additives are introduced - the multiplication of microflora is inhibited. Sealants have excellent adhesion with ceramic tiles and enamel coatings. Do not emit harmful chemical compounds into the air, are used in a wide range of temperatures. Can have different color solutions. |
| 160 rubles | Silicone sealants with pronounced antifungal properties can be used in very moist and warm rooms, mold and fungi do not reproduce on the surface. The material has a thick consistency, which allows you to cover relatively wide slits. Does not have a large shrinkage after drying. |
| 130-300 rubles | They can be acrylic or silicone, physical parameters depend on the material of manufacture. On consumer properties are middle positions. They are not afraid of direct contact with water, they have good plasticity, which minimizes the risk of microcracks. |
| 150 rubles | Shrinkage is minimal, the sealing can be done in one technological pass. They have excellent adhesion to ceramic coatings, guarantee the filling of gaps without a pockets. If necessary, a second layer can be applied, repairable. The assortment has a full range of all types of sealants. |
| 150 rubles | Special sealant for hospitals, public canteens, kitchens, children's institutions. Has the largest amount of fungicides, inhibits all pathogenic microorganisms. Sutures do not lose their original appearance for the entire period of use. |
| 590 rubles | The modern universal adhesive-sealant, is used during the installation of shower cabins and the sealing of joints of bathtubs. It is characterized by high adhesion to all surfaces, inhibits the reproduction of harmful microflora. By hardness is not inferior to the parameters of mixtures based on gypsum. It is used by professional assemblers of sanitary equipment. |
| 70 rubles | The lowest price fully meets the same quality. It is used not only to seal the baths, but also to glue together individual architectural elements. Afraid of ultraviolet radiation, quickly aging and losing its original properties. It is recommended to be used as a temporary substitute for better sealants. |
| 200 rubles | By all indicators meets the most demanding consumers, can be used as a basic or restoration material. Excellent plasticity, high strength, has a high adhesion to all materials. Does not lose properties under ultraviolet rays, is not afraid of high temperatures and water. On durability takes a leading position, is used by professional plumbers during installation and repair of equipment. |


This is only part of the manufacturers, we stopped at the most famous. During the selection it is necessary to take into account the maximum number of individual features of both the sealant itself and the place of its use.

How to choose the best sealant
It is recommended not to save on the sealant. The hope that the emerging mold will be removed in a timely manner is often in vain. Sealants should not only have high physical strength and adhesion properties, but also have antifungal properties. It is better to purchase professional materials, although their price is the greatest. To seal the tub, one tube is enough, its cost will not have a noticeable effect on the price of finishing works in the bathroom. The remains are hermetically sealed and stored for a long time. Use this sealant can be in different cases, it is always useful for masters.
Application technology
The performance indicators largely depend on the application technology. Do not miss operations, follow all the advice of professionals and manufacturers' recommendations.
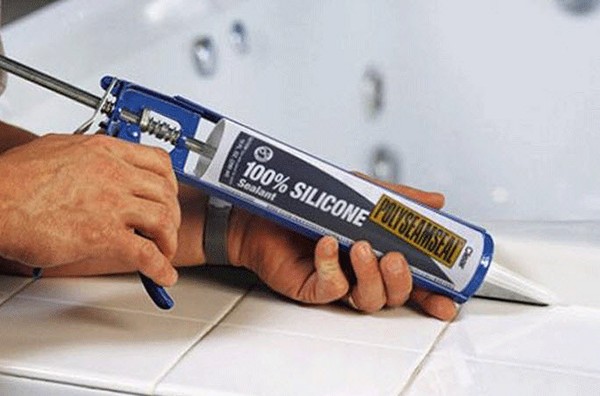
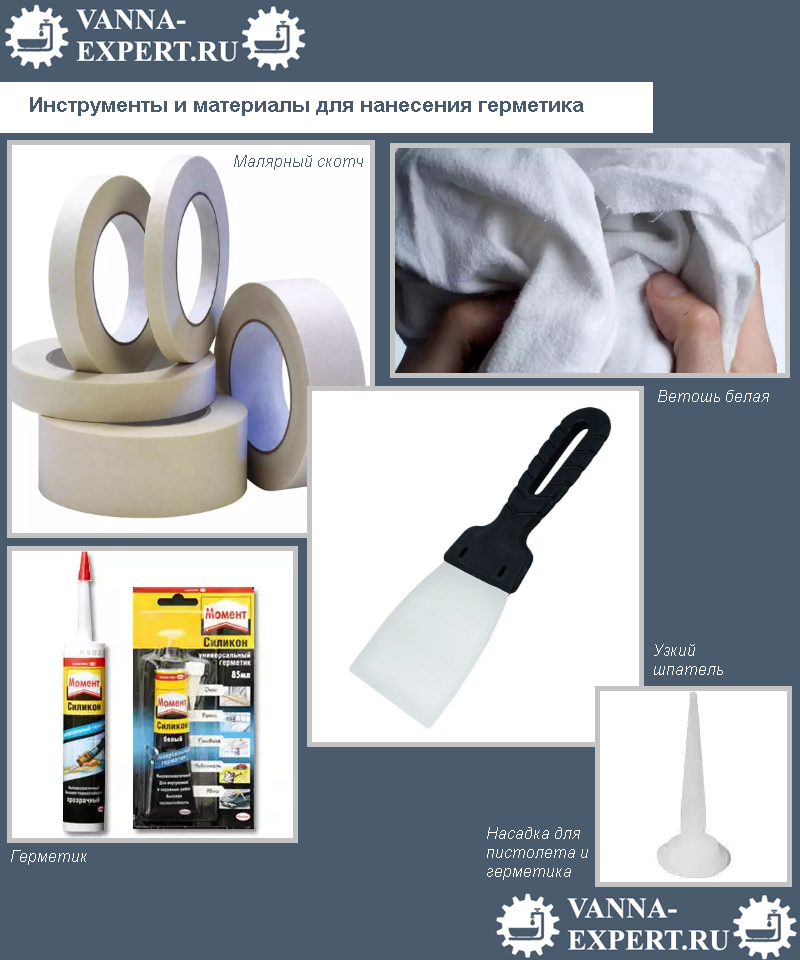
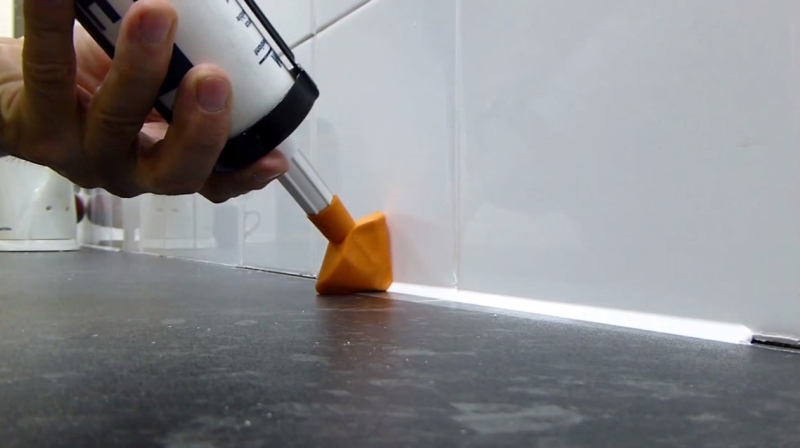
To produce the work you will need a paint tape, a sealant, a clean rag, a thinner, a narrow spatula. It is desirable to purchase a special nozzle. It is put on the tube and allows you to create a smooth surface of the sealant. After the nozzle, an even seam is obtained, with little practice, additional alignment is not required.
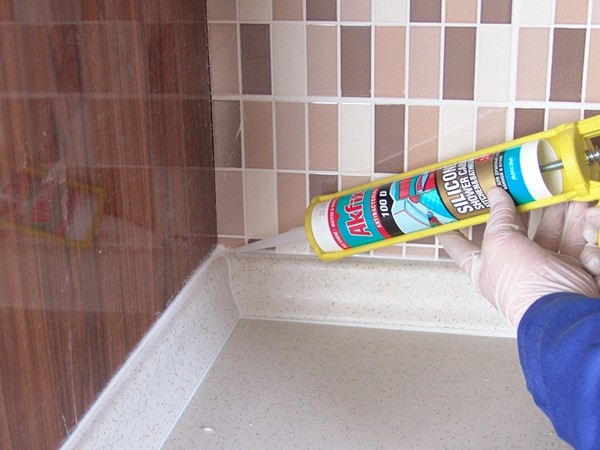
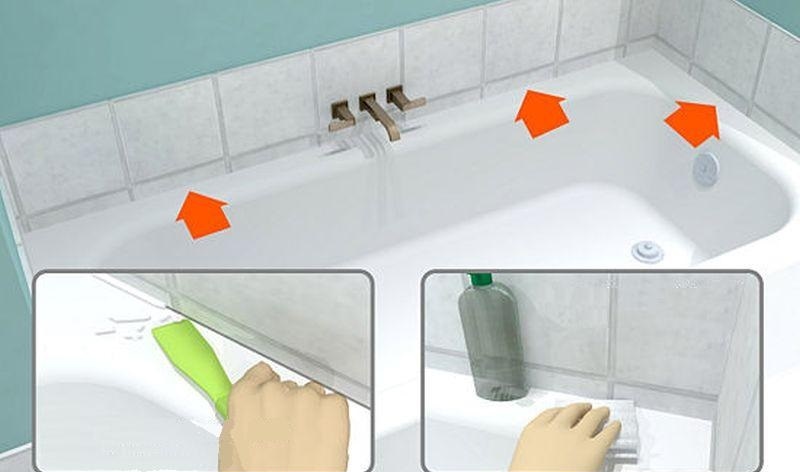
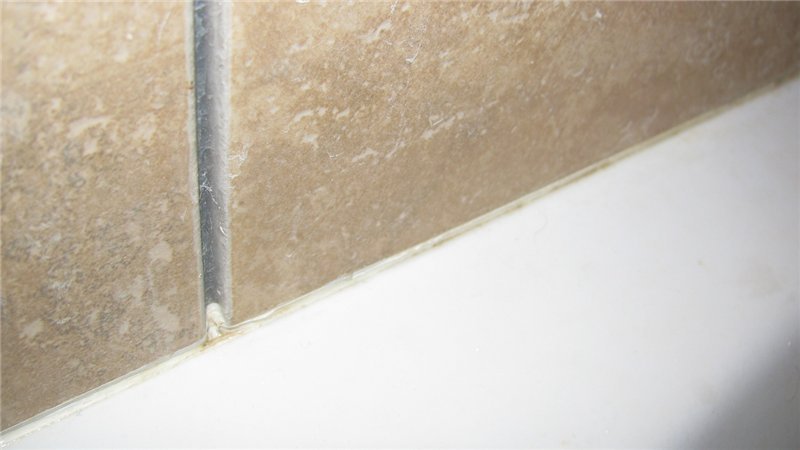
Step 1. Clean the joint between the bathroom and the wall from dirt, dust and grease. To do this, use detergents, after cleaning, rinse surfaces thoroughly. Take care that in the gap between the bathroom and the wall did not get a lot of water, use a washcloth.
If you need to remove the old sealant, then you can apply two methods.
Make sure that the surface is completely dry. For the warranty, you can dry it with a hairdryer.
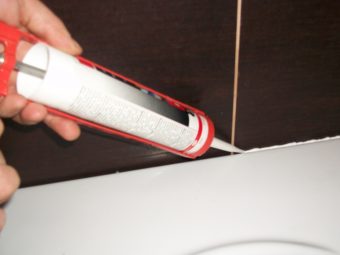
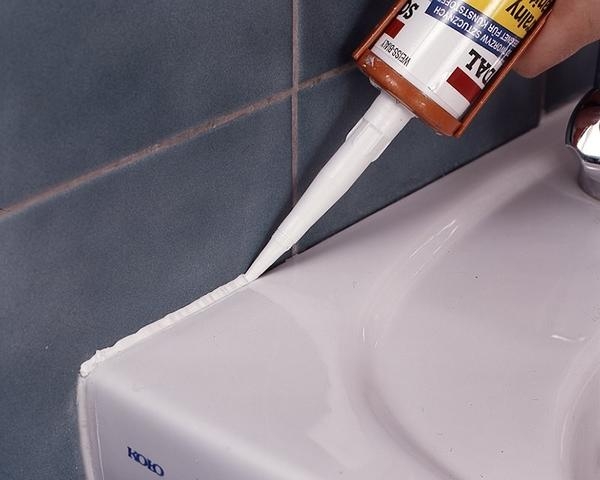
Step 2. Cut off the tip of the tuba, screw the spout. The nose should be cut at an angle of 45 °, during the sealing the cut must cover the gap as much as possible. The diameter of the cut depends on the width of the slit. Ideal option - a gap of several millimeters already, in this case, you can get a smooth surface of the sealant in one pass, nothing to level and clean up is not necessary. But this is not always the case, in some cases it is necessary to fill the gap in several passes. If the sealant fails, you can first fill the gap with paper or a sponge, and for the sealant leave no more than 5 mm of free space. It will hold the liquid material until it solidifies. Of course, this is not the best option for sealing, wide slots are better for sealing with cement mortars or special decorative ceramic corners.
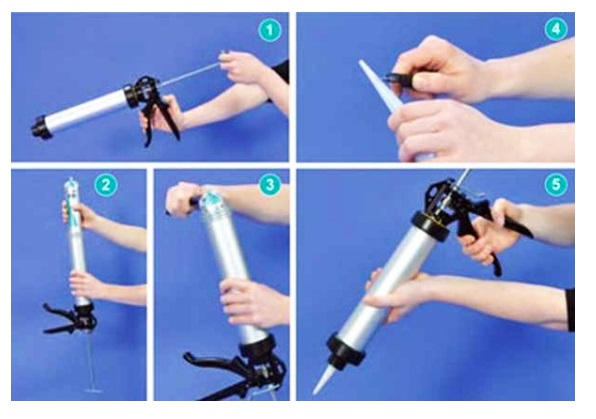
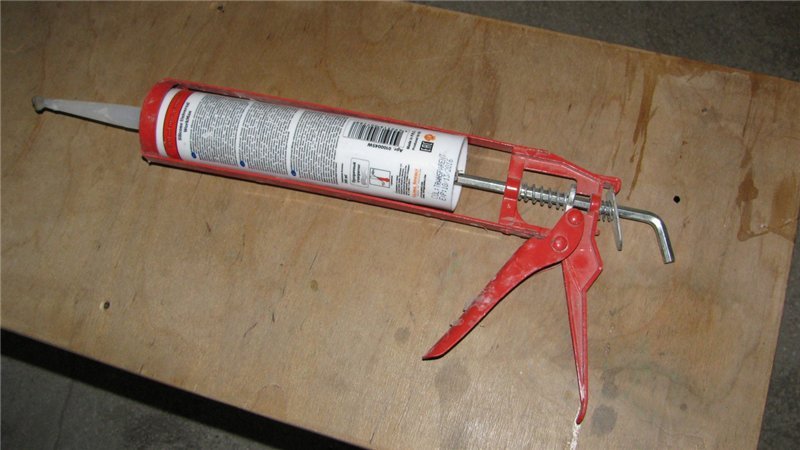
Step 3. Insert the prepared tube with sealant into a special gun.
Do a few depressions with the handle until the sealant appears from the spout, remove the excess. It is advisable to draw several lines on the waste, this way you can get at least a little practical experience. If the hands are shaking, call for an assistant. Beautiful and securely seal the space you never will.
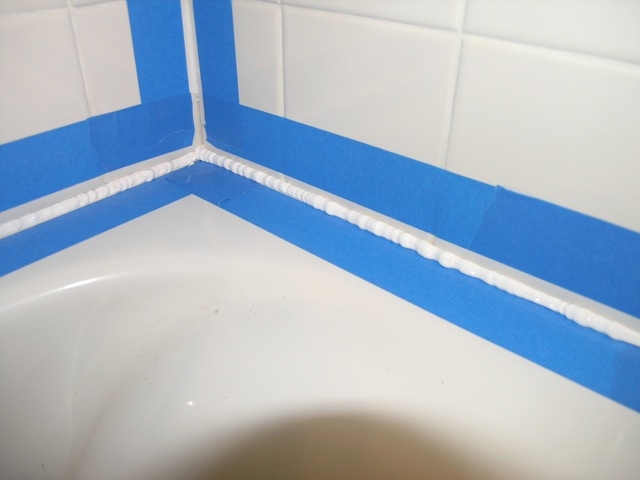
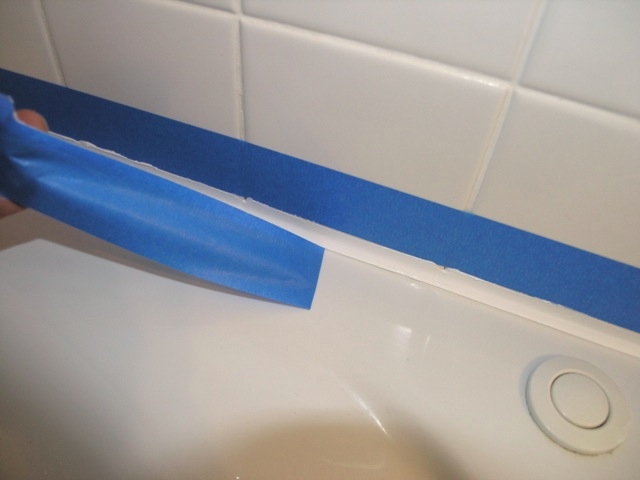
Step 4. Pour the surface of the wall and the side of the bath with paint tape.

Make every effort to ensure that the tape is flat, without bends and omissions. Remove the adhesive tape immediately after leveling the sealant surface, otherwise there will be difficulties. The scotch will undermine the thin edges of the sealant, the water will fall into the explosions, the sealant will completely exfoliate very soon, a complete replacement will be required.
Practical advice. If the gap is narrow and you have enough experience to fill it with sealant evenly, then the gluing can not be done. The sealant perfectly aligns with the finger.
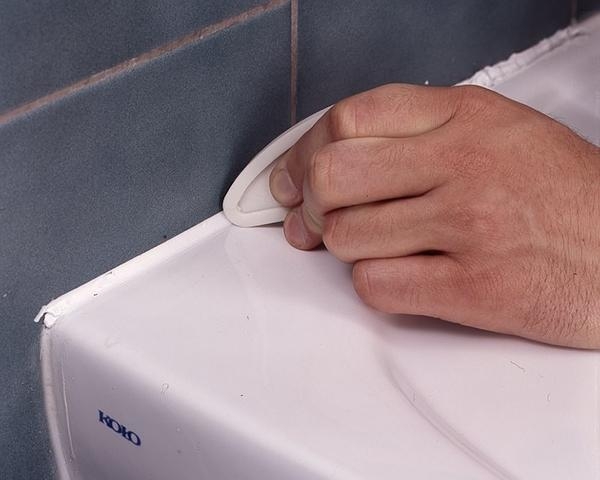
Step 5. Attach the cut off spout (or special nozzle) as tightly as possible to the gap between the bath and the wall, slowly press the handle and simultaneously guide the tube along the bath. At the exit, an even layer of sealant should appear. The speed of reference depends on the depth and width of the slit. Extrude the sealant without stopping, filling the gap must be done continuously. Each stop will be noticeable.
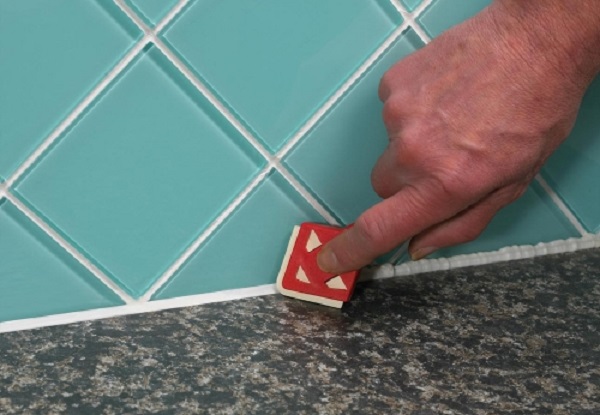
Step 6. Align the sealant surface. This can be done in several ways:
- if the width of the seam does not exceed 5-7 mm and the surface is even, then it is better to level with the index finger. Do not press it strongly against the material, the touch should be light and even throughout the entire length. Excess sealant periodically wipe with rags. The finger should be clean;
- if the width of the seam is more than 7-8 millimeters, then it is necessary to apply the sealant several times, it is very difficult to align such a wide strip with a finger. Use a rubber or metal spatula. Practitioners recommend working with a metal spatula. Why? He has sharp corners, during the alignment they completely cut off a flat surface from the surplus on the wall and the side of the bath. Then you can easily remove these excess with the tip of the knife. There is no work experience - use paint tape.
Step 6. Check the weld surface, if there are depressions or protrusions, then trim them.
Depending on the sealant brand, the setting time can reach 12 hours, do not pour water into the bathroom until the material hardens completely.
Video - Types of sealants for a bath
4511 0 2
Bath Sealer: 22 topical issues
What sealant for a bath is better to buy? At what stages of repair and where exactly can it come in handy? How to properly seal sealant between the bathroom and the wall? In my article I will try to answer these and some other questions.
Areas of use
- Where in the bathroom can I use a sealant?
Here are the most typical areas of its application:
- Sealing of the seam between and the wall to which its posterior side adjoins;
- Filling of the same seam between the bathroom or shower and tiles. Of course, this is possible only with relatively even walls. Their considerable curvature will require a plastic corner sticker;
- Filling the seam between the toilet and the floor. The sealer distributes pressure over the entire surface of the sole and excludes its damage to the unevenness of the floor;
- Grout joints between tiles. As a rule, in this case, a colored sealant is used in the tone of the tile. It is present in the range of products of many famous manufacturers.

I successfully applied the sealant to solve several other problems:
- For gluing joints of homemade furniture;
- For gluing tiles on drywall. Silicone allows you to glue it on materials that have poor adhesion to cement glue - plywood, chipboard, oriented chipboard, metal and plastic;
Use sealant for tiles can only be on walls. On the floor, the tile is experiencing high operational loads, and it is very important to distribute the pressure over the maximum area of the base. Therefore, the tiles on the floor are laid only on the cement glue applied over its entire surface.
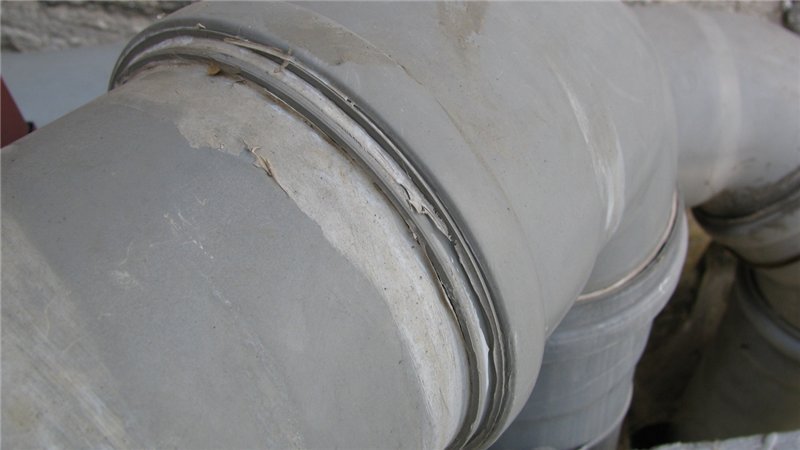
- To seal the connections of precast sewers. Rubber O-rings eventually lose elasticity, and the joint will leak. Sealant filling the gap between the pipe and the bell, reduces the likelihood of leakage to a minimum;
- For sealing the joint of the enclosure of the shower enclosure with the wall. There is no provision for a regular seal, and a shower jet directed to the joint often leads to the appearance of puddles on the floor;
- To eliminate the leak between the fence and the shower tray. The lower guide for the door with a standard fixture leaves a gap through which water under certain conditions falls on the floor.
Selection
- Which sealant is best for the bathroom - silicone or acrylic?
To fill the joints in contact with water - definitely more water resistant silicone. Acrylic sealant or acrylic putty can be used only when decorating the bathroom ceiling - for example, for sticking a foam plastic skirting board.
Acrylic putty will help to make inconspicuous crevices between the plinth and uneven walls. It is applied on the edge of the baseboard with the tip of a spatula. Surplus is removed from the wall and the plinth with rags.
- What is preferable - a sanitary or universal sealant?
Sanitary is different from the universal, as a rule, the presence of antifungal supplements. They are very handy where silicone is constantly in contact with water - on the adjuncts of plumbing fixtures and in the seams of a tiled apron over the bathroom. In other cases, you can use a universal sealant.
- Can I use aquarium sealant to seal seams in my bathroom?
Yes. It differs from the sanitary one by the complete absence of toxic additives (hardeners, fillers, etc.) with excellent adhesion to smooth surfaces (including glass and glossy tiles).
- How to choose a manufacturer? Who produces the best silicone sealant?
In my personal ranking, Ceresit is the first, and the second is Moment (Henkel). Among other manufacturers, I can not name explicit leaders, but this does not mean that the quality of their products does not differ. In general, there is a simple rule: the higher the price, the better the sealant.
There is one nuance. Silicone from different manufacturers differs primarily in adhesive properties. Ceresit CS 24, caught on the metal fence of the staircase, I removed with great difficulty, but the products of the unknown uncle Liao are kept only on rough surfaces - dry wood, drywall, etc.
Accordingly, a high-quality sealant is required when applied to a smooth base, but when gluing a tile on the GKL one can safely purchase the cheapest silicone.
Application
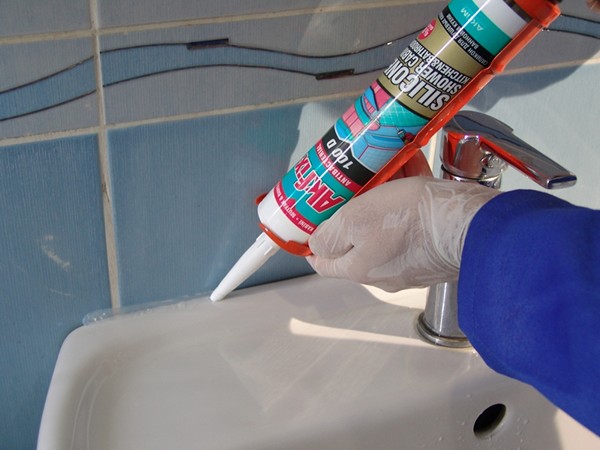
Seam between the sink and the wall
- How to close the seam between the washbasin and the wall with your own hands?
The instruction is not difficult:
- The joint area is cleaned of any impurities, degreased with an aqueous solution of soda, washed with clean water and dried;
- The tuba is fixed in the gun;
- The tube tip is cut so that the diameter of the hole in it is as accurate as possible to the thickness of the joint;
- On the shelf of the sink and on the wall are pasted stripes of paint tape. They will save you from having to think about how to clean the surfaces of silicone that has frozen on them;
- The nose is inserted into the seam with the simultaneous pressing of the pistol grip. The seam is filled to the maximum depth and leveled with a wet finger or a narrow rubber spatula.
Seam between the bathroom and the wall
- How to fill the tank with a silicone?
Just like in the case of a shell, but with one correction. As a rule, the seam is wider here, and the sealant that has filled it slides down under its own weight. To prevent this, just stick a strip of foam underneath, under the shelf of the bathtub.
- Do I need a sealant under the corner to the bath?
Let's put it this way: he certainly will not be superfluous. The rubberized edge of the corner is not always firmly pressed against the shelf of the bathtub. Moreover: plastic can deform when hot water hits.
- How to apply a silicone sealant under the corner?
When sticking a corner, this is done like this:
- On the cleaned and defatted shelf of the bath and the wall, two silicone bands are applied. Apply it to the corner itself is not worth it - soak the bath and the wall;
- The corner is put in place and pressed against the corner between the bathroom and the wall by a long straight rack, steel corner or any other suitable object;
- Above, the whole structure is loaded in any way (for example, several boards laid across the bath and the water basin placed on them).
If the corner is already glued under the tile and you want to seal the seam between it and the bath, use a spatula with a width of 10 - 15 cm. The spatula lifts the corner portion, then the silicone is applied under it. Then the corner is pressed against the shelf along the entire length in the way described above.
Sticker tile
- How to glue tiles on silicone?

I do it this way:
- The wall is cleaned of debris, dust-free and primed with a penetrating primer;
- The lower edge of the tile apron is marked;
An important point: markup is best performed not along the edge of the bath, but on the level. The bathtub is usually installed with a slight bias towards the outlet, ensuring full drainage of water. The deviation of the bottom row of the tile from the horizontal will make the seam between the vertical rows in the corner very untidy.
- Installs any stop that allows you to align the tile by marking. I used for this purpose plastic gaskets for installing insulating glass;
The thinner the seam between the tile and the bathroom, the more carefully it will look.
- The sealant is applied only to the tile, and not over the entire surface, but pointwise or striped. I put silicone bands around the perimeter of the tile and crosswise in the middle;
- The tile is pressed against the wall and rubbed against it by a pair of sliding movements;
- In order to withstand the constant width of the seams, I use plastic crosses.

- How long does the silicone dries under the tile?
You can remove the crosses between the horizontal rows in about half an hour. After two hours the tile can not be torn off. The drying time is somewhat longer than when filling the seams, due to limited air access.
- How to remove an old tile glued with silicone on the GKL?
Only together with a sheet of drywall. The adhesion between the tile and the base in this case is much better than when using cement glue.
- How to remove the old tile glued to the silicone on the plaster or brick wall?
The tile is chipped with a chisel and a hammer. On the plastered surface there is a chance to remove some of the tile, but the plaster will be visibly damaged.

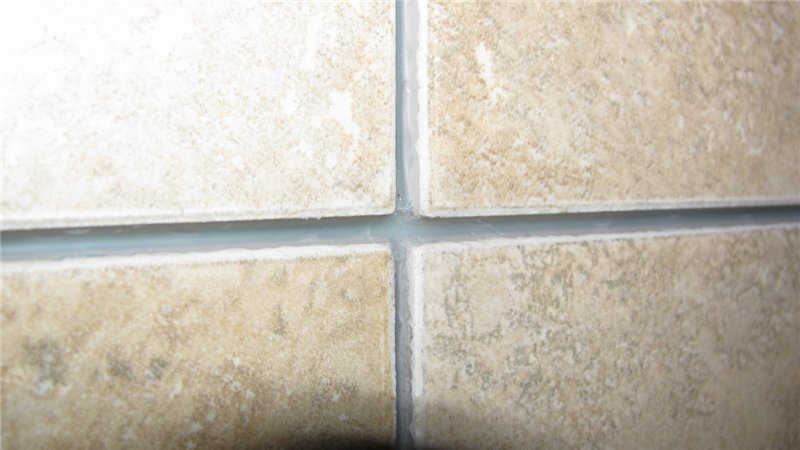
Grouting joints between tiles
- How to wipe silicone joints between tiles?
The seam is filled in exactly the same way as the abutment of a bath or sink. The tile is protected from contact with the sealant by paint tape. A few subtleties:
- The seam must be filled to the full depth. If lumens remain under the silicone, the leaktightness of the seam may be impaired if accidentally damaged;
- Along with a white or colored sealant for grouting, you can use a transparent silicone. It is checked personally: the basis shines through it only at very bright light and a glance in an emphasis. Under normal conditions, the seams look quite neat;
- Painting Scotch tape should not be used several times. It inevitably gets dirty when smoothing the seam. When you re-stick the silicone gets on the tile, and you again have to think about how to remove it.
Installing the toilet bowl
- How to apply sealant under the sole when installing the toilet?
The joint is filled with silicone to the maximum depth after installing the plumbing fixture for the staff fixture.

The sealer will firmly adhere the sole to the surface of the tile, and when you try to remove the toilet, you will tear it off together with several tiles. That's why instead of silicone in this case it is better to use diluted to consistency of very thick sour cream.
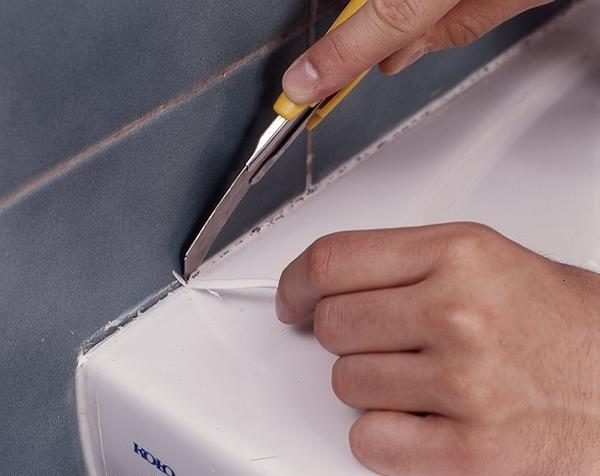
- How can I change the toilet seat installed on the sealant without damaging the tile?
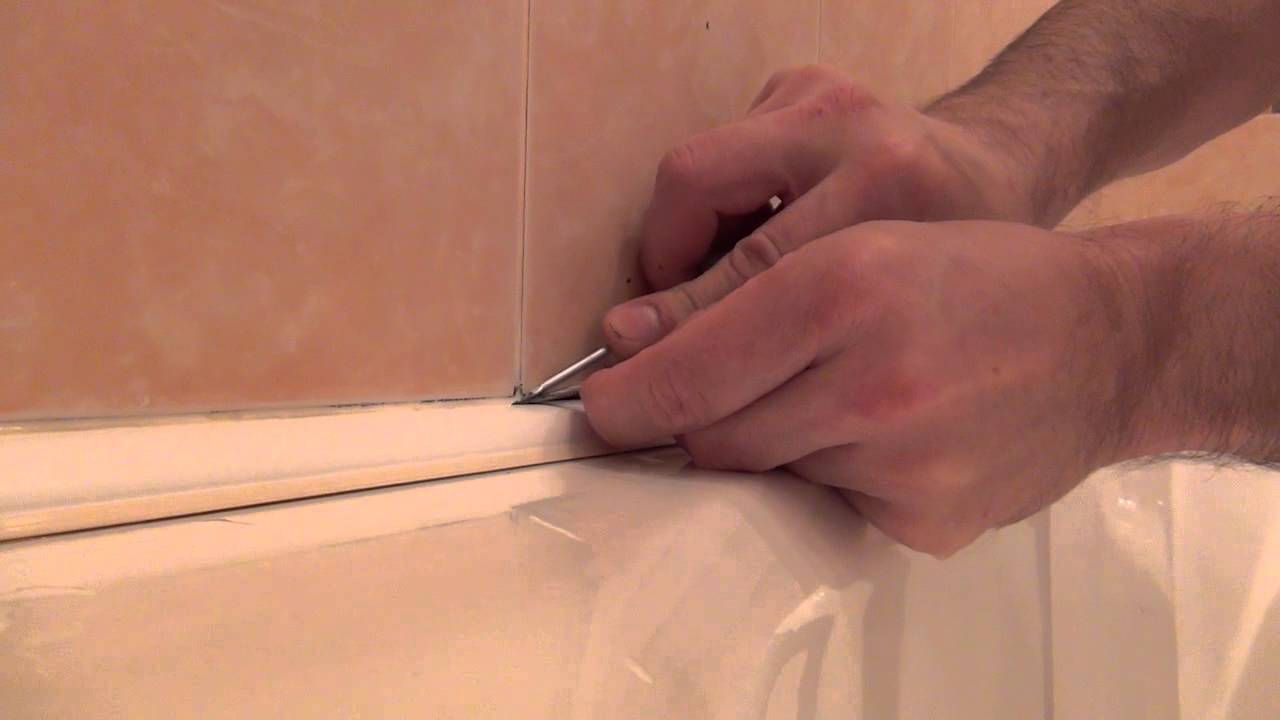
Before dismantling the plumbing fixture, cut the seal of the sole around the entire perimeter with a sharp knife with a thin blade.
Delete
- How to remove a seam seal between the bathroom and the tile?
With a stationery knife and a metal washcloth. At first, the main volume of the seal is cut out, then the sealants remaining on the surfaces are neatly removed. Traces of silicone with a moderate effort are wiped off with a washcloth.
Metal wool should not be used for acrylic bathtubs. There will be scratches on them. In this case, it is better to arm yourself with a damp cloth from rough fabric or use chemical agents, which I will discuss in a few paragraphs below.
- How to remove the sealant from the bath with enamel coating?
The same metal washcloth. Remains of silicone are removed with a sponge with any abrasive cleaning agent.
- How to remove traces of silicone from the tile?
Again, a metal washcloth or an abrasive powder for cleaning faience and washing dishes. The tile is exceptionally durable, and it is almost impossible to leave scratches on it.
- How to remove the old sealant from the abutment to the wall of the acrylic bath?
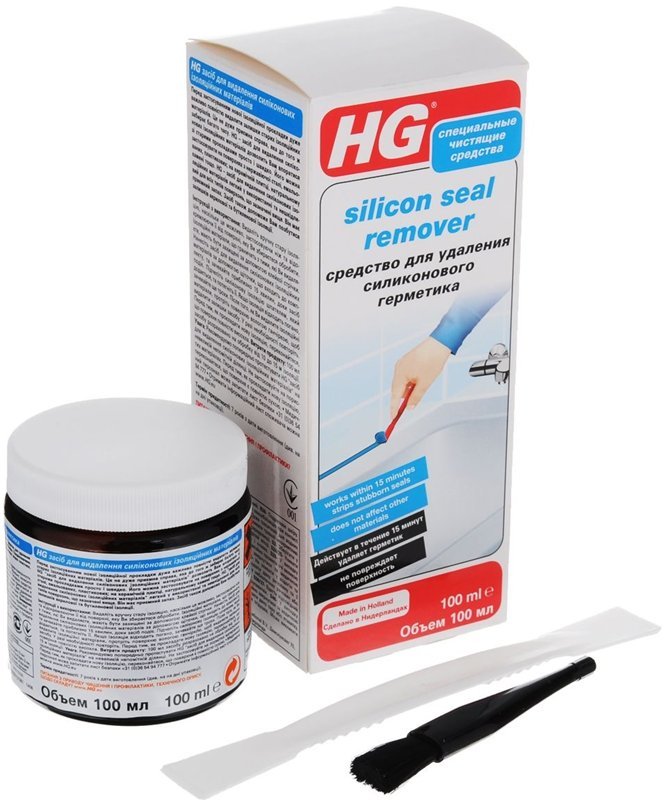
The seam is also cut with a stationery knife in this case. But for cleaning the traces of sealant, you can use a special chemical (for example, Penta-840 or CRC Gasket Remover). Dissolves silicone and ordinary white spirit: it is enough to apply to rags and carefully wipe the place of contamination.
Care
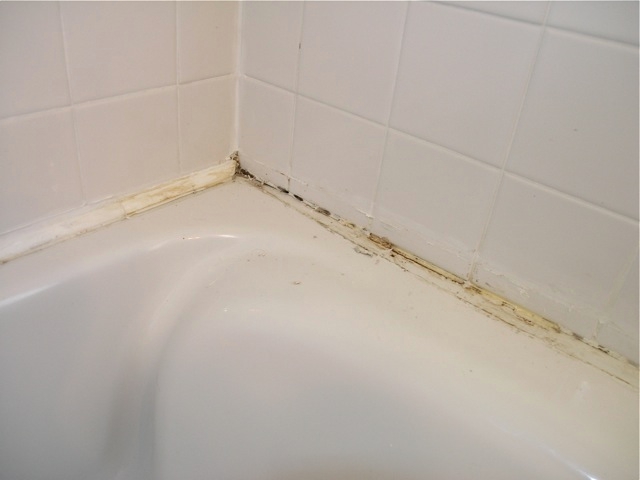
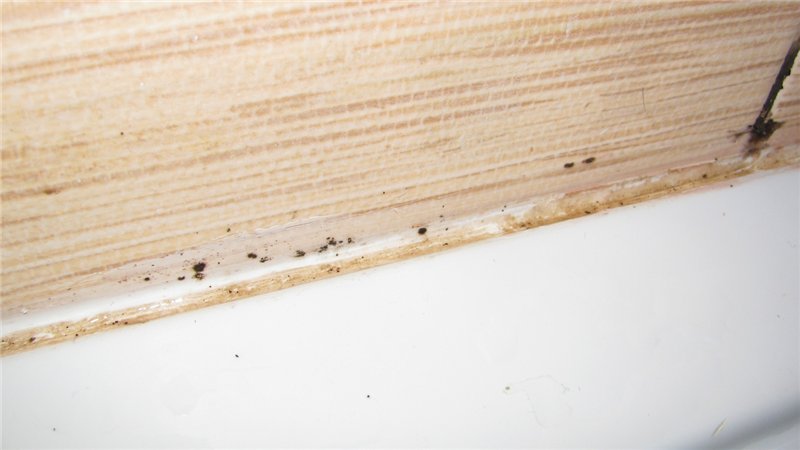
- How to remove the mold on the sealant between the bathroom and the wall?
I use for this purpose the "Whiteness" product based on sodium hypochlorite. It has a disinfectant or bleaching effect. The agent can be applied to the affected joint with a sponge or sprayed with a sprayer for flowers; After 10 - 15 minutes it is washed off with the remnants of dirt and mold.
- Is it possible to pre-treat with something a sealant for the bathroom against mold?
As I wrote above, antifungal additives are part of sanitary sealants. Alas, at constant dampness in a bathroom they do not rescue: seams all the same blacken.
Here are some tips that will reduce the likelihood of a fungus:
- Use not white, but transparent silicone. It does not darken even in places with high humidity. I do not know the reasons for this, but the fact remains;
- In places that do not come into contact with water directly, an antiseptic primer can be used to treat joints. Alas, over the bathroom, it will wash off at the first shower intake;
- Organize the forced ventilation of the bathroom. Having lowered the humidity in it, it is often possible to completely forget about the fungus;
- Provide room heating. For this purpose, a water or electric heated towel rail is installed in the bathroom. In one of the bathrooms of my house there is an aluminum battery connected to the electric boiler.

Conclusion
That's all I wanted to say. As usual, additional thematic materials will be found in the video in this article. Feel free to share your own experiences in the comments. Successes, comrades!
August 16, 2016If you want to express gratitude, add a clarification or an objection, something to ask the author - add a comment or say thank you!
Sealant is a polymer designed to handle seams between different types of surfaces. Without it, you can not do with the arrangement of the bathroom. If you do not seal the joints between plumbing and tiles, droplets of water and condensate will accumulate in them, becoming a favorable breeding ground for mold. Due to high humidity and temperature changes, all the materials used in the bathroom are subject to special requirements. Consider what better sealant for the bath to choose, as well as find out how to apply it.
In the bathroom, the sealant can be used for various joints, including between:
- the back side of the washbasin and the wall;
- toilet and floor - polymer promotes a more even distribution of the load;
- bathroom (shower) and tiles on the floor and walls - if the surface curves, then additional use of plastic corners is required.
Due to its adhesive properties, the sealant is suitable for:
- increase the strength of joints in sewage collection;
- prevention of leakage of water from the gap between the shower door and the tray;
- gluing of tiles on plasterboard, plywood, particle board, metal, plastic - can be used only on walls, as on the floor the tiles are subjected to high loads.
Another application of the sealant is the treatment of intertitic joints. In this case, you should purchase a colored polymer. Advantages of the sealant in comparison with the traditional putty filler are elasticity, wear resistance and the best adhesive properties.
Types and characteristics
The sealant consists of a polymer, a hardener, a colorant, a filler and additional substances. Depending on the type of polymer, funds are allocated based on:
- silicone;
- acrylic;
- polyurethane.
Silicone
The most popular and expensive is the silicone sealant for the bath. Its properties are:
- provides adhesion to virtually all materials;
- exhibits resistance to moisture, temperature changes, ultraviolet;
- after drying, shrink at a maximum of 2%;
- due to elasticity it can be used to seal joints in mobile structures;
- retains its characteristics for a long time;
- is available in a wide range of colors;
- is used for interior and exterior work;
- after application it freezes for 30 minutes, solidifies after 6-48 hours (the exact time depends on the types of sealant, layer thickness, temperature and humidity in the room).
Silicone sealants are acid and neutral. The former are characterized by an "acetic" smell and are not suitable for processing metal products, for example, baths, since they can damage (oxidize) their coating. Acidic preparations are used to seal the joints of wooden, plastic, ceramic and glass surfaces. Neutral sealant is more expensive than acid sealant, but can be used when working with any materials.
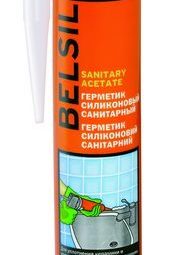
A kind of neutral agent based on silicone is a sanitary sealant for the bathroom, its feature is the presence in the fungicide - a substance that suppresses the reproduction of fungi. Such a preparation is indispensable for sealing joints that are constantly in contact with water - in the places of joints of sanitary ware and walls / floors, in between the tiles of the tiled bathroom apron. It is about sanitary silicone specialists say, answering the question, what sealant is better for the bathroom. 
Acrylic
Cheaper silicone is acrylic sealant for the bathroom, but it serves less time. Its properties are:
- withstands temperature changes;
- does not burn out;
- is characterized by high adhesion to different materials;
- on top it can be covered with paint, varnish, putty (in contrast to silicone);
- it does not have elasticity, it can not be used for joints with the risk of deformation;
- hardens within 24 hours.
Acrylic sealant is convenient to use for:
- fill the space between stone, brick and concrete surfaces;
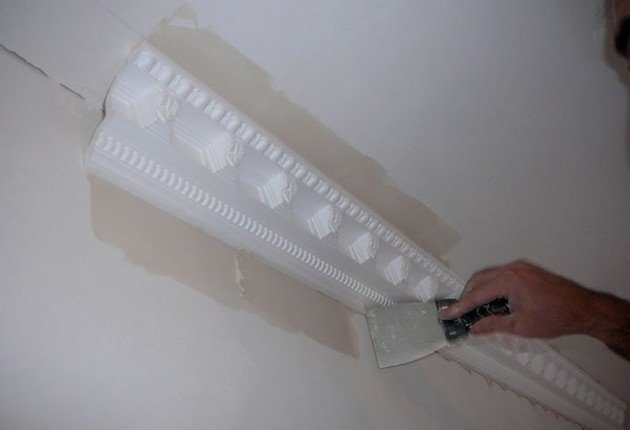
- stickers of ceiling skirting in the bathroom, while it smooths the unevenness of the walls;
- "Grouting" wide joints.
 Preparations based on acrylic do not always have a moisture repellent effect. At purchase it is necessary to specify, whether the means for a bathroom approaches.
Polyurethane
The polyurethane-based sealer is used to seal joints between glass panels, wood elements, stone, concrete, ceramics. Its properties are:
- quickly hardens;
- often used as an adhesive;
- funds can be transparent, white and colored;
- characterized by durability and elasticity;
- it is possible to cover the reconciliation with paint or varnish.
 Lack of polyurethane sealant - an aggressive effect on the skin with direct contact. When working with it, you must always wear gloves and a mask.
Other types
In addition to the basic sealants listed, they are also manufactured:
- silicone-acrylic - contain both polymers and combine their properties;
- aquarium - acid silicone sealants without additional components, which are used for gluing glass parts, sealing shower cabins, sealing aquariums.
As additives, sealants can contain:
- extenders (expanders) and fillers (quartz crumb, chalk) - for filling wide joints;
- organic solvents;
- dyes;
- rubber - for plasticization instead of silicone;
- mineral oils.
Note: In a quality product, there should be no more than 10% of additional components. Otherwise, its insulating and adhesive properties are reduced.
How to apply?
We'll figure out how to apply sealant in the bathroom by all the rules. The process includes such basic steps as preparation of surfaces and means, direct use and final processing.
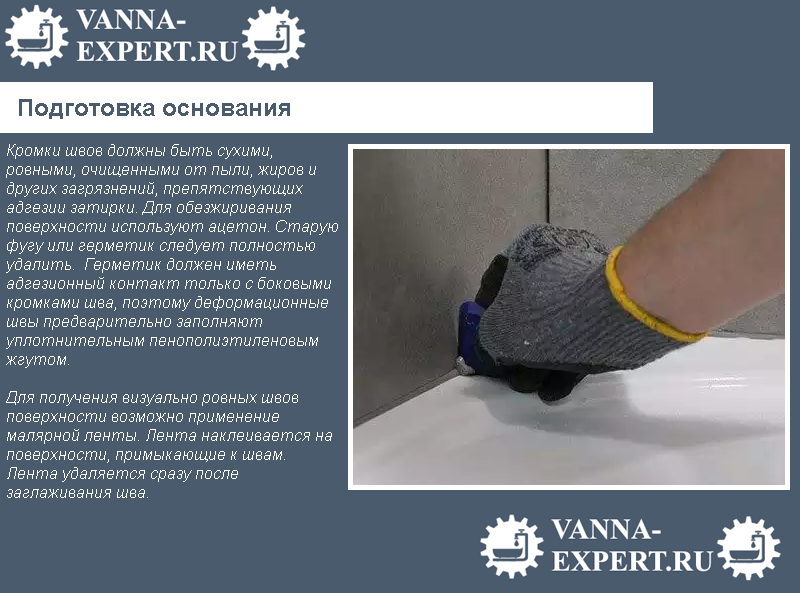
Surface preparation
First of all, it is necessary to clean the surfaces of dirt and residues of the old sealant. Then they should be degreased with acetone or alcohol and wipe dry. Deep seams should be best covered with hot air with a hair dryer. The surface must be perfectly clean and dry.

Next, it is necessary to paste the paint tape on both sides smoothly along the seam. This will help protect the coatings from dirt and make a neat strip of sealant. This stage is not mandatory, but it will seriously facilitate the subsequent processing.
Preparation of funds
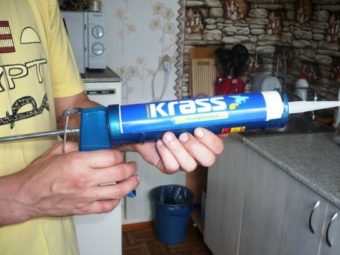
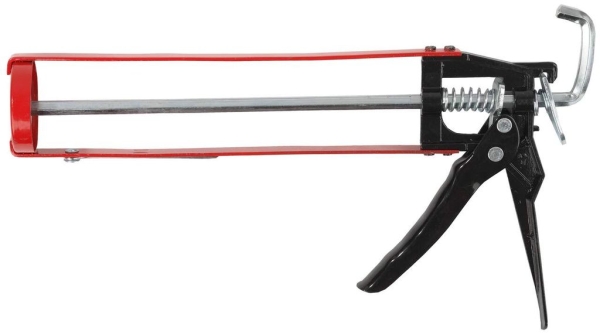
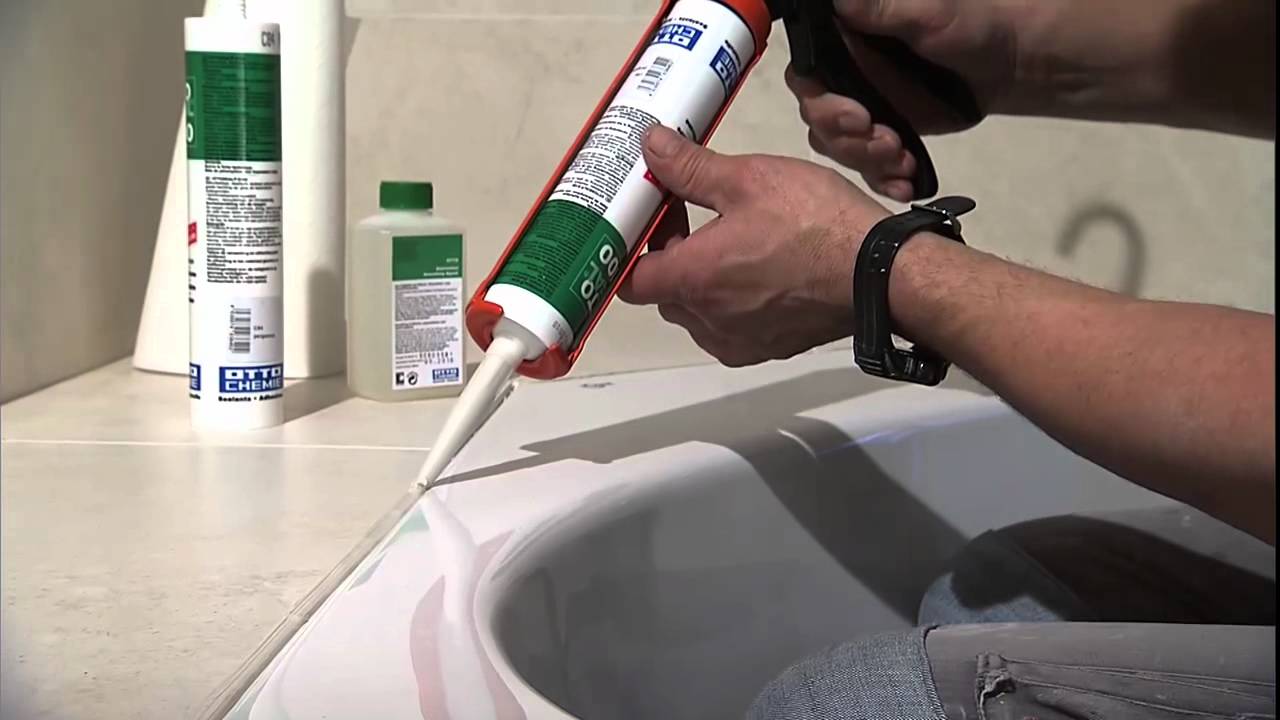
Sealants are available in tubes with a capacity of 80 to 400 ml. It is more convenient to use small bottles. The tube can be equipped with an applicator for application. If it is not, then you need a battery or a mechanical gun.
It is necessary to cut off the tip of the vial at an angle of 45 °. The cut location should be selected depending on the width of the seam to be made. Then you need to put the tube in the gun.
Application
It is necessary to put the tip of the tube into the point of the beginning of the seam and smoothly squeeze out the agent, evenly moving along the line. It is important to "clog" the sealant as deeply as possible and to press the trigger of the gun all the time the same way. It is impossible to allow the emergence of tears on the seam, as they will get water and dirt.

For the smoothness of the seam and the removal of excess silicone or acrylic, you should hold it with your finger, soaked in soapy water, or with an elastic spatula. In addition, it is possible to install a special nozzle on the tube for leveling the sealant. It will simultaneously apply and smooth the remedy.
Finishing

In the end, you need to remove the paint tape, until the sealant lean is frozen. If the seam is damaged, it should be slightly soaked and leveled. If you get funds for plumbing or tiles, you can remove it with a wet cloth. Suitable for dealing with persistent contaminants is solvent or refined gasoline.
After the work is finished, the room needs to be ventilated. You can use the bathroom when the sealant is completely dry.
Features of some types of work

Tip: To prevent the formation of mold in the bathroom, it is necessary to ensure forced ventilation and heating of the room, since even on sanitary sealants it can still appear.
How to remove the sealant?
Sealants have high adhesive properties, so it is difficult to remove them. Fresh silicone can be removed by cutting it with a thin knife. If the seam is wide enough to make an incision in one place, pull the strip and pull it. It is more difficult to work with narrow seams. It is necessary to cut the sealant along the entire length, trying not to damage the surface.
With strong materials, the remaining silicone will be removed with a metal washcloth. If the coating is exposed to mechanical influences, it is better to use a damp rough cloth.
It is possible to get rid of the sealant, including the old one, with the help of special solvents. Popular tools are Silicon Remover, Sili-kill, Permaloid® 7010, Penta-840, CRC Gasket Remover. Use them in accordance with the instructions that describe how to clean the sealant with this product. Typically, you need to apply a thick layer of cleaner over acrylic or silicone, wait for a while and remove everything with a cloth.
Popular manufacturers
Today, many sealants are on the market. To choose among them a quality waterproof drug, it is worth paying attention to the reputation of the commodity producer. The following means are popular:
- Ceresit CS 25 - acid silicone grout-sealant with an increased proportion of antifungal components;
- "Moment of Herment" is a series of sealants, in which acrylic and silicone based products are presented, as well as variants with fungicides;
- S 400 - acetate silicone sealant, characterized by high resistance to the appearance of mold;
- Ciki-Fix is a silicone sealant with excellent adhesive properties and good elasticity, but it does not contain fungicides;
- "Titanium rubber" from the Professional series is a rubber-based polyurethane sealant that creates strong and elastic bands, it is often used to correct silicone seams.
The right choice of sealant is an important aspect in the process of equipping the bathroom. Without reliable isolation of joints between plumbing and surfaces in the room it will be almost impossible to maintain cleanliness and it will quickly become the habitat of molds that are harmful to health. Buying a sealant, you can not save, because the quality of the product is often directly proportional to its price.
Bathroom - the only room in the house or apartment, which among all rooms in the residential space is maximally exposed to direct water. The question of tightness is especially relevant for shower cabins, shells, baths, since in these places the joints with the wall represent the most vulnerable places for water penetration. Seeping through them, moisture can accumulate under the bath or shower and do not dry out for a long time.
To seal such slots, previously used cement compounds, which over time exfoliated, as well as crumbled. Modern building technologies have firmly implemented waterproof bath sealant, which, besides the main tasks, effectively performs sanitary functions. It does not give mold, fungus develop in conditions of high humidity.
Varieties of sealing compounds for the bathroom
Sealants consist mainly of basic bases: polyurethane, acrylic, silicone, bitumen and others, as well as special additives that improve their properties. Accordingly, the following compositions can be distinguished:
- Silicone substances.
Gained popularity during repair work inside bathrooms. They are very well proven when used for sealing seams, because they have excellent adhesion to all materials, as well as minimal shrinkage. The silicone based on them is characterized by excellent moisture-repellent properties, as well as high resistance to temperature changes.
There are two types of silicone composition: acid and neutral. The first option has a characteristic acetic odor, as well as an affordable price. At the same time it is better to use when working with plastic, ceramics, because the chemical composition of acid silicone has a destructive effect on metals, activating and launching corrosion processes. Neutral silicone sealants are more versatile, suitable for acrylic and metal sanitary ware, although they are somewhat more expensive.
- Acrylic version
It is distinguished by an affordable price, practicality, but its main drawback is low elasticity. For this reason, its use is not recommended on surfaces subject to deformation. On the other hand, such seams can be covered with plaster, varnish, paint.
- Silicone-acrylic compounds
They have better characteristics, advantages of silicone and acrylic variants: excellent adhesion, elasticity. That is why it is better to use them as a sealant for a bath.
- Polyurethane Sealing compound
Provides a strong, reliable elastic seam. Especially positively, this sealant has proved itself in the repair of the old silicone coating.
Selection parameters for sealing compounds
Today, there is a wide choice of compounds for filling joints of rooms with high humidity. Which sealant for the bathroom to choose depends on the conditions of its use. Therefore, when purchasing, the following requirements must be met:
- It must be waterproof, as protection from water is its main function.
- It should include antifungal antibacterial additives. Protection from mold is an important aesthetic as well as a sanitary task.
- When choosing a sealant, it is important to consider how much it dries. Also, anyone can determine which option is better for consistency and color: white, colored or transparent.
- All means for seams of bathrooms happen for professional, and also household use. It is also important to choose the formulations suitable for working with sanitary equipment from metal, acrylic, plastic. For example, mixtures of mixtures indicate the acid composition, as well as the preferred application for acrylic and polyvinyl chloride. For acrylic sanitary ware, acrylic sealant for a bath is best suited, since it is the closest in composition.
- Various additives in the composition of sealing compounds perform various tasks: fill wide seams, increase elasticity, prevent the appearance of mold, fungus, reduce the cost of the product. In any case, if such ingredients in the sealant are more than 10% of the total volume, it should not be bought.

Sealing technology
Sealing compounds are applied by continuous continuous line to a clean, dry, defatted surface. The drying time of the joints depends to a large extent on the humidity of the room, as well as on the composition of the mixture. For example, silicone and acrylic sealant dries for about a day, and a polyurethane version - for 10 hours.
To carry out the work, the following tools will be needed, as well as materials:
- mounting gun;
- painting tape;
- rubber spatula;
- rag;
- solvent for degreasing.
Preparatory work
The sealant for the bath can be applied for the first time, as well as when replacing the seams of the old silicone compound. In the first variant, the surface preparation is that it is thoroughly washed out, and after drying it is degreased. The sealant for the bath is applied to the ideal surface, and the time it dries depends more on its internal composition and characteristics.
When re-sealing, it is important to remove the old silicone layer in the most careful way possible. To do this, use a stationery knife or blade. In the process of working should be extremely careful not to damage the walls or plumbing. The main result of such a tedious job is to get rid of the old seam. Otherwise, there is a chance of poor adhesion.
A big problem is a sealing layer, covered with black mold and lasted for a long time. To remove it you will need the use of chemical agents, which are presented today by aerosol or pasty versions.
Before starting work, it is advisable to take care of the ventilation of the bathroom. It depends not only on drying time, but also on the likelihood of respiratory damage to immediate repair workers, as well as people living in adjacent areas. Therefore, such work should be used rubber gloves and respirators. The process itself presents no special difficulties. It is important to carry out such activities in the following sequence:
- First, the chemical is applied to the surface and "dries" for a certain time. How long it takes to survive depends on the composition of a particular substance.
- After that, the old layer is removed with a light pressure of the hand with a napkin. When performing such work inside the bathroom space, it is recommended to treat the surfaces with an antiseptic that is better sprayed. At the next stage it is quite reasonable to use a sanitary polyurethane sealant, which dries in a shorter time.
Application of sealing means
Most sealing agents must be applied to a dry, clean surface. On the wet surface can be applied only a silicone version of the composition. The waterproofing agent for the bathroom is often available in the kit with special applicators, which allow you to carefully carry out special work. This option is most suitable for home use. For commercial use, the following types of sealing means are used:
- Moment - a multi-purpose silicone version of the sealant, which is available in tubes of different sizes.
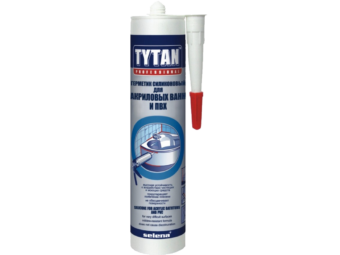
- Titanium is most suitable for shower cabins, as it dries a short time and retains high bond strength. Its only drawback is a small package of 310 ml. Available in two versions: acrylic and silicone.
- Ceresit can be used as an adhesive, but is not suitable for use in sealing aquariums and food surfaces.
How much you need to spend a sealing means depends on the smooth pressure on the sealant tube or on the "trigger" of a special gun. The main thing is the formation of a uniform weld, which will be resistant to moisture and temperature.