In this article, the whole process of selecting and installing an electrical flap in the apartment will be considered step-by-step, and common mistakes of newcomers will be described in order to independently assemble the electrical switchboard by themselves without resorting to the services of an electrician.
Preparatory stage
As a rule, the electric shield in the apartment is installed after the electrical wiring has been laid and the necessary cables are brought together in one place planned for installation of the switchboard. If, in connection with some reason, the flap is installed before the wiring, it will need to be protected from contamination during repair.
Especially a lot of dust will be when strobing the walls under the hidden wiring. Regarding the cables to be laid, you need to correctly calculate the cross-section of the wires, and divide the electricity consumers in the apartment into groups.

concealed wiring in the apartment to the electrical panel
The installation wiring must necessarily include a PE ground wire. It is advisable to make wiring with cables with multi-colored cores, and it is critically important to mark each wire leading to the shield.
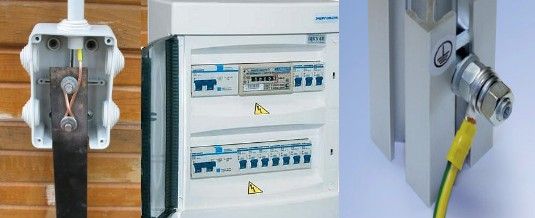
earthing bolt for El. flap
If this is not done (the common mistake of newcomers), then even without having an electric switchboard, you can already start the work by doing a dial and.

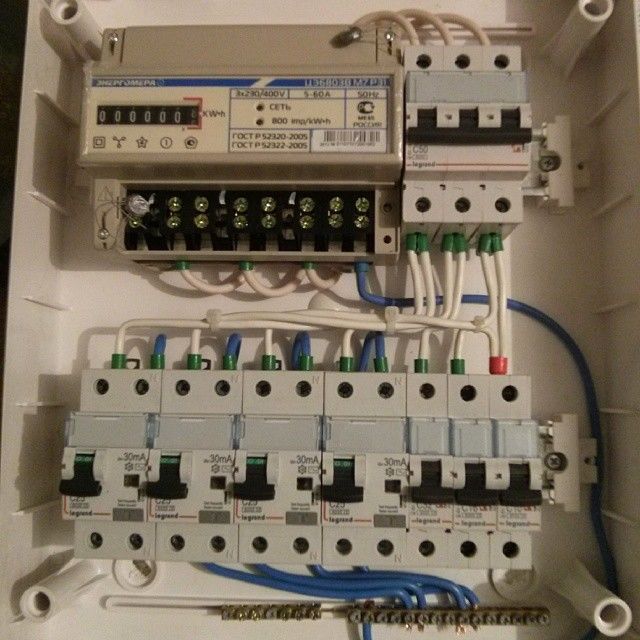
example of the location of automata and RCDs in a Shield with grounding
Choosing a safe switchboard for an apartment
Many users, choosing this device, are mistakenly guided first of all by aesthetic considerations, pushing other criteria to the background.
If you use the phrase to search the Internet:
« switchboard switchboard", The search engine will give out a lot of options of elegant products that will fit organically into the interior of the room. But it must be remembered that the housing shield, first of all, must meet the criteria for fire safety, so it is necessary that it be made of metal or refractory plastic.

installation of metal el. flush-mounted indoor unit
The cover of the switchboard should provide not only the aesthetics of the design of the apartment, but also be sufficiently reliable, because its main function is protection against accidental contact with the current-carrying surfaces of the terminals for connecting modular devices.
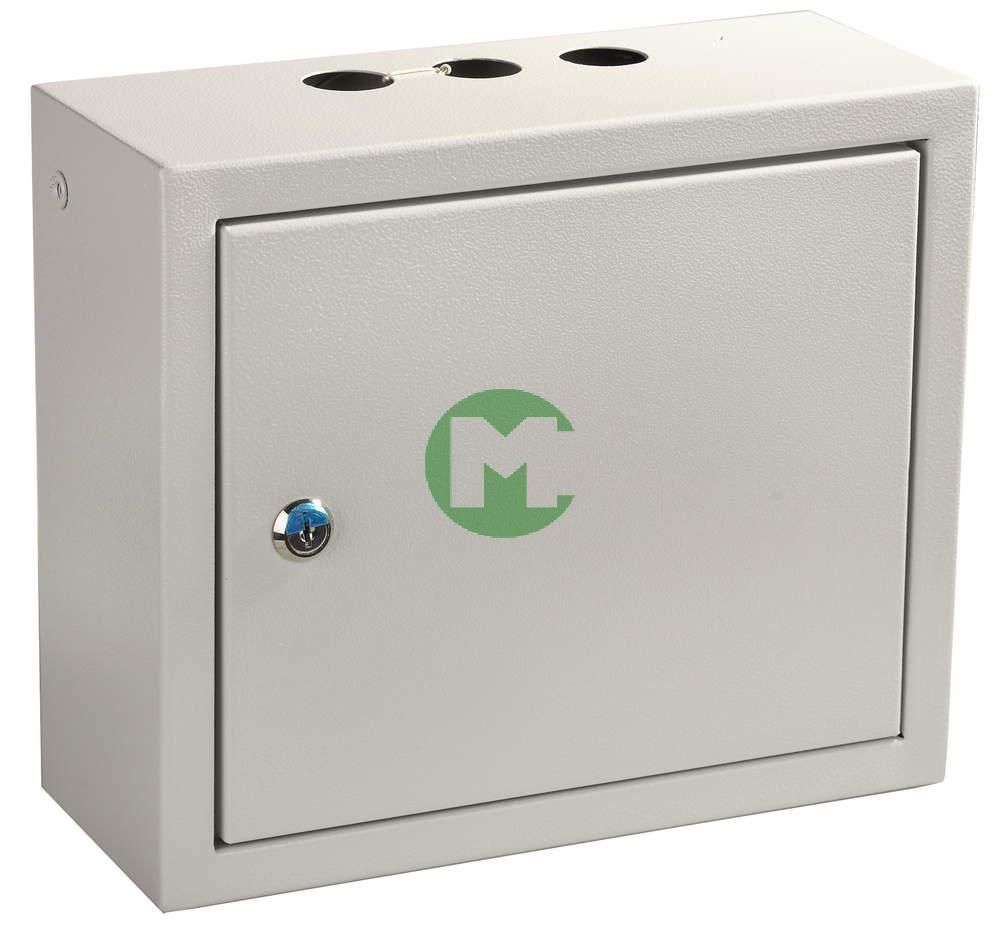
This is especially important if children live in the apartment, therefore, even if the guard is installed at an inaccessible height, additional precautionary measures should be taken, and an electric switchboard with a cover to be closed with a key should be selected.
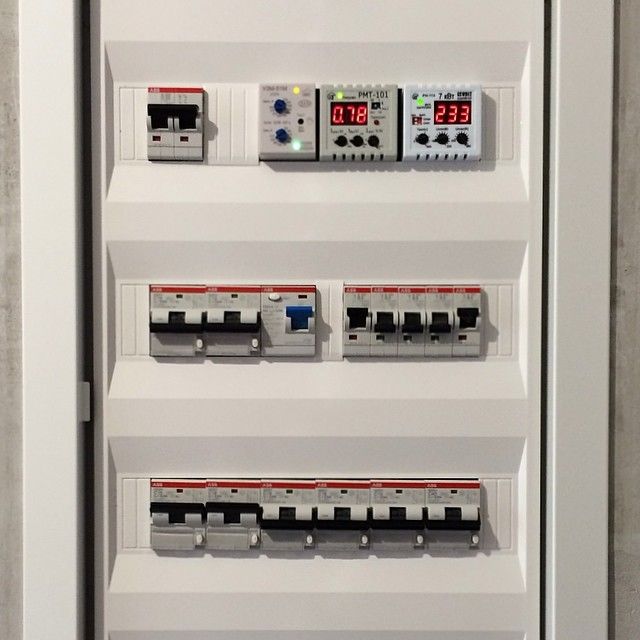
Choice of flap for capacity
The standard dashboard usually includes a built-in DIN rail. If it is not, then fixing holes must be provided, in this case it will be necessary to purchase a DIN rail of the required length in addition.

The automatic machine on DIN рейку
Also, the switchboard assembly, as a rule, includes distribution buses - zero on insulators (if metal shield) and PE bus, for connection of grounding conductors.

installation of the shield with earthing and zeroing bars
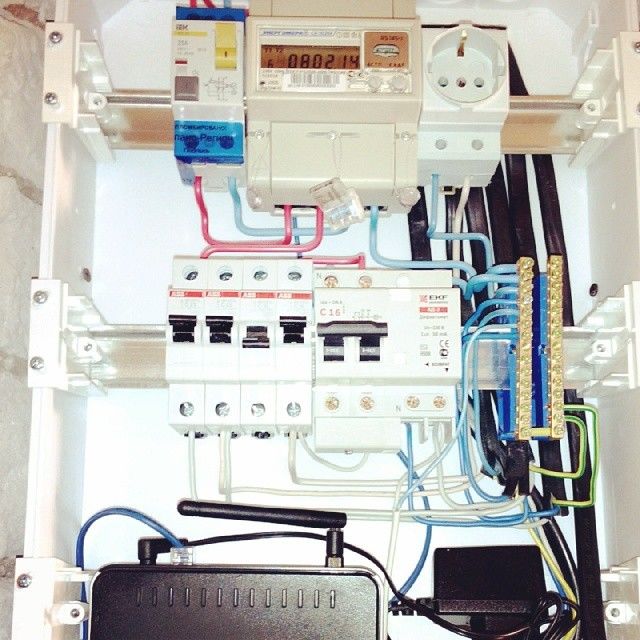
Some electrical flaps for the apartment are sold with a built-in electricity meter, and have a sealed compartment. In most cases, protective devices and residual current devices, called RCDs, users choose on their own, based on their own.
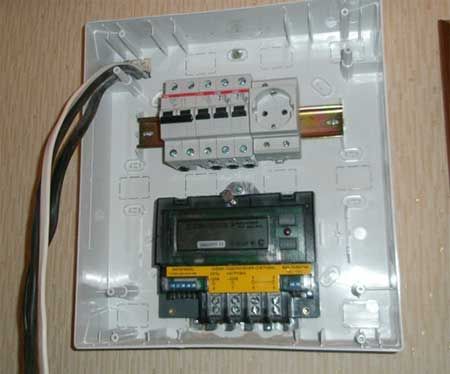
Shield with built-in electric meter energies
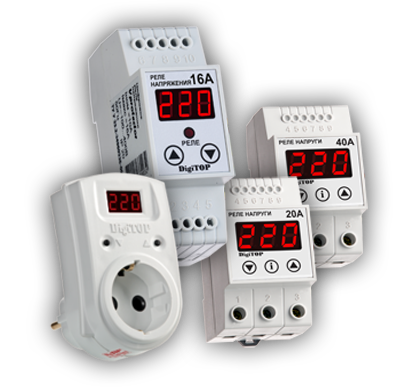
voltage relay
It is also customary to put in the housing electric switchboards, power limiters, various signal devices and modular sockets.
Very often in such shields establish communications, not related to power supply - junction boxes for cables connecting the Internet, cable television, wire radio. 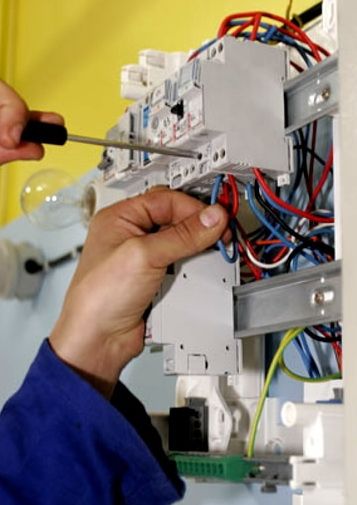
Therefore, the switchboard installed in the apartment should be chosen sufficiently capacious and with some margin for possible future installation of additional modules and devices.
Choice of the flap for quality
Shield of the open installation
There is absolutely no sense in concealed wiring to use an overhead flap, and vice versa, so the solution of this issue will be given even at the stage of planning the wiring in the apartment. The choice of the switchboard manufacturer should be paid special attention - many apartment owners, trying to save money, buy the goods of the "nameless" Chinese production, and then in despair, full of remorse, do not know what to do.
Distribute the concealed panel
For example, you can imagine a situation where, in a renovated apartment, against a background of beautiful wallpaper, the electric switch suddenly fell off the cover, or the internal electronic "stuffing" of the flap tries to fall out due to poor-quality plastic that does not hold screws and other fasteners.
It must be remembered that the replacement of the shield is equivalent to local repair, so it is necessary to take a very thorough attitude to the choice, guided by the criteria of quality and reliability.
Draw a wiring diagram shield
Many newcomers, especially those who already have some experience of wiring, feeling professional, make wiring in the apartment cover, holding a circuit in the head, which is the grossest mistake that real masters never admit.
Example of an assembly scheme for a Shield
Despite the skills and memory of a professional electrician, he will always make a connection scheme, at least to ensure that he (or someone else) in the future, servicing, repairing or upgrading the shield, does not take the time to investigate cobwebs of wires.
Moreover, wandering in the labyrinths of one's own memory, it is easy to make a mistake, which then, without having a flap chart, will be very difficult to detect. The universal scheme for an apartment shield can not be in view of the individual needs, but there are generally accepted principles for combining electric switchboards.
Organization Shield
Connection in the meter board and devices before it should be done by official services, we will assume that it has already been done.
After the meter (or before it), there is an input protective device, then often put the RCD (common to all groups) and from it, with jumpers, are made for individual consumer lines connected to the housing panel, which can also be protected by their own RCDs.

Earthing and grounding bar
It is necessary to avoid a common error with zeros when connecting RCDs and Difac- automats, and to provide an individual zero isolated bus in the housing for each such device.
Electric installation
When installing the external version of the switchboard, it is screwed with screws on the dowels. When mounting the flap of the concealed installation, it is necessary to bring all the incoming wires into the housing before fixing it, then fix it in the previously cut out niche with a solution of alabaster.

Mounting the flap
For wiring a minimum set of tools is required:
- Cross-head and straight screwdriver;
- Nippers or pliers;
- Mounting knife for stripping, or special tool;

It will not be superfluous to buy a set of heat-shrinkable tubing for marking. Having arranged modular devices in the right order, it is necessary to arrange wires in the shield rationally and ergonomically, not allowing them to be interwoven many times.

Heat shrink tubing set
You should start by connecting the lead-in line, making sure that there is no voltage on the wires. Having brought the necessary wires to the connection terminals and bent them properly, bite off excess, considering the margin for the entry of the wire into the mounting slot of the modular machine.
After that, the wire is removed isolation with such a wire so that the bare conductor is completely placed in the connection socket, while not speaking over the machine. The process of stripping wires should be given special attention, not allowing cuts or breaks of metal wires, otherwise the cable will overheat at this point.

Stripper for stripping wires from insulation
Clamp the wires with care, trying not to damage the clamps and not to press the rear panel of the shield.
Repeat this procedure for all wires one by one, one by one. In the same way cut off and connect jumpers.
Checking and preventing the shield
After completing the connections, you should load the switchboard automatics by connecting the available load (electrical equipment) to the internal electrical lines of the apartment, to which the safety switches were calculated.

Checking the flap
Looking for an hour for the shield in this mode of operation, you should make sure that there is no characteristic smell of burned insulation, check how much the machines are heated.
If there are no complaints about the operation of the switchboard, its connection can be considered successful.
Once every six months in the shield should be prevented the connections - tighten the screw terminals of the wires at the terminals of the modular devices.
The electric flap in the apartment, its importance in the electricity supply system of the house is extremely high. Posting can not
We mount the electric shield ourselves
qualitatively and fully functioning without the correct distribution of electricity consumers, and fire and electrical safety will be minimized in the absence of the necessary elements of protection. Of course, it will be better if the specialists are engaged in laying the wires and installing the equipment, but with some study of this issue (this article will help you) you will be able to independently mount the electrical shield yourself, without much effort and expense, by assembling an uncomplicated electrical circuit. The main thing to understand what are the schemes of power supply, what equipment to choose, how to calculate electrical loads, how to correctly and evenly distribute them.
General questions about electrical boards
At the moment there are two types of electrical panels. The first is an old and outgoing nothing - a shield with fuses (or plugs) that were disposable, and they needed to be twisted for replacement, and modern devices equipped with a system
(circuit breakers). Of course, it is better to use modern technologies, as they exceed outdated systems in terms of reliability, safety and durability, and places take less, but they are not repaired. In stores you can buy shields with already built-in circuit breakers, as well as empty "boxes" and you can install the necessary equipment yourself.
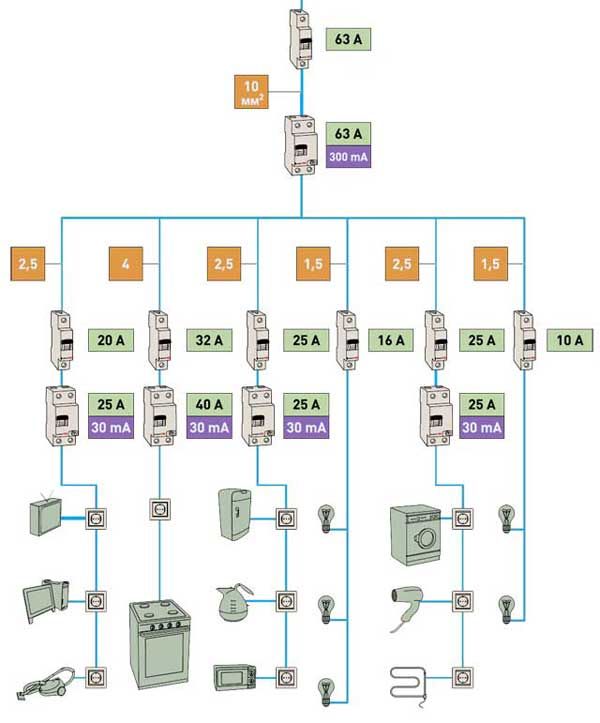
The electrical shield in the apartment, the power supply circuit of which can be varied, and the number of consumers and their power can grow with time, should be selected with additional places for circuit breakers.
An introductory machine, usually capable of simultaneously disabling both "phase" and "zero", should be selected based on the total load of the apartment. The magnitude of its current and protective characteristics is higher than that of auxiliary automata. As a rule, for 2 and 3-room apartments, a 32-40 amp machine (about 7 kW) is suitable, if the load is less, the machine can be taken for 25 or 16 amperes.
As for the auxiliary machines installed on the "phase", they are necessary to protect a separate room or device. Experts advise putting such an automatic device on each consumer, whose power exceeds 1.5 kW (heating tanks, washing machines and so on). The table of approximate loads of electrical appliances is located below.
Table 1 - approximate power of household devices.
Distribution of RCD power RCD (protective shutdown device), extremely useful device, if it is necessary to increase the level of electrical protection at times. They react to the slightest leakage of currents and voltages, instantly deenergizing the circuit. If there are bathrooms and children's rooms equipped with electrical appliances in the house,
Assembly and installation of the shield
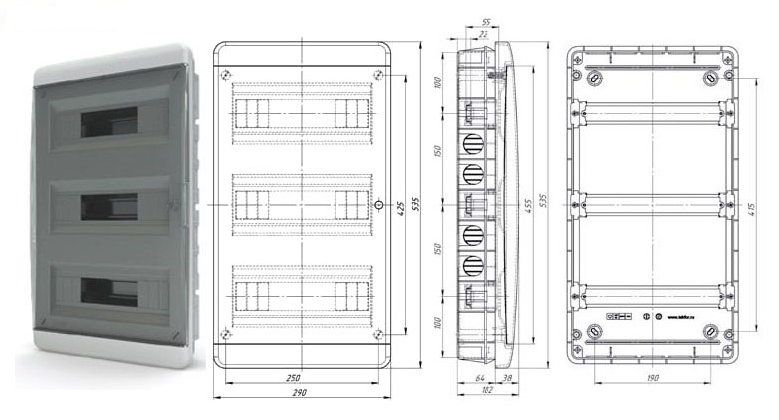
The electrical board housing abb or legrand can be of two types: closed (built into the wall) and open (shield fastened directly to the vertical surface). The choice of the type of installation basically depends on the type of wiring - if the open type wiring is ideal for mounting an overhead shield, such a shield does not require special preparation of the site, the wall is fastened with conventional dowel nails or "self-tapping screws" (all depending on the wall material) . If the wiring is hidden (ie built into the wall), then the best option is to install the built-in shield. Everything is more complicated here, since you have to chisel the walls, the main thing is not to forget to make sure that the thickness of the wall allows you to install a shield. After creating a niche, it is smeared with a fixing solution of gypsum or alabaster, and already in such a box a "box" is built in. Shield is more convenient to use plastic. The upper part should contain an introductory machine under which the counter is located. It is fastened with screws. The meter is installed after the completion of work related to the wiring device. This is due to sealing.
The installation of the electrical panel should be carried out on a hard surface where it is easily accessible and maintained.
The location of the flap is determined by the norms, far from the pipelines of water and gas. It should be located on a level surface of the wall with an angle of inclination of no more than 1.5 degrees at an altitude of about 1.5 m from the floor. If it is not possible to locate the meter far from potential damage sites, it can be placed in a cabinet equipped with an inspection window. Fastening of wires is allowed using bandage binding.
For wiring in the attic, you must leave the wire short, because the wire can not be twisted into the bay. If you are installing an electrical wiring in the attic, the cable is placed in a metal pipe with ground.
As for the materials from which the boards are made, it can be both metal and heat-resistant plastic. The second option is more convenient in installation and operation, more secure, and its appearance is attractive.
So, with the installation of the box itself was dismantled, now we will figure out how the circuit of the electrical board is arranged. 
In principle, all the electrical circuits of the shields are the same, but there are the main factors by which they are assembled, this includes:
- Number of consumers of electrical energy;
- total power consumption of electrical energy;
- power of each consumer;
- the place of installation of the electrical board;
- number of phases;
- the presence of a grounding conductor;
- presence of a power metering unit.
Voltage is applied to the input automaton (preferably, if two-pole) and goes to a single-phase electricity metering unit, where it arrives at the RCD. Next, the phase splits and the direct distribution of loads by means of circuit breakers and additional RCDs. For example, there will be automata separately for lighting, for sockets and for powerful consumers.
The device of the electrical panel with a three-phase power supply system is similar, only the input automaton, the RCD and the electricity meter will be three-phase, and the whole system will be larger both in terms of dimensions, and in the number of automata and connecting conductors.
Beginning the internal installation
Now let's figure out how to properly assemble the electrical shield. First of all, in the shield, with the help of self-tapping screws, a DIN rail is installed. Of itself, it represents a metal plate, to which all switching devices will subsequently be attached. To create the required length, it can be easily cut with a metal hacksaw.
In addition to the din-rails, terminal blocks are attached to the shield body (in another way distribution buses). Their role is to connect the zero conductors. If the flat or house of the old sample and the whole system is made only with phase (3 phases) and with a working zero (with a blue wire), only one terminal is sufficient. If the system is done according to the rules and there is an additional yellow-green conductor (protective zero or ground), then another bus must be installed. At this point in time, tires are on sale, the design of which allows them to be mounted on a DIN rail, as well as automatic machines.
After mounting the dyne-reek, we proceed to fastening the circuit-breakers. Modern design will make it very fast, enough on the top side of the machine with a flat screwdriver to pull off the snap device, put the machine on the din rail and remove the screwdriver. Removal is similar.
Assembly Instructions

The connection can be made in three ways:
With the help of multiwire copper wires with bushings of the NSHVI type.
Own to make jumpers of U-shaped form from pieces of a copper wire.
Using special insulated tires called combs. This tire is convenient in terms of installation and does not take up much space, plus several times reduces the number of connecting wires.
Following actions
After all the necessary steps have been taken to assemble the electrical panel, they begin to cut and connect the conductors.
1. With the cutting everything is simple - we clean off the excess insulation with the knife. 2. After removal, it is desirable to dissolve the exposed ends or equip with special crimps, which are also better to dissolve.
3. We make connection of wires to automatic machines - the terminals must be tightened with a screwdriver, weak contact will subsequently lead to heating and destruction of live parts.
4. The grounding conductor always goes past the machines directly from the ground bus.
5. The zero conductor is connected to the zero bus. If a normal automatic machine is used as protection (except for the introductory one) - zero goes directly, if protection is performed by the RCD - zero goes through it to the connected line. 
What else is necessary to know?
Installing the electrical panel and assembling it – this is not only the ability to correctly build circuits. It is also necessary to know some of the nuances in order not to regret later the time and effort.
It should be recalled that the assembly and installation of the electrical panel Legrand, ABB or equipment of another company must be strictly on the off line, after checking the absence of voltage.
To join the assembled shield to the current system, it is necessary to attract employees of the relevant organizations. For multi-family houses, these are representatives of the HOA or the housing office.
As a result, after completing the entire assembly and connection process, it is necessary to close or screw the cover and check its operation by applying voltage to the live parts of your shield.
(No ratings yet)
Alexey Shamborskiy, May 15, 2014
The problem of the collection and installation of an electrical shield arises, as a rule, in cases when, at the last stage of private construction, the worker becomes before the electrification procedure of the facility. The implementation of the wiring is not a complicated but dangerous and responsible process, and the last point is the installation of the shield. In the future, how to properly assemble an electric shield, and this material will be built in the form of installation instructions.
Instructions for assembling the flap
So, they begin to design the shield in the case when the main part of the work on laying the cable in the premises is finished. The first thing the installer will face is a choice - which will be a shield. Either it will be bought ready, or it will be collected independently. In the second case, materials must be purchased to assemble the shield in a specialized store, that is, the casing and slats on which the switches are mounted, and, of course, the switches themselves.
It should be borne in mind that there are two types of shields - an obsolete type, where fuses or so-called plugs could be twisted, and - a modern type. Of course, it is strongly recommended not to resort to the outdated version, since the new one surpasses it in all parameters of quality and safety. Modern devices that regulate the supply of electricity are called packet switches or "packers". The number of data switches in the switchboard must accurately correspond to the number of electrical circuits fed to the switchboard. This is the main aspect in understanding how to assemble the electrical shield. On the left is a central, main switch, which acts immediately on all the circuits. Has a different color.
It is recommended to add to the shield in addition to the main 2-3 spare packs, because the possibility of an additional network in the house is very high. It is necessary to clearly know that appliances having a power of more than 5 kW must have their own fuse. For example - water-heating boilers. The modern fuses are switched off automatically, but they are switched on manually by analogy with automatic plugs. The only drawback of the packers is that they can not be repaired.
So, the packages are fastened to a special bar - everything seems simple, but you need not forget a very important point - the installation of the grounding plate. You can also buy it at any specialized store. Installation of it occurs after installing the entire series of the necessary number of packers. It is from this plate that the ground wires will depart to the grounding means. The earthing scheme must be developed before the installation of the flap.
A special casing is needed where the flap will be installed, usually a rectangular hole of the calculated depth at the face level is hollowed out. After the shield is installed in the casing, the cables are connected. It is necessary to have a clear idea about the schemes of electric current and this work should be entrusted to a professional electrician. And, as practice suggests, a detailed analysis of how to assemble an electrical single-phase or three-phase shield, it is best to look at the video that is placed on this page of the site.
Scheme of electrical shield
We suggest that you familiarize yourself with the various schemes of the electrical shield.
Video assembly of electrical flap
A modern apartment is very difficult to imagine without a different electronics, which creates some inconvenience with the connection and high load on the mains. To improve electrical safety and reduce the load, you should think about separate control devices and install the control unit in the electrical panel of the house. Cable laying and the correct layout of the electrical panel can be done independently in the apartment, but as for completing the work, there is no way to do without a specialist, since it is necessary to have a clue about the arrangement of the switchboard, various regulations, schemes and be able to perform connection.
The choice and purchase of an electric flap is a very important and responsible matter, since this choice depends not only on the ease of use of electrical appliances, but also on safety in the home. The shields and their installation are subject to certain requirements, which are registered in GOST 51778-2001 and PUE. Further you can read the list of these requirements and rules regarding the flap and its installation:
- electric boards must be filled in accordance with the technical documentation coming with them, where the number of installed automatic machines and their rated current are reflected;
- the shield should have an electric safety icon indicating the voltage (220V or 380V);
- the shield should be made of non-flammable material and have a coating that does not conduct current. It can be plastic or metal, covered with special paint;
- it is necessary to carry out a switch-off inside the shield by making a marking on the wires, which indicates the groups of devices to be connected;
- the jumpers between the automata are made with the help of special bus-drives;
- the doors and the panel housing must be grounded. Also on the doors it is necessary to provide ears or another element so that the inspection organization can seal it;
- buying a shield, check the technical passport, where it will be reflected: the type of shield, the name of the manufacturer, the certificate, GOST, the rated currents of the input and protective devices of the RCD, voltage and frequency, the rated current of the shield, the rated operational currents of the RCDs, the degree of protection, the class of the flap, instructions by connection, weight and dimensions.
If you adhere to the above requirements, as well as the requirements noted in GOST and PUE, then you can without additional difficulties to buy, install and make a shield connection at home. In addition to this knowledge, you will also need to have on hand and control panel electrical diagram, so that there are no difficulties in accepting the work of the staff of the housing office.
Drawing up the scheme of the electric flap
An important step in the installation of the electrical shield is the creation of its circuit. There are several explanations for this. Suppose, if you plan in the future repair or modernization of wiring in the apartment, with the help of the scheme you can quickly establish what each automaton and part in the shield is responsible for. The circuit will also be needed when receiving work by an electrician. Besides connecting the wires, having such a scheme on the hands, it is much easier. You can draw it both manually and in specialized programs, and then print it.
The electrical circuit is created in several stages. First of all, it is necessary to find out what kind of power supply system is in the house, then break all the points of electricity consumption into several categories. After this, based on the data already available, a shield layout is created. It is extremely important that the designation used conventional symbols, which are detailed in GOST 21.614 "Images of conditional graphic electrical equipment and postings in the original."
So, as was said above, all work starts from the definition of the power supply system and grounding in the apartment, because this will depend on the connection of the shield. You can find out by looking at the flap on the floor or by going to the housing office. Often, three systems of TN-C, TN-S, TN-C-S are settled in the residential.
It should immediately be noted that the first system was created by the old GOSTs and was used in homes that were built before 1998. The TN-C system is represented by two-core copper or aluminum wiring. A three-phase cable (L) with a single residential PEN was walking to the distribution floor board, in which ground and zero were combined. The last two systems are used in modern homes. The apartment is laid three copper wire , and a cable with three phases (L), zero (N) and earth PE (S) is connected to the shield.
Having broken on points
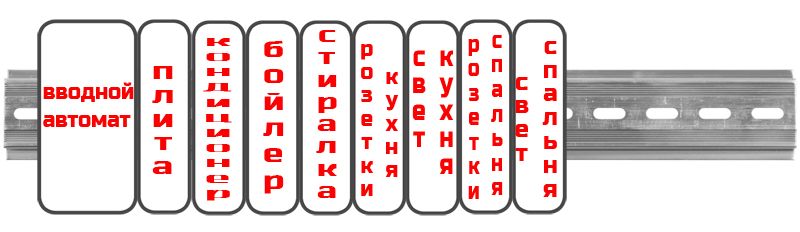
After that, the points are split to connect to several groups. Many people ask themselves: why all this? Yes, it's very simple. So you can more economically use materials and simplify the installation of the electrical shield. You can group as you wish. You can reduce living quarters to one machine, hang another on the other boiler , the third automatic air conditioner, etc. And for each group you need automatic machine with its characteristics.
For outlets need automata for 20A, for lighting systems and switches - automatic to 16A, for electric stove - from 32A, for a boiler, washing machine and air conditioning at 25A. By the way, it is worth considering that sometimes on sockets, lighting and switches, it may be necessary to install additional automata on 25A and 40A.
When you specify the power supply and grounding system at home, and break down the points of connection of electrical appliances into groups, start drawing the circuit itself. With all the necessary data, its creation does not take much time. Again, it is worth considering that you have concepts with conventional symbols from GOST 21.614. Having finished with the diagram, you can start work on the connection. Having the appropriate experience, installation will not take you much time.
Installation of electric guards
Before proceeding with the installation of the electrical shield, it is necessary to do two things. The first is to purchase the necessary materials, the second is to equip the place for him. And now let's talk about everything in order and start by choosing a shield.
It should be noted immediately that the flaps are built-in and hinged, and their choice depends on several factors. If the wiring is hidden, then pay attention to the first type, and if open - then on the second. At the same time, do not forget that the projects of new flats under the shields are provided with a special niche. As for the apartments in the old houses, then there is no such thing and therefore will have to hang a hinged shield. If it does not really fit in the interior, then it can also be disguised with plasterboard. You can also make a niche in the wall. To do this, you need to be sure that the wall is not carrying.
Second - the dimensions of the electrical panel depend on the number of machines to be installed. According to GOST, shields can be on 6, 12, 18, 24, 30 automatic devices or 6, 9, 12 threaded fuses. By the way, you need to take a shield with a margin. If you plan to install 12 automatic machines according to the scheme, it is recommended to take the shield to 18. Thus, you can protect yourself against additional expenses in case of installation of additional automata.
With the choice of machines and wires, everything is much simpler, because the first have the main characteristic, which is reflected in the scheme, and all that is required of you is to buy the right one. Now on the wires. It's even simpler, because the wires inside the switchboard are taken from the main wiring, and then attached to the vending machines. The only nuance will be the use of special copper tires with insulation.
So, with the choice of the shield and its "filling" is over. Now comes the second stage, namely the choice of location. Turning to GOST, the shield should be in an easily accessible place, at the same time, if it is installed near the door, then in the open state, they do not cover it. He should be at a height of about a meter and a half from the ceiling.
After that, if there is such a need, make a niche under the shield, well, and if not, just drill the holes for the fasteners and hang it on the wall. It is extremely important to do all the work related to the use of power tools in advance, since during installation and connection of the shield, the apartment should not have electricity.
In order to fix the flap on the wall, there are holes for self-tapping screws. To make wiring in it, holes are provided in the walls of the flap, which can be covered with plugs. After removing them, connect the cable and the wiring. Using self-tapping screws, secure the flap in the pre-drilled holes. If the flap is mounted in the wall, then the cracks around it should be covered with putty and give it time to dry. At the same time, make sure that the casing is flush or slightly protruding from the wall. Otherwise, you are unlikely to be able to fasten the door of the flap. So, the important points:
- Fixing the flap on the wall.
- Elimination of cracks.
- Output of the posting.
What is important to do
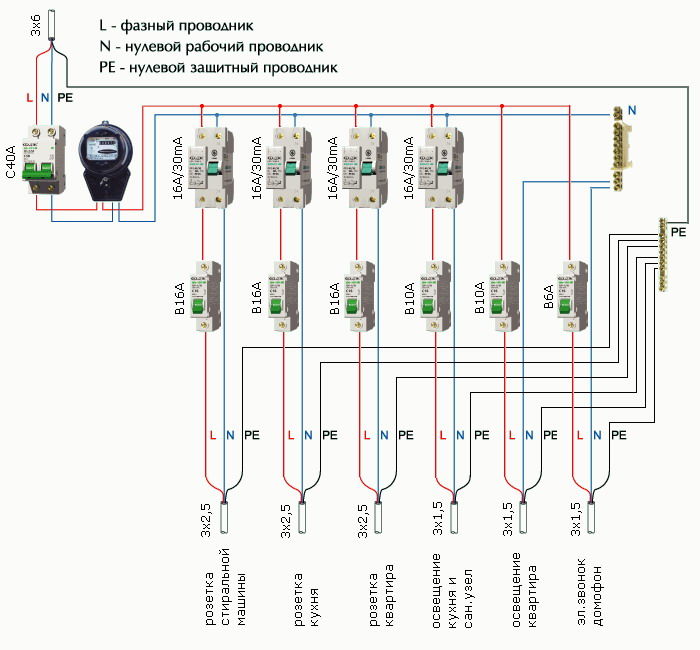
And here you are, to, perhaps, the most crucial moment - filling the flap. In fact, nothing complicated in this. To begin with, install the ground and ground bus. Often, the zero bus is connected to the top of the shield, and the grounding bus is connected to the bottom. Their fixation is carried out with the help of self-tapping screws. After that, the RCD automatons are connected, which are attached using the same self-tapping screws.
Next, you need to connect the power cable and the internal wiring. The supply cable has three cores - white, blue and yellow with a strip of green color. The blue wire is zero, which connects to the zero bus. White - the phase that connects to the nearest machine at the top. And the last core is connected to the ground bus. A similar procedure is also carried out with the posting of the apartment. The phase wire is usually red or brown, and is connected to the bottom of the circuit breaker. At the same time, make sure that the phase wire of a group is connected to the machine that is assigned to it, which will help in the future avoid confusion during operation and maintenance of the shield.
After that, it remains only to connect all the machines from the phase side to each other. To do this, you can use a special insulated copper bus or with the help of VVG-5 * 6 wires, used for the winding cable from the flap in the entrance to the flap in the apartment. To connect machines, it is necessary to cut it into pieces 4-5 cm in length and connect in series to the upper parts of the machines, starting from the one to which the phase is already connected.
But if in the circuit there are additional automatic machines that unite groups of electrical appliances, they need to be connected in such a way: in the upper part to the phase, and at the bottom the zero wire is connected, and from them to the zero bus and the phase that diverges into a group of automata. Important do not confuse the wires when connecting them - for this purpose, the RCD has the appropriate markings, and therefore the process of disconnection will be done without problems.
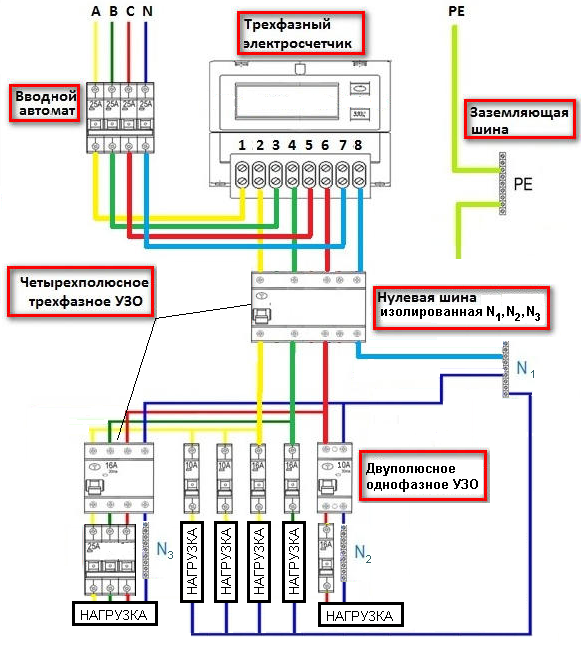
If you live in a private or modern apartment building, then it is not uncommon to use the 380V input for the electrical panel, i.e. it is powered by a four-wire or five-core cable (in the latter case - the fifth core - ground). Three different phases are connected to the input automaton, which then goes to counter . From it, they go to a common machine, after which the phases go to single-phase machines for connecting equipment designed for 220V.
It happens that it is required connecting the device to 380V, and this requires a three-phase machine. Remember that between different phases the voltage is always 380V, while between zero and one phase is 220V. Therefore, be careful - if you submit to household appliances two phases instead of zero and phase, then it will simply fail.
As you can see, there is nothing complicated in the installation and connection of the electric flap in the apartment. This is an extremely simple task, from which even a person far from these matters will cope. The most important thing is that learn the rules, given in the PUE and GOSTs, and follow them clearly, and after completing all the installation work, call each element through the tester for errors. If everything turns out to be in order, then call an electrician from the housing office to take work and put your apartment in the general network of the apartment house.
Finally, instead of summarizing, general recommendations for assembling the electrical panel: