They are both constructive and decadative elements of the interior. They make the space warmer, more inhabited and spiritualized. Often it is the arch that creates the character of the room, but only where it is assembled correctly and tastefully. And even in this case there is a well-informed question: how to trim the arch? Decorating arches can be extremely diverse:
Arches with wood trim
Arches with wooden trim make the room more significant. They are ideal for rooms decorated in a classic style. Elements made of wood perfectly emphasize the shape of the trapezoid, vaulted arches and interior structures in the shape of an ellipse. However, designers do not recommend resorting to wood finishing where there are arches of non-standard shapes, as well as in laconic interiors and in wet rooms. Natural wood is an expensive material and it should be very well considered the feasibility of its application.
Arches finished with MDF and chipboard

Such arches are much cheaper than their analogues, lined with wood. However, from such plates, with the right approach, smooth angles and arches of beautiful geometric shapes are obtained. If we additionally apply the technologies of lamination and veneering, the material can not be distinguished from an integral tree, but only experienced professionals are able to carry out such a task.
Arches, finished with facing brick

This option is also not suitable for every interior. This is a rather laborious process, which involves 2 stages:
- First of all, vertical columns are placed;
- In the second, the arch of the arch is erected.
The arch is made using a template, which must not be removed until the solution is completely frozen. Angles and joints can be made with plastic.
Polyurethane finish

Reflecting on how to trim the arch is stylish and inexpensive, it is worth remembering polyurethane. The polyurethane finish looks expensive, although it is affordable. This sturdy, yet flexible and lightweight material has impressive performance characteristics, so it is universally used for making stucco moldings, for finishing ceilings, corners, cornices and, of course, interior arches. The undoubted advantage of polyurethane is the ease of its installation - a completely unprepared person can implement it with their own hands, with a little effort. On execution such arch constructions are not inferior, and probably, and surpass arches from many other materials.
Decorating the arch with decorative stone

This finish looks organic only when part of the wall is involved in the stone composition. At the same time, if a natural stone is a very difficult material to process, then the decoration of the arch with a decorative stone does not imply great difficulties - it is very easy to attach it to special glue or ordinary liquid nails.
Gypsum plasterboard walls, and walls made of light blocks, are not designed for heavy loads, so the finish will be more successful if you use an artificial stone with the mind. This material is based on a binder, for example, gypsum or cement. In addition, the composition has expanded clay or perlite, and modern staining technologies make artificial analogues almost indistinguishable from natural stone. The big plus is the limitlessness of its shades and textures.
Decorative plaster

How to trim an arch without much labor? Decorating arches with their own hands is most simply done by plastering them with decorative plaster. First you should fill in the unevenness and visible parts of the fasteners, the primer is applied from above. After it takes 4 to 24 hours (the exact time is indicated in the manufacturer's instructions), you can start applying decorative plaster. The assortment of this mixture allows you to select any surface texture. If the relief is supposed, it should be applied to the wet composition. In the case of using this method of finishing the arches, it will be appropriate to use that will save the plaster from chipping.
Pasting the arch with wallpaper

As a variant of the arch finish, wallpapering is suitable. It should be noted that the glutinous mixture should be slightly thicker than for conventional pasting of walls. Corners will help protect the wallpaper from abrasion. You need to take those wallpapers that are stronger and better bend, the right options:

Mirror Tiles

Mirror tiles are a specific facing material that can be used to decorate a wide variety of rooms. In the case of the arch, it is suitable as separate inserts from narrow strips. Such a tile is perfectly combined with all other finishing materials (plastic, wood, etc.) and can serve for stylish separation of different decoration textures, decorating corners.
Mosaic

How to decorate the arch to give a unique look to the room? The decoration of the arch with mosaic is ideal for a stylish interior with a character. Mosaic can be:
- From glass;
- Ceramics;
- Natural stone;
- Self-adhesive panel and so on.
In any case, to strengthen it is a delicate and time-consuming process. At the same time, this decoration is performed quite often, as it looks original and unusual. First, an adhesive solution is applied to the wall, all angles are well greased, and then a mosaic is applied using the level, beacons are inserted between the parts, then they are pulled out, and the seams are treated with decorative putty.

In addition to these methods, the decoration of the arch in the apartment can be carried out with the help of a lot of other materials that can be unique. For example, it is convenient to apply a flexible acrylic tile, which repeats the appearance of natural stone, but can be of all sizes and colors. Strips of decorative molding, fixed with "liquid nails", look very good. There are options with plastic - the use of plastic lining and panels can quickly and easily give the arch a neat and beautiful look. Decorating with plastic is very inexpensive and practical.
Wall decoration around the arch

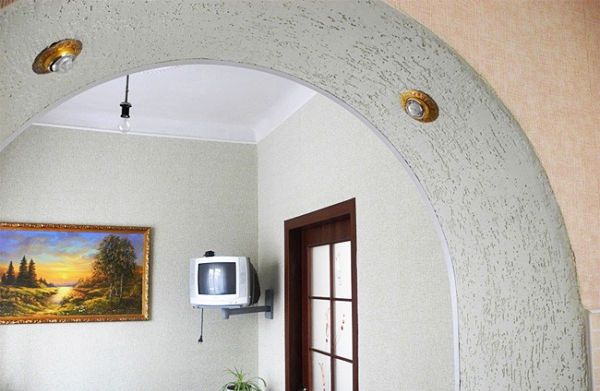
Decorative arched corner serves to highlight arches against the background of the rest of the interior. In addition to the design function, the corner allows you to hide irregularities in the arched doorway. This is especially true for those who make an arch with their own hands. But even the ideal doorway must match the style of the wall on which it is located. The main purpose of this wall is to emphasize the beauty of the opening. This works well, for example, against the background of decorative relief plaster. Equally harmonious is the wall, lined with an artificial stone. As an elite finish options - compositions from Venetian plaster on the wall. If the arch is finished with plastic, then the wall section can also be pasted with plastic. You can also decorate the wall with a tree - attach the wooden panels to the wall part. Even simple wallpaper, matched with taste, will emphasize the beauty of the arch on the wall.
Decorative decoration of arches in the house requires great delicacy, at this stage it is easy to make a mistake, which will disfigure even the most solid and accurate arch construction. And yet, it's quite realistic to finish the arch without the help of specialists - with your own hands.
Increasingly, owners of private apartments, houses or offices prefer decorative arched openings that look stylish and original.
It does not matter, from what material the arch itself is made, much more interestingly, which version of the finish for it to choose.
Today we will tell you how to trim the arch in the apartment and what finishing materials are suitable for this purpose.
The main ways of finishing the arch
We will not focus on the process of manufacturing and installing an archway with our own hands, but we'll talk about how to revet an already finished construction.
The market of building materials offers just a huge selection of different decorative materials that can be used for facing all sorts of arched constructions.

By the way, the arches in the apartment can be not only interroom, they are used for the decoration of wall niches, window openings, as well as for internal zoning of the premises.
The most popular materials are:
- Wallpaper;
- Fake diamond;
- Decorative plaster;
- Ceramic tile;
- Bung;
- Textile;
- Mirrors;
- Mosaic.
In more detail, we will consider only the first three options, which are the most common and easy to implement.
Decorating wallpaper - simple and affordable
This is a budget and simple method of facing any arch, which still requires some skill. To carry out the work, you will need to prepare the following:
- Wallpaper (in texture and pattern, combined with the rest of the design of the room);
- Adhesive composition;
- Ruler, pencil;
- Brush for glue;
- Scissors;
- Clean rags.
At the initial stage, follow the preparation of wallpaper paste, it should be thick and dense in consistency. The surface for the cladding must be cleaned and leveled. Putty is used for leveling. Pasting with wallpaper is done only after the filler has completely dried.

The first strip is glued to the wall surface near the arch. The next strip is glued to butt from the first, but so that most of it covers part of the arch. The protruding part should be cut off, leaving an allowance of 2.5 cm. When gluing subsequent strips, the allowance is always made.
Then cut a strip width of 2.5 cm and is glued to the slope and with a brush tightly pressed against the surface. To avoid the formation of wrinkles, on the allowance we cut out small corners, they will help smoothly glue the strip to the base.
By the same principle, the opposite side of the arch also is glued. During work, care should be taken to ensure that the strips are adhered correctly, and the joints are not overlapped.

The arch is compiled last. To do this, cut a strip of width equal to the width of the arch, but along the length you can make an allowance of 15-20 cm. Next, the strip is glued to the arch vault and to the sides of the walls of the opening. The strip is glued from top to bottom on both sides of the opening.
With a high arch, the strip can be cut in half, but the joint must always be in the uppermost part of the arch.
To smooth the wallpaper and remove air bubbles is recommended clean rags from the top down, as well as from the center to the edges.
This method of decoration, of course, has its own characteristics and advantages:
- Simplicity and accessibility. The cost of this material is much lower compared to its competitors. Yes, and perform the veneer by any, even an inexperienced novice;
- A wide range of colors and textures for an ideal combination with any interior style;
- Low cost. The wallpaper is still one of the most affordable and inexpensive finishing materials.
However, this method of finishing has its drawbacks: a short service life, the difficulty in carrying out restoration work and the susceptibility to high humidity.
Decorating with artificial stone - exquisitely and stylishly
This veneer always looks rich and effective, suitable for most modern interior styles and will fit well into a unique design project.
Sufficiently practical material, it is convenient to work with, besides it is not as demanding on the surface as opposed to wallpaper.

The execution of the stone cladding works begins with filling and priming of the surface. After the layers have dried, you can start laying the stone.
Such finishing requires the preparation of a special solution based on cement, lime, sand and glue mixture. Small decorative stones can be planted on glue nails.
The laying process starts from the bottom up, at the junction that connects the wall and the arch. The first stone is laid out on the joint, then tightly pressed and leveled.
The best way to fix it is to overlap, which will help to avoid additional work on processing external corners. Those elements that will be installed along the entire arch arc are cut off along the radius using a file or construction pliers.
Particular attention should be paid to the processing of seams. For this, a special compound for the joints is used.

The advantages of such a finish include:
- Long service life. Such material will last for several decades.
- Efficiency and attractiveness. Decorative stone has high performance, it is distinguished by its strength and durability, besides it has an attractive appearance.
- Easy to clean. The stone is sufficiently resistant to any detergent, therefore all care of it is reduced to a usual wet cleaning.
But the disadvantage of many consumers believe its high cost, however, this may be a contentious issue.
Decorative plaster finishing - easy and fresh
In the apartment plaster can be used if it is made of plasterboard. To carry out the work you will need to prepare stamps, and a plaster mixture.
Work begins with shpatlevaniya and priming. This is necessary in order to level the surface and provide it with better adhesion to the decorative plaster layer.
Stucco mixture is evenly applied to the entire surface, with the thickness of the layer should not exceed 1.5 cm. Then the roller or stamp creates the desired relief or pattern. Waits for some time to freeze.
The finished relief is treated with a primer, then let it dry completely. After 18-20 hours the surface can be painted in the right color.
![]()
Advantages of this method:
- Simple application. Does not require special skills and complex tools;
- Long service life. Such finishing will serve not one year, as it is resistant to temperature and mechanical influences.
The disadvantages include the difficulties of maintenance and restoration.
Video on how to make the facing with plaster:
It is not so difficult to choose the right material, the main thing is to know what the final result should be.
When arranging arched openings instead of traditional doors, the owners of apartments and houses think over the options for decorating these interior elements. There are numerous options, but the choice should be made taking into account the overall stylistics of this or that interior.
If a professional designer is responsible for repairs in your apartment, you will not have to think about how to make an arch better. It will only be necessary to choose the best option among the presented ones.
If you yourself act as a designer, foreman and even a finisher, then you will have to decide everything yourself, implementing everything yourself.
It is not difficult to equip an arch if the interior of the whole apartment is created in the same style. In general, this is the way it should be, since the arched openings unite the spaces, therefore, at least adjacent rooms, which are united by an arch, should not differ in style. Let's consider some basic types of arches and we will talk about how it is better to make out them.
This style, used for interior design, is in high demand these days. This style is characterized by the following characteristic features:
- minimalism;
- use of modern materials;
- clear, strict forms.

Arch in the style of hi-tech is rare, but if you still want to equip this element in your apartment, it is better to abandon its classical form. It is better to choose an arch portal with a straight top and rounded corners, or give preference to the original arch of irregular shape.
Anyway, this opening will not require any unique design - you will only need to paint it under the color of the walls. You can decorate the arch with built-in lights, acrylic mirrors or other materials that have a glossy surface.
Such doorways have a relatively large radius and a pronounced transition from rounding to a straight section. The design of the interior openings in this case is made of wood or MDF panels. Do it yourself is not easy, so even before cutting down the opening it is recommended to acquire a ready frame and adjust the shape and dimensions of the arch to it.

If you do not, you will need to contact the company, which specializes in the production of arched structures on order.
The radius of the arch in the classical style is always equal to half the width of the through or doorway. Such arches have an elegant appearance, differ by the presence of smooth lines, flowing from rounded areas to straight lines.
Such openings can be made with wood or materials based on it, and sometimes polyurethane moldings painted in a certain color are used.

The arch in the classical style can be based on a half-column or column of some strict form. If you complement the design of stucco, sculptural elements or carvings, the arch can be successfully integrated into the Baroque or Empire style.
The easiest way to finish the arch is to glue it with wallpaper, which is used to decorate the plastered walls in the room. For work you will need the following tools and materials:
- wallpaper;
- special glue;
- brush;
- pencil with ruler;
- scissors.

First of all, you need to prepare glue. The mixture should be more dense than the one used to glue the wallpaper on the walls. A thick consistency will give you the opportunity to shift the strip of wallpaper, achieving a clear coincidence pattern.
The process of gluing wallpaper
First of all, you need to paste one strip of wallpaper on the wall at the archway. The next strip is glued so that it covers a part of the archway. After gluing the strip, it is necessary to prune its protruding part and leave a 25-millimeter oversize allowance.
Cut the allowance with an interval of 2-3 cm and bend it to the slope, and then with a brush tightly glued to the surface. In the same way, we glue the plane of the arch from the side of the second room.
We left to hang the arched vault with wallpaper, for which we cut out a strip of wallpaper along the width in accordance with the depth of the archway. The strip is cut out a little longer, so that you can achieve a clear coincidence pattern by sliding the wallpaper.

We glue the wallpaper to the arch of the arch and the side walls of the opening. In the event that the arch has a sufficient height, the strip must be divided into two or three parts. In the first case, the junction will be at the top point of the arch, and in the second, it will be possible to join at the junction of the arc and vertical planes.
Glued wallpapers should be ironed well, expelling all formed air bubbles.
If you do not know how to make an arch using an artificial stone with your own hands, we'll tell you. First, carefully prepare the surface, making it not very smooth to ensure better adhesion to the glue. You can also make small incisions with a hatchet or a knife.
After that, an adhesive compound is prepared, which is made from glue, cement, sand and lime. Better when buying a stone, find out which glue is better to glue the finishing material.

As a rule, a stone is used for finishing not only arched apertures, but also adjoining sections of walls. The first stone is recommended to glue near the floor at the junction of the arch and wall. Be sure to check the level of masonry.
The first stone in the second row should be glued in such a way that it protrudes slightly around the corner by the thickness of the decorative tile. When you reach the rounded part, stones should be carefully cut in an arc. To do this, they are first applied dry to the wall and made a pencil outline and conducted along the cutting line with a sharp knife with effort. After that, the excess can be broken off with the help of pliers. All the formed irregularities must be ironed using sandpaper.
After pasting the facade of the arch in the same way, it is necessary to revet the inner surface. Sutures should be rubbed in about a day, so that the glue managed to grasp, and the stones were clearly fixed in place. Doing everything should be very careful with a small rubber spatula. You can also use a regular confectionery syringe, filling with a solution of interlace slots.
Arches are now actively gaining a place in homes and apartments. Being elite elements in the design of premises, they are most often installed in hallways, especially if they consist of several rooms or have an elongated shape. Door apertures in the kitchen and living room is also a convenient place for placing geometric floors.
In translation from Latin, the arch is an "arc", a "bend". It is used as a space separator in architecture for more than 4000 years and from the architecture of the Ancient East smoothly migrated to the interior of Ancient Rome. Temples and palaces of wealthy Romans can not be imagined without arched ceilings.
For several centuries, the arches have changed slightly, and its functions have remained almost the same:
- arches allow to give the room an originality and individuality;
- visually divide the space into separate parts and at the same time are the architecturally unifying beginning.
Today, many owners in the process of repair replace the doorways on the arched floors.
Professional advice and personal preferences will allow you to choose the style of the arch and design in general.
Types of arches
When choosing design solutions, consider geometry. It is because of it that the arches are divided into:
1. Passive - it's classic and strict, standard forms. They are more reserved and standard.
- Classics - absolutely correct arc radius. This solution is applicable in almost any interior. The doorway acquires softness and subtlety. This is the most commonly used type of arch ceiling.
- Modern - arc arch has a pronounced ascent. There are 2 varieties - with legs and without them.
- Ellipsoidal - the arc of the opening in the form of a regular or irregular ellipse.
- Romance - the upper arch has a horizontally cut surface in the middle and rounded sides.
2. Active - have the most diverse and bizarre forms. They have the ability to most visually expand the space.
An example is an eastern arch with an asymmetrical vault on one side.

Active arches in form can be:
- horseshoe shaped;
- lancet;
- keel-shaped;
- semicircular;
- trapezoidal;
- boxed;
- and even creeping.
The use of arches is closely related to the possibilities of stone finishing. Look how it looks, maybe you'll find new ideas.
Asymmetric arches often serve, kitchens or bedrooms in Art Nouveau style.
Materials.
1) the traditional tree (ash, aspen, pine, oak, beech, etc.) It is mainly used for passive arches.
These 3 types are the most stable, therefore they are used both indoors and outdoors.
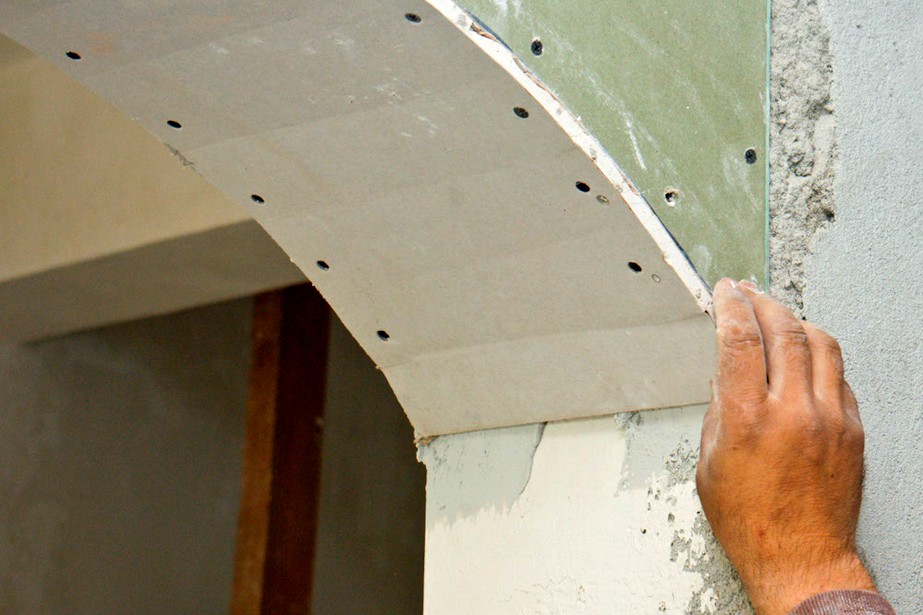
4) drywall
5) plastic
Recent materials allow you to draw an arch only indoors.

If you are designing a new building or transforming your house, think about how to include the arch as a decorative element.
Many rooms in our apartments in the original version completely do not assume the presence of arches, but it is easy to convert the usual doorway into an arc-shaped shape.
Arched corridors

Arched ceilings look great in corridors and aisles, which have insufficient lighting. They also have an additional zoning function: they break up space, creating mini-halls.
French doors with arches

Swing doors with transparent or frosted glass, made in the form of an arched arc from above, decorate the interior with its unusual and stylish. Doors will perform their basic functions and simultaneously combine spaces, letting light from the room into the room.
Decor arch from brick and stone masonry

Some people prefer to see in their premises an untreated stone or a rough brick. For some stylistic decisions, this is justified. A brick, laid in an arch, will give an additional accent to the whole room.
Arch in the bathroom

In our minds, the arch in the bathroom is strongly associated with the oriental style.
Not many have arches in the bathrooms. But if the room allows, the designers will be able to make your bath unique.
Wonderful windows

Arched windows are a stylish decoration of any house.
The nearby windows can be of different sizes, so make sure that the arches on them turn out to be different in size but equal in proportion.
Arches in the interior of the kitchen

Arches allow you to smoothly translate the view from the kitchen to the dining room, living room or hallway. At the same time, these are independent spaces. 
The wider the arched opening, the more accurate it is to think about the color and stylistic connection of the two rooms.
Arched entrance to the loggia

It became customary to connect a loggia or balcony with a room. But the transverse beam, which is not a refinement of architectural design, is sometimes just annoying. Look closely at how interesting this problem can be solved.
Arch at the bar

The original solution is to connect the living room and dining room. At the same time, the bar counter is an additional unifying principle.
Arches with through niches

Effective decoration and zoning of the room - that's the purpose of an easy, if carved, arch in the children's room, a large dining room, studio apartment.

In the open space of the verandah the arches on the columns harmoniously fit.
It does not matter what material your arch was built from. It will be a full decoration of the interior only after you perform its decorative finish. If you ordered a general project, then experts will prompt you - how best to trim the arch in the apartment, so that it fits perfectly into the design concept of the premises.
However, if you like any decor, you can always choose it yourself, and after that you will only need to perform the facing of this architectural element. Worry about the complexity of the process is not worth it - you will be able to manage yourself. The main thing here is that there is a desire and the necessary tools / materials. Let's talk about the arch finish right now.
Arches are good in that you can decorate with this design not only the door. This architectural element will effectively decorate the niche in your wall in this or that room, also this method is chosen when they want the finish of the window to look original, exclusive.
It is because of the variety of options that the requirements for finishing the arch vary. If the arch is interior - it necessarily suffers serious loads. The decor in this case should differ not only in external aesthetics, but also in certain strength - this rule should not be ignored.
Overview of materials for finishing
![]()
The modern market of finishing materials offers a sufficient number of solutions in order to be able to finish the through hole.
If there is an arch - how to finish it? Let's analyze the most popular materials:
- Decorative rock;
- Wallpaper (a classic solution, tested not by one decade);
- Mirrors - used for decoration not so long ago;
- Mosaic;
- Textile;
- Bung;
- Ceramic or tile;
- Facing bricks.
Arched angles
Vulnerable places of the arch structure are necessarily designated by corners - so it was led. Protection is not required only for their hard facing.
If the finish of the arch is made with some hard material, you can not use arched corners - it is not necessary.
But, if you have a completely different design, it is the corners that are needed to protect the entire architectural design from mechanical damage. So you will retain the aesthetic appearance of your arched doorway for years to come.

Today on sale it is possible to pick up arched plastic corners of the most different width - let out production for designs of any volume. But experts note that the convenient solution is the following solution: 1 by 2 cm. A wide side of the corner is glued inside the arch - liquid nails are used especially for this procedure. The narrow side of the corner is fixed on the facade of the arch structure.
To achieve maximum effect and finish the arch qualitatively, the corner should be pressed to the base for a long time. It is best to wait about 12 hours. Therefore, use a paint tape - to securely secure the already glued plastic element to the arch structure.
To make an arch wallpaper - it's not difficult

When there is an arch - what is the easiest way to finish it? Of course, you can choose for this task wallpaper. This cladding is not only very economical, but also simple - the design is easy to do by oneself, the help of specialists-finishers is not required.
We carry out gluing
So, you decided that the wallpaper on the arch is exactly what you need. In what order should the work be done?
- First, you need to level the surfaced surface - for this, most often, produce a putty;
- When the base is ground, you can start making glue. Stir the composition of the construction mixer, you can also use a drill - if there is a suitable nozzle;
- A strip of wallpaper is glued vertically - next to the opening, the edge bends to the arch. The amount of bending is somewhere 30 mm, not more. Near the first strip exactly the same way, glue the second strip - about the first;
- The allowance is necessarily made and at gluing of all subsequent strips it is necessary;
- Further, with the help of scissors in these allowances, cut corners - this is done specifically so that there are no folds. They are glued to the arch structure, while gently smoothing.
In the last phase the vaulting of the arch is performed. How do I do this part of the finish?
Everything is simple:
- First of all, cut out a strip of wallpaper of such width, which is equal to the width of the arch. The length is also done a little more - in order to be able to combine the picture on the canvas;
- This strip is glued at the top of the arch, then descends.
To smooth the wallpaper on the arch is taken from the top down, then it is done towards the edge. It's better to act in such a way - so that there are no unpleasant surprises in the future.

Another popular question - what are the advantages of such a cladding? Indeed, how to trim the arch with wallpaper, we figured out, but is it worth doing in your apartment?
The undoubted advantage of using wallpaper during the decoration of the arch is that you are given a lot of drawings, colors of the material. That is, you can choose the ideal option, which easily fits into almost any room.
The cost of such facings is also pleasantly pleasing - especially, those people who really like to count money will be delighted.
Disadvantages also exist, they are as follows:
Finishing the arch with wallpaper is not durable. The material can quickly turn yellow, after a while you will feel that the lining has lost its novelty, lost its freshness. But this is not all: alas, the wallpaper is easily damaged because of moisture. The arch, finished with a stone, does not know such drawbacks - so this is an occasion to think about choosing some other facing material.
Be sure to watch the cognitive video: finishing the arches with wallpaper. Perhaps, it is this video that will help you determine whether it is worth using wallpaper for decoration of arch structures, or it is better to invest more money, but to get a really beautiful design for many years.
Finishing of arches with cork

Decorating arched openings with a stopper today is a very popular direction. Everything is simple: the material is chosen because it is very warm, natural and safe from an ecological point of view.
Finishing of arches with a stopper can be performed only when the roll type of material is used for this work. In addition, you can easily cope with the application of cork self-adhesive wallpaper.
How in the apartment can you trim the arch with a cork? Here everything is the same as a simple wallpaper label - some special difficulties can not be distinguished. Unless, in order to increase the strength of the coating, after the facing of the arch, the plug should be covered with a layer of lacquer.
A small recommendation for working with cork rolls: if you are going to decorate a kitchen arched opening - choose a material that has a wax coating. Due to this moisture will be repelled and the pristine appearance of the arch will be preserved for many years.
See video: arch - cork trim. The material will help to avoid mistakes, especially recommended for beginners.
We use decorative plaster
Today, the decoration of arches with decorative plaster is not so rare - people often choose this kind of lining for their designs. And there are reasons for this, about which we will now talk:

- Apply decorative plaster on the archway is very simple, there are no complications. Finished finishing will be durable - you can not argue with this;
- Among the drawbacks, it can be noted that the work aimed at restoring the finish, is not so easy. In addition, to monitor the cleanliness of the relief is not easy, just like washing. Keep this in mind if you decide that finishing the arch with decorative plaster is exactly the solution that your interior will benefit from.
To polish the surface of the opening with decorative plaster, you will need relief stamps or rollers.
Pay attention: use slow drying mixtures for finishing arches (we are talking about ready-made compounds) - the right option in order to facilitate the whole process. While the plaster is damp, it is easy to make a relief on it - it will be confirmed by any master.
The order of implementation
- The mixture must be spread over the surface. To avoid errors, carefully study the instruction: the recommended layer thickness is given there. As a rule, this figure does not exceed 15 mm;
- Then, with the help of relief stamps or ridges, a relief is made. Rollers in general for such work are very convenient option - they will help save not only time, but the material itself. About stamps this can not be said;
- When the above procedures are performed and the relief is already dried, a primer is made on the archway (more precisely, the finish that was applied to it).
Then we must wait, usually at least twenty hours. And you can make the coloring. There is a special scheme here:
- To effectively highlight the relief, first the dark paint is applied by that roller, which has a longer pile;
- The organization of the second layer looks like this: a bright paint is made by the roller (the pile tool is shorter than in the first case).
Sometimes they choose a rubber tool. That's all - there is only one thing: you need to paint all the tops of the relief so that the work looks finished.
Stone for decoration of apertures

An arch finished with a stone is a beautiful solution that will decorate any room in your apartment. The effective design of these architectural structures with tiles or stone can be symmetrical: it is a worthy choice for country or eco-style.
Also, you can make an asymmetrical facing - if you trim the arch with a stone in this way, you will get a magnificent stroke in the Art Nouveau style or deconstructivism.
Putting a stone along the arc
If you want to finish the arch with a stone, there is a great way - laying the material along the arc:
- Laying is carried out only on the surface, the preparation of which is done carefully;
- Before tiles it is accepted to try on, from the wrong side there is a cut line;
- On the line, which is drawn, several times must be drawn with a construction knife. Then the unnecessary part is easily broken off by pliers, the edges are smoothed out using a file;
- After 24 hours after the work is done, you can begin sealing the seams.
We lay the tile
- The surface of the arch before these works must be plastered, then primed. In addition, it is necessary to make incisions;
- The solution is prepared from glue, sand, lime, cement (or the tile can be fixed with liquid nails - if the instruction to the material does not prohibit it).
If you glue the material overlap - you do not have to close the outer corners. Buckle pasted in the first row, in the second it is customary to make a shift inside.
- That is, in each of the odd rows, it is necessary to combine the edge of the tile directly with the boundary of the opening. But the overlap is attached in each of the even rows.
Work with facing plastic
Suppose, you decided to perform the decoration of the arch with plastic. This choice can be called successful - such work is considered not very time consuming.
If the arch is made of plastic, the putty and the primer of the substrate can be omitted - usually the frame is immediately made.
However, it is recommended to check the level of inclination during the work often, as well as the parallelity of the entire finish. Only this way you can protect yourself from errors.
- Under various plastic panels a frame is being constructed - any racks, even wooden ones
- On both sides of the arch they are attached with mounting foam. In addition, it is necessary to put temporary spacers - to hold the structure until the foam completely solidifies
- Next, the plastic parts are cut off - of the necessary dimensions, and they are mounted on the slats - horizontally or vertically. Here you will be helped by large staples and a stapler.
Outcomes

Decorating arches is a very important stage in the repair work in the apartment and in a private house. This architectural element fits perfectly into any interiors and perfectly decorates the room. To make the finishing work, you can use a variety of wallpaper, lining, decorative plaster, a board (parquet or laminated), natural or artificial stone. The use of any material assumes its own peculiarities, which we considered in the framework of this article. In addition, pay attention to the instructions to the materials - so do not make mistakes.
The easiest way to do the facing of the arch-trapezium - moreover, it is this design is called the most economical. Only the vaulted semicircle will have to be done. For this work, it is best to choose bending and elastic materials - they will look great on the arched surface.