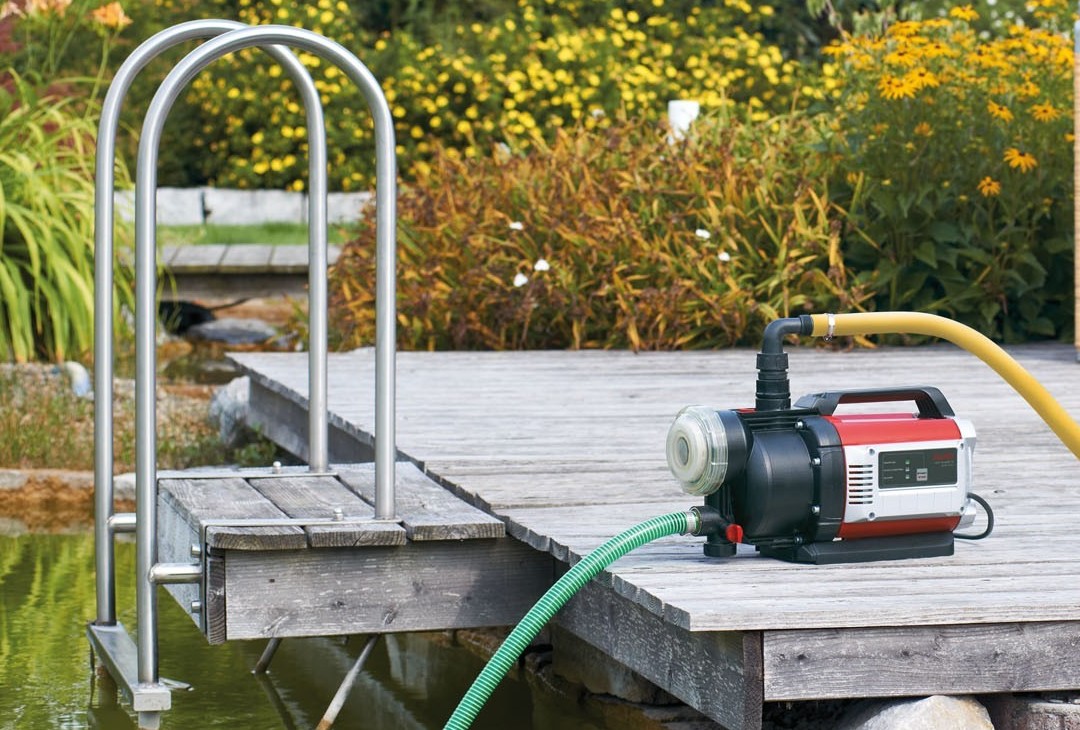
Providing water to plants and plantings is one of the concerns of homeowners. Someone watered beds with vegetables, some flowers and lawns, and someone needs to provide a garden with water. In any case, the procedure takes a lot of time. But this is not all: in the usual way, a crust forms on the surface, which prevents the plants from developing, because the soil has to be loosened. All these problems are solved if drip irrigation is made. You can buy ready-made sets, order development and installation "on a turn-key basis" and you can do it yourself. Here's how to make drip irrigation yourself and will be discussed in this article.
Principle of operation and varieties
This technology was tested several decades ago. Its results were so impressive that the system was widely used. The basic idea is that water is fed to the roots of plants. There are two ways:
- poured on the surface near the stem;
- is fed underground into the root formation zone.
The first way is easier to install, the second one is more expensive: you need a special hose or drip tape for underground laying, a decent amount of ground work. For a temperate climate, there is no particular difference - both ways work well. But in regions with a very hot summer the underground gasket showed itself better: less water evaporates and more it gets to plants.
There are gravity systems - they need a water tank installed at a height of not less than 1.5 meters, there are systems with stable pressure. They have a pump and a control group - pressure gauges and valves, creating the required force. Is completely. In the simplest version, this is a valve with a timer that opens the water supply for a specified period of time. More complex systems can control the flow rate separately for each of the water supply lines, testing the soil moisture and determining the weather. These systems operate under the guidance of processors, the operating modes can be set from the control panel or computer.
Advantages and disadvantages
Drip irrigation has many advantages and they are all significant:
- Significantly reduces labor intensity. The system can be fully automated, but in the simplest version, irrigation requires just a few minutes of your attention.
- Reduces water consumption. This is due to the fact that moisture is supplied only under the roots, other areas are excluded.
- The need for frequent loosening disappears. With a dosed supply of water to a small area, the crust on the soil is not formed, respectively, it does not need to be broken.
- Plants develop better, yield increases. Due to the fact that water is fed into one zone, the root system develops in this place. It has a greater number of fine roots, becomes more cloddy, absorbs moisture faster. All this contributes to rapid growth and more abundant fruit bearing.
- There is an opportunity to organize a radical top dressing. And the consumption of fertilizers due to point feed is also minimal.
The economic efficiency of drip irrigation systems has been proven repeatedly even on an industrial scale. In private greenhouses and kitchen gardens the effect will be no less significant: the cost of creating a system can be reduced to a small amount, and all the pluses will remain.

Cons, too, there are, but very few:
- For normal operation requires water filtration, and this is additional costs. The system can also function without filters, but then it is necessary to consider a purge / rinse system to eliminate clogs.
- Droppers over time are clogged and require cleaning or replacement.
- If thin-walled tapes are used, they can be damaged by birds, insects or rodents. There are places of unscheduled water consumption.
- The device requires time and money.
- Periodic maintenance is required - blow the pipes or clean the droppers, check the hose mounting, change the filters.
As you can see, the list of shortcomings is not big, but they are not very serious. This is a really useful thing in the garden, in the garden, the flower bed or.
Components and layout options
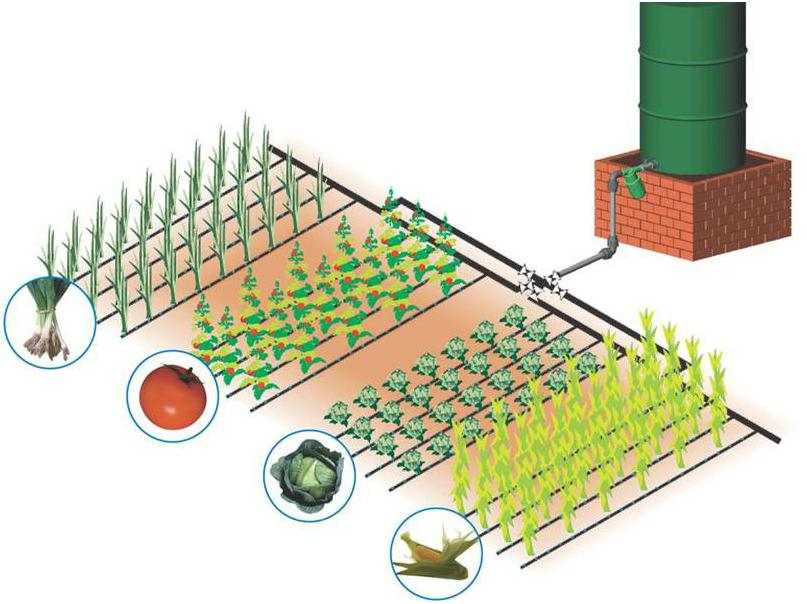
Drip irrigation systems can be arranged by having any source of water. A well, a well, a river, a lake, a centralized water supply, even rain water in the tanks will do. The main thing is to have enough water.
The main pipeline is connected to the source, which brings water to the watering point. Then he goes on one side of the irrigated area, at the end it is drowned out.
In front of the beds, tees are inserted into the pipeline, the drip pipes (pipes) or tapes attached to the lateral terminal. They have special droppers, through which water is fed to plants.

Between the outlet from the source and the first branch to the bed, it is desirable to install a filter or a filter system. They are not needed if the system is powered by a domestic water supply. If you pump water from a lake, a river, a tank with rainwater, filters are mandatory: there can be a lot of pollution and the system will be too often hammered. The types of filters and their number are determined depending on the state of the water.
Drip Hoses
Hoses for drip irrigation sell in coils from 50 to 1000 meters. They already built in water consumption points: labyrinths, through which water flows before it enters the outlet. These sucking hoses provide the same amount of water throughout the entire line, regardless of the terrain. Due to this labyrinth, the flow at any point of irrigation is practically the same.
They differ in the following characteristics:
- Rigidity of the tube. Drip hoses - are hard, they are soft. Soft are called tapes, hard ones are called hoses. Hard can be used up to 10 seasons, soft - up to 3-4. Tapes are:
- Thin-walled - with a wall thickness of 0.1-0.3 mm. They are laid only on the surface, their service life is 1 season.
- Thick-walled tapes have a wall of 0.31-0.81 mm, the service life is up to 3-4 seasons, there is both for ground and underground laying.
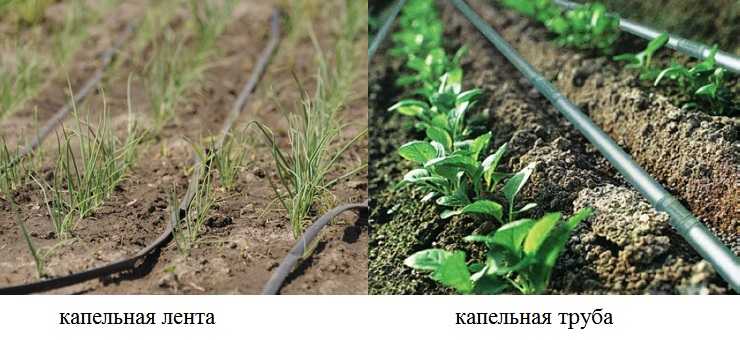
Watering can be organized using tapes or hoses
The maximum length of the irrigation line is determined so that the unevenness of the water outlet at the beginning and at the end of the tape does not exceed 10-15%. For hoses, it can be 1500 meters, for tapes - 600 meters. For private use, such quantities are not required, but it is useful to know)).
Droppers
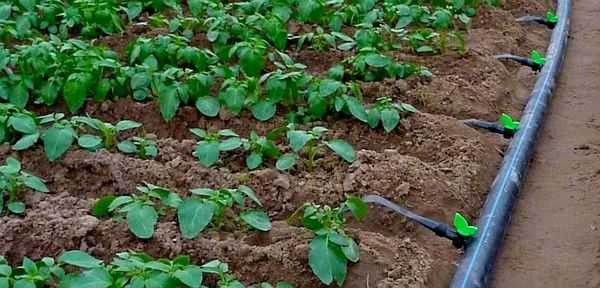
Sometimes it is more convenient not to use tapes, but droppers. These are separate devices that are inserted into the hole in the hose and through which water is supplied under the root of the plant. They can be installed with an arbitrary step - put a few pieces in one place, and then a few in another. This is convenient when a drip irrigation of bushes or trees is organized.

There are two types - with the normalized (constant) and adjustable release of water. The body is usually plastic, on one side there is a fitting that is inserted into the hole made in the hose with force (sometimes rubber rings are used for sealing).
Distinguish still droppers compensated - and not compensated. When using compensated at any point of the irrigation line, the water output will be the same (approximately), regardless of the relief and location (at the beginning or at the end of the line).
There are also devices such as "spider". This is when several thin tubes are connected to one output. This gives the opportunity to simultaneously water several plants from one point of water outlet (the number of droppers decreases).

Dropper type "spider" - you can water from a single point of distribution of water several plants
Trumpets and fittings
When creating a system for laying the main pipeline from the source of water to the irrigation area, use plastic pipes and fittings from:
- polypropylene (PPP);
- polyvinyl chloride (PVC);
- polyethylene:
- high pressure (LDPE);
- low pressure (HDPE).
All these pipes are well tolerated by contact with water, do not corrode, are chemically neutral and do not react to the application of fertilizers. For irrigation of a small greenhouse, vegetable garden, lawn, a diameter of 32 mm is most often used.
Trunk pipes - plastic. Specifically, choose any type: ППР, ПНД, ПВД, ПВХ
In the branch lines, tees are installed, to the side outlet of which a drop hose or tape is connected. Since they are smaller diameter, adapters may be needed, and their outer diameter should be equal to the inner diameter of the hose (or be slightly smaller). Fastening tapes / hoses to fittings is possible using metal clamps.
Also, bends can be made through special fittings, which are installed in the hole in the hose of the required diameter (as in the photo above).
Sometimes after the tee on each line of water distribution put a tap, which allows you to turn off the line. This is convenient if drip irrigation is diluted on plants by moisture-loving ones and those that do not like excess water.
If you are reluctant to choose components and size, the diameter of the fittings, you can buy ready-made from different manufacturers.
Drip irrigation by one's own hands: examples of the device
There are a lot of options for the device of the system - it easily adapts to any conditions. The most common question is how to organize watering independent of electricity. This can be done by installing a sufficiently large water tank at a height of not less than 1.5 meters. This creates a minimum pressure of about 0.2 atm. It is enough to water a small plot of garden or garden.
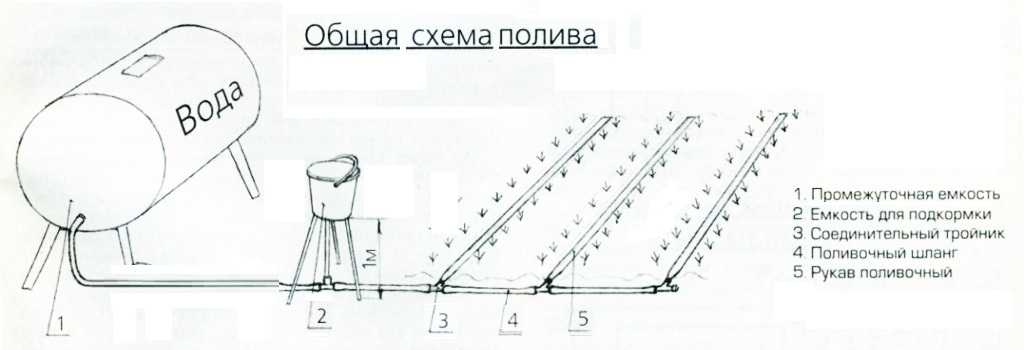
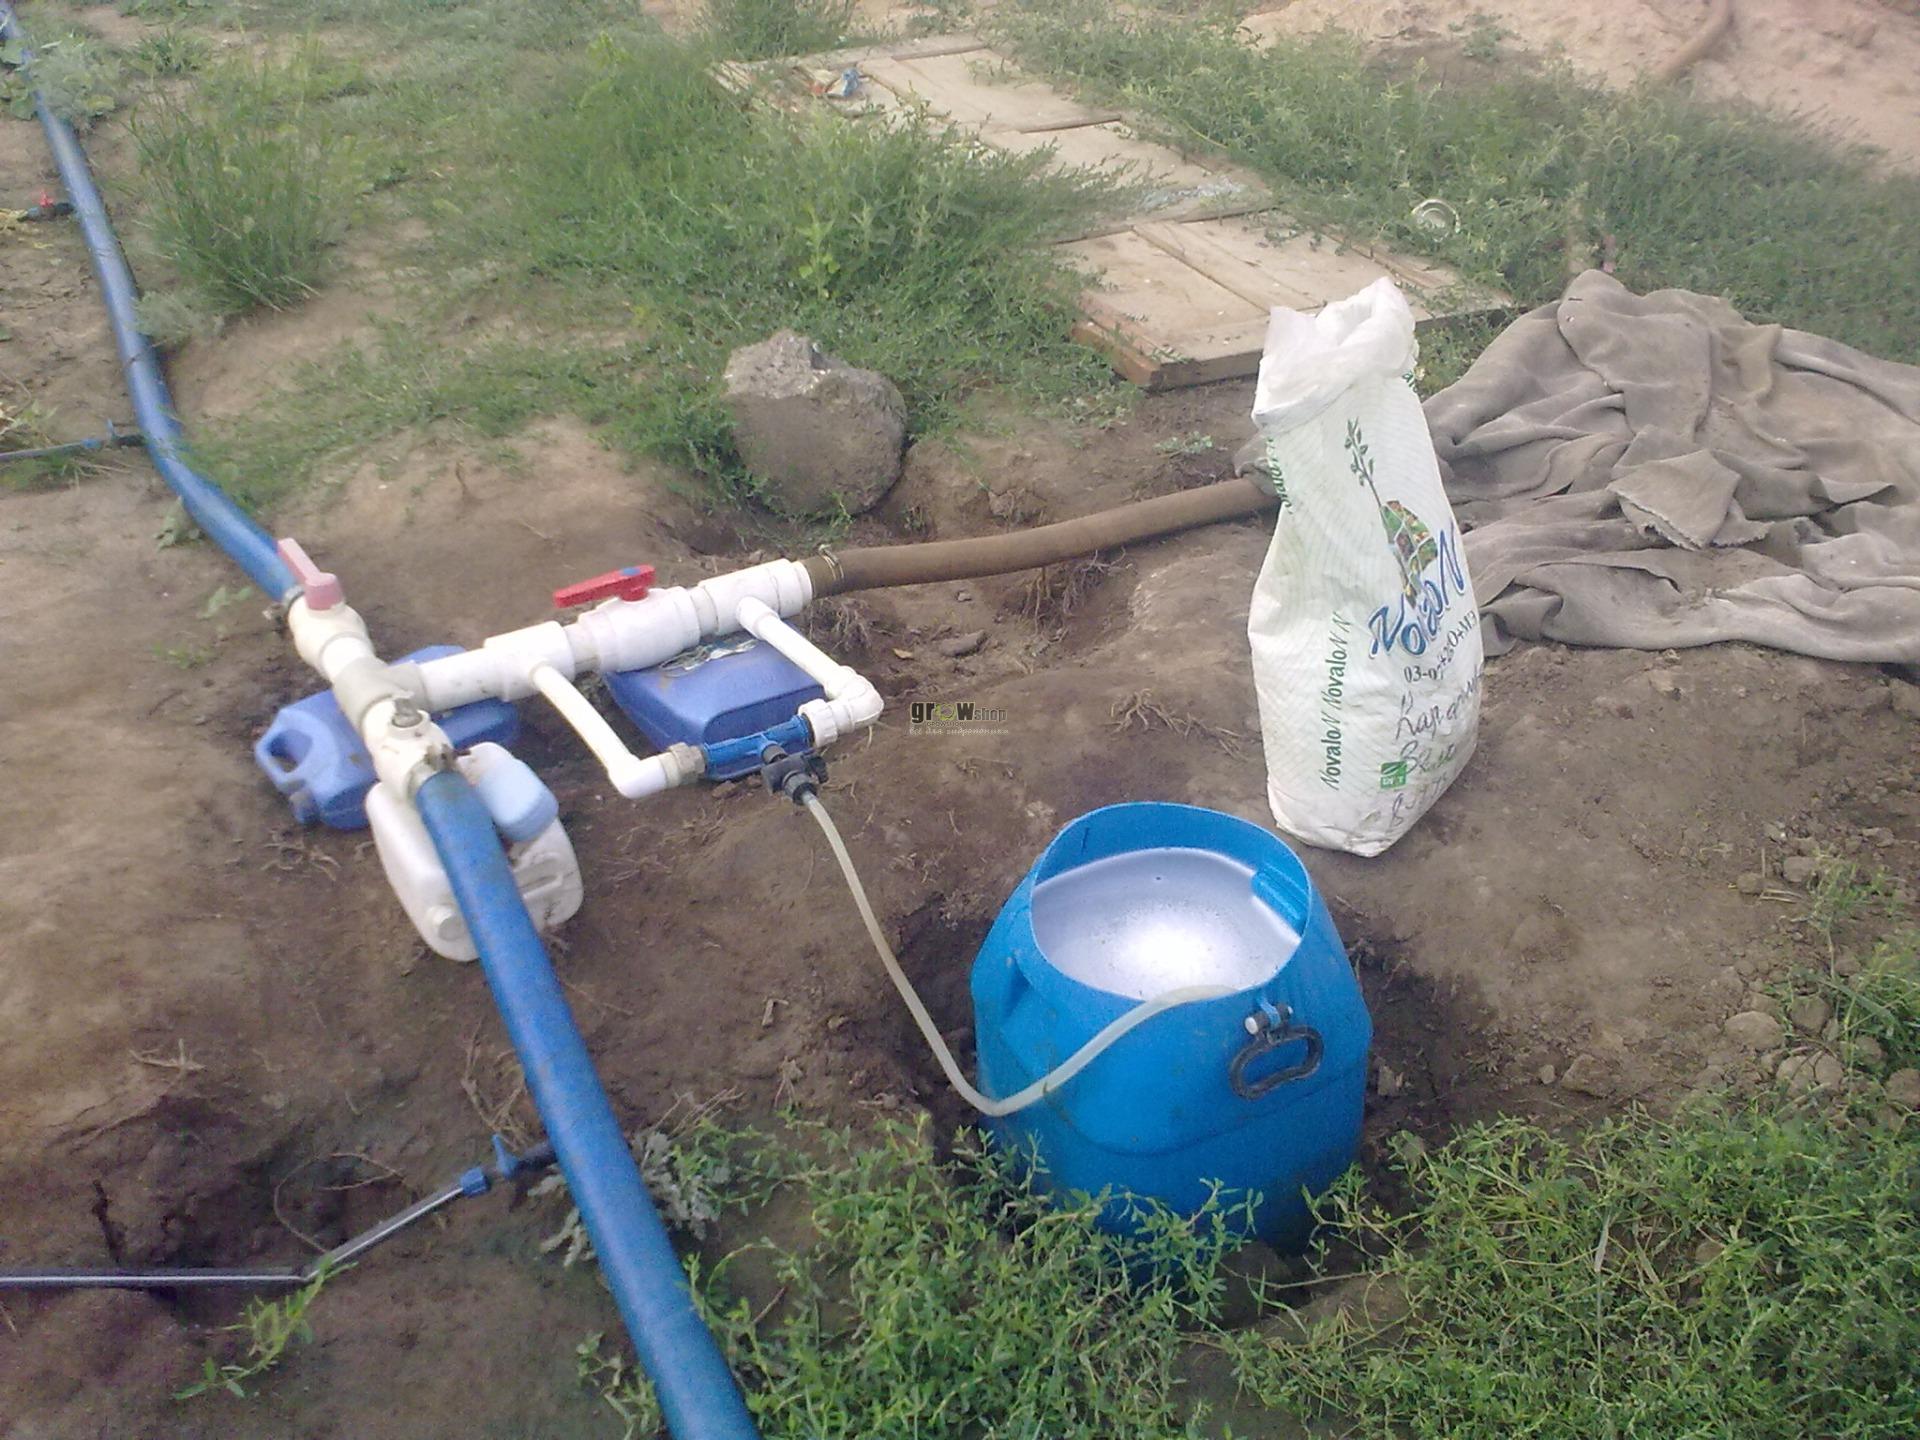
In the tank water can be supplied from the water pipe, pumped, poured from the roof, even poured buckets. In the lower part of the tank make a crane, to which the main pipeline is connected. Then the system is standard: on the pipeline up to the first branch on the irrigation line, a filter (or a cascade of filters) is installed, and then there is a wiring for the beds.
For the convenience of introducing fertilizers on the highway, it is possible to envisage the installation of a special unit. In the simplest case it is, as in the photo above, it can be a container on the legs, in the bottom of which a hole is made, and a hose is inserted. A shut-off valve (tap) is also needed. It is cut into the pipeline through a tee.
If necessary, you can water and shrubs and fruit trees. The difference is that the tape or the hose fit around the trunk at some distance. Each tree is assigned one line, bushes can be poured a few pieces on one line. Only in this case it is necessary to use a conventional hose into which to insert droppers with the necessary water flow.
If the low pressure in the system does not suit you, you can install (on the photo below) on the main water pipe or a full one. They will provide even remote areas with water.
Is it possible to feed water directly from the source? It is possible, but undesirable. And this is not due to technical difficulties - they are not so much, but with the fact that plants cold water do not like. That's why most small-scale drip irrigation systems - for greenhouses, vegetable gardens, orchards and vineyards - use storage tanks. In them, water is heated, and then it is bred on the site.
Drip irrigation: how to calculate the system
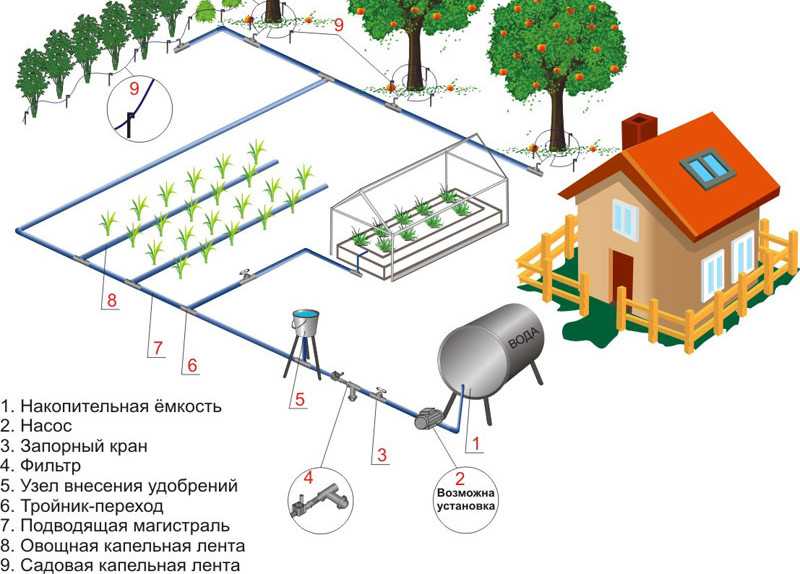
The capacity from which water is supplied from the system can be one - general, as in the picture above, or separate for each site. With a considerable distance between the objects of irrigation, this can be more profitable than pulling the main pipeline.
The necessary volume is calculated depending on the number of plants and the volume of water for their normal development. How much water you need to water the vegetables depends on the climate and the soil. On average, you can take 1 liter per plant, 5 liters per bushes and 10 liters per tree. But this is the same as the "average temperature for the hospital," although for approximate calculations it will work. Count the number of plants, multiply by the consumption per day, all sum up. To the received figure add 20-25% of a stock and the necessary volume of capacity you know.
With the calculation of the length of the trunkline and the drip hoses there are no problems. Backbone - the distance from the crane on the tank to the ground, then along the ground to the place of watering, and there on the front side of the beds. By adding all these lengths, the required length of the main pipeline is obtained. The length of the tubes depends on the length of the beds and whether water is dispensed into one or two rows from one tube (for example, with the aid of droppers-spiders it is possible to dilute water for two or four rows simultaneously).
The number of tubes is determined by the number of tees or nuts and taps (if you put them). For each branch with the use of tees we take three clamps: press the hose to the fitting.
The most difficult and expensive part is filters. If water swings from an open source - a lake or a river - a first coarse filter is necessary - gravel. Then there should be fine filters. Their type and amount depend on the state of the water. When using water from a well or a well, the coarse filter can be omitted: the primary filtration takes place on the suction hose (if used). In general - how many cases, so many decisions, but filters are needed, otherwise droppers will quickly get stuck.
Homemade drip hoses and droppers
One of the most significant items of expenditure for self-made systems from ready-made components - droppers or drip tapes. They, of course, provide the same amount of water all the way through and the consumption is stable, but in small areas it is not so necessary. You can adjust the flow rate and flow rate of the cranes built in at the beginning of the irrigation line. Because there are many ideas that allow you to make the distribution of water for plants using conventional hoses. One of them is in the video.
This system is not easy to call drip irrigation. It is rather a radical irrigation: the water is supplied by a trickle under the root, but it works, it may only be a little worse and more suitable for plants with a root system developed in depth. This method will be good for trees, fruit bushes, grapes. They need a significant amount of water, which must go deep into a decent distance and this homemade drip irrigation system can provide this.
In the second video, a drip irrigation is organized. This is done with the help of medical droppers. If you have the opportunity to stock up such a used material, it will turn out quite cheap.
The amount of water supplied is regulated by the wheel. From one hose it is possible to supply water to three and four rows - if you take a sufficient diameter of the hose, you can connect to it not three devices, but more. The length of the tubes from the droppers completely allows you to water two rows on each side. So the costs really will be small.
Droppers can be used almost without altering. This is in case the system was with a bag. An example is in the photo.
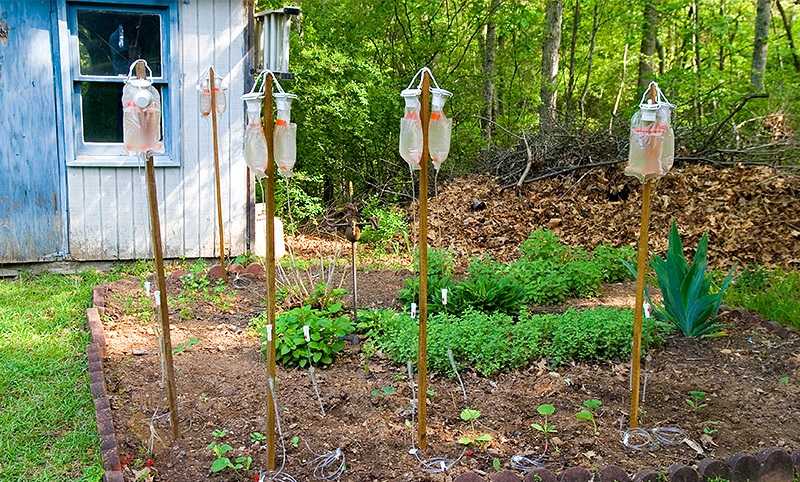
Waste to income - watering for young plants is provided
Almost also it is possible to make drip irrigation for domestic plants. It is suitable for those flowers that like constant moisturizing.
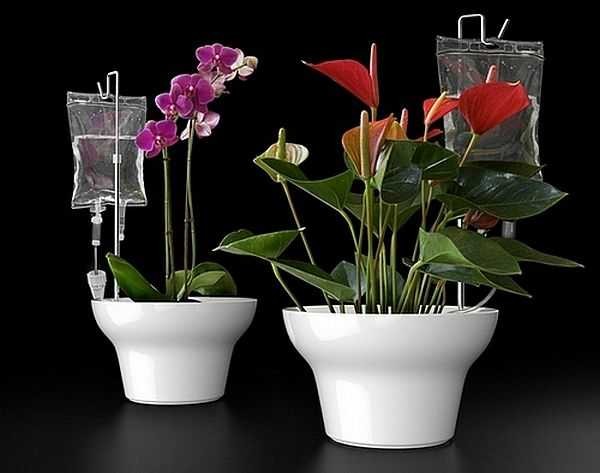
Constant moistening of your flowers on the balcony? Easily! Watering from a dropper
Cheapest drip irrigation: from plastic bottles
There is the cheapest and fastest way to organize water supply to plants without hoses and large tanks. We only need plastic bottles and small lengths - 10-15 cm - thin tubes.
At the bottles you partially cut off the bottom. So, to get the bottom out of the lid. So the water will not evaporate. But you can cut the bottom and completely. At a distance of 7-8 cm from the lid in the bottle, make a hole, into which a thin tube is inserted at a small angle. A bottle should be dug down with a cork or pinned to a peg, and a peg stuck into the ground next to the plant, sending the tube to the root. If there is water in the bottle, she will run down the tube, running down the tube, under the plant.
The same design can be done by turning the bottle upside down. But this option is less convenient: it is more difficult to pour water, you need a watering can. As it looks, look at the picture below.
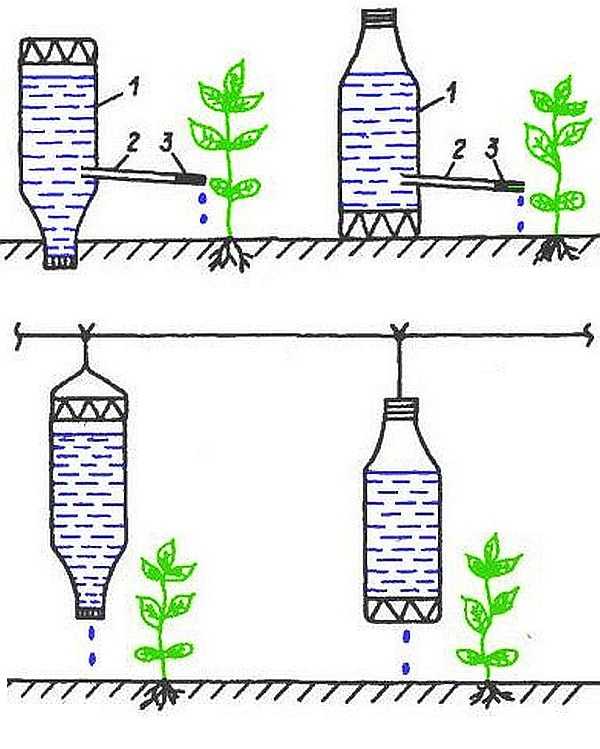
As you can see, there is a second variant of drip irrigation from plastic bottles. A wire is stretched over a bed, bottles in the bottom or a cover of which the holes are made are tied to it.
There is another photo-version of the use of bottles, but with standard droppers for irrigation. They are fixed on the neck of bottles and in this form is installed under the bush.
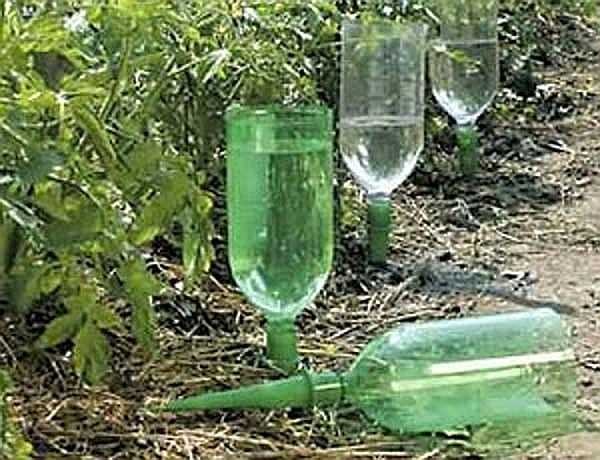
This option, of course, is not ideal, but will enable plants to develop better, if you can rarely visit a dacha. And two liters of a bottle can be decisive in the battle for the harvest.
The main guarantee that suburban area, a vegetable garden or in a garden there will be high harvests of fruit, berries, vegetables and fast growth of colors, it is possible to name safely qualitative watering. Among the popular irrigation options, one of the first places is a drip or point irrigation system. Its main advantages include accessibility and economy.
Drip irrigation: convenient and beautifulPlus, in comparison with traditional methods of irrigation with the use of hoses and sprayers, drip irrigation provides half the water consumption. Note that modern technology allows you to make the water supply system fully automated. To do this, it is sufficient to enter into the program of the water management unit the required time parameters and the water supply period.
It is possible to equip drip irrigation in your own garden with your own hands even without special knowledge. It is only necessary to understand the principle of the construction using the diagrams and photos of this article. Read also:,
Varieties of drip irrigation
There are various systems of drip irrigation, while among several options can be divided into three most popular:
- Droplet hose. The basic component is a pipe with thick walls, most often polyethylene. Such pipes are designed for pressure up to 3 atmospheres, which makes it possible to supply water for hundreds of meters. In the wall of the hose with the same period emitters or droppers are located with the calculation for a specific water flow. As a rule, it ranges from 1 to 2 liters per hour. To install such a system, plastic fitting elements are used. It is also possible to dismantle the structure for the winter season.
- Droplet tape. A flexible tube with thin walls, the thickness of which is 0.12-0.6 mm, is connected directly to the main hose. Its internal diameter in most cases is 16 or 22mm. Installation and installation is performed using fittings and connectors with standard sizes 1/2 and 3/4 inches. Such tapes can reach a length of hundreds of meters and are capable of passing up to 500 liters per hour.
- External micro-droppers with a specific water flow. In their quality, injectors and sprinklers of various models can act. They provide watering in the form of drops or micro-jets. In certain designs, the intensity of irrigation is regulated. The location of the droppers is the outer side of the pipes or on the tubular branches. It is also possible to mount a conventional hose on which you can place in the required places the drippers with self-punched fittings.
Drip irrigation by gravity without a pump
Feeding water under the influence of gravity without a pump is one of the options for drip irrigation. Such a system provides for storage capacity. It can be a conventional barrel or other tank. The accumulator is filled with tap water or from a natural reservoir. Sometimes used rainwater is used.
The peculiarity of the drip irrigation system is that it can be polluted by living organisms and small vegetation of reservoirs and debris.
Thus, water does not come from any water body, and the surface of the tank should be resistant to corrosion and destruction. Barrel of plastic, synthetics or galvanized iron - the most suitable options for water intake tanks. To keep the leaves or garbage in the barrel, it must have a lid.
The dimensions of the barrel depend on the flow of water resources. The volume should be sufficient to provide the necessary watering. According to the norms of consumption, cabbage requires 2.5 liters a day, potatoes - 2 liters, and a bush of tomatoes - 1.5 liters. As a result, the owner of the dacha or garden needs to individually calculate the daily consumption, in accordance with the number of bushes of seedlings and trees. Knowledge of these data is useful when choosing an irrigation system.
 Watering is carried out due to the water pressure in the barrel raised above the ground
 To provide water pressure in the system of 0.1-0.2 atmospheres, the reservoir should be arranged at a height of 1-2 meters above the ground. It is important to monitor the cleanliness of the water coming from the barrel. In order to prevent accumulated debris from entering the hose, the drainage hole should be placed 100 mm above the bottom of the tank. In this construction, a screen or other filter is also needed. The gravity irrigation systems are designed for a small pressure, so only uncompensated droppers are suitable for them, since the compensated ones maintain the pressure of the water flow constant at excess pressure.
If you plan to use herbicides and fertilizers, it is worthwhile to provide in the system a separate node of fertigation for the dilution of liquid forms of preparations. After each procedure, the irrigation system requires cleaning. This requires that the system, filled with clean water, worked for several minutes. The filter also needs periodic cleaning. It must be done weekly.
Rules for installation and maintenance of the drip irrigation system

The assembly of the irrigation system in the country or homestead should be done in a certain sequence, observing a number of simple rules:
- Begin to assemble the irrigation system from the water intake unit. The power can be supplied from a water pipe, pond, well, well or special reservoir. When installing the water tank, a tap with an external thread and a tap with an internal 3/4 inch thread will be required.
- If impurities and large particles are present in water, a screen or disk filter should be provided.
- The mixing unit is then installed. It saturates the water with chemicals and fertilizers or feeds nutrients. The node of fertigation is a reservoir where the dilution of the corresponding preparations takes place, which is connected to the irrigation system by means of a tube with a dispenser in the necessary place.
- For the construction of the main pipeline, plastic pipes of HDPE with a diameter starting from 32 mm or polypropylene pipes are used. In principle, any pipes that meet the requirements of the system are suitable.
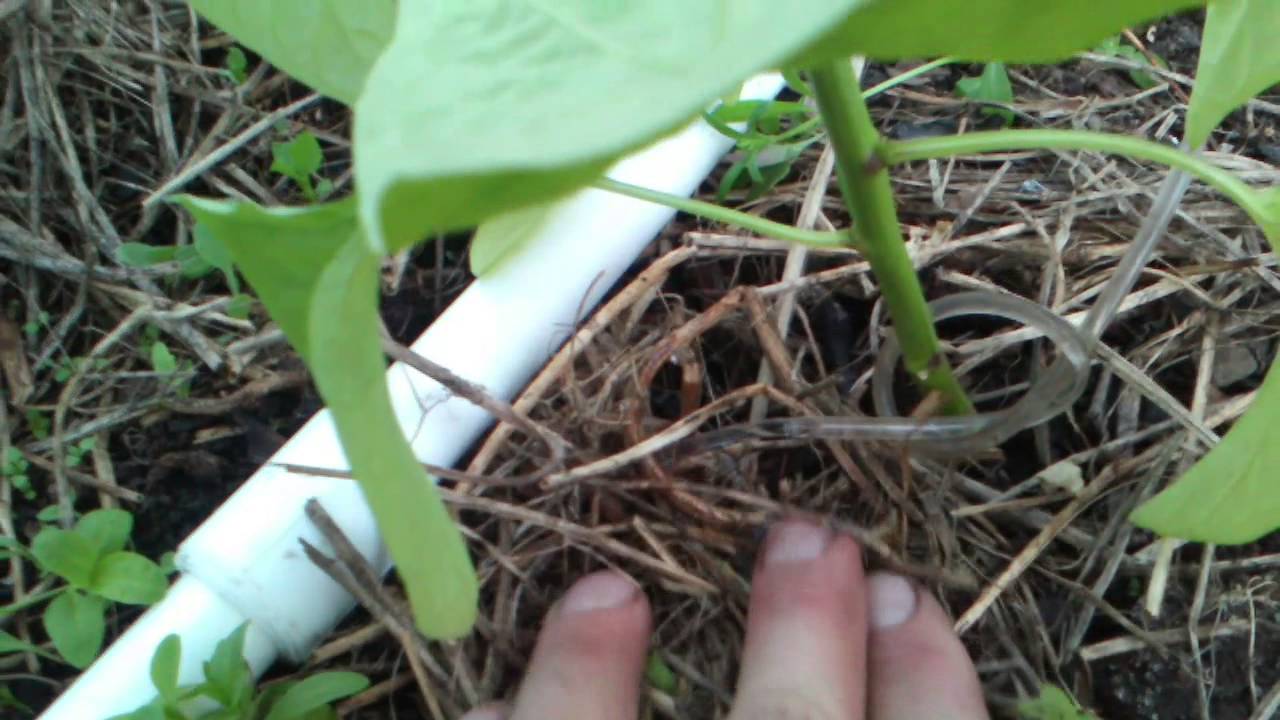
- The next stage is the installation of the distribution network. Microtubes or watering drip tapes are laid out in irrigated areas.
During the installation, fittings are required: connectors and fittings, tees and corners.
 Fertilizer application in drip irrigation system
 Creating a system of drip irrigation with their own hands, it is worth considering some of the nuances:
- Route the main pipe at an angle of 90 degrees to the rows of beds. This will make it convenient to connect the branches.
- Avoid contamination of the irrigation system will help the plug installed on the end of the pipe of the pipeline itself. It must be removed in the process of cleaning the irrigation line.
- Drilling holes in the pipe band construction, the first need to wind start - the corrector, which is tightly put on the tape. The tape itself must be damped at the opposite end to achieve tightness and to be able to rinse and purge its clogged areas. This can be done by using a 1cm-wide ring, which is cut off from the ribbon and which lies flat on its tucked end.
Use of polypropylene pipes
Nothing prevents to build drip irrigation with their own hands made of polypropylene pipes. This variant of drip irrigation from plastic pipes has a mass of merits. These pipes are strong, elastic and characterized by low density. Polypropylene pipes are sufficiently resistant to hydraulic shocks and temperature changes.
Modern additives allow the walls of polypropylene pipes to remain unscathed under the influence of ultraviolet rays. The pipe is not damaged if the system has frozen water, except for its full filling. In addition, the device for drip irrigation from polypropylene pipes will cost cheaper than from HDPE, since the cost of components for welding is lower than the prefabricated structures on the thread.
 Scheme of drip irrigation from polypropylene pipes
 Pipes from of this material suitable for creating a main pipeline and for a distribution network with droppers. In the latter case, holes can be drilled in the right places. Diameter is selected in practice with a fully assembled system.
Of course, when working with plastic pipes, there are some disadvantages:
- Use of a special soldering iron.
- The system can not be dismantled for the winter period or for cleaning.
- In comparison with HDPE, polypropylene pipes have less resistance to freezing of water in the structure. For this reason, the entire system before the winter must be purged with a compressor.
Varieties of drip bands
Since we have started to build drip irrigation with our own hands in the country or vegetable garden, it is necessary to choose the right irrigation tape. The choice of the type of tape device is determined by the specific conditions on your site. There are three main types of tapes:
- with a labyrinth;
- slot type;
- emitter.
 Type of drip tape indicated on the marking
 In the first case on the surface of the tube there is a built-in element - a labyrinth. This structural feature allows you to slow the water flow in the ribbon barrel and streamline the flow of water through the holes. Unfortunately, the external location of the maze leads to the fact that during the laying of the tape there is a great danger of damaging it.
The holes in the slit-type tapes for flowing water are made with a laser with an interval of 20 to 100 cm. Inside along its entire length a labyrinth is built in order to prevent the turbulence of water movement. The tape should be installed with a maze up. This promotes a uniform outlet of water through the holes. This is the easiest option to organize watering, which does not require significant expenses. The only thing to remember when choosing a slot type is the need for high-quality filtering.
A distinctive feature of the emitter form is the presence of additional openings built in by flat droppers that face inwards. The point is that the droppers are located on the inner, rather than the outer surface of the wall, as a result of which a turbulent movement of water arises inside the belt. Thanks to it, self-cleaning of the droppers takes place.
Also, when choosing a tape, the thickness of the wall is important. If you plan to lay under the ground, then the thickness of the tape should be 0.2 mm. In the case of arrangement of drip irrigation, a tube with a smaller wall thickness will fit on the surface of the earth.
Self-mounting drip system
Below is a diagram of how, at home, to collect drip irrigation on the backyard independently. An example is the equipping of a 150m2 plot with 10 rows of planted strawberries, the length of which is 12 meters.
For a homemade system, a drip strip 110-140 m in length is required. When emitters are placed or perforated through 30cm, the system capacity will be about 4 liters per hour. The estimated pressure without using the pump is 0.1 atmosphere, for maintenance of which the irrigation system tank should be placed 1 meter above the ground. It is not possible to create a water pressure of 1 atmosphere, since in this case it would be necessary to raise the reservoir of water to a height of ten meters. As a result of insufficient pressure, the throughput drops three times - to 1.3 liters per hour. As a result, the irrigation time is tripled.
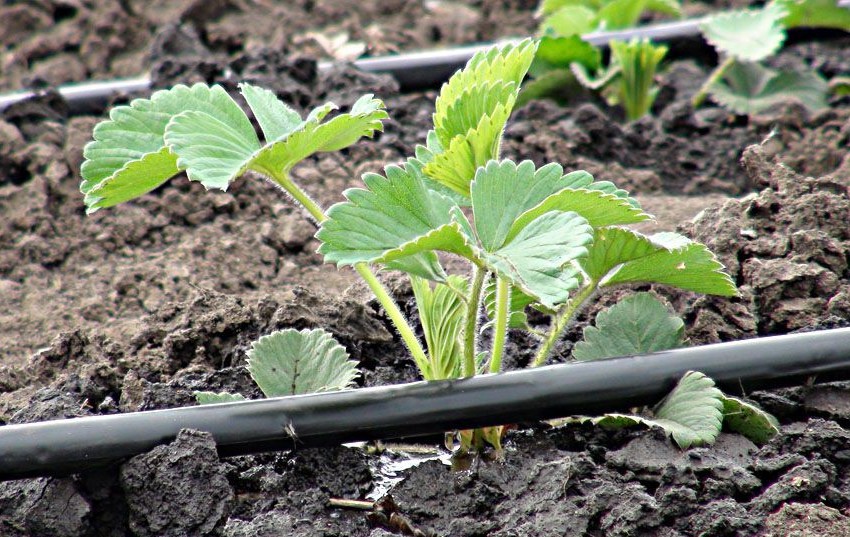 Drip irrigation strawberries - the right solution
 A sequential scheme of actions to create own hands drip irrigation:
- Connect the tap to the tank connection, then put the filter.
- With the help of a coupling, a distribution pipe is connected and laid perpendicular to the beds for irrigation. If the area is less than 300m2, a 32mm pipe will do. The pipe itself should be laid parallel to the horizon, and irrigation tapes - with a slope. The end of the pipe on the opposite side of the section must be closed with a removable plug or a valve to facilitate preventive washing.
- In front of the strawberry beds, you need to drill a pipe, screw the fittings with gaskets or install cranes. The latter will ensure a separate shutdown of each tap of irrigation if necessary. Also it is possible to connect pipes, which are initially equipped with start-connectors.
- Along the entire garden of strawberries lay emitter strips. One end of the tube should be worn on the union, and the other end.
- When using a common dropper for watering several bushes, you should attach to it mini-fittings in the form of tubules and lay them near the roots of the plantations.
Example of installation of drip irrigation from the central water supply system
 This capacity is enough for a long time
 Before arranging the drip irrigation from the central water supply network, you should choose the way in which the construction will be connected to the water supply. A direct connection to the valve or connection via a storage tank is possible.
Pressure in the municipal water supply is 4 atmospheres, but taking into account its jumps and water hammering, this figure can vary from 2 to 7.5. Considering the fact that tapes with low working pressure (about 0.2-1.5 atmospheres) are usually used for drip irrigation, in order to avoid a system rupture due to a strong water pressure, a reducer is placed between the tap and the central pipe, which lowers the pressure.
Another way to lower the pressure to the desired numbers is to use a storage tank that has a bypass valve. It is filled with water to a specific level, which controls the valve, regulating the supply of water. From there, water enters the system by gravity through the nozzle to the bottom of the tank. In the case of creating a self-irrigation system, a standard valve from the toilet bowl can be used as a bypass valve.
 Filter in drip irrigation is necessary element systems
 Step-by-step instruction one of simple options laying drip irrigation in the country or vegetable garden:
- Collecting the filter node. It consists of 2 filters, namely: a filter-sludge filter and a filter for fine cleaning. Between each other the filters are connected by a coupling, the connectors are wound on them, after which the entire assembly joins the main hose.
- Along the central path is laid a hose with a diameter of 20mm. Near all the beds it must be cut, so a sequence of individual segments is formed.
- The resulting pieces of hose must be connected among themselves via tees with a single output of 15mm for further wiring.
- To the tees, drip bands are attached, which can be fixed with metal clamps. Loose ribbon ends must be tightened and secured with plastic clips, and the hose must be connected using adapter 20-15.
Installation of a drop system using a pump
The pump can be used in the drip irrigation system either to fill the irrigation tank or to increase the pressure in the system itself. In the first case, the scheme of operation is almost the same as that for watering. This will require a water level sensor in the tank, which will shut off the pump as it is being filled.
The sensor can be made by hand by connecting the limit switch to the valve from the toilet bowl. However, the pump will not turn on and off at the same time as a result of a "rattling" of the switch contacts, which could cause the pump to malfunction. The control scheme will have to be supplemented with a timer that is sold in the electrical goods store. All questions are solved simply if you purchase the finished pumping station.
 In the absence of a water pipe irrigation is organized by means of a pump
 Organization of automatic drip irrigation
Drip irrigation is inherently automatic, since it supplies water in a certain amount for a certain period. If the source of water is the capacity, then at the expense of the entire stock, irrigation will end automatically. If you want to improve the process, you can install a valve with a mechanical or electronic timer. Thus, the water supply is turned off and turned on at the set time.
The presence of a microcontroller makes it possible to program the flow of water according to a specified scheme. Thus, the owner can be absent for a long time without fear for the fate of vegetation on his plot. The systems are more expensive to include a soil moisture sensor, which helps to adjust the irrigation program, based on weather conditions. In detail about the system of auto-watering we tell the article:
I inherited a small piece of land (about 1.5 hundred parts). The family council decided to plant it with currants. Given that the soil is very dry, and there are one and two-year-old bushes and seedlings on the site, I decided to make my own hands drip system glaze. For irrigation bushes decided to use hoses for branching, and for seedlings a drip hose.
The site itself, with the system of irrigation, is depicted in a simple diagram below.
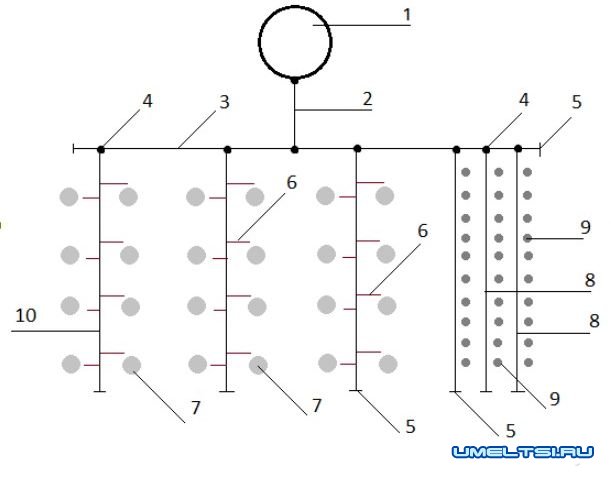
What would I need to make a drip irrigation system with my own hands:
1. The storage capacity;
2. Trunk pipe;
3. 4 pcs. distribution pipes.
4. Ball valve;
5. The final plug of the PVC pipe;
6. A droplet (a tube from the adjustable dropper);
7. Droplet hose;
8. Branching system (PVC pipe).
How did drip irrigation with their own hands made of polypropylene pipes
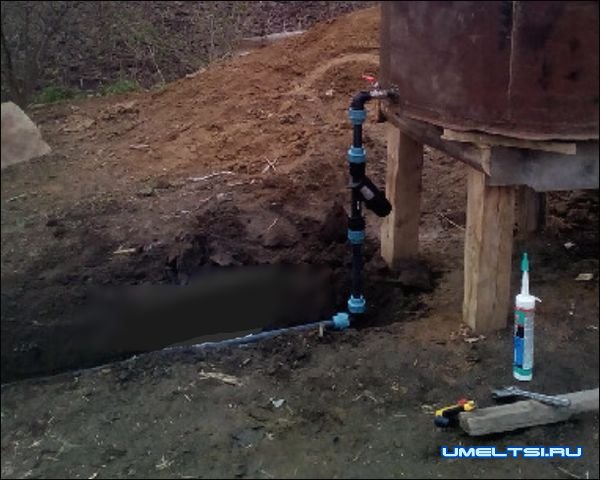
A large, metal barrel (in our cases it is a storage tank) is installed on any level, to create pressure without which water supply will not be possible.
The water in the barrel will be both rainwater, and fed from the well, this requires a water tap and a water filter.
First of all, we lay the main pipe (diameter 32mm) whose function will be to supply water to the distribution pipes.
The distribution pipe is a PVC pipe, which lies over the entire radius of the section to which ball valves are attached, and already to them we attach the branches of the system and the drop hose.

Using a screwdriver, drill holes for the installation of cranes.
We attach the ball valve to the distribution pipe, and from it the branching of the system (PVC pipe with a diameter of 25 mm) and a drip hose or as it is called a drip irrigation belt (25 mm in diameter with cuts 1 cm long at a distance of 10 cm from each other)
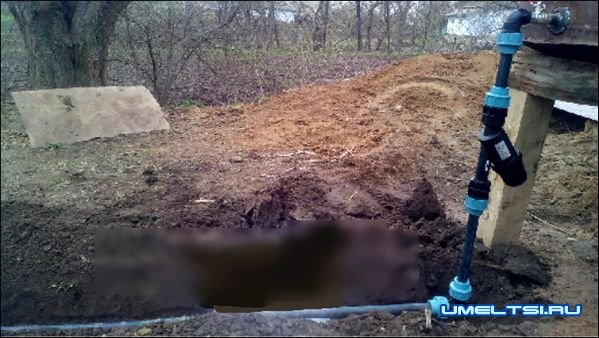
Some clarifications about self-made drip irrigation on the site.
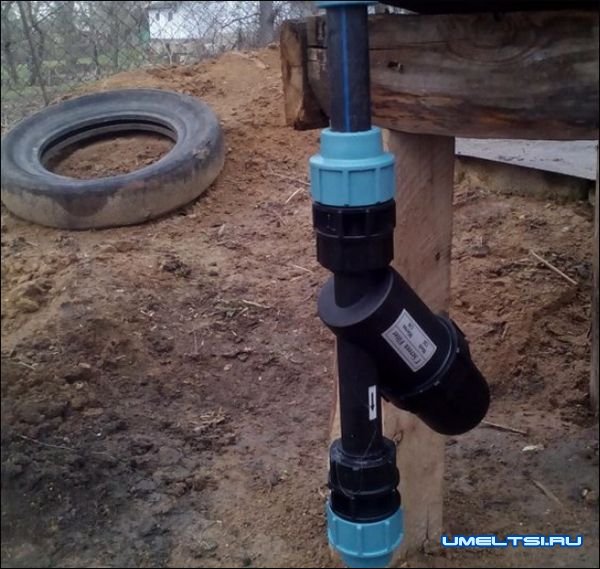
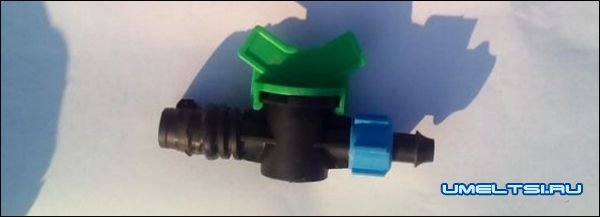
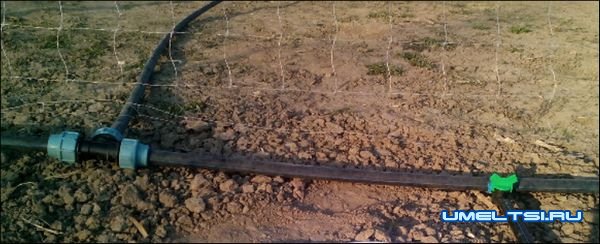
This is how the branch pipe is connected to the tap attached to the distribution pipe.
Final stubs on pVC pipes it is not necessary to fasten "tightly", if necessary they can be removed and connected to other pipes. (even in cases of expansion of the irrigation site).

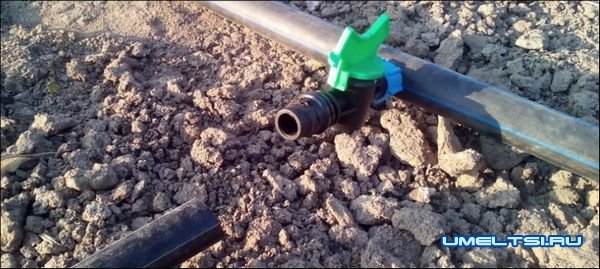
This is the kind in already fixed cranes on the distribution pipe.
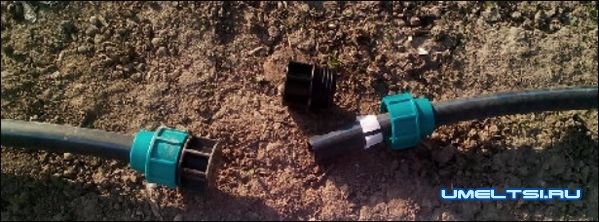
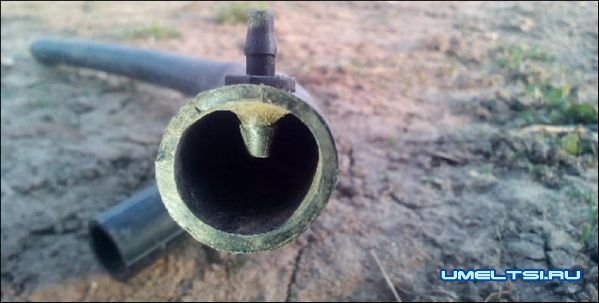
In the photo: a tee-adapter from the main pipe to the distribution pipe.
As you have already understood, the trunk pipe is connected with the distributor by means of a tee. Here, too, a branch pipe

A capillary tube 4 mm in diameter is attached to one side of the branch pipe using a fitting, and to the other edge we attach a regulating dropper.
In the photo, an example of attaching a drip tape to a distribution pipe.
![]()
A branch hose with all accessories.
With the help of my photos, you can easily make drip irrigation with your own hands made of polypropylene pipes.