In the summer, most people spend their free time in a country housewhere there is a cozy, warm and you can relax from the city bustle. Today it's very fashionable to equip the villa site on your own, but how to build a gazebo with your own hands is simple and quick, we'll take a closer look.
Before proceeding with the construction of the structure, it is necessary first to choose a suitable place and determine the material, that is, from which it will be made.
Summer bower are of the following types:
- Of brick.
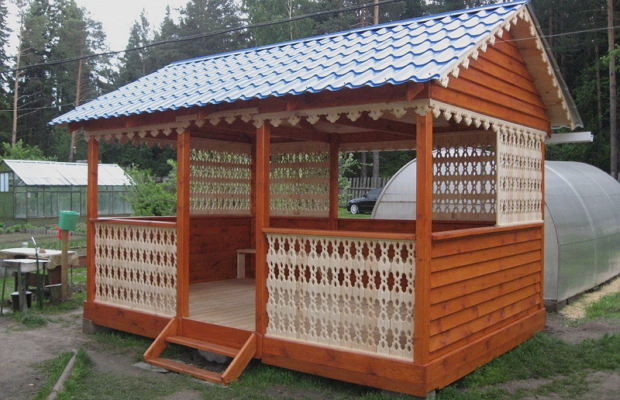
- Wooden.
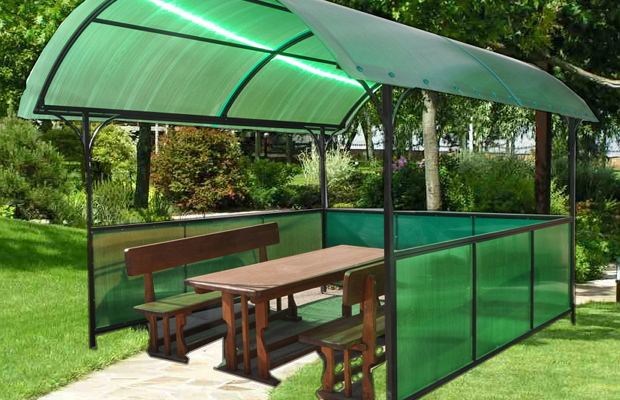
- Of polycarbonate.
- Metal (see).
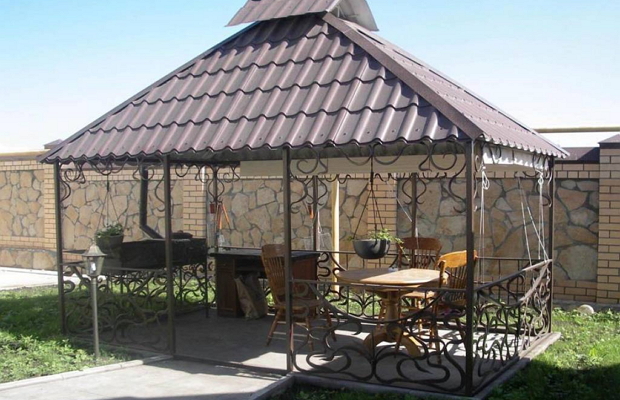
- Forged.
- Rectangular.
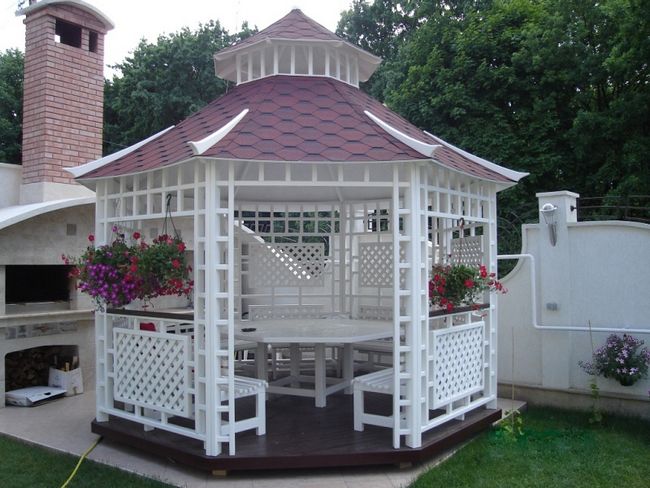
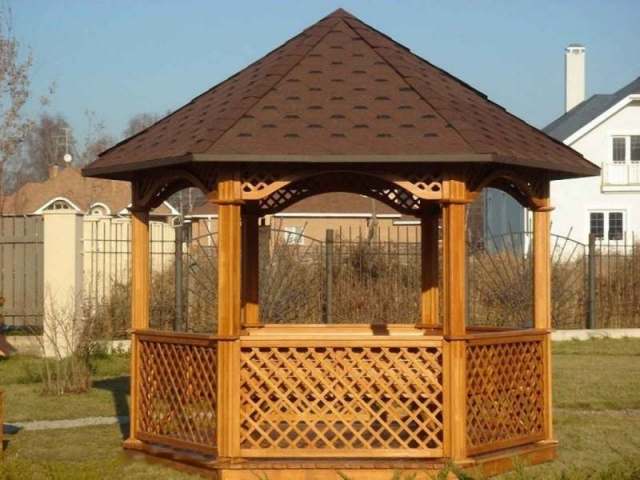
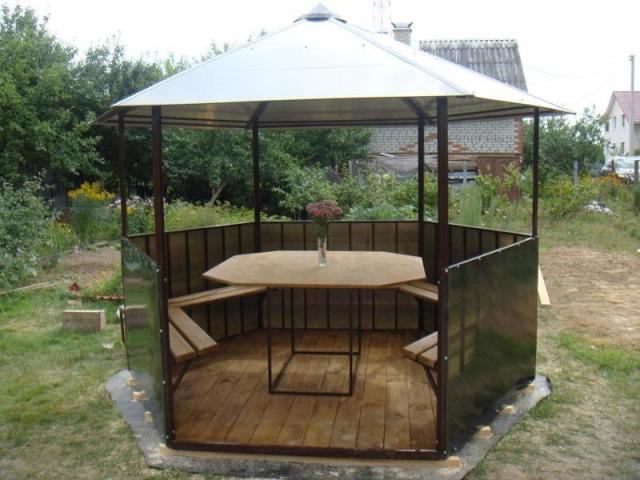
- Hexagonal (see).

First of all, you need to see how to build a simple gazebo with your own hands video, where every stage is described in detail. This will allow you not to lose sight of important points during construction.
Description of pavilions of different materials:
|
|
The most simple gazebo with your own hands:
|
|
|
They are the most durable and reliable, but it will take more time to build such a structure:
|
|
|
This is the simplest construction that you can do yourself:
|
|
|
To build such a design, you will need tools such as:
|
|
|
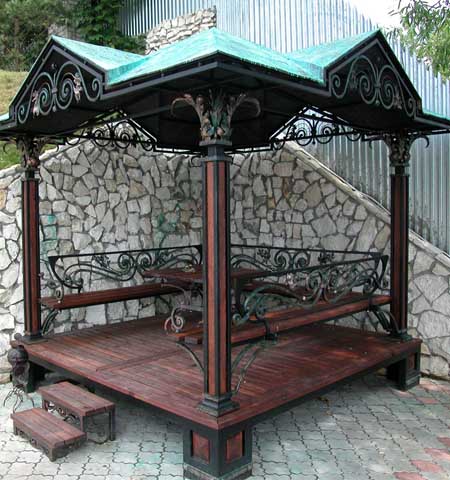
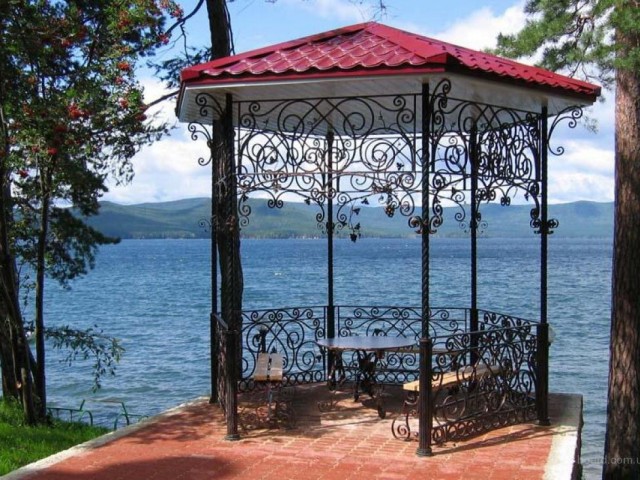
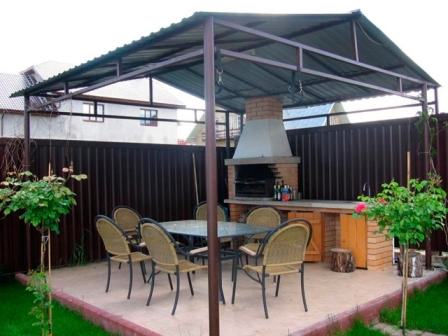
From metal gazebos, they differ in complexity and speed of installation. These are the most beautiful and decorative structures, but they are very expensive. |
|
|
Drawings should be clear and without any flaws, the quality of the structure will depend on this. |
|
|
It is very easy to build it, because it has the right forms. It can be made as a summer (see), and winter. Material for building construction can be used by anyone, but most of all they are made of wood, metal, brick. |


Self-erecting the structure will allow you to significantly save your funds, in addition, it is very interesting and exciting.
Main stages of construction
Enough desire, patience, a little imagination and creativity.
Stages of erection:
- Stage 1: Layout. First of all, you need to choose the type of pavilion and the material from which it will be made.
- Stage 2: choice of location. After planning, you need to choose a suitable place for construction. This stage should be taken very responsibly.
Council. Requirements in the choice of location - is the presence of soil, communication, plantations, the size of the area and a uniform surface.
- Stage 3: foundation installation. The choice of the foundation will depend on the type of gazebo. Also consider the size and weight of the structure, shape and materials used.
- Stage 4: Erection of the base and frame. The installation of the base is carried out strictly according to the design.
Council. After installation, make sure that the frame and foundation are well fixed. This must be done before installing the roof of the gazebo.
- Stage 5: installation of the roof. Raw material for the roof is selected depending on the type of construction. It must be strong and reliable. For a wooden and metal frame, the roof will be made of metal tiles or corrugated board (see).
These are the main stages of construction of the structure. Next, you need to equip the inside and outside of the arbor.
General principles and rules for the construction of arbors

- With the help of a special program you can calculate the consumption of all materials used, as well as what tools will be needed during construction work.
- Do not forget to indicate in the estimate all the necessary materials, including decorating and equipping the gazebo.
Council. When creating a gazebo project with your own hands, make sure that its size will allow you to accommodate sufficient number guests. And also a place for barbecue, stove and other household items.
Basic rules and instructions:
- The site for the construction of the gazebo should be selected in a place protected from the wind, preferably in the shade.
- The building must fit organically into the landscape of your country house.
Council. Although it is considered that this is an easy structure, it is better to make it stationary, but not collapsible.
- Before installing the foundation, remove the upper black layer of the soil. The depth of the foundation must not be above the freezing level of the soil, otherwise after the thawing, a displacement of the columns may occur.
- To secure the bottom strapping band, it is best to use a wooden beam made of softwood.
- The frame of the structure can be made of various materials. The main thing is that it must be strong and reliable to keep the load from the roof. Take into account that in winter it will have an additional load due to snow.

- For walls, it is possible to use enclosing structures or decorate them with flowers.
- The floor of the gazebo can be laid with small-piece or ceramic tiles.
- The lighting of the room should be carried out according to all requirements and electrical safety rules.
How to choose the right material

Gazebo with its own hands a simple construction - from metal. Metal pipes are very durable and stable, they can hold even the most difficult and heavy roof construction. But for their installation it is necessary to have welding machine.
Note. The frame of the object can be built from sawn timber, they are very easy to machine and long serve. However, the best material is a tree, besides it is inexpensive.
The simplest gazebos with their own hands are built of bricks:
- At first, it will serve both in summer and in the winter season.
- Secondly, such a gazebo is very long.
- Thirdly, reliability and protection from bad weather and other external factors.
Arbor 3 * 3 with their own hands is built from a foam block. They are inexpensive, but they have great advantages: large and practical. Materials from the foam block have only one, but a significant drawback - a small hydrophobicity, so this structure requires additional plastering.
Decoration of the arbor, the creation of comfort and comfort
A simple gazebo with your own hands is not only the erection and construction of a structure, but also the creation of comfort and comfort
This is done with the help of certain objects and elements of the interior:
- Table.
- Chairs and benches.
- Shelves and curbstones.
- The oven (see).
- B-B-Q.
- Barbecue.
Note. The most important thing is to equip it with communications and pick up beautiful furniture. Gazebo simple with their own hands is almost ready, it remains to finish the last: decorate it and decorate.
There are many ways to decorate the gazebo:
- You can cover with varnish and decorate the walls.
- Before building, plant flowers, and decorate the interior with napkins, tablecloth and curtains.
- Decorate the gazebo can be any improvised items and interior elements, which can also be created independently.
To decorate and decorate any suitable and unusual items, for example, a case from a guitar, an old umbrella, everything that your imagination and imagination will tell you will do.
Arrangement of the territory in front of the gazebo
Even the simplest gazebo with your own hands will require a lot of energy and energy from you to erect it. But one of the important moments is the arrangement of the territory before the construction.
It can be:
- Pathways.
- Pond.
- Landscape design.
Note. The main thing is that all elements are made in one style and complement each other.
If the gazebos with their own hands are simple - these are constructions made of wood materials, then the paths can be made from small stones. But the best way is to cover it paving slabs, as shown in the photo.

A few tips on how to arrange a gazebo with your own hands:
- Plant creepers, for example, clematis and climbing roses. They braid the design and fill the space with the inviting scent of flowers. Thus, creating an atmosphere of mystery, in addition, and effectively look.
- Install outdoor fireplaces or stove.
- At night, lighting can be installed lamps or special luminous stones.
- All items suburban area, such as a gazebo, paths, pond, bridge, must be executed in one style.
- Gazebo dacha with their own hands, the simplest best looks at an open level ground. Especially if you want to build a nearby oven and BBQ.
As you can see, you can build an arbor independently, you can. The main thing is desire, patience, zeal and a little imagination. And in order to help, we recommend you to watch the video in this article for more detailed information.
Before you start any construction, you need to prepare project documentation for it. The construction of a gazebo with your own hands at the dacha is no exception, it also requires schemes, sizes, sketches, which in the complex will provide a complete picture of the future structure.
You will understand what materials are needed for construction, and also where and how certain structural elements will be placed. Most importantly, it will be possible to make estimates in order to avoid unnecessary costs.

Summerhouses - it's simple and beautiful
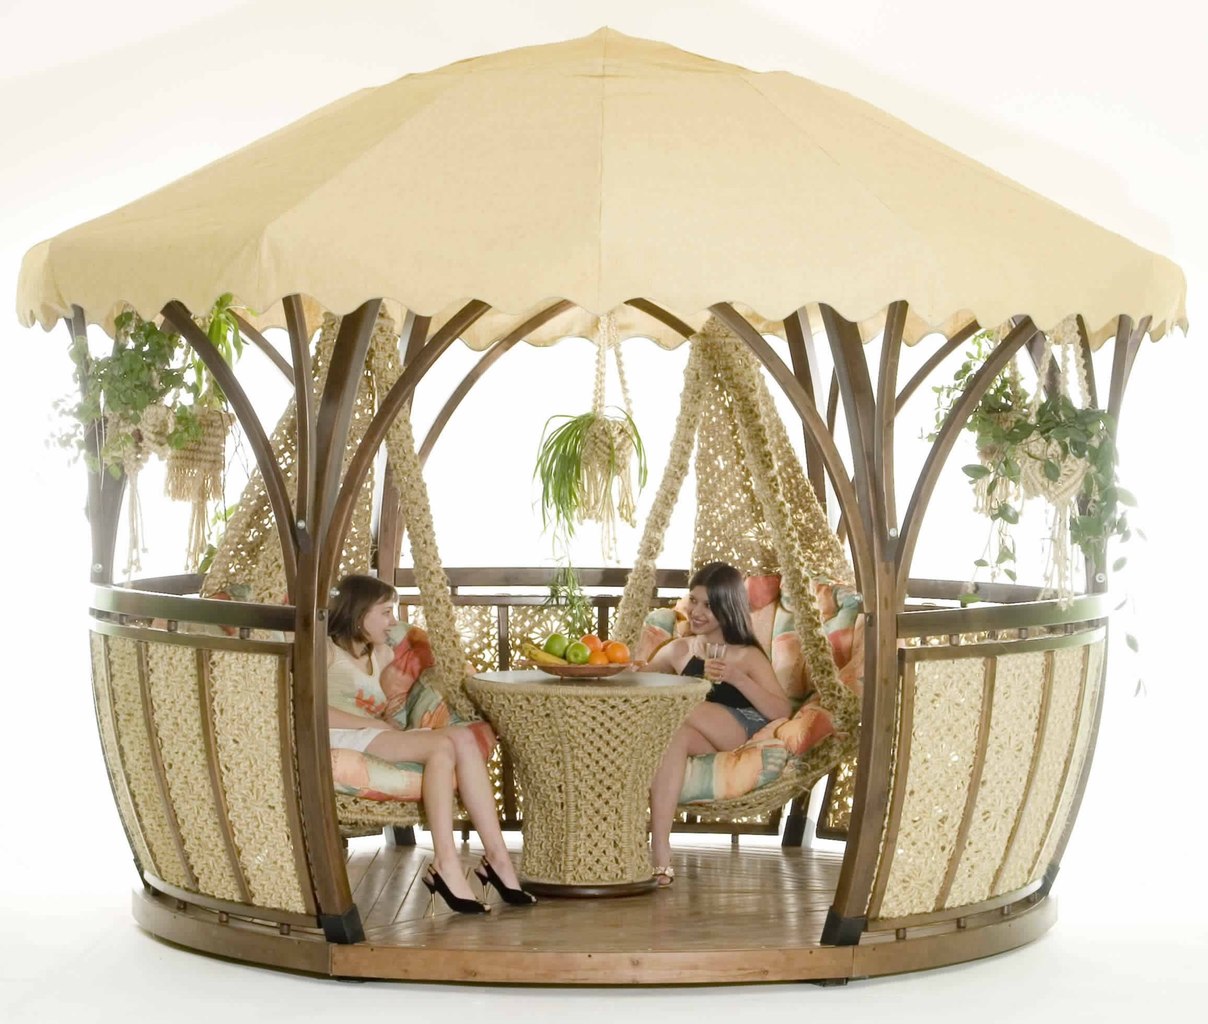
To date, a lot of modern construction and finishing materials. Consequently, there is an opportunity to move away from the use of the usual building materials and create unique designs of pavilions with their own hands. In the understanding of many people, the gazebo is simply a place where you can relax. Indeed, this is so. But now in the arbors there are kitchens, couches, swings and even barbecues.
Due to the fact that modern building materials are light and elegant, you can collect gazebos on your own. Complexity is determined only by one's own ideas. On the Internet you can find a huge number of photos that inspire you to create on your site a unique gazebo:
Design of summerhouses in the country, photo:
Portable construction
If we take into account the different characteristics of the arbors, we can conditionally divide these structures into groups. So, there are:
- open pavilions (simple in construction, used mainly in summer),
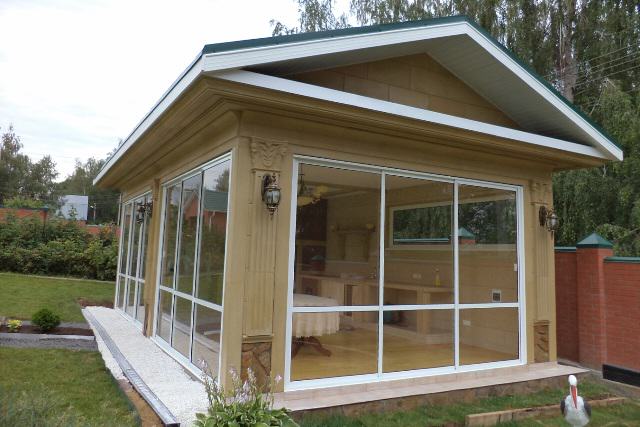
- closed gazebos (construction with walls, windows and doors),
- portable arbor (it is dismantled and collected easily).
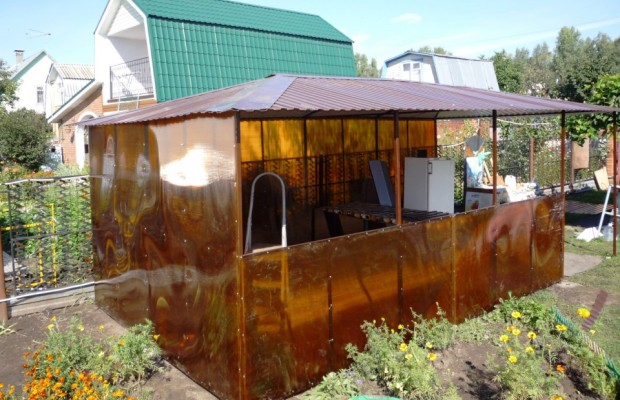
There is a huge variety of building materials that can be used for building gazebos by our own hands. So, we use wooden, metal, glass and plastic objects. In addition, the stone is actively used. Popular in recent years have become gazebos made of stone. Here, even raw materials that nobody uses at all can go into the course: plastic bottles, pallets, trees, and others. It all depends on what kind of fantasy the owner has.
A gazebo drawing for a small plot
As for the size of the future gazebo, everything is determined by the area of the site itself. If the area is not much, then the arbor should not be created very large. The configuration is square, rectangular, round, in the form of a hexagon, an octagon. Sometimes they create pavilions in the shape of an oval.
Advice! If, for the first time, you create a pavilion with your own hands, then it is necessary to use photographs, drawings, and advice from specialists. All information can be found on the Internet. This will avoid mistakes in the future.
As a roofing material for gazebos choose slate, corrugated board, flexible tile, cellular or solid polycarbonate. If you consider that many of these materials are very plastic, you can do not only single-deck, but multi-slope, as well as spherical, arched, dome and other forms of roofs. Common are gazebos, in which as a roof - curly green plants.
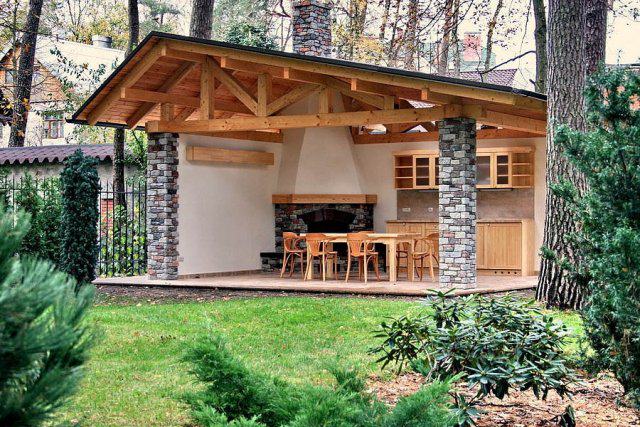
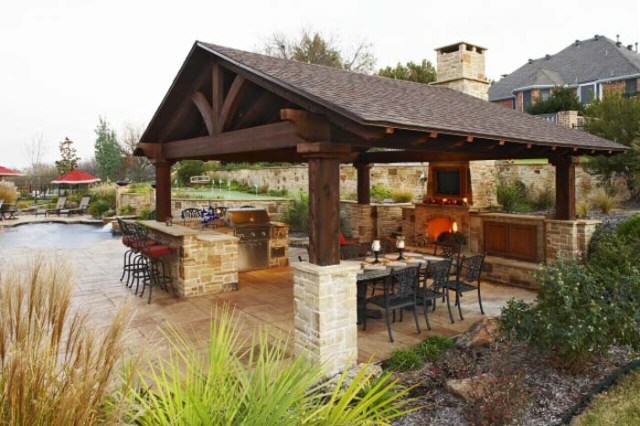
Especially popular today are gazebos, which equip summer kitchens. There also built in barbecues, fireplaces or barbecue. Remember that you will need to meet certain requirements to create such structures. And again: it is necessary to have drawings, sketches and designs not only of the entire gazebo, but also of a stove, a fireplace, for example. This will allow you to unerringly cope with the work, as well as spend a minimum of funds.
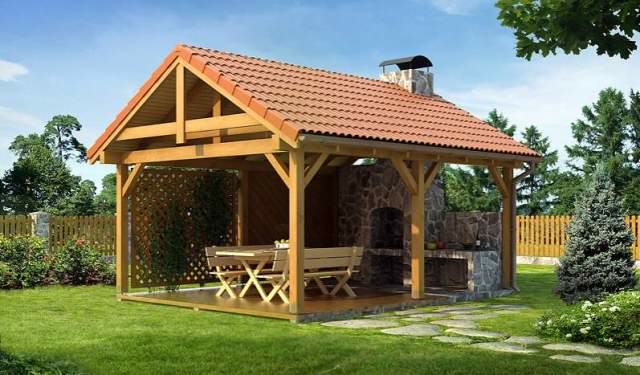
Arbor with open barbeque
Construction of pavilions with your own hands
How to create summer bower? On the Internet, as it was said earlier, there are many projects and drawings of arbors. If you are not sure that you can create your own project on your own, it is strongly recommended to use the projects of those arbours that will be found on the network.

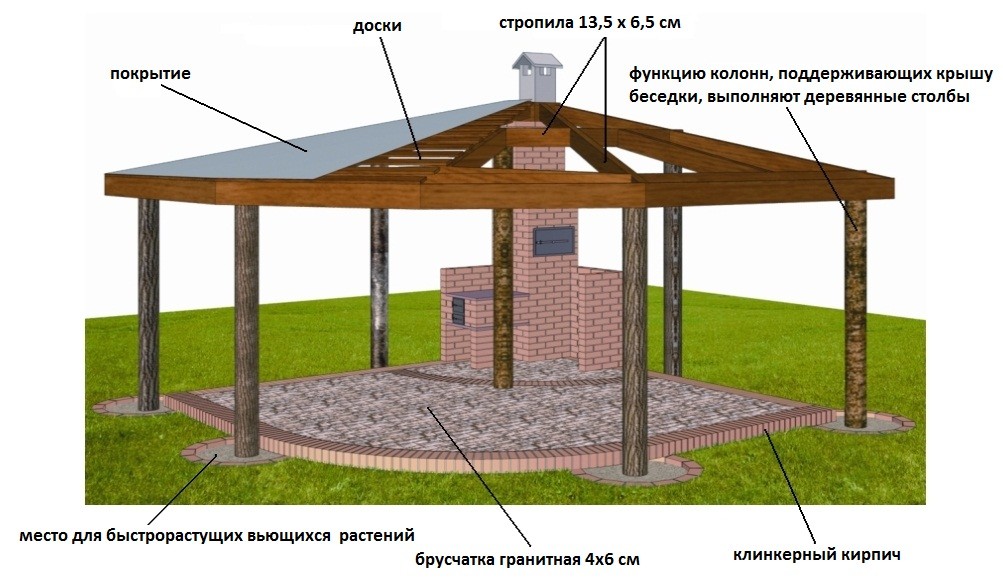
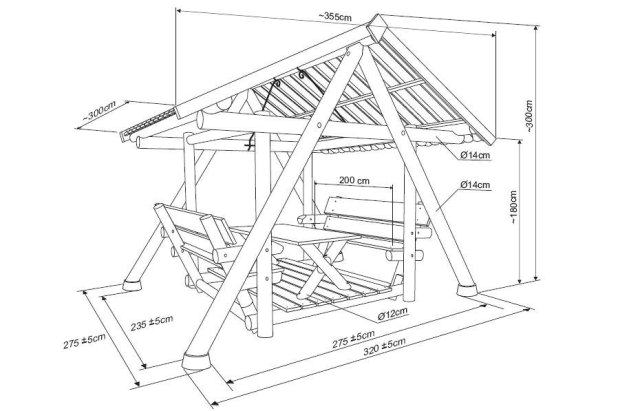
Design drawing made of wood with dimensions
So, the creation of the gazebo project consists of several stages. First, you need to create a sketch of the future building, make working drawings. Schemes and sketches will allow at this stage to plan the layout of the structure, outline the arrangement of equipment and furniture in it. If communications are needed in the gazebo, in addition to light, their supply system is also determined. There are clear recommendations that will allow to properly prepare the project.

Open-circuit design
So, initially determined by the type of arbor - open or closed. Then - think over the style of the summerhouse, which should be combined with other buildings on the site. Determine the building materials that will be used in the works. Finally, on the site it is necessary to allocate a place for a gazebo. All dimensions must be clearly reflected in the drawing and coincide with the site on the ground. If the gazebo in the country house is of a closed type, then it is necessary to create a ventilation system. For massive arbors, the type of foundation is determined:
- tape,
- columnar,
- base plate.
Now you can go on to describe the constructive nodes. Here, place the installation of windows, doors and stairs. The roof scheme is a separate work. The technology of erecting each of the constructive elements Summerhouses are determined separately, which should be reflected in the project. It is time to mark the wiring of electricity and running water. The plan displays the places of installation of furniture, equipment, lamps. It should be noted that this is far from all the work, nuances, which should be taken into account, making up a gazebo project.
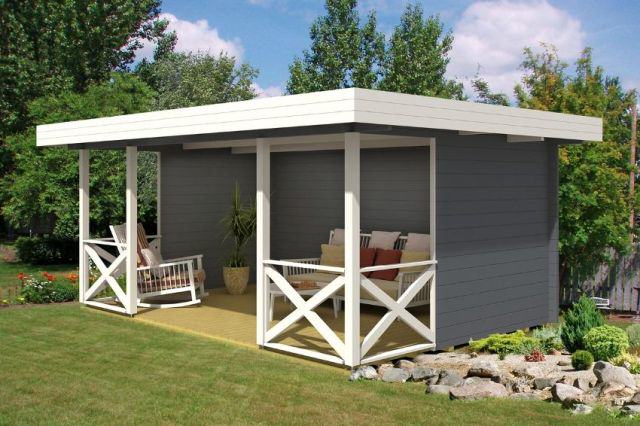
Photo of a rectangular project
The more carefully the project is developed, the more accurate the calculations of building materials will be made, the easier it will be to build itself. The most important thing is that errors are practically leveled. The design will be strong and durable.
Video: garden gazebo made of wood, step by step instruction
Building a wooden gazebo with your own hands
So, if we are talking about the choice of material for the construction of a summerhouse, many people prefer to choose a tree. The fact is that this material allows you to create a summerhouse for a dacha that fits into the interior of any site. In addition, wood is an environmentally friendly material that is environmentally friendly, durable. The tree is easy to process and for the construction of arbors use timber, logs, boards, other elements.

Winter construction of arbors from a tree, photo
Rectangular arbor
The simplest option for self-construction is the use of rectangular construction. This is an open type building for summer use. There will be open support posts, a roof and a fence. In the drawing, only the dimensions of the structure, the height, and also the sketch of the structure should be displayed.
As a rule, a drawing of the profile and frontal projection of the gazebo is created. The foundation is output by a separate circuit. As a rule, a columnar base is preferred. Here you need to specify the size of the pillars, the height and depth, to which they will be dug.
Advice! In order to make the work more convenient, you can attach to the project detailed scheme installation of technical units with the indication of the options for fixing each other.
As for the roof drawing, it is appropriate to display the rafter systems, indicating the fastening of the upper harness, the lower support for the rafters, and also indicate the step between the rafters. Once all the drawings are ready, you can directly start construction work. So, we prepare and mark out the plot for construction. Stakes tied with a rope are used. Once the perimeter is marked, we begin to equip the foundation.
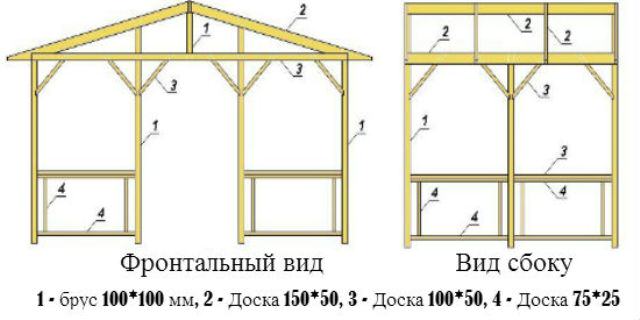
Drawing a simple wooden gazebo with your own hands for a summer cottage, dimensions
To create a foundation, according to the drawing, you should excavate the foundation pit. Although the pit is difficult to call a foundation pit if it has a depth of 80 centimeters. Nevertheless, everything should be called according to the rules of construction. At the bottom is laid a layer of sand. They put the supports, which are then concreted. Be sure to check the level of evenness of all supports, their distance from each other, as well as the level of height.

Photo of the initial stage of work
Now we turn to the creation of the lower strapping, we arrange the floor from the lag. Wooden beams are used. Once the floor frame is ready, you need to create flooring from the boards. Then fix the upper harness, collect the roof frame. The frame is covered with a board and covered with roofing material.

Stages of erection
Once the design of the gazebo is standing still, you can create fences. Initially, fix the horizontal bars, which will be both rails. Then set up vertical racks. If the project provides for a wooden grid, then it is necessary to create a frame from the bar, and then inside it is packed a grate.

Wooden construction, dimensions for construction
Arbor with barbecue and barbecue
Before you start creating a gazebo project with barbecue, fireplace or barbecue, you need to create a sketch that shows the location of the gazebo on the site. The fact is that gas and water will be suitable for such pavilions. Therefore, the layout should be ideal. Consider the direction of the wind, in which smoke from the stove will not spread to other buildings.
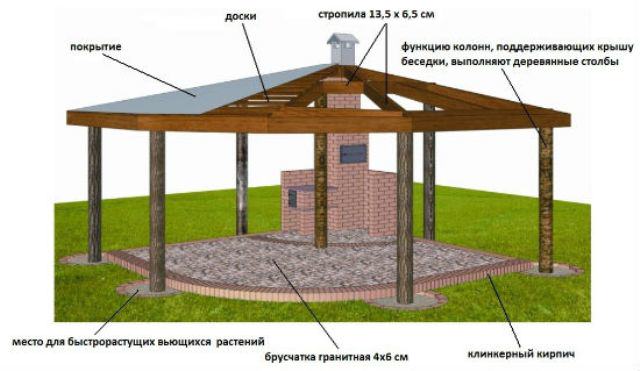
Pavilions made of wood with a barbecue, stove or fireplace, usually replace the summer kitchen. It is noteworthy that the structure can be of an open or closed type. So, a closed gazebo can be used even in winter. Therefore, during the design phase, you need to take care of the insulation of the room, as well as the creation of a high-quality ventilation system.

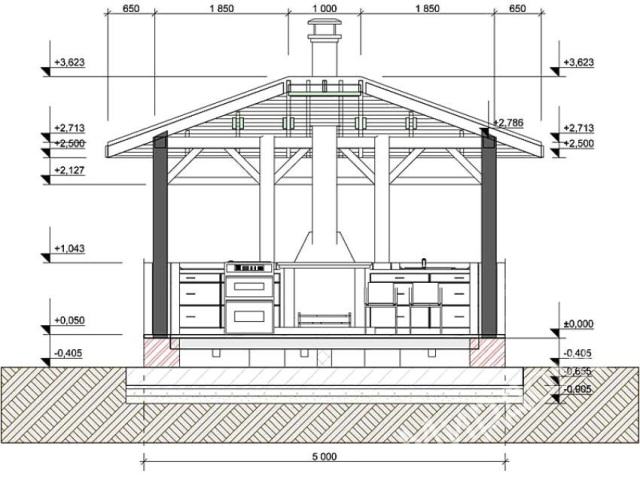
Note that to create project of a gazebo with barbecue, a barbecue or an oven - this is quite a difficult job. It takes into account not only the design of the gazebo and the foundation, but also elements such as a stove, a fireplace. Remember that oven equipment is made of stone, which has a lot of weight. Generally, a band foundation, and under the stove or fireplace - tiled.
Advice! To prevent cracks in the concrete foundation, it is necessary to lay the armature under the brazier or fireplace.
In the drawings, you need to display the dimensions of the future gazebo, as well as the location of the fireplace or barbecue in it. The diagram of the foundation and chimney is separately indicated. The project itself will include the brazier itself, the shape of the brazier, the number of fire points, laying the stone along the rows.
During the development of the gazebo plan, it is necessary to carefully consider the zoning of the premises. It is necessary to provide the safest location of the table, to provide a free approach to the fireplace or to the grill. Do not forget that you will have to clean the stove, fireplace and so on. It is extremely important to designate an area within the project, within which fire-resistant material will be laid around the fireplace.
If your gazebo with a fireplace or barbecue will be used as a summer kitchen, then it is necessary to bring water, light and gas to it. Therefore, in the project it is necessary to provide the appropriate communications, the wiring diagram, water and so on.
Once again, we should note that we will have to work hard not only when creating the project, but also during construction. Therefore now it is necessary to make the project as carefully as possible so that later unpleasant "surprises" could be avoided.

Very often, in addition to wood, metal is used to build arbors. It can be aluminum or simple iron. The material is good because it does not need to be specially treated like a tree. Connections are created using a welding machine. It is noteworthy that models of metal gazebos can be not only stationary, but also prefabricated / collapsible. In the second case bolts are used to connect the structural elements.
Advice! In order for the metal structure to last as long as possible, it must be treated with anti-corrosion material, and occasionally dyed.
When it is planned to create a metal pergola, carefully choose a place on the site. The fact is that the metal is very hot in the summer. Therefore, metal constructions of arbors, as a rule, create an open type in the garden.

Simple construction from profile pipe
Before you start creating a project, it is better to think over the design of the building, which will correspond to the style of the exterior. The dimensions that are laid in the drawings depend on the number of people who are supposed to be inside the gazebo. In addition, it is necessary to take into account the amount of furniture, equipment and so on.
Usually people use ready-made schemes for the construction of metal arbors. It is not difficult to find photos and projects on the Internet. The simplest design is a rectangular shape, which measures 2.5 by 3 meters. In this case, the arbor will not be cumbersome. At the same time, it is easy to install several seats and a table.

Due to the fact that the profile pipe has a number of advantages, many people use this material to build arbors. The structure is not only easy to build, but it is easy to take care of it. The fact is that the metal is not strongly influenced by the environment and has a relatively high durability. Profile pipes are not expensive, they have a neat appearance. Before you begin construction, you should determine the type and shape of the structure. In addition, drafts are prepared, the availability of materials and tools that will be involved in the work is checked. So, you can create a rectangular, round, square, hexagonal and other shape of the arbor.
Advice! If you do not have enough experience working with a welding machine or if you are creating such structures for the first time, like a gazebo, it is better to choose the simplest designs.
You can create your own drawing, sketch of the arbor. All dimensions are indicated in the drawings, the remaining calculations are performed as accurately as possible, since the further appearance and longevity of the gaze depends on this.
So, to build your own hands arbor from profile pipes, you should use such materials: concrete, a primer for metal processing, roofing material, as well as the actual profile pipes. Of the tools must be a welding machine, a level, a Bulgarian, drills with a drill, and fasteners. Once the site for the construction of the construction will be chosen, you need to proceed with the arrangement of the pits. Their number is determined according to the project - by the number of supports. Pits have a depth of up to 60 centimeters. The height of the racks is taken into account with this dimension. As supports, it is allowed to use a profile of 80 to 80 mm, as well as a wall thickness of 3 mm. To the posts are welded the support heels. This will increase the degree of rigidity of the structure.

At the bottom of the prepared pits fall asleep rubble. After that, the litter is rammed, put up racks and pour concrete. Here you should follow the vertical of the racks as precisely as possible. As soon as the concrete starts to harden, check the flatness of each rack again. After these work is done, you need to wait about two days until the concrete "grabs".
Now you can start creating the bottom harness belt. Here a profile of a smaller section is used, welding the material to the supports at a certain height above the ground level. As a rule, the strapping is made at such a height that it is possible to enter the arbor as comfortably as possible.
There comes the stage of creating a roof. From the profile you create rafter system according to the drawings. If the shape is gable, the profile is welded at an angle of 15 degrees. In order to secure the roofing material, the profile pipe is welded onto the frame as a crate, the step of which is 45 cm. That's all - the frame of the gazebo is considered to be assembled.
Construction of metal and polycarbonate
The main advantage of polycarbonate is that it has a transparent structure. In addition, it fits well with other materials. Pavilions made of polycarbonate can decorate any yard. It is noteworthy that polycarbonate can be used not only for the roof, but also for fencing.
- Forms of arbors
There is a huge number of forms of polycarbonate arbors. This can be explained by the plasticity of the material, the light weight, and also the ease of installation. The design is oval, round, rectangular and even spherical. The structure can be of an open or closed type.
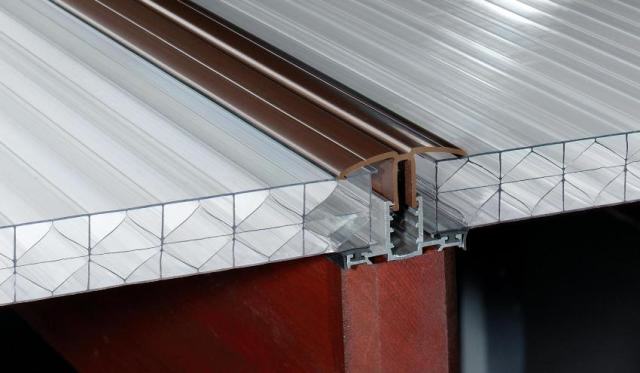
Polycarbonate should be closed from the ends. If a moisture enters its honeycomb, destruction begins.
The roof can be single-pitched or gable, arched, hipped and so on. Since all sorts of polycarbonate colors are sold, a unique atmosphere can be created inside the gazebo. The color of the material is chosen according to its own tastes. Polycarbonate is combined with any material: stone, metal profile, wood, plastic and so on.
Video - original construction project
Photo of arbors: simple and beautiful

Photo of a simple and beautiful gazebo made of bricks

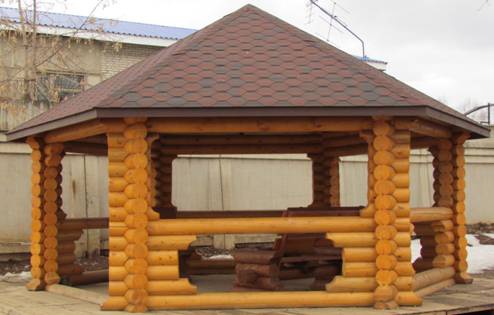
Photo of a gazebo made of round logs with metal-plastic windows
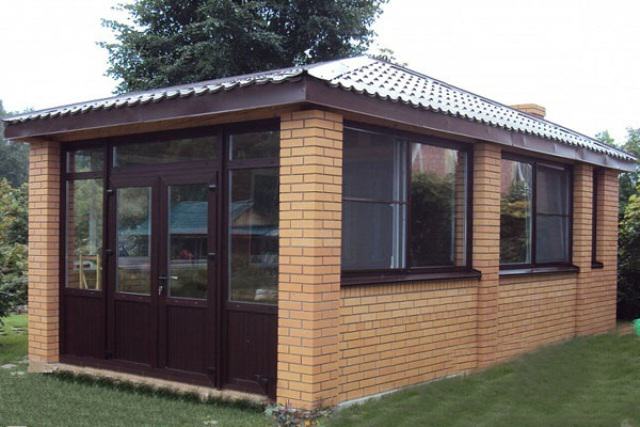
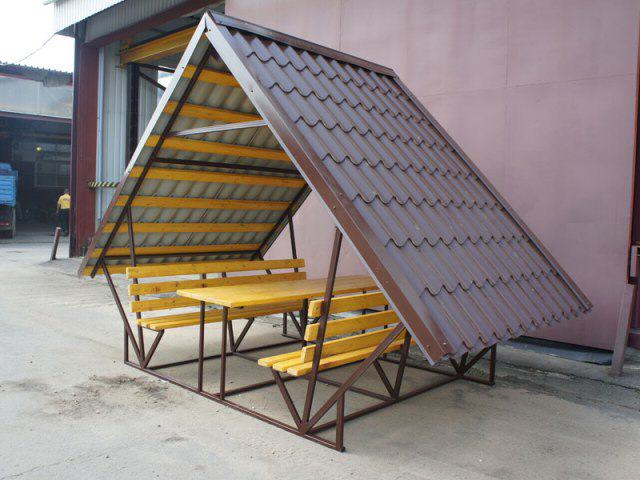
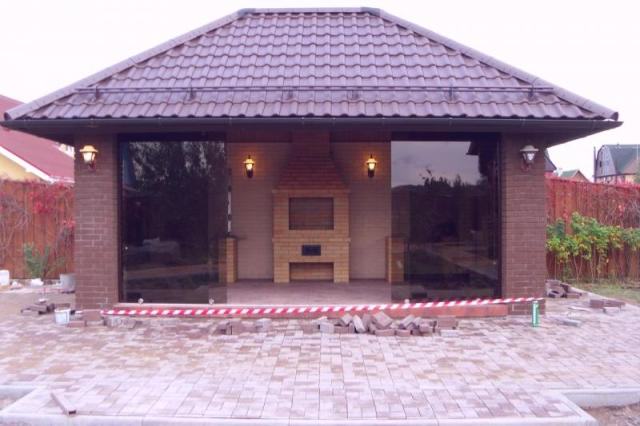
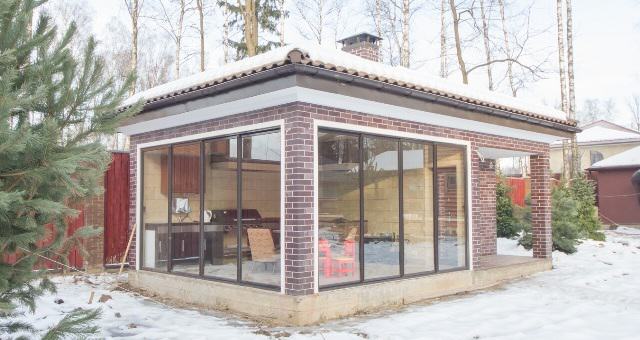
Photo of the building made of bricks with glass inserts
Regardless of what kind of material is used to create a gazebo, you need to check the quality of the structure at the end of the works. So, we make sure that the edges of the materials are processed, not sharp. In particular, polycarbonate must be closed from the ends. If a moisture enters its honeycomb, destruction begins. Created by gazebo with your own hands from any building material will be strong, reliable, functional and durable, if correctly to make the project documentation. What structure to create depends on your preferences and financial possibilities.
If you are at the stage of choosing a gazebo for a summer cottage, evaluating popular solutions in one article will help find a soul-pleasing option. Let's get started!
1 What kind of gazebo to build?
Of course, one of the charms suburban area - Beautiful and well-kept beds. But giving is also a holiday in nature. To arrange a cozy corner for rest every summerman dreams. The best solution is a gazebo. How and from what it is possible to organize such construction? That's about this and talk. Condition of the problem: to choose an inexpensive and durable material. Naturally, that should not take a lot of time.
There is room for imagination! According to the type of construction, the buildings are open (they consist of a frame and a roof, this is an exceptionally summer option), half-open (when part of the gazebo is closed by a wall), closed (they have walls and windows along the perimeter, they even install doors). In form there are round, rectangular or square, multi-faceted, gazebo-sheds.
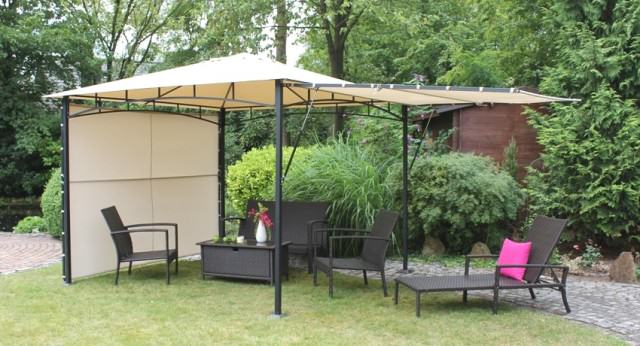
Polyhedral and round forms are the most complex types of structures. A rectangular or square arbor is much easier to install. And if you want it to be a continuation of a living space in the open air, then the construction of a canopy is a suitable option. In addition, during the construction of the canopy, it can be assumed that the two racks are already installed, they will serve as a wall of the building, to which the canopy will be attached.

The second version of the gazebo-canopy is collapsible. Very simple construction. Such a mobile tent can be easily assembled and dismantled, moved to another location. All of his wisdom consists of four metal supports and a stretching awning made of a film or water-repellent fabric. Tired of being at the dacha - they collected an awning, and on the beach.
2 What material should I use for a stationary gazebo?
Better one that is already at hand. But it is possible that some materials will have to be purchased. After all, the arbor must become an ornament of the site and the pride of its owners. Almost everything is suitable for the construction of a gazebo.
The construction of wood is not only simple, but also very beautiful. Especially if you own a carving, then the decoration of such a gazebo can become a masterpiece. The foundation for it can be any material. For the construction of wood will need a beam, logs and boards. Here the main elements are the roof and the racks. Only, if you plan to install it in the brazier, you will have to think about the fire safety technique. In addition, a galvanized metal sheet is required. And it is even better to install a brazier at a safe distance from. Then it definitely will not burn.
How long will it take to build a summer cottage out of wood? A few days. Everything will depend on inspiration. The lack of a gazebo made of wood - it is designed exclusively for use in the warm season. So the New Year's matinee will not be held in it. The construction of wood requires constant care, especially as the arbor is in the open.
The next material is metal. It does not burn, but for the construction of a support you will need welding, and if you are not a welder, you will have to invite a master. And this is already a little expensive. For construction metal gazebo It is best to use galvanized steel at the dacha. This is the most durable material. In addition, it is inexpensive. Profiled sheeting can be used not only for the roof of the gazebo, but also for the construction of the rest of its elements. Care for this material is also required, but it is only to paint the metal with a periodicity of 5-6 years.
This material for the construction of summer cottages is convenient because the sheets can be removed for winter and stored in a place protected from bad weather until next season. There is some feature - the collapsible elements are better ordered from the manufacturer, then they will be equipped with fasteners on the edges. But you can make a capital arbor. Only in this case it is necessary to take care that the thickness of the sheets can cope with the climatic loads. For the frame, in both cases, you need to use metal supports.
There is an opinion that such country arbours They are good in winter and in summer. But it is not difficult to imagine how the metal is heated in the sun and freezes from frost! Absolute coziness from such a design is not expected. Unless you supply it with additional heat insulation, which immediately needs to be covered with a protective layer. And this is not a gazebo, but a house ...
3 Forged, brick or polycarbonate?
- an option for those who have a crop of cucumbers and potatoes at the country house was as rich as in the advanced collective farm "Path to Communism". She is very beautiful! For connoisseurs of beauty, money is not an obstacle. From the point of view of practical utility, it is suitable only in the summer. In addition, such a masterpiece will require considerable effort for permanent restoration. Self-construction of such a gazebo is only for the master, but you can stay with him in apprentices - you decide.
Brick or stone gazebo - a building for centuries, we can say without exaggeration. It will serve without major repairs for as long as the dacha will stand. But the construction will take quite a few days. This structure can be adapted to any weather and season. In summer there is an open gazebo. In winter, if you arrange window openings in advance with removable frames, it will be an excellent place for a family celebration. Here it will be appropriate and mangal, and even a Russian stove or fireplace. It can be built of brick or natural natural stone. The foundation must also be taken care of so that it can withstand the load of all elements of the structure. A well-designed design will make this gazebo a decoration for your site.
Polycarbonate arbor - the solution of the issue in one day. In addition, if you want to realize something light, transparent and airy, polycarbonate perfectly suits this design desire. Among its advantages is also the extraordinary strength and convenience in processing. And the price of this material pleases, and the variety of colors that give the opportunity to fool up fantasies.
True, in addition to polycarbonate will require a strong frame. Care of such a structure is only in washing with water from a hose. There are precautions: you need to protect the surface of polycarbonate from mechanical damage, so as not to disturb the protective layer. And polycarbonate "does not like" chlorine, alkali and other abrasive compounds. Such a gazebo will last about ten years, because for the polymer this service life is optimal.
Step 3: Foundation and frame
Now you can start laying the foundation, its shape and dimensions should be checked several times with the project. As you know, it must correspond to the area of the structure and withstand the mass of the entire structure. In a skeleton the bearing bases should be distributed evenly and carefully fixed in the foundation.

Step 4: Building the Roof Base
Fragments of the roof frame must also be made of a material that will withstand the load of the coating. Bearers, that is, the basic details of the roof, should be fixed on the base, after which they are fastened along the perimeter of the roof between themselves: first at the ramp, then in the middle and at the top. Do not forget that the roof must withstand the load of the snow mass. At the final stage, a roof covering is arranged.
This article is devoted to how to build a gazebo with your own hands. It's quite easy to do this, especially if you have all the necessary materials and tools at your fingertips, and a ready plan in your head.
Necessary materials, tools and preparatory work
We recommend that you start work on the construction standards in your area (depth of foundation, distance between rafters, recommended materials, etc.) and legal requirements. Always use high-quality materials and professional tools if you want to make an arbor, for the appearance of which you will not be ashamed.
If you are allowed funds, buy quality timber - cedar, pine or mahogany. Ensure that all materials used are weatherproof. So, we build an arbor with our own hands ...
| Materials: | Instruments: |
|---|---|
| A - Foundations: sand, cement, gravel, tubular formwork (9 pieces); | Circular saw, saw for cutting at an angle, jig saw; |
| B - Racks: a beam of 10 × 20 cm with a length of 325 cm (8 pieces); | Drill and drills; |
| C - Perimeter of the floor planking (lower strapping): 5 × 15 cm bar length 360 cm (2 pieces) and 472.5 cm long (2 pieces); | Hammer, level, carpentry, measuring tape, melted string |
| D - Intermediate beams of the floor frame: a bar length of 165.5 cm (4 pieces), a length of 455 cm (1 piece) and a length of 224 cm (2 pieces); | A bur for digging pits under the pillars; |
| E - Floor slabs: 5 × 15 cm rails with a length of 175 cm (10 pieces) and 232.5 cm (8 pieces); | Stairs; |
| F - Flooring: bars 5 × 10 cm long with 240 cm (40 pieces) and 180 cm (52 pieces); | Protective gloves, glasses. |
| G - Top harness: 5 × 15 cm bars with a length of 360 cm (2 pieces) and 472.5 cm (2 pieces); | |
| H - Enclosure: bars of 5 × 10 cm in length of 223 cm (9 pieces), 163 cm (12 pieces) and 67.5 cm (92 pieces); | |
| I - Roof end: 5 × 15 cm bar length 244.5 cm (1 piece), 5 × 10 cm beam length 193 cm (2 pieces); | |
| J - Corner truss legs: a bar of 5 × 10 cm, length 276 cm with sawn at an angle of 61 ° ends (4 pieces); | |
| K - Rafters: 5 × 10 cm beam length 245 cm (10 pieces) and 137.5 cm length (4 pieces) with sawn-off at an angle of 34 ° ends; | |
| L - Rafters: 5 × 10 cm beam length 80 cm (4 pieces) and length 136 cm (4 pieces) with sawn off at an angle of 45 ° ends; | |
| M - Roofing material: sheets of 20 mm plywood 120 × 240 cm (11 pieces); | |
| N - Roll roofing material: ruberoid or roofing, 56 sq.m .; | |
| O - External roofing: bitumen roof tiles (tiles), 600 pieces. |
Advice:
- At the end of the basic construction work, fill the holes from the self-tapping screws with the putty on the wood and level the wooden surfaces.
- Apply a few layers of stain on all the wooden elements of the structure.

Diagram of rectangular arbor.

Diagram of the roof of the arbor.
Construction of the base of a rectangular gazebo with your own hands
Before starting construction work, you must designate the perimeter of the future gazebo on the terrain, using pegs and a rope stretched over them. With the carpentry corner, make sure that all corners are straight. Measure the diagonals of the rectangle. If necessary, make the necessary adjustments.

Installation of gazebo stands is, perhaps, the most an important stage building process, so you should approach it with due attention and responsibility. Dig out holes with a depth of 60-90 cm (at least 15 cm below the freezing level) and tamp the bottom layer of the soil. Put a tubular formwork into the hole and fill a small amount of concrete, after which you can install the racks.
Tip: Use the alcohol level to ideally set up the wooden racks vertically. Temporarily, until the concrete is frozen, fix the posts in two directions. Make sure they are all on the same level.

Installation of gazebo stands.
Before installing the lower strapping, allow the concrete to freeze for several days. Drill the bars of the correct size and secure them from the outside of the racks with 9-centimeter self-tapping screws. In order to prevent the splitting of the wood before screwing the screws, drill in the right places the guide holes. Make sure that the bars of the harness are horizontal - this will determine how smooth the floor of your gazebo will be.

The next step of the project is the installation of intermediate floor lag. As you can see in the figure, you need to attach them to the middle racks. Make sure that the logs are horizontal.

Arrangement and installation of support lags for the floor.
The lags should be located every 40 cm to evenly distribute the load. Place the alcohol level on top of the mounted bars to make sure that the floor grating is flat.

To fix the floor lags in their place, we recommend using special steel clamps to support the ends of the wooden beams. Make sure that the clamps are located at the same distance from each other and at the same level.

Fastening elements of the flooring.
Flooring of floor boards is a simple process, but you should think in advance about the most suitable design. Mount the floorboards to the logs with 6-cm galvanized self-tapping screws, pre-drilled and slotted holes.
Between the boards it is necessary to leave cracks. This will not allow water to accumulate on the floor, which means that it will not be exposed to the destructive effect of excessive moisture. To ensure that the gaps everywhere were the same, we recommend inserting cloves between the boards of flooring.

Install the components of the top harness at the top of the racks and secure them with 9-centimeter self-tapping screws. Use the spirit level to make sure the beams are horizontal.

Installation of the upper strapping.
We mount the perimeter fence
To make the fence for the gazebo easy enough, the main problem here is to choose a design that matches the style of your house and garden. First of all, you need to install horizontal bars between the posts, fixing them with 9-cm galvanized self-tapping screws. Use an alcohol level to control the horizontality of the elements to be mounted.

After the balusters have been securely fixed on them, fix the rail on the upper horizontal crossbar using decorative railing studs (you can additionally use glue to increase the bond strength).

Construction of the roof gazebo
The shape of the roof you can choose at your own discretion. There are many options here - from the simplest gable construction, with the construction of which any person with basic skills can cope with, to a unique roof, the construction of which will require a lot of effort and materials.
Start the construction of the roof from the installation of the ridge and corner rafter legs. Make sure that the roof ridge is mounted horizontally, otherwise the roof of your gazebo will be asymmetrical.
Tip: Ask your friend to help you when building the roof frame. One person should hold the elements in their place, while the other person will fasten them with screws.

Installation of the main rafter legs.
Now you need to install rafters on the sides of the roof. Place them at a distance of 60 cm from each other, starting from the center. Drill the guide holes and fasten the rafters with 9-cm galvanized self-tapping screws on the corner rafter legs and the top harness.

Installation of auxiliary rafter legs.
After that, install the rafters on the front and back slopes of the gazebo roof. Their fixing is carried out by screws to the roof ridge and the upper strapping.

To the roof skeleton withstood its weight, the rafters must be placed every 60 cm, starting from the center. Align the rafters at both ends and secure them with self-tapping screws. To prevent the splitting of wood and at the same time to obtain a rigid joint of the elements, drill the guide holes at an angle.
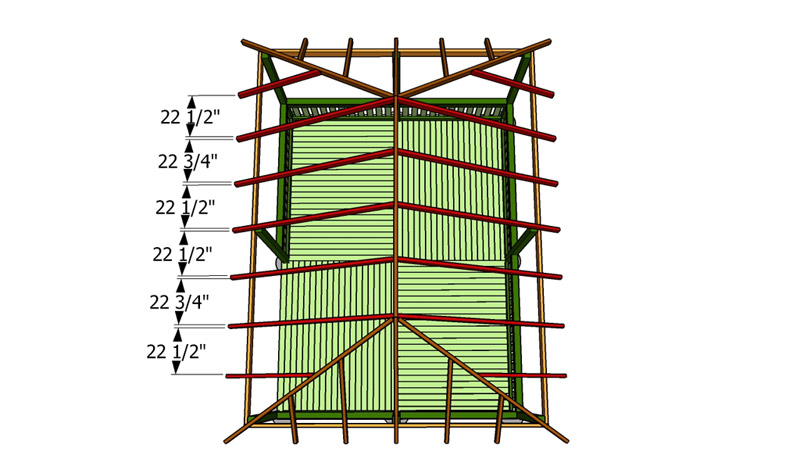
Arrangement of rafters.
Attach 20 mm thick plywood sheets to the rafters, as shown in the figure. We recommend that you saw off the sheets with a circular saw before attaching them to the rafters. Fixing of plywood sheets is carried out with the help of 3-centimeter self-tapping screws, which are screwed along the rafters every 15 cm. Do not leave between the sheets of cracks and gaps.

Sheathing of the roof with sheets of plywood.
To protect the arbor from damage by water, we recommend that you cover the sheets with plywood or roofing felt. Make sure that the strip of material overlaps at least 5 cm, and secure them with staples. For the roof ridge, cut a piece of roofing material 30 cm wide. Along the perimeter of the roof, mount the drip, placing its edge under the layer of roofing material. Before installing the shingles, read the manufacturer's instructions carefully.
Tip: When laying the roof tiles, each successive row should move horizontally relative to the previous one by half a square. Vertically, the layers of the tile are overlapped.

Attach to the ends of the rafters a decorative strip, fix it with the help of finishing nails. Do not leave gaps between the bar and roofing sheets.

Decorative finish of the roof edge.
The arbor is ready, you just have to take care of the small strokes. Fill the holes with putty on the wood and allow it to dry for several hours. Sand the wooden surfaces with fine sandpaper.
Cover all wooden structural elements with several layers of stain or paint. This will help not only protect the tree from rotting, but also improve the appearance of the arbor.
Now you know how to make a gazebo with your own hands. Anyone who has the elementary skills of woodworking, can easily cope with this work, if he follows our step-by-step instructions. However, be careful and do not forget about common sense, if you want to avoid costly mistakes and potential problems.
Video: Project of the gazebo
"A good arbor, yes it is rarely poured!" And if there is no gazebo in the yard, then the guests will remain completely unhappy with the event. The first problem can be easily solved by making a small investment in several boxes of "combustible material," but with a gazebo it's not so simple. Here you have to be moderately rich or hardworking enough.
Many construction companies and individuals propose to build gazebos at a price from 60 000 rubles for an ordinary wooden structure 3 by 3 meters. Beautiful and exclusive gazebos are already from 450,000 to 3-3.5 million rubles, an important role in pricing is played by area and materials (log and metal is always more expensive). But this amount is not everyone can lay out for some small architectural form in his yard.
It's far from a secret that materials for the construction of a gazebo are worth a penny (compared to its market value) and up to 85% of the money is taken for the work itself. Also consider the cost of foundation and land works. Now we will consider a detailed guide to the construction of a gazebo with our own hands and with its help we will make a quality wooden product that will not be inferior to the "factory" options!
We choose a place for the construction of a gazebo
The arbor is built to solve many problems. It should simultaneously take a big noisy company and serve as a place for a romantic dinner, so the owner should choose its location on its site. In most cases this is the most secluded place, which is not visible from all sides and where there are no drafts. It is also necessary to consider the following points:
- The construction of wooden arbors should be carried out away from septic tanks, sewer canals and settling tanks in a private area. Nothing should interfere with your rest, especially unpleasant odors.
- It is necessary to take into account not only the forthcoming stages of construction of the arbor, but also what will happen later. The brazier or tandyr can become a problem in the future, if the structure stands next to the house. It is better to retreat a minimum of 3 meters from all buildings.
- You will certainly want to look at the pond or forest after a hearty dinner. It is better to arrange it in the most picturesque corner of the courtyard.
- Pay attention to the drainage. Deepening in the yard should be excluded - a greater likelihood of undermining the foundation.
- A secluded place from the wind. Quietly sit down - you'll go further.
With the basics of choosing the location of the disassembly, we have sorted out, now we proceed to the stage-by-stage construction of the arbor and consider how to make an excellent construction of inexpensive materials without throwing out huge money for the wind.
The foundation of a garden gazebo with your own hands
Is it necessary to make a foundation? No, you can even without it, if you do not care about skewed structures and periodic spring restorations of arbours. Without a foundation of support, they will be installed under the weight of the roof and the whole structure, they can be washed by spring waters or simply leave to the side after the glaciation / thawing of the soil in the spring. In any case, it is necessary to do it - so it is correct. Let's consider some variants how to establish the foundation without superfluous expenses.
. Make it simple enough. We take a drill with a diameter of 50-60 centimeters (it's easier to borrow from a neighbor) and start making an arbor of wood with our own hands. We make a marking (for example, 4 by 4 meters) drill 4 holes with a depth of 1 meter, fill in the concrete. You can use cement M300, the proportion with sand and gravel - as for foundations. After 15-20 days, you can safely build the ground part of the structure.
Brickwork
. A very simple way that suits everyone who knows how to use a shovel and trowel. The essence of this method is as follows: dig a pit 60x60x60 cm, then pour 1-2 buckets of concrete onto the bottom, lay 2 silicate bricks along and 1 side across. All subsequent rows of bricks should be staggered until the "column" is above the ground level by about 20 centimeters. So lay out 4 columns (or 6 pieces, if you are planning to make a hexagonal wooden pergola with your own hands), after 15-20 days you can proceed to further construction. 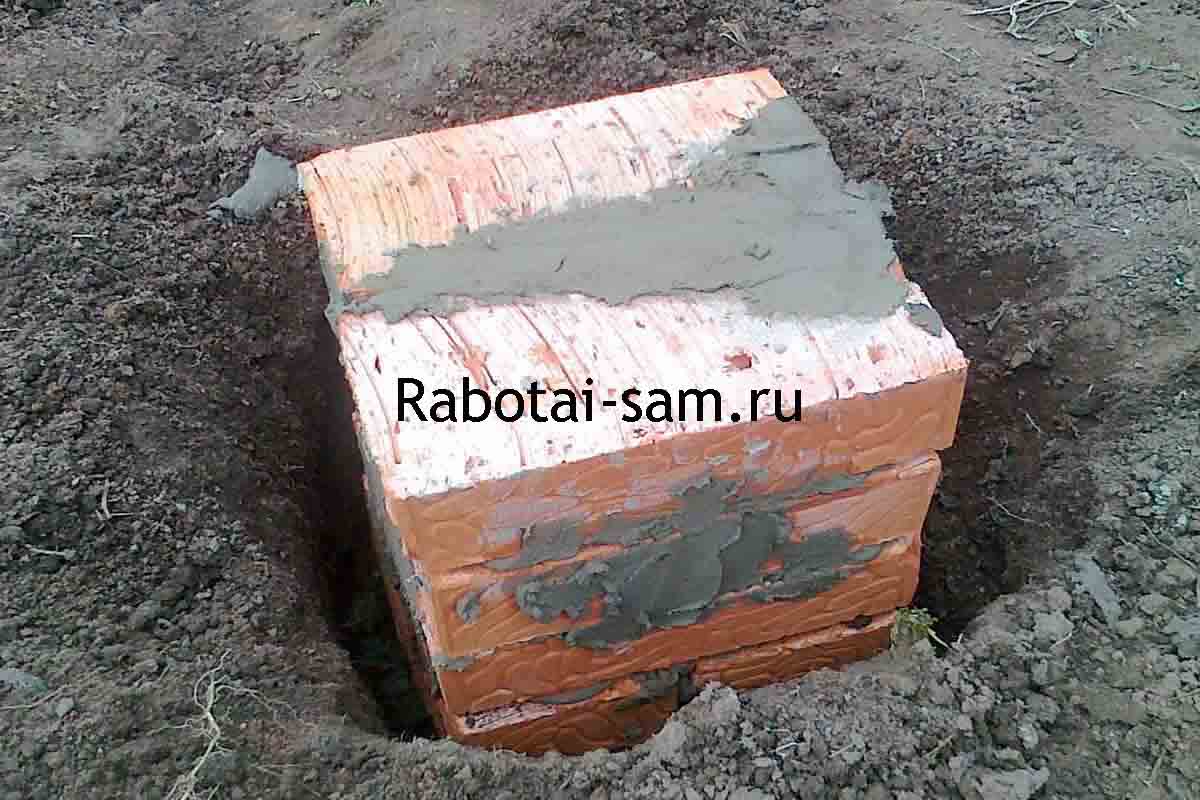
The buried block
. We take a shovel and go to bury the treasure in the yard. Suitable for a concrete block length of 50-90 centimeters. It is necessary to dig an appropriate pit, pour in 10 cm of rubble (if it is possible to ram it - in general it is excellent), 5 cm of sand and lower the block. So repeat for each column. 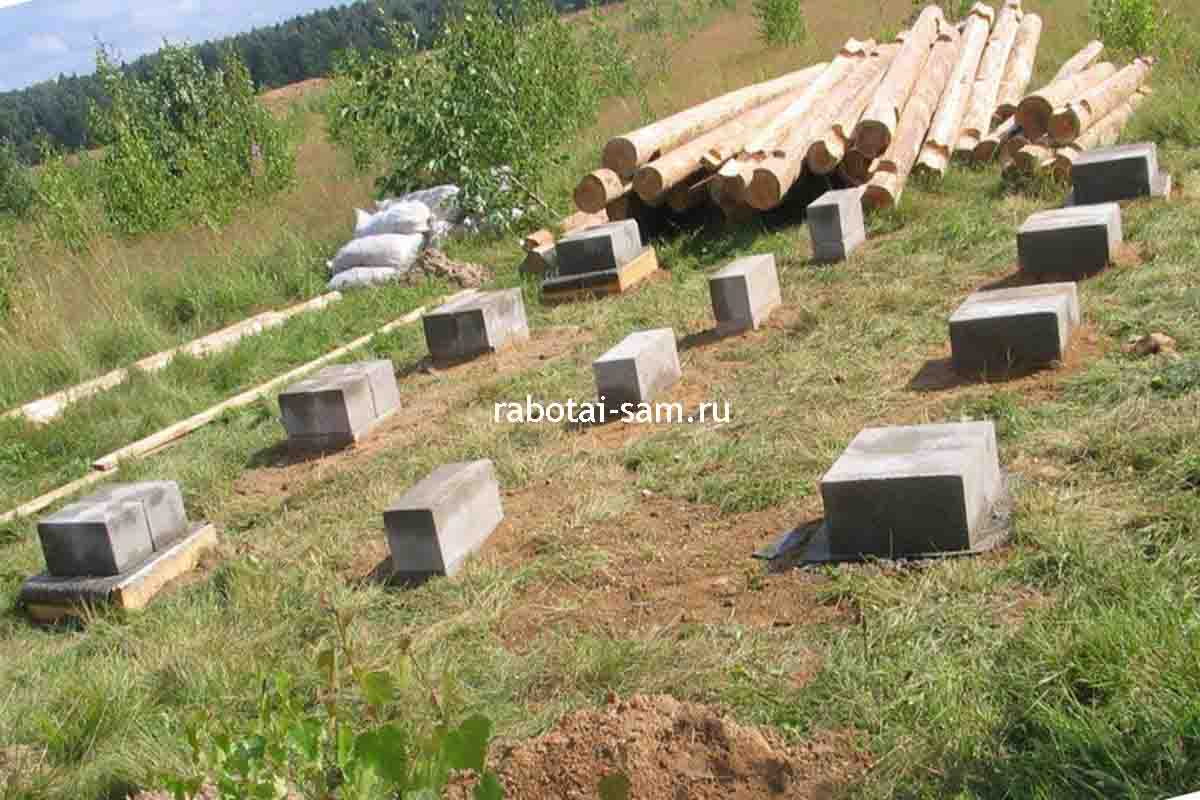
All the above methods are suitable in case you make a simple gazebo with your own hands (up to 30-40 square meters). Heavier structures (including multi-level roofs) are installed only on tape and deep columnar foundations, since the mass of the structure can deform brickwork, blocks or poorly made concrete. In some cases (for example, two-story arbors), even drainage will be required. 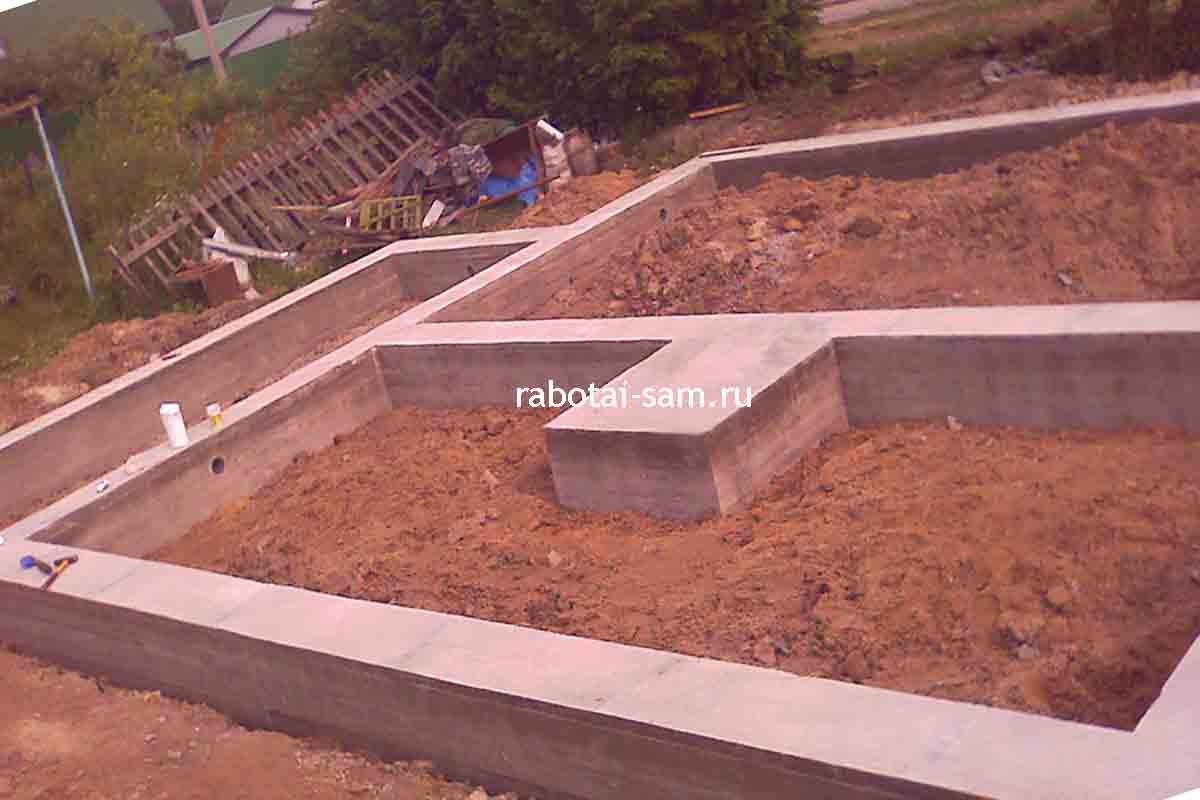
For all SNiP and recommendations, the foundation must be at least 24 days old, but the actual term for its hardening is much less, since it will not be affected by large loads until the roof is built and all furniture is installed. You can start "easy" work already on the 5th-10th day after it is poured - nothing will be to him. Now is the time to consider the features of installing the gazebo with your own hands, drawings and dimensions of the structure, materials.
We make a wooden frame
Let's start with the racks. Actually, the other can not begin. We will use a wooden beam of 30 to 30 centimeters, because it looks much better (massive parts are always in fashion) and it will be easier to attach a weather cloth to it. The minimum dimensions of the beam are 10 by 12 cm. Now you have 4 supports that you need to fix on concrete posts, and you can do this in several ways.

Realizing the construction of arbours from the tree with your own hands, you should use the level as often as possible, especially in the case of concrete piers, because it will not be possible to correct it. It should form a right angle with the concrete base and be perfectly level with respect to the plumb.
Now you can go to the lower strapping of supports and laying lags. You need to make the most stable surface, which will easily withstand the weight of the deck and a large number of people who will be on it. Consider the process of constructing the floor gazebo for giving your own hands step by step.
STEP 1 : strapping. We use a 10 x 15 cm beam (this is with a margin), which must be laid between the concrete columns and screwed to the supports at the bottom. It should go strictly horizontally, measure by level. If the angle is deflected, something must be put on the support, which is lower in level. 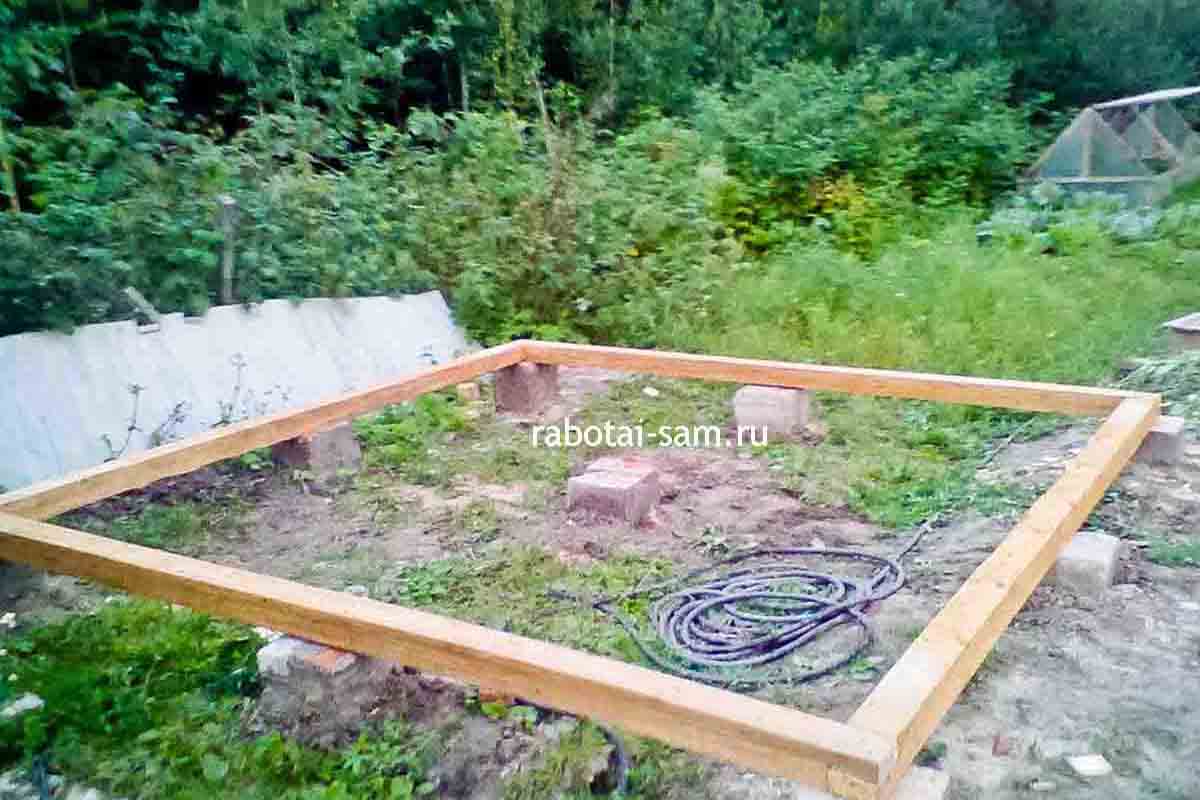
STEP 2 : make the central jumper-gain. We fix the bar 5x10 cm exactly in the middle of both sides of the harness strapping. It will prevent the subsidence of planks or any other flooring in the gazebo. If the structure has sides more than 3 meters, the number of bridges should be increased. Approximately 1 gain per 120-150 centimeters. 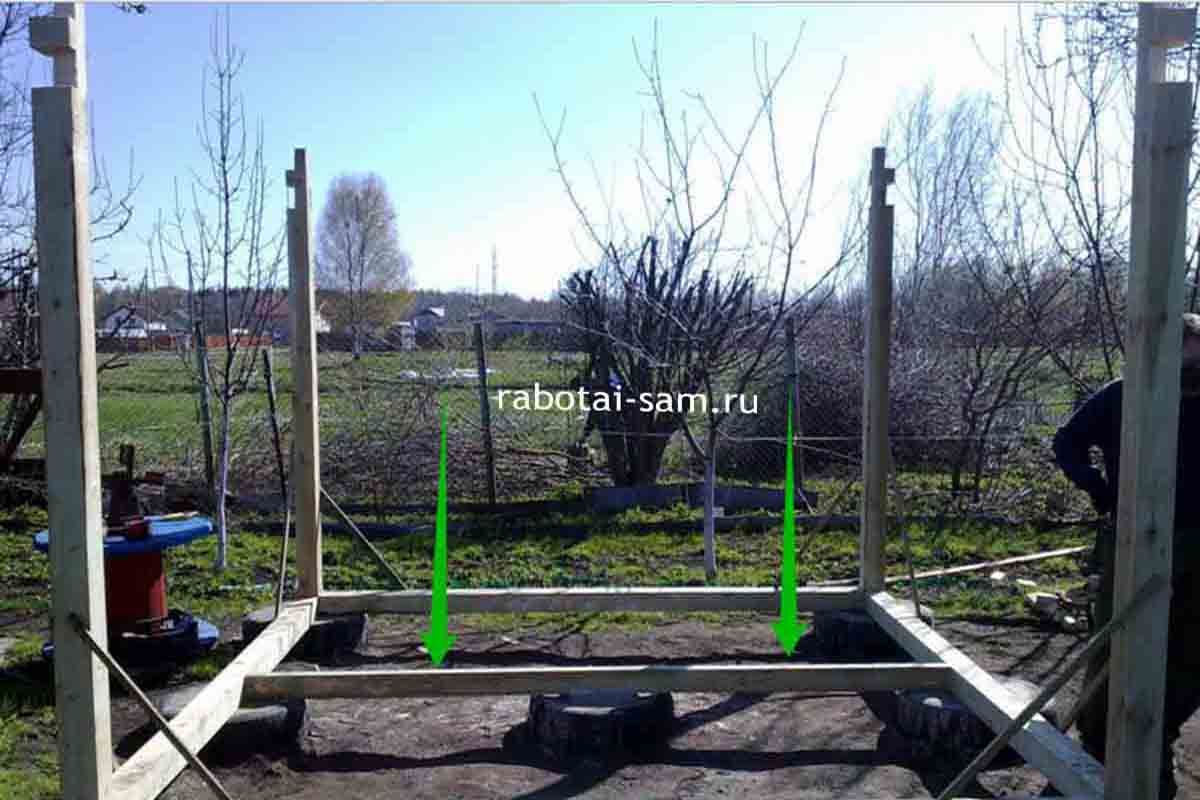
STEP 3 : we fill on top of the board. You can use boards 250 wide and 3-4 cm thick - the best option for solid loads. The length can be chosen as complete (through the entire gazebo and fasteners to the gains), and partial (only between amplifications). It is better to use short boards, they will last much longer and will be cheaper to replace in case of damage. You can use both nails and screws, it does not matter. 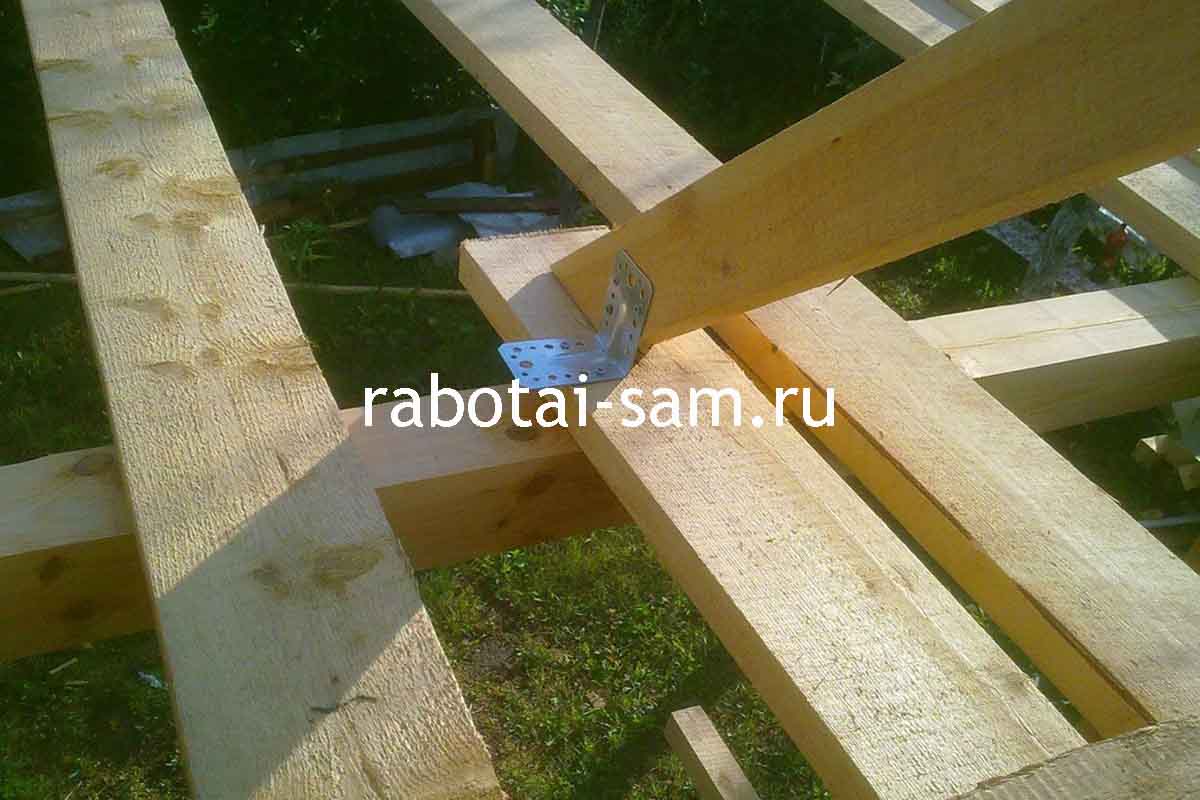
STEP 4 : open with anti-corrosion protection. Suitable conventional inexpensive impregnation. A good varnish can be processed after all the work has been completed, its consumption will be much less after the primary impregnation of the tree, which you will do now. 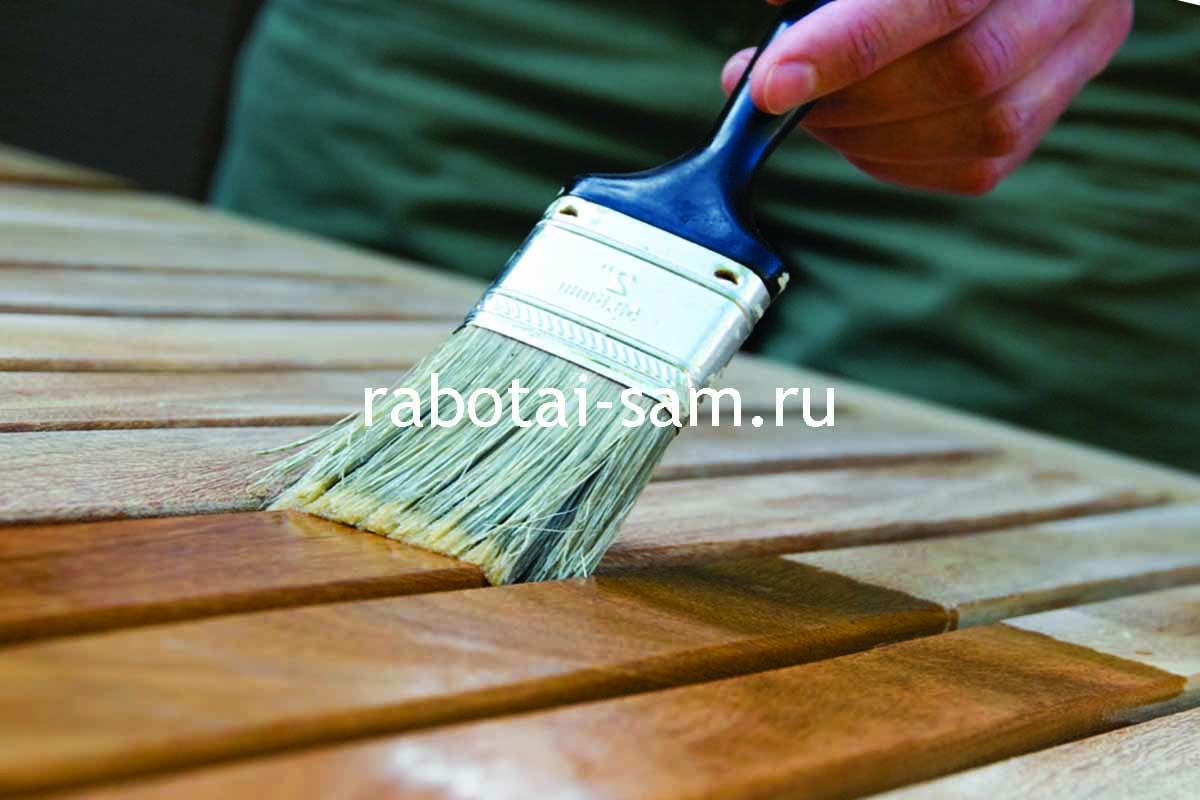
When fixing the lag of the floor and all the reinforcements, it is better to use metal corners with perforated sides. They can be found in every construction shop. The height of the clamp is better to choose the height of the wooden beam to fix it as best as possible. It will be appropriate to have a powerful screwdriver, as it will have to screw up a lot of large screws, you can do this with a screwdriver, but it's quite difficult.
Additional support racks with a length of a gazebo of up to 4 meters can not be used, but if the design is larger, then it is necessary to strengthen the upper strapping. In the middle of the wooden bar of the lower strapping, it is necessary to fasten the metal stand (30-45 mm square) and level it to the level, it will "support" the upper wooden harness, which we will install in the next section of the article.
Construction of the roof gazebo with your own hands - step by step instruction
Now let's move on to a more complicated process - building a roof. Variants, how to do it very much, right up to the construction of multi-level Chinese structures with bent corners. But our main goal - a gazebo with our own hands from improvised materials, which can be found in any market or in the stock of a stocky owner, so we will do a simple and reliable construction.
STEP 1 : upper strapping. Everything is exactly the same as below, only now we use a beam of 10x10 centimeters. The load on it will be much less than on the floor, so it makes no sense to weight the design and transfer money. If the roof is made of a flexible roof tile or roofing material, you can put the beam and do 50x60 mm. In the middle, we twist with additional support posts, which we examined in the previous section. 
STEP 2 : the main rafters. A wooden beam of 80x30 mm for a gazebo with parameters of 4x4 meters or less is suitable. Set from the corners of the top harness to the middle of the room, it will be better to use the plumb and professional level to equally set and fasten all 4 rafters. The upper edge of the bars cut at an angle of 45 degrees, so that the rafters come together in the center of the room without gaps and protrusions. 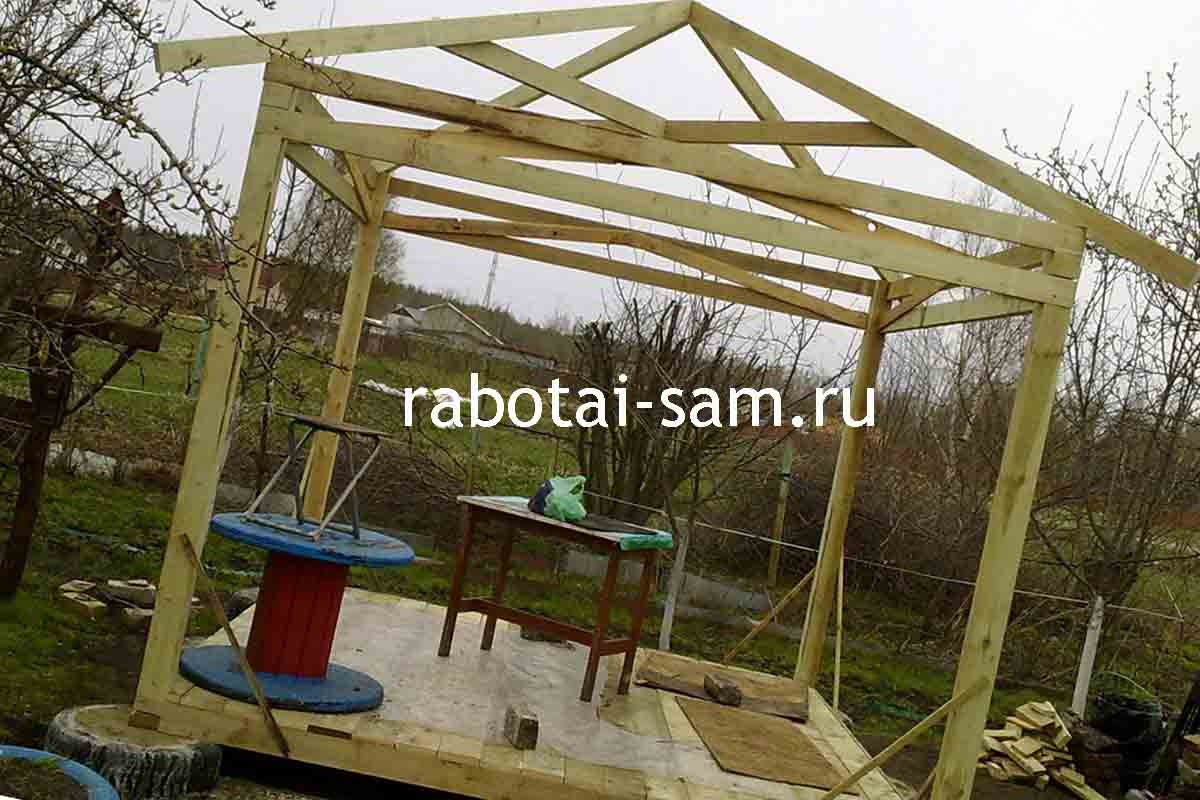
STEP 3: auxiliary rafters. We find the center of each side of the upper strapping and from it we put auxiliary bars (40x30 mm) up to the center. They will support the roofing material, prevent the sagging of the roof. Be sure to put everything in order, to maintain the same value. Check the smoothness of the structure, if nothing does not appear, you can twist all with screws and fasten with metal clamps at the top. 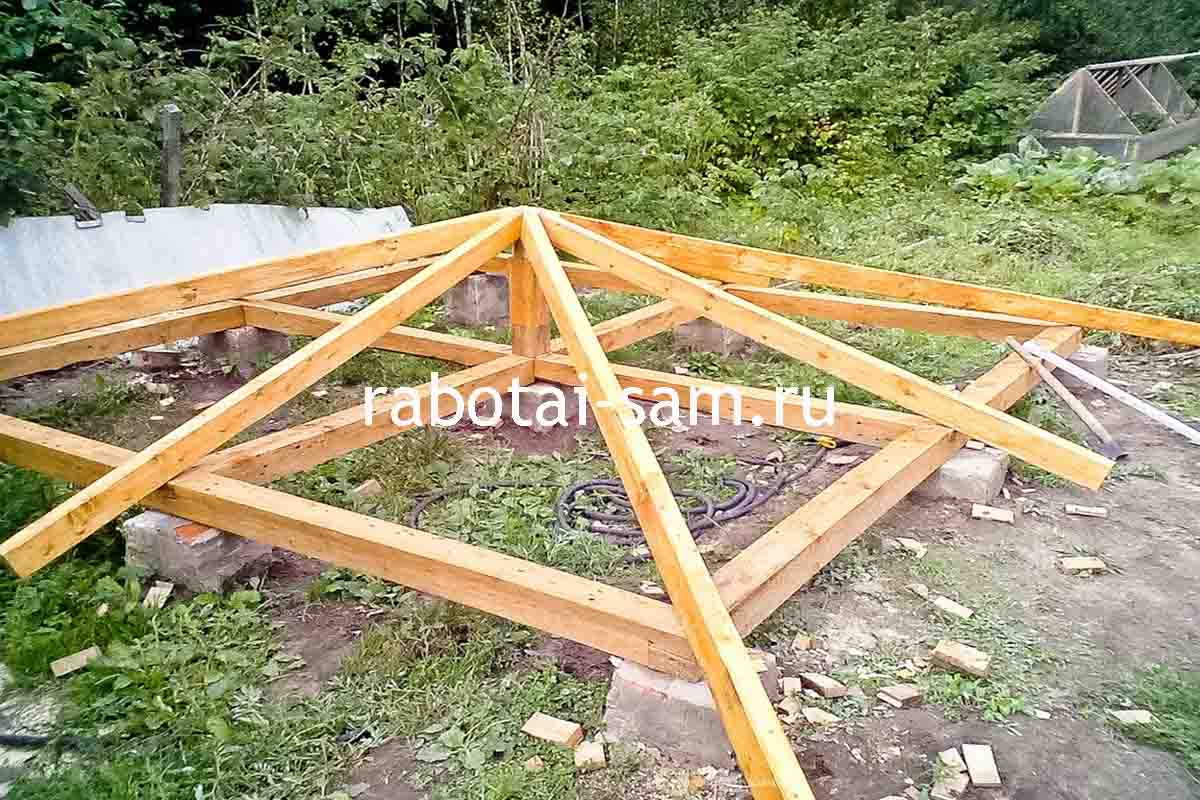
STEP 4 : We lay sheets of plywood or OSB. Here everything is simple, if the rafters are previously well leveled. Screw in every 20 centimeters to the main and auxiliary rafters. You will need to cut the sheets, make it easier on the ground, having previously marked the necessary lines. 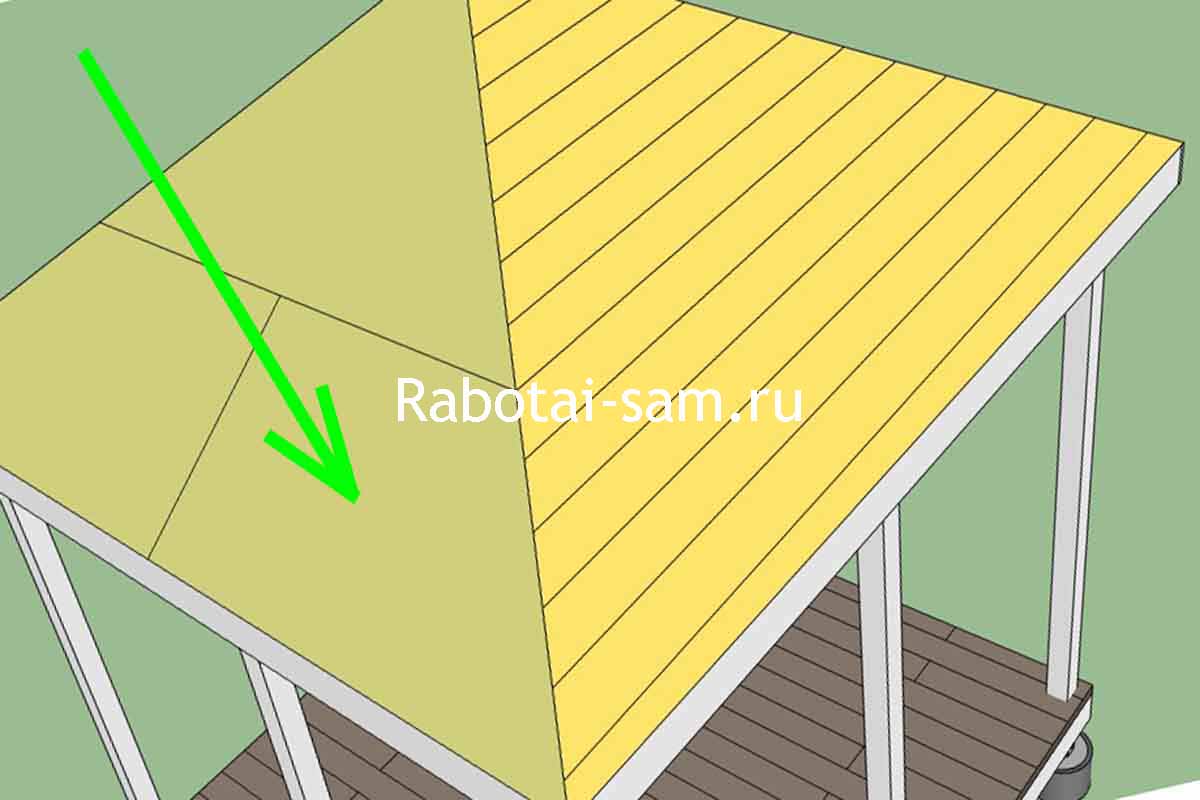
STEP 5: roofing material. Now you can stack anything, but it will look beautiful eurorebroid or flexible shingles. We start to lay it from below, or from above, slipping each next sheet under the bottom of the previous one with an overlap of 4-5 centimeters. From above, you can make a "horse" to prevent moisture. On the main rafters, you can easily tuck the edge of the material and screw it to avoid ugly metal protections from water. 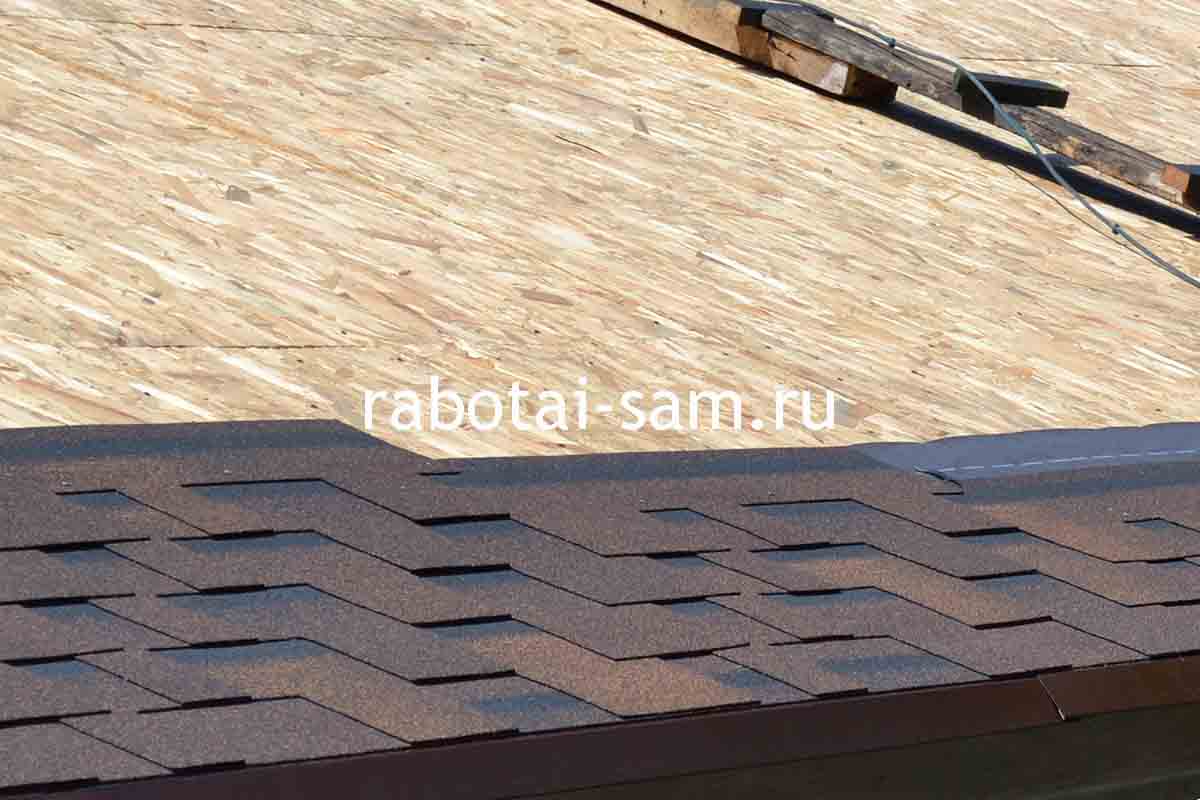
We examined how to build a gazebo with your own hands and you only need to uncover the entire tree with varnish so that it is not corroded. Do it better in the end, because in the process of construction materials are always damaged and will have to be repainted.
If you want to decorate the structure, you can install wicker panels on the bottom harness or lay a wooden beam - it will be much more comfortable and neat inside. But if you are looking for a way to make a gazebo with your own hands with minimal investment, then you will have to abandon such decorations. One panel (400 by 80 centimeters) from wicker vines or planks will cost at least 4000 rubles.