Each master faces a problem, how and what to strengthen assembled doors. To install the finished door unit, various installation methods can be used. Knowing these mounting options, you can easily choose the right one for yourself. You will need a small tool kit such as a drill, perforator, level, screwdriver and a hammer. Also, to fasten the box directly in the opening, you need fixing elements and mounting foam. Depending on where you need to fasten the door unit, you may need screws, dowels, anchors.
The main stages of the installation of the door unit
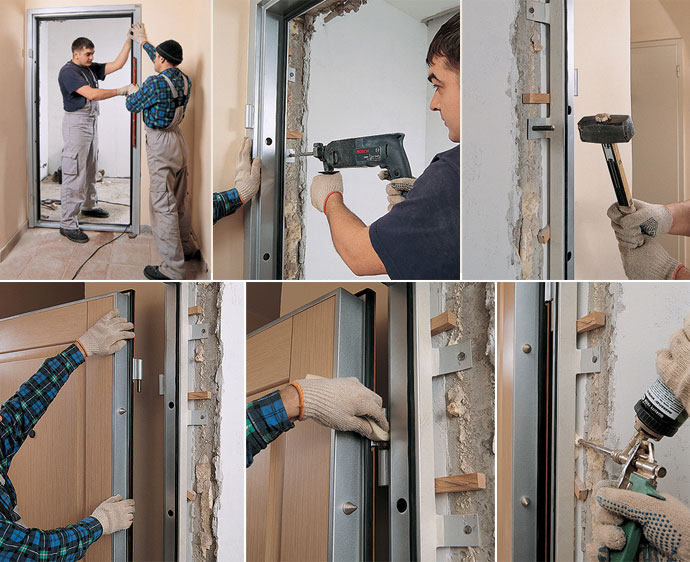
At the very beginning, the old door frame is dismantled. It can be done using a nailer (forage), having pre-cuts from both sides of each vertical bar, then to squeeze this structure from the opening. If the anchor bolts were used for the installation of the old box, the nails that can not be unscrewed can be cut with a "bolgar".
Before installing the box of interior doors, it is necessary to check the verticals of the walls and take into account the differences in the level of the walls and the floor. The door box should be placed so that if there are irregularities, the wall of the box does not go deep in the opening. This is necessary for the cushioning of the door. In order to correctly position the door frame, you should use the building level and take into account all the errors in the opening.
First, the installation is rigidly fixed in the opening, to achieve the initial level of rigidity, use wedges. After completing the fixing work, it is worthwhile to repeatedly check the correctness of the positioning with the level so that the box is flat with the door.
Working with foam
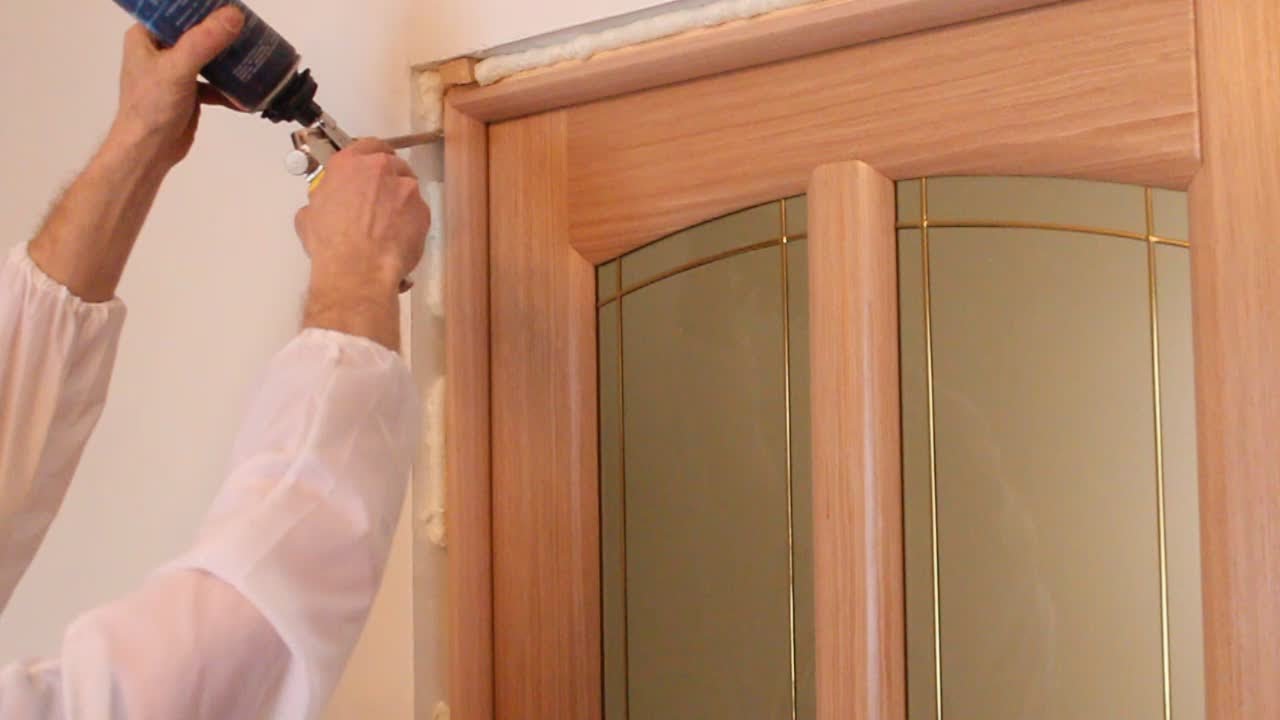
It is important to know the foam that is designed for the gun, it is much better and more convenient to work because it is more dosed and has a small expansion coefficient, it freezes much faster. Foam, which is supplied with a large amount of a tube, will last longer. Before you start, it is better to cover the door leaf with paint tape and film, because the foam is difficult to wash. It is important to know, you have to start with the fixing of individual small patches. After 30 minutes you can go through the entire perimeter. All the cracks are filled with foam (50% of the total volume). Do not fill with a large amount of foam, because during expansion the foam will squeeze the box inside. We recommend using professional foam.
As the tree shrinks and expands due to the increased humidity due to expansion, the door block is deformed. The door simply will not close for this reason.
Video on possible ways of installing doors
There are several ways to fasten the door frame in the opening, each of which provides for the use of a special type of attachment. Various mounting options provide a certain level of reliability and strength of the fixed structure. We hope that the video stories on the options for installing boxes of wooden doors will help you.
Video: Door frame fastening from wood and MDF in the doorway
A hidden way to install doors on a foam
The door box is fixed in the opening using wooden wedges for fixing, and the correct location is checked on the building level. Foaming with mounting foam should be done gradually, with sections and with interruptions to avoid deformation. Holds door frame almost due to foam alone.
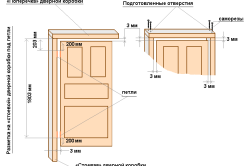
To maintain the clearance between the box and the door itself, use a 3 mm spacer that is inserted between the door and the box. They can be removed only when the foam dries. Usually the door is left overnight.
This method is convenient if you do not need to go into the room, it is fast and does not require much effort. It's important not to overdo it with foam so you can open the door.
Installation of doors with clamps or spacers
The principle of installation is that we use it inside to temporarily fix the door block in the gap of the spacers. This can be like ordinary wooden rivers, and special adjustable devices.
These two methods are very good for light and small doors.
Video: Template for installation of door frames.
Fastening of doors with Knauf suspension
For these purposes, the direct suspensions of Knauf, which are used in suspended ceilings, can be used as well.
- Preliminary it is necessary to fasten plates to the box.
- Insert the door into the opening.
- Adjust the level.
- We mark the places for deepening in the wall.
- We make a selection under the plate.
After that, set the level and make fixation of the plates. For adjustment, we use wedging with wooden blocks.
It should also be noted that with this method of mounting the box on the outer part of the wall, the place of the recess must be hidden under the layer of plaster. That's why this method is good only if there is no finishing.
Video: Installation of an interior door from the company Senator
New mounting options
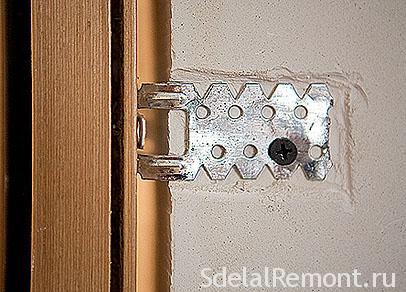
This video will let you know how to secure the door frame in the opening. This type of attachment is the installation of the box of the interior door, by putting the box on the screwed heads of screws that are in the ends of the opening. This happens with the help of metal plates with a hole, which are screwed from the outside of the box.
To achieve the final fixation of the box in doorway, conventional adjustment means are used.
In this way, the door frame stands move freely in the aperture.
A clear advantage of this method is the full possibility of adjustment and at the same time rigid fixation with the preservation of the original form of the box and exterior finish walls. 
Hidden installation, fastening under the hinges
 As a rule, for the rigidity of the construction, screws or anchors are used, which are hidden under the hinges. To do this, make a hole between the screws in the loop and fasten it to the wall through it. From the side of the lock under the decorative plate, another fastening is attached. As a result, we get 3 fixation points.
After the direct fixing, we put the spacer in the lower part of the doors, since the bottom is not fixed and fill all the gaps with foam.
A significant plus of this method is relative rigidity, preservation of appearance.
Video: By zapenivaniem a door frame and a few tips.
Fastening by a through method on anchors or screws
This is the most common standard installation of interior doors. For this version of the fastening, first drill the holes for the anchors in the right places of the racks, then fasten the door in the opening.
Preparation
- Marking of 4 anchors on each side.
- Drilling with a pen 14 mm to a depth of 10 mm (place for the plug).
- Drill a through hole 10 mm with a feather (place for fixing the anchor).
After that, the box is exposed and drilled with 10 mm burr concrete under the anchor. When the box is on the anchors, it holds securely and does not require any struts. The fastening points can be hidden by installing decorative caps of the desired color, size (14 mm). Instead of anchors you can use screws that will reduce the diameter of the stub. The application of this option is the most reliable for heavy doors. Using it, you can align (tighten) the curved rail. Doors can be used almost immediately. It is possible to adjust the gap. The downside is the presence of stubs. 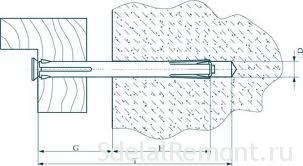

Video: How to install a door frame with plugs
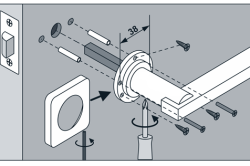
Tricks when installing door handles
Video: We milling a quarter on the door frame / How to install the device if there is nowhere to put it
Conclusion
There are many options for installing a box of interior doors, but it is worth choosing the one that is the easiest, convenient and reliable or fastest. The choice can be made by any method of mounting the door, but these methods can affect which opening is being installed, take into account the intensity and other factors.
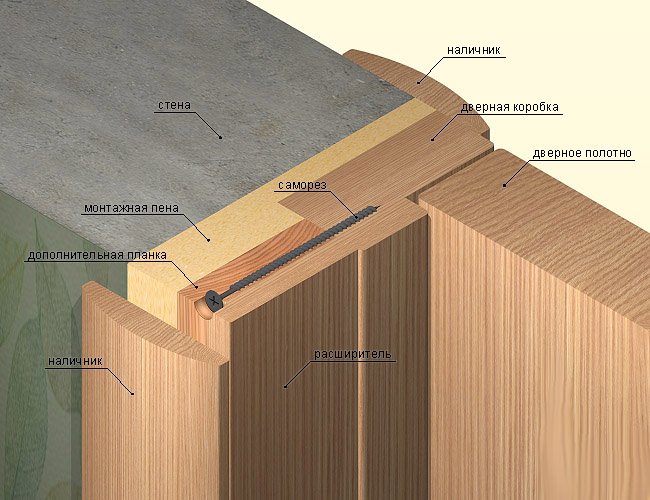
The door frame is a structure consisting of side racks and horizontal elements mounted at the top and bottom. A box is installed in the doorway with dowels and steel linings. The fastening has its own characteristics, depending on the material from which the wall is made. To the brick and wooden wall fixation is carried out by means of nails. To mount the structure to the wall of the plates use special staples. On the other subtleties of mounting this construction will be discussed in this article.
Various materials are used to make such structures. It can be:
- wood of natural origin;
- aluminum;
- metal plastic.
The most common form of construction is rectangular. The box is installed before laying floor covering and fixing skirting boards. You can start work immediately after drying interior decoration walls. It will be much easier to perform the installation after the repair work, because in this case the surface of the walls will be flat. The work process is carried out along the wall plane. If the wall has significant deformations and unevenness, the box should be placed at the most prominent point. In the opposite case, there will be difficulties with the installation of platbands.
Before installing the door frame, determine the direction in which the door will open and perform the installation accordingly. It should be noted that, according to fire safety standards, the doors must open to the exit side. In the sale of boxes come in most cases in the ready state. But you can also find separately sold parts. The advantage of the latter option is the ability to correct the design for certain parameters of the opening.
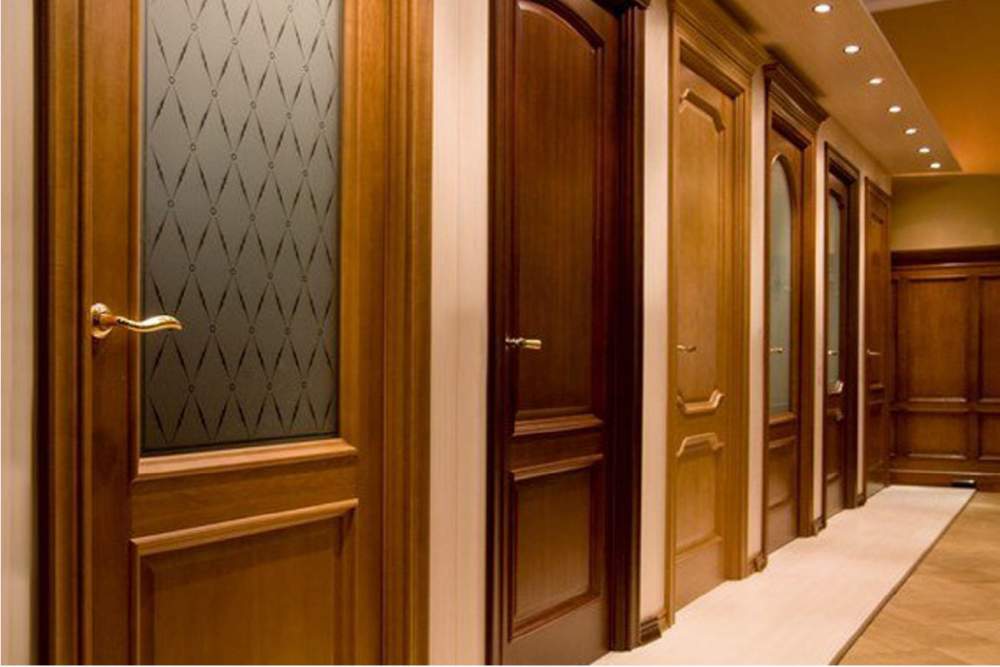
Door box. A photo:
Criterias of choice
In the selection process, the main criterion is the material that was used for manufacturing. Box based on fiberboard has a rather attractive appearance, low cost, but does not differ in strength and durability. Such a box will bend even under the influence of its own weight, so it is not suitable for heavy doors.
More positive characteristics has a laminated box made of wood. It has a sufficient seal to ensure high-quality sound insulation and decorative coating. When choosing special attention apply to the application, it should not be made of thin paper.
The structure of the profiled beam is of low cost, but it is quite strong. This material Needs finishing finish, but it is more quality than fiberboard.
Dimensions of door frames
To qualitatively perform the assembly, you need to know the dimensions of the door frame. There are the following recommended norms for the ratio of wall and box dimensions:
- The thickness of the brick wall is 75 mm. In this case, it is recommended to use a construction with a width of 108 mm.
- The thickness of the wooden wall is 100 mm. For it, you should use a box with a width of 120 mm.
- The optimal ratio of thickness values between the wall and the box is a very important condition for the subsequent installation of the platbands. If the thickness of the box is less than the analogous value of the wall, the construction should be increased with the help of dobors. These are wooden panels of various thicknesses. They are divided into horizontal and vertical elements. To avoid a drop in colors, the docks are selected for the color of the door.
- Choosing this part, you should start with the parameters of the groove. The thickness of the well should not exceed the width of the notch. If the box is not completed with grooves, the fitting of any thickness will do.
Typically, the docks are installed on one side of the structure, but if necessary, these elements can be installed on both sides. Fixing is carried out before mounting the door to the underside of the box in the following order: the vertical elements are initially installed, and then the horizontal ones are installed. This order is due to the need to superimpose the elements on each other.
Docks can be found on sale, and you can cut yourself. To do this, use fiberboard, MDF or wood. If desired, such details can be painted over with paint that is identical to the color of the door. Docks have a certain advantage over the mounting foam, because they look much neater.

Door frame fastening process
So, first of all it is necessary to prepare such tools:
- nails and a hammer;
- bars;
- drill or screwdriver;
- building level;
- a set of screws;
- electric fryer;
- wooden slats;
- hacksaw;
- a chisel;
- mounting foam.
The installation of the door frame should begin with the assembly of the bars. Beforehand, make sure that there are grooves. These parts are necessary to connect all components of the structure. The following actions are performed in this order:
- It is necessary to connect the grooves of the upper bar with the side parts and to fasten these elements together with screws. In the absence of grooves fastening should be performed with the help of nails.
- The protruding ends of the bars are sawn off. The surface should be absolutely flat, and the corners of the box - straight.
- Further, by measuring, it is necessary to determine the width of the upper part of the structure. Then you need to cut off the rake a little length of the result and fasten it to the side rails with nails. The extra rake ends are cut off.
- Then loops are installed. From the top of the box you need to measure 20 cm. Then a loop is applied to this section, the contour of which is surrounded by a pencil. The loop in the folded state forms a gap of 0.4 cm between the door and the box. This point should be taken into account when calculating the depth of the loop installation.
- Next, you need to make a platform for mounting loops at the top and bottom. This procedure is performed by means of an electric router. However, if it is not available, you can use a chisel for this purpose. From the bottom point, the loop should be located at a distance of 21 cm, 1 cm is left for the lower gap.
- The door structure with attached hinges should be attached to the door, on which to mark the attachment points of the hinges. Next, determine the height of the side of the opening. The obtained parameters are transferred to the side rails. Direct mounting is then carried out.
- If there are gaps between the box and the opening during the installation, they can be easily removed with the help of mounting foam or wooden wedges.
- After installing the frame, it should be attached to the slopes of the doorway with dowels. If there are projecting parts on wooden wedges, they should be cut off. It is also necessary to remove the strips and struts.
- On this installation work for the installation of the box are finished, you can proceed to install the door.
Install the box with a mounting tape
This method allows to solve the problem of how to install a door frame without drilling. To perform this installation, you must perform the following actions:
- At the end of the structure at 3-4 points, using two screws, a perforated mounting tape is fixed. Excess tape should be bent on the wall.
- Next, the box is installed, after which free fragments of the tape are attached to the wall by means of screws and dowels. The space between the wall and the box is filled with mounting foam.
- It should be taken into account that only 20% of the space is to be filled. To dry the foam will take 10 to 18 hours. Then its excess is cut with a construction knife.
Installation of door and clypees
The door is installed using the hinges that are attached to the kit. Before making the installation, you need to put the stops under the door leaf and fix the hinges on the stand. The final stage of the work is the installation of platbands. These elements have a decorative purpose and are installed to hide all the details of installation. During the execution of this work, it may be necessary to strengthen the box more rigidly.
Cases are installed on the inside of the box, 5 mm from the edge along the entire perimeter of the door. After installation, they need to be filed at an angle of 45 °, using a panel saw for this. It is important to take into account that piece of clypeus, which will be installed perpendicularly. It is also necessary to correctly calculate the length, since after the casing is installed, they must hide all the elements of the box. Nails without hats are used for mounting, which could later be hidden. For example, paint over.
Conclusion
Mounting the door frame with your own hands is an essential preparatory step for installing the door. The work involves several stages. During the installation it is important to pay attention to the quality of the work performed, as this is a condition for the long-term operation of the door.
Mounting the door frame. Video:
Correctly delivered front door provides not only the safety of property, but also reduces heat loss (due to the warming of the frame) and reduces the audibility of what is happening outside the house or apartment. First of all, it is worthwhile to know that the installation of the front door with your own hands is possible. And you can do everything alone, but if the canvas is heavy, it's easier to work together. In the technology itself there is nothing complicated, but there are several features that need to be known before starting the installation yourself.
Preparing for installation
Before starting the installation, remove the old door. It is necessary to do this carefully, trying not to damage the opening severely. Then the installation of the entrance door will pass quickly.
Dismantling the old door
First remove the door leaf. If the model with removable hinges, the doors are opened, a crowbar is placed under the lower edge of the blade, and when lifting the doors, they are removed from the hinges. If the hinges are not collapsible, you have to unscrew them. To begin better with the bottom.
After dismantling slopes, remove wallpaper, repel plaster or putty. The task is to determine how the box was fastened, to find the fixing points. If the door box is metal, it is usually an anchor, pieces of reinforcement. In the joints they are cut off by the Bulgarian. When all the fasteners are cut off, the old box is squeezed out or knocked out. But with this procedure, you do not need to exert excessive effort: you can destroy the box so much that it will require repair.

If the box of the old front door is wooden, everything is easier. The lateral posts can be cut approximately in the middle, and then, after picking up a crowbar, break out of the opening. After the sidewalls are removed, the lintel is easily removed. Also, without difficulty, the threshold is removed.
Preparation of aperture
After old door removed, the doorway is prepared for installation. First remove all pieces of putty, brick fragments, etc. Get rid of everything that can fall off. Then evaluate the opening that resulted in the result. If there are large voids, they are filled with brick, planted on cement mortar. Small potholes can be ignored. If there are cracks, it is better to cover them with a solution.

The existing significant protrusions, which can interfere with the installation, must be removed. You can use a hammer and a chisel or a grinder with a cutting blade.
Carefully inspect the condition of the floor under the door frame. In old buildings in this place is built a wooden beam. Often he is already rotten, crumbled. If so, delete it.
If the appearance of the bar is still whole, check the condition of the wood with an awl. With a solid effort, stick a few into the wood, after shaking a few times, take it out. So check in different parts of the bar. If enters with difficulty, at a shallow depth, the hole remains small, then everything is fine. If not - it comes in easily, from the swaying it crumples and / or crumbles, the wood has fallen into disrepair. It also needs to be removed.

The vacant space is filled with the same beam (treated with impregnation from decay), laid with a brick. The gaps are filled with a solution.
As a result of all these actions, the doorway should be more or less even. In order to be able to install a new front door.
Installation of metal doors
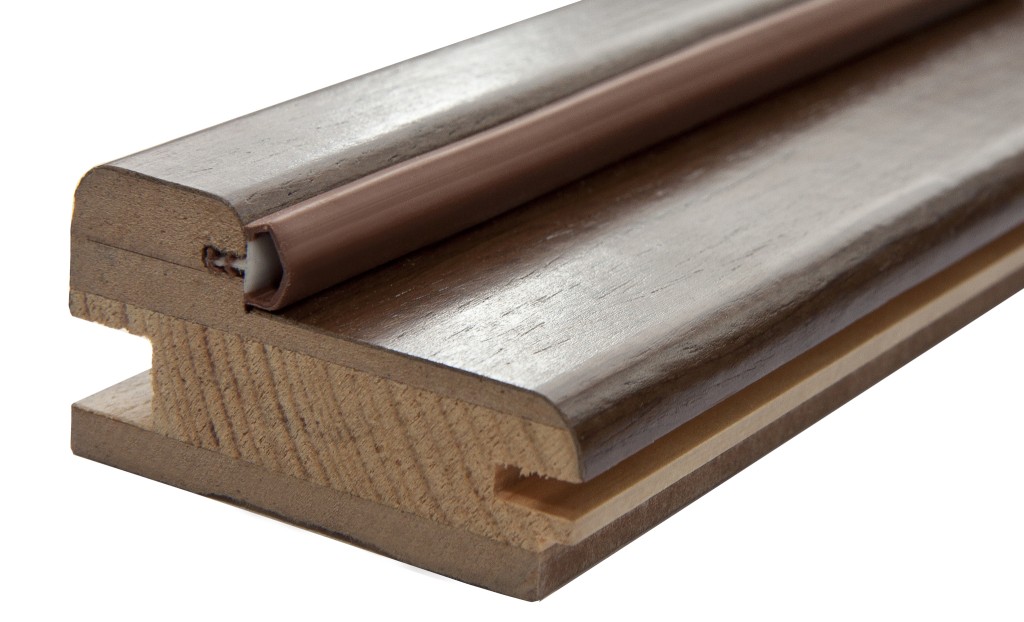
As the entrance doors most often put steel (metal). The door frame, the door frame and the outer surface of the door leaf are made of metal. To ensure the required degree of heat and sound insulation, the canvas is laid with a soundproof material. On the side of the room, the entrance doors can also be sewn with metal, or can be sheet material (budget variant).

On the frame around the perimeter of the vestibule (sometimes on the door leaf) a rubber insulation is laid. It performs two functions: serves to seal and reduces the strength of sound that occurs when the door is slammed. It turns out a reliable, warm and "quiet" entrance door.
Preparing the door
Since it is problematic to pierce the metal door, order the doors immediately with the lock. You come to a kit, which includes an already installed lock. Separately, handles come. Here they need to be installed in place, screwed with screws. Before installation, you need to check the operation of locks and latches. Everything should work smoothly, without effort and problems. If everything is fine, you can proceed with the installation of the entrance metal door.

If the doors are installed with an exit directly to the street (in a private house, for example), the door frame is laid from the outside with a heater. You can use cut stone wool. It is inserted into the frame and is held by the force of elasticity. It has a significant disadvantage: it is hygroscopic, because of what the doors can rust from the inside (if they stand as an exit on the street and are not tightened tightly). In multi-storey buildings this is not critical: there is no precipitation in the entranceway. Another way out is to put foam or fill the frame with foam. They do not fear moisture, but the thermal insulation is normal.
To ensure that during installation and subsequent finishing works, the paint coating of the box is not damaged, it is pasted around the perimeter with painting tape. It is removed after it is made. If some wires are coming through the door frame, it's time to install the mortgages - a piece plastic pipe or corrugated hose, through which these wires will get inside.
Installation in a brick and concrete wall
It is more convenient to put doors in which the canvas can be removed. Before installation, it is removed from the hinges. A door frame is inserted into the prepared opening. At the bottom, it is placed on mounting pads with a height of 20 mm. She should get into the opening freely.

Changing the thickness of the pads, we want the lower frame to stand strictly on the level. This is checked using the building level. Putting it in the horizontal, we set it vertically: so that the racks do not deviate forward or backward, but stand strictly vertically. This is also checked with a level, only the device with the bubble is on the short part of the instrument. Another option is to check with a plumb line.

After the box is exposed exactly, it is wedged with prepared wedges. They can be cut from wood, and you can buy plastic. The wedges are inserted on long racks of tri-pieces, at the top - two. They should be installed near the fasteners, but not overlapping them.

After installing the wedges, it is checked again whether it is right: in the horizontal and vertical planes. There should be no abnormalities.
Next, the installation of the metal door frame in the opening begins. There are two types of mounting holes: steel eyelets welded to the box and a through mounting hole (there are actually two: in the outer plate of a slightly larger diameter and in the inner plate of the smaller one).

There is no difference in the method of installation. Just frames with holes in the body of the box can be installed on thinner walls. This may be important if the installation of the front door is in a panel house: it is not always possible to put doors with lugs in them.
Fixing through through hole
Fasten the iron entrance doors to the anchor or pieces of steel reinforcement, with a diameter of 10-12 mm. The diameter of the fasteners is selected for the available holes. If an anchor is used, their head must pass into the outer hole and "get stuck" in the inner hole. The diameter of the reinforcement must match the diameter of the holes. In any case, they are pre-drilled holes.
We take a punch, a drill and an anchor. The drill bit is the same diameter as the fastener. Its length should be at least 30 cm. To determine more accurately at what depth it is required to drill, a sticky tape is attached to the drill. It marks a distance that is slightly larger than the required depth.

Installation of fasteners on the hinge side begins. When drilling, it is important not to move the installed box. First they drill from above.

Install the anchor, finishing it with a hammer. To drown it to the inner edge of the box, insert a screwdriver into the slots, and tap the screwdriver with a hammer. Then, when the anchor was driven, it is still tightened a few turns with a screwdriver. We check to see if the box is moved at work - we take the level and check everything.

Similarly, install the hardware below. Also check, vertical and horizontal. If the door leaf is not heavy, you can already at this stage to check how correctly the box is exposed. To do this, hang the doors and check to see how exactly they have "sat down", whether there are any distortions, cracks and other troubles, how much the locks and latches coincide and work normally.
If the canvas is made of thick sheet steel, weighs about a hundred kilograms, two fastenings are clearly not enough. Then install all the fasteners on the side of the hinges, as well as one from the side of the lock. After installing each fastener, the verticality and horizontalness of the box are checked. Then gently hang the canvas and check how it "walks". If everything is OK, the fasteners are still being installed. No - it is necessary to remove already installed fasteners and expose the frame in a new way.

We put the anchor in the door frame of the entrance door from the bottom, checking the verticality of the rack
After checking the canvas again remove, finally tighten the already installed anchors. Then they put everything that is needed on the side of the hinges, then on the side of the castle. When everything is finally installed, put the door leaf back in place.
Now you need to fill the gap with foam. To install the front door with your own hands it is better to take it with a small expansion factor: it's easier to work with it. To polymerize the foam was normal, the cavity, which will be filled with water from a spray gun (ordinary household). Then all is slowly filled up with foam.
Blow out the entire width of the door frame: then it will not blow and sound insulation will be better. When installing the iron door, you do not have to worry about that the box is unlocked: the rigidity of the metal is such that the foam expansion forces are far from sufficient. Because you can generously fad.

Only if the foam hit the canvas, it should be removed immediately with a damp cloth. After 5 minutes, you just will not wipe it off. While wet - is cleaned without traces. Then it is necessary to scrape, but this does not pass painlessly: traces will remain. Foam polymerization will end after 24 hours. Then we can assume that the installation of the front door with their own hands is suspended. Left .
Mounting the box with eyelets
If there are on the box welded plates - eyelets - the box is placed exactly the same: on the pads. Then it is leveled and wedged. Then there are two options:

When installing by this method, the position of the box should be checked more carefully: it is easy to move it from the spot. If you do not correct, the doors will work badly.
Installation of an entrance door in a wooden house
AT wooden house Any windows and doors are not mounted directly to the wall, but through a casing or a window. A window is a wooden beam, which is fixed to the frame (from a log or a timber - it does not matter). It connects due to the connection of the "spike / groove" type and is held by the force of elasticity. The door frame is already attached to this bar.

This is a necessary measure. After all, the wooden house constantly changes its height. The first five years he sits down - due to shrinkage and sealing of the planting sutures. The first year doors and windows are not put at all: too big changes. In the second year the shifts become less pronounced, but are always present. Therefore, it is impossible to secure the doors rigidly: they can be jammed or bent, or they will interfere with the normal shrinkage of the frame.
For this, a groove is cut in the doorway. They make the casing from the bar in the form of the letter "T". The width of the groove should be slightly less than the thickness of the stud: in order to keep well. Insert it into the spike, hammering with a sledgehammer. That's all. No other fasteners.
Note: the height of the racks is much smaller than the height of the opening: after the lintel has been installed, at least 3 cm must remain at the compensation gap. It is covered with mineral wool. This is also necessary in order that the shrinkage of the door does not distort.

Installation of an entrance door in a wooden house in a section
After installing the casing, a box is attached to it. Use of anchors here to anything. You need powerful screws or screws. Under them, too, necessarily drill holes, but the drill bit is slightly less than the diameter. Note: the fastener along the length should not reach the wall (in the photo above it is visible).
This video shows how to make a casing, forming a groove in the opening.
This video shows a different type of manufacturing of the window: a thorn is formed in the opening. With a chainsaw everything turns out quickly, but this level of ownership is available to a few.
Installation of the entrance door to aerated concrete
Another one construction material with features - aerated concrete. He does not hold shock loads well, because to fasten the entrance doors as a brick wall does not work: they just fall off. The output is as follows: to make a frame from the metal corner, which will be supported on the wall by means of an abutment.

In this case, the jumpers that pull together the two corners are made in the places where the fasteners are located - the lugs or mounting holes. And it is on these lintels that the door will hold.
Features of installation and construction metal doors - in the video.
The second method of installation is less common. It requires less time and materials. But how reliable will be the entrance door, mounted on such a technology - is unknown. While there is no data.
Installation of the door frame is carried out only after finishing the finishing works on the ceiling and walls. The repair in the room must be completely finished, but the skirting board should not be installed.
Doors can have such types of complete sets:
- door block - all parts are connected, hinges are embedded, and doors are hung. This is the easiest kind of integration of interior doors for installation, as everything has already been assembled and it remains only to install the door yourself;
- door leaf and box. Such a complete set consists of all the parts that perfectly fit each other in size, but not yet assembled. The owner needs to correctly collect all in a single whole and then already;
- door leaf. All materials and components in this situation are bought separately. Next, the door frame is assembled and the door is installed in the doorway.
The more complete the collection of doors, the more expensive they will cost you. This must be taken into account when choosing the most suitable equipment.
Dimensions of the door frame
The door box consists of many elements and for its assembly it is necessary to clearly know all the parameters of the components. Their dimensions are directly dependent on the height and width of the wall, for which the door was correctly selected.
Experienced masters advise to adhere to such proportions of sizes of components:
- for the interior wall of brick, a thickness of about 70 mm, you need to choose a door frame with a width of 108 mm;
- for a wooden paved wall about 100 mm thick, the best option would be a wooden box having a width of 120 mm.
Such parameters of wooden door frames absolutely correspond to the standards in our country. Foreign manufacturers can produce boxes with a size of 80 to 205 mm.

If the dimensions of the door frame do not correspond to the width of the doorway and wall thickness, then it can be replaced by a special "rough draft". In this case, the door frame is made of boards or special beams, and properly adjusted to the thickness of the wall.
Required Tools
The installation of the doorframe with your own hands does not require significant effort, you need to know how to carry out installation work, and also have on hand the necessary tools:
![]()
- a hammer;
- drill or screwdriver;
- nails (for interroom box installed in a wooden wall);
- screws;
- milling machine;
- hacksaw;
- wooden slats;
- a chisel;
- building level;
- a template for installation of door frames;
- a set of bars, which are usually sold together with the door frame.
If you do not have such an instrument, then you can rent it for a nominal fee.
Dismantling of the door box
Before installing a new door, it is necessary to properly dismantle the door frame. First you need to remove the trim, and then carefully dismantle the wooden door frame. Old bolts and fasteners can be removed, having made a saw with a Bulgarian or a hacksaw, in the future they will not be useful. After the complete dismantling of the door structure, it is necessary to check the interior wall for strength and properly reinforce it, if necessary.

Sometimes, when a wall requires fastening, it is necessary to use a special reinforced structure or to carry out concrete work. Thanks to such methods, it is possible to significantly strengthen the wooden or brick wall and extend the life of the door frame.
Assembling the door frame
Methods of fastening the door frame to the wall
There are four basic methods to fasten the door frame:

- Types of doors and boxes for installation
- Basic fixing methods
- List of tools and consumables required for work
- Assembling boxes: recommendations
- Furniture fittings: features
- Box installation: highlights
The interior door is always in sight, so its installation should be done without the slightest flaws, so that at each opening or closing, do not remind yourself. As with the help of wage workers, everyone must decide for himself. However, it is necessary to have an idea of the progress of the process, if only to check the work of the master.
Interior doors should be a beautiful and harmonious complement to the interior.
Types of doors and boxes for installation
Before you install the interior doors, you should decide on the choice. Now the market offers a lot of options for doors, different in terms of material execution and design. From the point of view of technology for installation, the material from which the door leaf, the box and the additional elements are made is most important.

Types of interior doors by the way of opening.
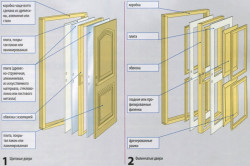
According to the design, interior doors are distinguished:
- made of solid wood;
- panel (frame) doors.
The frame of such a door is made of bars and is lined with sheets of fiberboard with subsequent finishing. By filling, such doors can be hollow or filled with short lengths of bars.
The box and additional elements can be made of solid wood or MDF with various variations decorative finishes (paint coating, lamination or untreated mass).
Different material of the performance will dictate various technological methods of work when installing the door leaf.
Back to contents
Basic fixing methods

It is possible to distinguish several practical methods that allow the establishment of a modern interior door, each of which has its advantages or disadvantages.
The most reliable option for securing the box in the doorway is by means of dowel-nails of sufficient length or anchors. Vertical bars are drilled through and rigidly connected with fasteners to the wall.
The disadvantage of this method of fastening is that on the surface of vertical racks there are visible attachment points. Disguise the fastening heads by installing plastic decorative plugs of suitable color. A more radical, but more expensive variant of masking fasteners is the use of a box with a groove for the installation of fasteners and a liner, which this slot closes at the end of the work.
Less costly, but also less reliable will be the through door fastening through the holes in the hinges and the mating part of the lock. Here, just as in the previous case, rigid attachment to the wall is carried out. Due to the fact that in fact there are only three attachment points, the construction of the door frame will withstand less strain without deformation. But here it is not necessary to hide fasteners. He camouflaged for a regular fastening hardware.
Finally, a method that is the least time consuming. In this case, the door frame is exposed in the opening in the required position and fixed with wooden pads. Then all the free space between the beams and the wall is filled with mounting foam.
It should be understood that with this fastening, the entire load will be covered by a layer of frozen foam. And if you hang a heavy door, then in time it can shake the joint and even wrest it. With the mounting foam, only light panel doors can be installed.
Back to contents
List of tools and consumables required for work
To perform the installation you need a certain set of tools and supplies:
- hacksaw - for cutting the packing bars;
- electric drill;
- puncher (it is necessary if the material of the walls is reinforced concrete, in all other cases it is basically possible to do with a drill);
- chisel, it will be required for inserting the hinges and door-latch;
- the building level, will help to independently check the correctness of the installation in the vertical plane;
- dowel-nails or anchor bolts;
- mounting foam.
Naturally, to perform the installation works, in addition to all of the above, you will need the details of the door kit:
- door leaf;
- set of beams of the box;
- threshold, if necessary;
- additional elements to inscribe interior doors in the opening with a large wall thickness;
- it frames the installed interior door around the perimeter on the wall surface and closes the gap between the box and the opening.
Back to contents
Usually the set of bars that form the box consists of two vertical racks and one horizontal crossbar. In some cases, they are supplemented by a threshold.
Before, it is necessary to adjust the details to the size of the door leaf and the opening where the installation will be made.
With a small tooth, the vertical posts are cut to the desired size at an angle of 45 °.
It should be noted that the angle of cut must be in the upper part of the beam from the side facing the door. Similarly, the upper horizontal jumper is also fitted.
It is not necessary to adjust the parts to each other at an angle of 45 °. In general, they can be interfaced at 90 ° with the support of the upper bridge on the vertical posts. This option will be slightly easier to perform than the previous one, although it will yield aesthetically.
If it is necessary to set the threshold, it is adjusted to the posts at a right angle. A very important point that can not be overlooked is the accuracy of the fit. Between the beams of the box and the door leaf there should be a gap of 3-5 mm. This is necessary to compensate for possible changes in the size of the door when the humidity fluctuates. In the case of an accurate fit, the jamming effect can result, and then the interior door should be opened with the shoulder.
Back to contents
Furniture fittings: features
While the box is not installed in the opening, it is very convenient to cut the hinges and locks. The door and the box are temporarily assembled on the floor of the room. A pencil marks the position of the hinges and the door handle-latch. Then all the details are again disconnected and the full arrangement of the hardware is drawn on them.
Sampling of surplus material is a very important moment. On how well it will be performed, the smoothness of the door, the presence of creaking and the period of trouble-free operation will depend.
If the material of the door and the doorpost is a tree, then the chisel is enough to perform the work on the additive accessories. The grooves under the loops are chosen elementary: along the circumscribed perimeter, an incision is made to the depth of the installation of the loops. Then everything that is inside is simply cut off.
The situation with the lock of the castle will be somewhat more complicated. To facilitate the selection of a deep groove, you will need to use a drill here. The diameter of the drill bit installed in the chuck must be slightly less than the thickness of the fittings to be inserted. In fact, the groove under the lock to be installed is drilled into the tree array. The chisel just needs to straighten its walls in order to perform a tight installation without distortions.
If the cut-in is carried out not in a tree, but in MDF, the requirements for sharpening the sharpening of the tool are increased several times. This is due to the characteristics of the material itself. MDF, in comparison with wood, is a harder material, but at the same time much less durable. Excessive force applied when selecting slots for hinges or locks can simply crack the work pieces.
The best option in this case is to use a hand-held router to cut the fittings. To facilitate the work and improve the accuracy of the grooves at the end of the door and vertical racks will help specialized devices and templates. They can be purchased in advance or manufactured independently from improvised materials. Do not interfere with the milling cutter when working with wood.