Yesterday they installed doors. In the children's room Pashkin's son. Long time this business was not engaged, but, it appears, still we can. We can tell and show how to install interior doors with your own hands.
Yes ... if you put a few pieces a day each day, then you'll shpak them like a robot, and if one a year - better to measure seven times before cutting.
Here it is, our doorway. Near - a box in disassembled form.
![]()
And the doors - the simplest, the most usual - a frame of bars, covered with a plate of fiberboard. With a decorative window under the glass. On the very first photo.
In our case, the doorway is assembled from a metal profile and covered with a double layer of plasterboard. Paul, in addition to collecting plasterboard structures.

The thickness of the wall is 15 cm. In stores, boxes with such a wide board are not for sale. There usually 9-10 centimeters do. We ordered a box in the carpenter's workshop. Immediately on the entire thickness of the wall, then not to put more dobory. And the whole board is more beautiful - without seams and ledges.
The width of the board was ordered 153 mm - 3 mm larger than the wall. Why these 3 mm? A box of 1.5 mm on each side will protrude beyond the plane of the wall. Then, when the platbands will be beaten, they will lay down nicely, without distortions, and to the box, and close the wall.
Our interior doors will be with a threshold, so all four bars will go into business, if you put it without a threshold, the bottom of the box can be temporarily fastened with some board-spacer, nailing it to the racks. And after installation - tear off.
Let's proceed to assembly of the box. Carefully cut off the ends of the bars, so that the slices were at right angles.


The upper and lower bars are cut to the size of the door leaf (70 cm) plus 3 mm per gap between the canvas and the box - a total of 70.6 cm. Now consider the length of the side racks.

The height of the door leaf is 200 cm plus the thickness of the bars in the place where the quarter is chosen - 3 cm.

Plus 3 mm per gap between the box and the door - a total of 206.6 cm. Again, all slices at right angles.
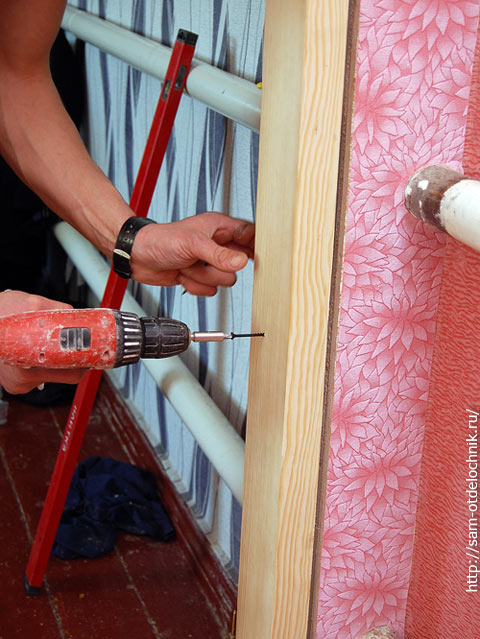
We put the crossbeam on the side stand for clarity and conduct a line along which it is necessary to make a saw cut to the depth of the sample.

Usually choose a quarter of a depth of 1 cm - such a depth and propyl. To make it neat, it is better to rest the saw in a piece of already peeled bar.


Pilyim carefully, so here such scratches do not do - they will not close, will be visible, the wife then Pashka "saw" will.


Well, here's something like this:

The same thing was done on the opposite side and with the second bar too. We drill holes for self-tapping screws. Self-tapping screws in the holes should be free to enter, so that the beam is attracted.

We collect the door frame by inserting the edge of the upper (lower) beam into the sagged edge of the side frame and pulling them together with screws (75 mm) with a screwdriver.


The box is ready. We put doors in it.

With the help of wedges, the gap between the door and the box was the same along the entire perimeter. We note where there will be loops. To do this, step back from the top and bottom of the door of 20 cm, attach the hinges and make notes on the canvas and on the box.

Orienting on the made marks, we outline the loop loop on the box and on the end of the door.
Only on the box - one part of the loop, and on the door - the other.

On this contour, the chisel is sampled to a depth equal to the thickness of the loop plate.

The loop must be flush with the sample.
 On the door - the same.


Those who are engaged in installing doors professionally, such operations are done with the help of such a "miracle" as a router. But we tell how to install interior doors own hands, without the help of a professional, so that the chisel in this case is the most suitable "device".

If you need to move the loop - the screw can be unscrewed and, after adjusting, wrap it in another hole.
Switch to the box. We put it in the doorway and wedge it to fix it using wooden wedges.

And Pasha from the construction of support pads pulled - used them. We spread out at the corners, at the top and bottom bars, in other places wedges will bend the boards.

When the box is fixed with wedges, we forget for a while about all its sides, except for the counter on which the doors will hang. Now we are only interested in this bar. You need to adjust it vertically in the level and fasten it. We check the level of one plane.

If the rack needs to be tilted, do this by slightly hammering the hammer on the top or bottom corner of the box. At the same time, make sure that the edge of the box slightly (by the very 1-2 mm) protruded in relation to the level of the wall.

Now we look at the second plane.

We achieve the vertical position, if necessary, increasing the thickness of the wedges on one side and decreasing on the other. All, the stand is adjusted to the level, we drill 3-4 holes for the screws along the entire length of the beam.

We put wooden pads in these places, so as not to bend the box.

And fix it with screws 75 mm long.
If the wall is brick - drill into the brick through the timber and fasten the box with long dowel-nails or anchor bolts.
We hang interior doors, carefully cover and see what the second rack shows us.

And she shows us that the upper crossbar wedges - the doors do not close.

Raise this edge of the box a little, placing a wedge underneath.

Now the doors are closed and the gaps between the box and the cloth are the same everywhere.

We cover the doors, pushing without effort, and we look at the porch. The bottom corner adjoins perfectly.

And above - a gap of about 3 mm. We remove it by tapping lightly on the upper corner of the box to meet the door. Now also the upper corner with free closing of doors, without a backlace is adjacent to the box.

Once again check the position of the box relative to the plane of the wall, so that the clypeus then stands up well. All, we fix this rack with self-tapping screws, similar to the first one.
Before filling it is possible to insert in several places between the door and the box of the wedge, so that the foam does not bend the box inward.

Even if the box is fixed with screws, it can squeeze out easily. If you need to walk through the doors - you can put between the pillars of the box, in the middle, the brace of the bar - will have to bend.
It remains to fill the gap between the doorway and the box with mounting foam. Fill half the space - foam greatly increases in volume.

We check the correctness of the installation of the doors - they are not opened, they do not open themselves spontaneously and do not open - they stopped in place.

You can permanently fix the hinges to all screws or screws from the loop set. The next day cut off the protruding pieces of foam, and you can fix the platbands, put the handle-latch.
That seems to be all, has set a lot, but I tried, so that, for example, when I first read the article, I understood how to install interior doors with my own hands. If you missed something, ask questions.
To receive new blog articles on your e-mail, subscribe.
There are no similar records.
I would be grateful if you share an article on social networks:Photo from the site vasilekmusic.ru
Success in the self-installation of overlapping openings can be achieved if you correctly approach the solution of this problem. On the one hand, it is not difficult to do such work, but on the other hand there are a number of nuances that must be taken into account during the installation.
In this article I will tell you, how correctly with their own hands to insert wooden interior doors with dodings or with a box in the house or apartment, we will provide detailed photo and video-instructions, so that you yourself can cope with each of the stages of work.
Preparing for installation
Like any other activity related to the repair or renovation of the apartment, the installation of interior doors necessarily includes a preparatory stage. And this is correct, because without it, such a seemingly simple thing as the replacement of the canvas and the box can drag on and become a real long-term construction for the owner.

photo from the site vasilekmusic.ru
To begin with, we will see that the size of the common block corresponds to the existing opening. In this operation there will be enough clearance about three centimeters, which will remain after the installation of the linen and components. Thus, we get the opportunity to put the box and the opening on one level.
It is quite easy to do this. With a perforator or other percussion instrument, the opening can be made wider. If everything is the opposite, then we will use a wooden bar in order to narrow the passage.
Approximately five centimeters of the gap will be optimal in any case.
To install the design correctly, you will be helped by one rather simple technique.
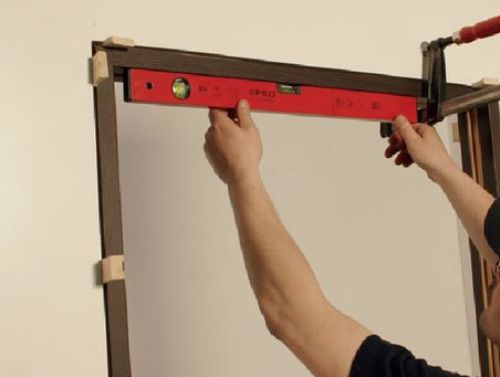
- We establish three wooden perches across the opening, so that the first is located at the top of the entire box, the second, respectively, from below and the third - in the middle. Thus, with the help of such a device, we are able to install the door as accurately as possible and evenly, in accordance with the lines of the opening.
- In order to avoid breakage or various defects on the surface, it is necessary to put previously used racks in a fixed position using wooden lining. By screwing these overlays to the ends of the system, we get the desired result. In the end, it should turn out so that already in the established design the perches rest against the walls.
Of course, there are also a couple of tricks for installation without the hassle.
- To begin with, the previously mentioned racks will need to be fixed from the side of opening the room.
- To fix the box, use a thick cardboard, after having folded it two times. Make sure that the box is fixed strictly vertically, without any distortion.
How to install the interior door yourself: step-by-step instruction with video

Photo from the site vasilekmusic.ru
After you are finished with the preparation and stocked with the necessary tools, it's time to start installing the cloths.
In this case, you can not do without:
- hammer;
- overhanging lumbar level;
- fomki;
- balloon mounting foam.
A good solution will be the purchase of foam Macroflex 65, it is ideal for this type of work, because of low polymerization.
In addition, you will have to prepare several wedges made of wood. You can buy and plastic, just make sure that they are strong, do not buy too cheap products.
After that you will need to perform the following works:
- First, put the common block in the opening. At this stage, you need to carefully examine the side where you are going to mount the structure. You must stand in the place where the canvas will be when you open it. Raise the structure and insert it into the center of the opening. Make sure that the gaps on both sides are the same, for this you can slightly move the box.
- Then you will need to make sure that you have correctly and vertically arranged the rack boxes. In this, the building level will help you. Attach it near the upper jumper at the very bottom. If you notice any deviation from the norm, then take the forehead and slightly raise its lowest post. In the gap formed, place a few wooden wedges.
- The next step is fixing the block and partitions. Drill several holes of medium diameter (from 5 mm) in that part of the lintel of the tree, which protrudes most strongly. Screw in the holes dowels. Carefully follow the position of the entire structure with respect to the side walls. From time to time correct her position. It is very important that the box is level.
- Then draw some water into the spray gun and wet it and the opening and the box. This is necessary to ensure that the mounting foam is better polymerized and attached to the walls. After that, check again how well the box is. Take advantage of the construction level again. In addition, pay attention to the gaskets, which are most often fixed in the space near the opening and the puddles and are made of cardboard. If any of them fell out during the installation, then return them to the previous position.
- The next step is filling the voids with a mounting foam. You will need to fill in its free space between the block and the partition. Give the material a few hours to dry.
The average frothing rate of the foam is from 7 to 12 hours. Remember that this material is poisonous, so do not allow children or pets to approach it.
Do not ignore the simple rules of personal safety: do gloves.
- At the final stage, you can safely get rid of the aids. You will not need them any more. Using a screwdriver, remove the screws that held the jumper in the opening. Remove the slats and open the room.
More details with the installation instructions can be found in this video.
We perform the decoration of the opening
If you think that after the canvas has become in its place, the front of the work can be considered complete, then you are mistaken. After installation, it is necessary to finish the opening. We will tell you about several ways to perform this procedure, which are based on different indicators of the width of the opening and the type of the block.
- If the partition is thin.
A similar situation can be encountered when we set the door to the bathroom. In this case, only quality casings will help us to trim the opening. This option is very convenient, inexpensive and fast. All you need is: buy parts, fix them on both sides of the box, so that they close themselves where the assembly foam is visible.
- If the opening is wide.
In this case, the finish can be done and with the help of platbands, as has already been described, and with the help of dobors. The latter does not necessarily buy in the tone of the canvas, they can be different colors with it. Cut out the bar of the size you need and fix it with glue.
Besides this there is another way of finishing. You can just properly plaster the slopes. This technique is most popular when you install a box of wood.
The texture of the solution, which we will use, perfectly emphasizes the picture of the tree, and as a result you will get not only a sound and high-quality construction, but a stylish enough design element.
Plaster can not be used if you install a door from a fiberboard. From moisture this material can deform and exfoliate, which will lead to its destruction.
When you install the unit, take care of installing the casing. Cut from one of them the edge at an angle of 45 degrees, and then attach it to the box. For this you can use carnations, decorative clips, self-tapping screws.

Photo from the site vasilekmusic.ru
What to do after installation: several rules for caring for the structure
You need to understand how correctly and well you have not installed the door, it can quickly stop you from rejoicing and becoming worthless. It's all about misuse and inadequate care.
Here are some tips, the following of which greatly extend the life of your design:
- Install such partitions only in those rooms that have a temperature inside of 15 to 35 degrees in the positive direction. And the humidity in them does not exceed 70%. Sharp temperature fluctuations and high humidity will have a negative effect on the design.
- Note that close attention should be paid to the use of such systems in those apartments where sealed windows are installed. If you do not regularly ventilate such a premise, additional moisture will begin to form, which will damage the elements and materials of the structure. For example, the surface of the canvas can become blistered, exfoliate or begin to deform otherwise.
- Models from MDF can not be installed in rooms with high temperature and humidity. For example, in swimming pools, saunas, areas where there is no heating or floors covered with cement.
- At the same time, it is allowed to operate interior partitions under short-term exposure to moisture. At the same time, ventilation of premises is a prerequisite. An example of such an object is the bathroom.
- Opening and closing the blade must be carried out exclusively in ways that do not entail damage to the structure and casing. In addition, even if the structure is equipped with a wear-resistant pavement coating, rough mechanical action on the structure should be avoided. Otherwise, chipped, cracks, burrs and rubbing are likely. Such defects significantly worsen the aesthetic appearance of the general block.
- The interior door, like the furniture in the room or other interior items, needs careful attitude and attention. To maintain the aesthetic appearance of the structure, it is sufficient to periodically apply special care products.
- Clean the unit from dirt and dust with a soft cloth or a damp cloth.
- Avoid contact of the structure with various solvents, acidic and alkaline compounds.
Adhere to these rules and then your important details of your interior will last for many years, will please your excellent appearance.
Summing up, we will note that the process of installation will take about 5 hours for the layman, during this period preparatory work does not include. Therefore, when starting work for the first time, soberly assess your strength and call an assistant.
I welcome all the house masters! If you work confidently with a hand saw and power tools, then you will not be able to install interior doors independently. And how to do it right, we'll talk further on the article.
Necessary tools and materials
To install the interior door, we need to prepare the following:
- building level (laser or alcohol), tape measure and pencil;
- a hacksaw on wood with a small tooth, a chair, an electric drill with drills for wood and concrete;
- screwdriver + galvanized self-tapping screws, hammer and finishing nails;
- chisel or cutter for selecting grooves for fittings and planes;
- mounting foam, wooden blocks for spacers and wedges from scraps of sawn timber.

Preparatory stage
Before buying a door with a box, measure doorways. The width and height of the box should be slightly smaller, otherwise you will encounter the need to expand the openings in the walls, which is very troublesome and expensive. The gap between the door frame and the opening in the wall should be from 10 to 40 mm - in the future it will be filled with mounting foam.

If the depth of the opening exceeds the dimensions of the shaped bar from which the door frame is composed, the remaining gap will subsequently be closed decorative finishing. The easiest way is to use a special bar - the dash, made in the color of the door structure. In this case, it is recommended to purchase a door frame with a special longitudinal groove to install the fitting, this will greatly simplify installation.

Assembling the door box
First of all you need to free up the elements door frame from the packaging, trying not to damage their external decorative coating. The box can be supplied:
- fully assembled and ready for installation;
- in the form of ready-to-assemble elements;
- in the form of a shaped bar from which it is required to make a construction for the size of the door leaf.

If the box consists of items that have been added to the size (hinge and feather bar, lintel bar), it needs to be assembled. Using a peg made of wood, knock out with a hammer plastic plugs from the upper ends of the racks.

Then connect the edges of the lintel to the upper edges of the vertical pillars, insert the previously knocked-out plastic parts into the formed holes. In order not to spoil the appearance of the box, punch the inserted element through a wooden gasket.

The self-manufacturing of a box from a bar requires multiple measurements (use only one tape measure!) And accurate calculations. The dimensions of the box are selected so that there is a gap of 3 mm between the door leaf and the frame along the entire perimeter. The elements of the box are secured using galvanized self-tapping screws, which are installed on the back of the beam contacting the doorway.
An experienced home master, using a chair, will be able to accurately saw the upper edges of the posts and the ends of the horizontal bar at an angle of 45 degrees. To fix each such connection, two self-tapping screws are screwed perpendicular to the oblique cut into the pre-punched holes: into the upper part of the horizontal element and into the side part of the post.

If you are not sure of your skill, execute the U-shaped frame from the rectangular pieces of the beam - the upper one should rest on the ends of the racks. To make the cuts perfectly smooth, use a stool. Both ends of the horizontal element are attached to two screws to the upper sections of the racks.

Insert the door leaf into the resulting frame, check the width of the gaps. Measure the opening in the wall and determine at what distance from the edge of the canvas you need to saw off the lower parts of the racks, which should be supported on the floor during installation. There should be a gap of 8 to 15 mm under the door.

If it is intended to set the thresholds, prepare this element - its length should exactly correspond to the distance between the frame racks. The piles are inserted between the posts and fastened to each side by two self-tapping screws, which through the vertical frame member enter its ends. The clearance between the door leaf and the door should be 3 mm.

Mark the position of the door hinges and remove the layer equal to the width of the hinges, so that they would be fastened flush. If it is not possible to use a specialized tool (milling cutter), the recesses for the loops are made using a chisel. It is important to act extremely carefully, so as not to damage the outer decorative layer of the door structure. The hinges are set 20-25 cm from the top and bottom edges.

Door installation
The assembled door frame should be installed in the opening level, strictly vertically. With the help of wooden wedges pinned with a hammer, the box is fixed in the opening. If the design is not provided with padding, take care of the horizontal spacers, which will not allow deforming the U-shaped door frame - as spacers are used bars, packed in the size of the internal width of the frame.

In the frame, drillings for wood of various diameters are made holes for the fastening elements - under the head, which must be hidden in the back, and under the body of the fasteners. Then, with a suitable drill, holes are made in the wall structure. To install the door frame, it is sufficient to use three anchors, the places of their installation are hidden under the back of the lock on one side, under the flags of the hinges on the other. To fasten the frame to concrete, dowel-nails are required, for the installation of a door in a gypsum board with wooden bricks, sufficiently powerful self-tapping screws.

The gap between the box and the opening is frosted. It is most convenient to use a mounting foam with a dispenser and fill the voids with small portions of foam - in this case you do not have to cut off excess, the risk of accidentally splatting foam with the outside of the box is reduced. When the main part of the foam seizes, the spacer wedges should be removed and the points of their installation fixed.

When installing the box with the dash, the decorative strip is inserted into a special longitudinal groove in the frame and fastened to the glue. If the groove design is not provided and there is no possibility to cut it, before fixing the box, fix the slats to the rear side of the frame elements. For this, small galvanized self-tapping screws are used, the fastener step is about 60 cm.

After the mounting foam around the box is frozen, you can gently remove the spacers and hang the door. Check how it closes and opens, if necessary, correct the installation of the hinges if they are excessively recessed or protruding beyond the plane.

At the final stage, the platbands are mounted. Saws at an angle of 45 degrees are performed using a chair. To the door frame trim is nailed by finishing nails or studs without hats. In order not to damage the casing from MDF and other fragile materials, drill holes in the fasteners in them. The joints of the planks of the clypeus and the attachment point are filled with mastic under the color of the door structure.
Video on the topic "how to install the interior door with your own hands":
It should be noted that the services of specialists in the installation of doors can cost no less than she herself. To avoid such costs, many prefer to perform installation work yourself. How to do it qualitatively? This will be discussed later.
Measurements
For this, it is necessary, if available old door, remove the trim. You can do it with a nail and a hammer. It is necessary to insert the nail into the slot between the casing and the door frame, to make several punches with a hammer to enlarge the slot. And then you should make efforts in different places along the length of the clypeus to tear it away from the door frame.
The most optimal way to take measurements is to look at the size of the old box. If it is not in the opening, then it is necessary to measure the width and height in several places. Choose the smallest value. Experts recommend from this value to take away about 10 cm to get the dimensions of the door leaf.
When taking measurements on an old box, remember that modern samples are somewhat thinner. Typically, the thickness is 1.5 cm. It turns out that the width of the canvas together with the box is considered so: the width of the fabric plus the double thickness of the box (left and right) plus a small gap between the box and the cloth. For example, the canvas has a width of 80 cm, then we get this calculation:
80 + 1.5 x 2 + 0.4 x 2 = 83.8 cm.
Preparation of the cloth
We believe that we have already received a canvas and a door frame, based on the measurements taken. Now you need to go to the active activities. And it's worth starting with the canvas.
The following tools will be required for work:
- sharp chisel;
- a hammer;
- roulette;
- a drill with a screwdriver for screwing in self-tapping screws, with a drill in wood, the diameter of which is smaller than the size of the screw.
We will not use expensive milling equipment, using only standard tools available to a wide range. And if you have the opportunity to use such a machine, the task will be simplified and accelerated at certain stages.
This will require such an accessory:
- loops;
- latch with handles.
So, we examine the door leaf. More often damage can be on edges, therefore it is necessary to examine them properly. If there are any problematic areas, you should consider how it is better to place the canvas in relation to the opening and the box in order to hide the defects.

Door hinges are hung from the upper and lower edges of the canvas to 20 cm. Apply alternately in these places overhead loops (using a smaller, inner part of the overhead loop). We make marks. A pencil is suitable for this. If you use a dark material, for example, the now popular wenge, then you will have to choose an alternative. For example, use a ballpoint pen, pressing in the marks.

By these marks, with the help of a drill, we make holes, after putting the door horizontally, with the butt face down. You can make them quite small in length, this will be enough. Now you need to try on the hinges and fix them using two screws (from the kit). Do it best with the same drill with a cross-head attachment or a screwdriver. Do not screw in all the screws, because the hinges will have to be removed.
If we use cutting elements, then the canvas will have to make indentations.
Next, prepare a place for installation in the latch cloth. It is believed that it is placed at a distance of 90-120 cm from the floor. We choose the optimal for yourself and your family members height. If there are small children, then, most likely, it is better to place the latch higher.
So, the canvas needs to be flipped (imagine how it will work in the end, so as not to confuse top and bottom). Apply to the end of the latch, you need to outline its dimensions. Further, using a chisel and a hammer, we make a deepening, we follow the verticality of the actions. You can pre-drill it. As a rule, in the place where such an element is supposed, producers add a piece of wood. This is the case if you are using not an array, but, for example, MDF.

Check that the core is well entered. Next, you need to make a recess for fixing. We make its outline and, observing the thickness of the metal, we create such a shallow cell. It remains to insert the core of the latch, check. If everything is good (it enters the canvas, does not protrude beyond the edge of the butt), it can be fixed with screws (included), pre-drilled holes. Handles will be installed later, so as not to interfere with the assembly of the box.
Assembling the box
We will need tools:
- chisel;
- a hammer;
- a drill with a nozzle for screwing self-tapping screws, with a drill in wood, the diameter of which is smaller than the size of the self-tapping screw;
- hacksaw for metal.
One of the most critical stages that requires special attention. Since we do not use expensive equipment, the circular saw does not apply, which means that it is not possible to cut the box elements 45 degrees high even if using a chair. We will act differently. In the upper and lower bars, the protruding elements for securing the vertical bars will be cut out.

You need to start from the bar on which the loops are to be placed. Cut off the upper part at a right angle, using a hacksaw for metal (it will provide better edges). Apply to the end face to determine the location of the "return" of the loops. Place the bar so that it extends slightly above the top edge of the canvas - about 4 mm.
We put the marks on which we apply the hinges. We note where the screws will be, drill holes. We fix the loops using 2 screws.
Now you need to cut off the top bar of the box. In it, and just have to cut the ledge. First cut the edge of the bar so that it is flat and perpendicular to its length.
Apply the upper bar to the bar with loops strictly perpendicular, mark it. On the mark, carefully cut the ledge at the required distance from the edge, and then cut out the chisel to get a flat base. We try it, so that there are no gaps in the assembly.
Make holes, then with two screws cut off the vertical and horizontal bar of the box. Make the assembly carefully so that the angle does not move. Similarly we do the rest of the corners, remembering the necessary clearance - the distance from the door leaf should be about 4 mm. From the bottom, it can be more, because the door can eventually sink.

When the box is assembled, we check the gaps and the quality of opening and closing the blade. Now you can remove the hinges from the box and install a convenient cloth to fix the latch handles. To do this, you first need to make labels under the screws, and then make holes. We fix the handles. Let's pay attention that in most cases there is an opportunity of their additional fastening by through screws. This reinforces the handles, counteracts the damage to the web with inaccurate use, the application of excessive force when opening the door.
Dismantling the old door
First we remove the cloth, unscrewing the screws, with which the hinges are attached, if they are all-in-one. Further it is necessary to make cuts by means of a saw in the middle of vertical racks. Typically, this is enough to break the box in parts, using a nail and a hammer.
Preparation of aperture
It is necessary to clear the opening from the remains of the box, finishing materialsso that nothing would interfere with the installation. Next, you need to measure with roulette the dimensions of the resulting new box and correlate them with the dimensions of the opening. If there are inconsistencies, they should be eliminated.
Box installation
Another difficult stage. The box should be installed to the edge of that side of the opening where the door will open. It is necessary to achieve such an effect that the box maintains the level, while not protruding and not falling in relation to the plane of the wall. If you do not keep the level, the door will open spontaneously or close, which experts try to avoid. If the plane of the box does not coincide with the plane of the wall, there will be problems with installing the platbands.
We will look at how to perform the installation of a box using a hidden method. It is implemented simply. Self-tapping is performed in three places:
- in the area of attachment of two loops (holes are made so that the heads of the screws are closed with loops);
- in the "return" zone of the latch (a recess where the tongue will enter).
So, first make holes in the loop area, fix the box, keeping track of the level. Then you need to hang the door and make a "return" using a chisel and a hammer. At this point, make a hole to fix the box.
Between the box and the opening it is necessary to insert wooden pegs, which will allow to fix the construction more rigidly. After fixing, we check how the door opens and closes.
Installation of additional laths
Now you need to install additional rails. Most often they have to be cut in width. It is necessary to accurately measure the distance from the box to the edge of the wall in several places. These values may be different, which means that the width of the edges of the additional strip will be different.

When the additional strips are installed, it is necessary to fill the space between the box and the opening using a mounting foam. It is better to choose a composition that does not increase much in volume to avoid skewing of the structure, if suddenly the foam widens by curving part of the structure.
Mounting of platbands
After that you can proceed with the installation of the clypees. There are several ways how to perform their installation, so that the fastening elements are invisible. You can take nails (2-3 cm long), cut off the hats. Drive them into the wall (if it is wooden) and into the box with a cut side. And then use them to fix the platbands. This method is dangerous by the appearance of cracks in the material, so it is more reliable to make chamfers under the screws and with their help to fix the platbands. Hats can be easily hidden using special accessories (the right color), available in every construction shop.

The upper horizontal bar and two vertical bars can be combined at 45 degrees. If there is no machine or chair at hand, you can make 90 degrees, cutting off the products at a right angle.

Now you can enjoy the result of work both in aesthetic and in practical terms!
Sometimes there is a situation when it is necessary to do a real man's work around the house. And here you can not get out anywhere, otherwise the bought doors standing on the threshold will be a long time to interfere, and one day they will fall on the head, which had been hurting from the annoying buzz of his wife about her installation in the room.
In this article, you will read how to get rid of these troubles and put independently interior doors.
This work is well suited to the saying that it is necessary to measure seven times before cutting off. If you put doors every day, there would be no problems - experience means a lot! But being a "kettle" in this area, try to listen carefully to the advice.
We install the interior door by following the instructions

We will put the most simple doors made of fiberboard, with a glass window.

Our doorway is made of a metal profile that is trimmed with a double sheet of plasterboard. The wall thickness is 15 centimeters. Such a non-standard width in the store is not found, because the door frames are usually sold at 9-10 cm wide. Therefore, order a box in the carpentry shop, the width corresponding to the wall thickness, so that you do not add it after all, because the solid board looks much more beautiful than the national team.

Ordered the width of the board 15.3 cm - 0.3 cm wider than the wall. Ask why? Then, that the door frame should protrude beyond the wall of the wall by 1.5 mm from each side of it. When the platbands are nailed, they will adorn themselves nicely to the box, just these 1.5 mm, without any distortions, and close the wall.
Since our doors will be on the threshold, all four beams will go into business. If you do not want to put the threshold, the bottom of the box just need to be fastened with some wooden spacer, and nail it to the racks. After installation, the spacer is torn off.

Let's proceed to the process of assembling the door frame. Just need to gently trim at right angles the ends of the bars.

The upper and lower bars cut in width of 70.6 cm, which includes the width of the door leaf - 70 cm, plus 0.3 cm per gap between the box and the cloth on both sides.

The length of the side racks will be 206.6 cm, which includes the height of the fabric - 200 cm, the gaps between the door and the box - 3 mm, the thickness of the bars in the selected quarter - 3 cm on each side.

For clarity, put the crossbar on the side stand and draw a line through which you will make the cut for the depth of the sample.

The propyl is 1 cm wide, the same as the quarter. To make the propyl turned neat, put the saw in a piece of sawn timber.


Be careful not to cut your nails carefully, so as not to accidentally make scratches in a prominent place that will not close in any way, and all the time you live there will make your eyes look pissed.

Sharp chisel carefully with a sharp chisel.

Repeat the same procedure on the opposite edge, as well as on the second bar.
![]()
Drill holes for self-tapping screws so that they can fit freely, and the beam is attracted.


After that, we collect the door frame. Insert the edge of the upper and then the lower bar into the sawn end of the side frame and pull them together with a screwdriver with self-tapping screws (75 mm).

So the box is ready. Put the doors in it. Align the doors with blades around the perimeter so that the gap between them and the box is the same.

Mark the place for the hinges, stepping back from the edges of the door to 20 cm. Attach the hinges and make notes on the box and the canvas.

Outline the contours of the loops at the end of the door and the box, one part of the loop on the end, the other on the box.


Use a chisel to sample the contours to the same depth as the thickness of the loop plate, which should fit into the sample flush.


We do the same with the door.
Wizards for installing doors know that professionally such operations are usually performed by a router. But for a simple person who installs their own doors, it is enough to have a chisel in the house, which will serve as a router and many other useful functions.

Hang the hinges on the door and the box, fixing it with one screwdriver so that you can adjust the setting.
To move the loop, if necessary, the screw can be unscrewed, adjusted position, wrap it anew already in another place.

We pass to the door frame. Place the box in the doorway and wedge to secure the structure with wooden wedges.

Place the wedges in the corners, near the top and bottom bars. Nowhere else is it necessary to place wedges, otherwise they are bent boards.

After the box is secured with wedges, pay all your attention to the stand on which the doors will be hung. This bar should be carefully adjusted to the vertical level and secured.

If there is a sudden skew and the stand needs to be tilted slightly, do a few gentle strokes with a hammer on the upper or lower corners of the box, while watching that the edge of the box protrudes 1-2 mm from the level of the wall (to fix the platbands).

Check the level with the second plane of the rack. It is necessary to achieve a clear vertical position. To do this, if necessary, you can increase the thickness of the blade on one side and reduce it on the other.

After the rack is leveled, drill 3-4 holes along the entire length of the beam.
Secure the stand with self-tapping screws 75 mm long, by placing wooden pads in these places so that the box does not bend.
If the wall is brick, it is necessary to use for anchoring the door frame with anchor bolts or long dowel-nails.

Hang the doors on the hinges, gently cover and see how they went into the box.

If the doors do not close, the cause may be a wedging crossbar.

To fix the situation, raise the edge of the box slightly and place a wedge underneath.

If everything is done correctly, the doors should be closed and the gaps between them and the box will be the same everywhere.


Cover the doors, check the fit in the corners. If a gap is visible in any corner, remove it by tapping lightly on the top corner of the box with a hammer to meet the door. In the normal position, the corners of the doors should lie against the door frame without gaps.
Again, check the position of the door frame against the wall plane for the further possibility of installing the casing. After making sure that everything is in order, fix this rack using self-tapping screws, similarly to the first one.

Before splitting cracks, you need to insert wedges between the door and the box in several places, just in case the foam does not bend the box. This can easily happen, even if the box is fixed with screws. If you need to walk through the doors during the installation, put the spacer between the posts of the box in the middle - it's uncomfortable, but what can you do, you'll have to bend over.

Fill the slots with mounting foam half the space - the foam is very swollen and increases in volume.

If you have correctly installed the doors, then in the slightly open position they should not open or close spontaneously, but will stand still.
Secure the hinges completely with the remaining screws or screws from the supplied set of hinges. When the next day the foam dries, it will need to be carefully trimmed, and also to fix the platbands.
After that, you can assume that you have installed the doors with your own hands! Male work is done, the family is happy, the doors are standing, you are proud of yourself and are ready to give advice to everyone in a row to install interior doors, because you are now a pro! Congratulations!
I'd like to hope that this article will help many who have a desire to do repairs themselves.