If the ceiling of the living room will be decorated with a stretch cloth, you should think about installing the chandelier in advance, as after tightening it will be extremely difficult. This can be explained by the fact that the film, stretched on the frame, can not be used as a reliable base for fastening the chandelier. In addition, it is impossible to violate the integrity of the canvas, as this can lead to its rupture. About how to install a chandelier on the ceiling and what lights are better to use, we will tell you today.
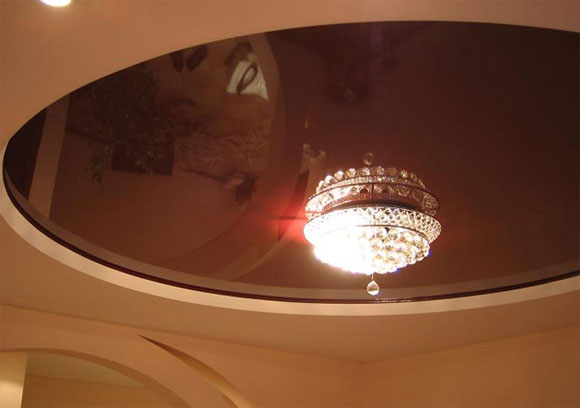
Chandeliers for stretch ceilings
Ceiling constructions of tension type have an incredibly beautiful appearance, a variety of textures and colors. Such a coating is very convenient to maintain, it allows profitable transformation of the interior of the room. Due to this, stretch ceilings are a very popular solution (read: ""). But in the process of their installation, the artist meets with the difficulties of installing ceiling lighting fixtures, because the canvas can simply tear under the weight of heavy structures. In addition, the use of a certain type of lamp can cause overheating of the blade and its "creeping" (more in detail: ""). There are several ways to screw the chandelier to the ceiling. Today we will briefly consider each of them, we will begin by how to install a chandelier on a stretch ceiling.
To create effective and high-quality lighting in a room with tension structures, you can use luminaires that have such parameters:
- a chandelier of a plate type should not have a metal base, since such a case will heat up, transferring its heat to the surface of the blade. Regardless of the type of ceiling (PVC or fabric), this effect is unacceptable;
- in order to avoid the formation of dark spots on the film, the chandelier is selected with shades directed to the sides or downwards;
- in the lamp it is recommended to screw in lamps of energy-saving type;
- the design of the chandelier should be simple, and the technology of assembly available to each artist, so that he knows,.
Types of chandelier fastenings
In view of the peculiarities and fragility of the stretch fabric, there are several ways of how to install a chandelier on the ceiling.
Installation of ceiling chandelier on the mounting hook
Is the most reliable type of attachment.
A huge number of its varieties are available on the market:
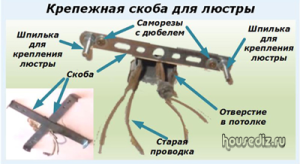
Mounting bracket
Such fasteners are designed for small chandeliers. The bar is often included in the lighting kit, it is equipped with special fixing pins or side holes with thread and clamps (more in detail: ""). How to transfer the chandelier on the ceiling with this type of attachment? It is enough to make new holes in the surface and just move the lighting device.
This type of fastener is included in the set of chandeliers of medium size in various shapes (round, oval, square).

I-beam mounting plate
With its help, large and heavy chandeliers are installed.
Stage of preparation
To install a ceiling chandelier, you need to do some preparatory work, which depends on the type of attachment used. Let's consider each of them in detail.
Hook
Method 1
To fix the anchor hook, it is necessary to drill a hole in the concrete base. Its size should be equal to the diameter of the anchor. After that, the anchor is slammed into the hole, and the nut or hook is carefully tightened. The diameter of the anchor varies depending on the size of the luminaire and can be 6-14 mm.
Method 2
If you are still at the stage of building a house and the placement of lighting devices has already been planned, then you can resort to using a different method. Where you are going to install the chandelier, make a hole through type. Then cut out two plates of square steel with a drilled hole exactly in the middle. The size of the hole must match the diameter of the shank of the hook.
How to install a chandelier on the ceiling? The first plate is applied to the surface, and the second is placed on the floor of the attic or the second floor. Using a stud with a solid thread, one nut is screwed to the stop, so it securely fixes the bottom plate, and the second is wound onto the shank. Both plates are tightly pressed against the base surface, and the chandelier is securely fixed.
Method 3
In the hole prepared in the channel of overlap (diameter 30-50 mm) establish a mortgage rod. The hook can be made from wire rod 6-8 mm, from one side of which make a ring, and on the other - a hook. It is simply inserted into the hole and passed through the mortgage rod.
Method 4
The installation of a chandelier on the ceiling is similar to the previous version, but in this case only one plate, a fastening element and 2 nuts are needed.
In the plate, drill a hole diagonally. The first nut is screwed to the end of the thread, a plate is put on the pin, which is clamped on the other side by a second nut. The remainder of the shank is cut off. If you make a recess in the base of the ceiling, then the nut can be hidden, thereby firmly pressing the plate to the ceiling.
Mounting plate
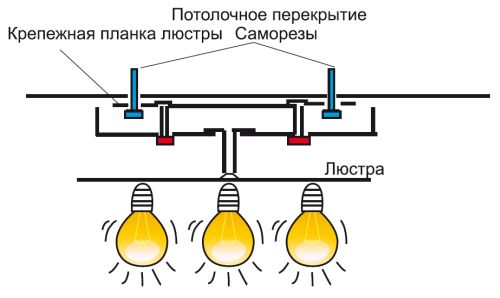
Mounting plates have standard dimensions and the same characteristics. In the side part there are screw terminals for the luminaire, and on the main surface - holes for fastening elements. The bar is fixed on a wooden bar, which is 5-10 mm shorter than the distance from the base surface to the stretch ceiling.

Cross-head mounting strip
It is possible to fix this bar securely with a carrier platform from plywood. Its thickness should be 10-12 mm. In the center, cut out a hole for the cable outlet. In order to fix the structure to the main ceiling, it is necessary to use a plate of a certain length, which is fixed with dowels with self-tapping screws.
I-beam mounting plate
This option is fixed similar to the previous one.
It should be understood that it is not possible to use gypsum board as the base foundation, since it simply can not withstand such loads. To begin with, it is necessary to dismantle the old coating and only then proceed to install the fasteners on the main surface. All the embedded elements are mounted until the tension ceiling is installed.
Mounting the chandelier in the stretch ceiling
After you have installed a stretch ceiling, and wait until the sheet cools down, you can proceed. It should be borne in mind that each lighting device has its own installation features, so we will consider the common points inherent in all types of chandeliers. So, what is the installation of the chandelier on the ceiling.
There are several options for fixing:
- hook. In the place of installation of the lamp on the linen, it is necessary to glue the thermo-ring. The hole is cut out strictly by the inner diameter of the ring and already with a stretched ceiling. The cable is pulled out. It should be remembered that the outer diameter of this thermo-ring should be less than the diameter of the chandelier glass;
- the method is similar to the previous one. But there is one difference. The inner diameter of the thermocouple will be much larger. Otherwise, you simply can not fix the bar;
- i-beams and cruciform bars. The heat ring is glued on the output section of the electrical cable and the strap is installed to the main platform. The bar is gently fixed to the base.
Installation of the chandelier on the suspended ceiling, details on the video:
Connecting the chandelier to the network
After you have successfully completed the installation of fasteners, you can proceed to connecting the chandelier to the electrical network. If the house has already completed all the electrical work, all the wiring is done and the ends of the electrical wires are taken out into their places, then to connect the chandelier it is enough to do the following:
- disconnect the circuit breaker on the shield;
- make sure that there is no voltage on the wires;
- clean the electric wires and connect them to the luminaire;
- fix the chandelier on the ceiling;
- switch on the electricity supply on the guard and check the chandelier's performance.
Mounting the chandelier to the ceiling
When buying a new chandelier, the question of its correct and reliable fastening to the ceiling surface, as well as a safe and reliable connection to the electrical network of the home, becomes urgent. You can do this without third-party assistance, so arm yourself with the necessary tools for installation, read our instructions and proceed with the installation.
In this article, we will talk about how to fix the chandelier on the ceiling with your own hands.
Fastening the chandelier through the mounting plate
As a rule, chandeliers are of two kinds:
- Equipped with a fixing strap. The bar is mounted on the ceiling, and afterwards the chandelier is attached to it directly.
- Attached to the ceiling hook, securely screwed into the ceiling.
We will try to explain in more detail how to fix the chandelier to the ceiling surface, using each of these methods.
Fixing a chandelier to a stretch ceiling with your own hands »href =» http://potolokspec.ru/svet/lampy-lyustry/kreplenie-lyustry-k-natyazhnomu-potolku-459 »\u003e Fixing a chandelier to a stretch ceiling
).Electrical connection :
 text-decoration: underline; "\u003e The rules for connecting a chandelier to an electrical outlet, there are the following
- If there is a one-key switch, the ceiling wiring under the chandelier usually consists of two or three wires - a phase, a zero and an optional ground wire. The presence of a ground wire often depends on the time of construction of the house - in the Soviet era such a wire was very rarely envisaged.
- It is necessary to determine the purpose of each wire, both among the ceiling and among the available in the chandelier. The phase wire is usually hidden in black, brown or red insulation, the neutral wire in blue, and the ground wire in yellow-green.
Wiring connection
Before attaching the chandelier to the ceiling surface, it is necessary to connect the power wires provided in it to the power system of the house. Before connecting the chandelier, it is absolutely necessary to de-energize the home wiring and check the absence of voltage using the indicator.
The rules for connecting the chandelier to the electrical network exist the following:
- If there is a one-key switch, the ceiling wiring under the chandelier usually consists of two or three wires - a phase, a zero and an optional ground wire. The presence of a ground wire often depends on the time of construction of the house - in the Soviet era such a wire was very rarely envisaged.
- It is necessary to determine the purpose of each wire, both among the ceiling and among the available in the chandelier. The phase wire is usually hidden in black, brown or red insulation, the neutral wire in blue, and the ground wire in yellow-green.
 ). Their connection is carried out respectively to the phase conductors of the 1st and 2nd group chandeliers (if any). Zero and ground wire are connected in the same way as in the first case.
 Fastening the chandelier to the mounting bracket
How to hang a chandelier on a concrete ceiling with the help of a bar:
:
You can do this in the following way:
- The closing decorative element of the chandelier is attached to the bar and their connecting holes are compared.
- Screw in the holes decorative nuts, thereby attaching the lighting fixture to the ceiling finally.
- Mount the lamp, plafonds and other decorative elements in their place.
Mounting the chandelier to the ceiling surface in this way can be considered finished.
Fastening the chandelier with a ceiling hook
Such fastening for a ceiling chandelier as a hook is often installed during the construction phase of the house, and if you have one, check it for strength. Checking the hook is to try to tear it away. To do this, you can pull or hang a load comparable to or larger than the weight of the chandelier, and let it hang for a while.
If the hook is fixed "tightly", you can mount the chandelier to the concrete ceiling cover. If it falls out or is simply not provided on the ceiling it will be necessary to mount it yourself:
Fixing ceiling lights - it's not difficult at all »href =» http://potolokspec.ru/svet/lampy-lyustry/kreplenie-potolochnyh-svetilnikov-826 "\u003e Fixing ceiling lights).
You can do this in the following way:
- The closing decorative element of the chandelier is attached to the bar and their connecting holes are compared.
- Screw in the holes decorative nuts, thereby attaching the lighting fixture to the ceiling finally.
- Mount the lamp, plafonds and other decorative elements in their place.
Mounting the chandelier to the ceiling surface in this way can be considered finished.
Fastening the chandelier with a ceiling hook
Such fastening for a ceiling chandelier as a hook is often installed during the construction phase of the house, and if you have one, check it for strength. Checking the hook is to try to tear it away. To do this, you can pull or hang a load comparable to or larger than the weight of the chandelier, and let it hang for a while.
If the hook is fixed "tightly", you can mount the chandelier to the concrete ceiling cover. If it falls out or is simply not provided on the ceiling it will be necessary to mount it yourself:
For those who do not fully understand all the subtleties of the editing process, we recommend that you familiarize yourself with the video presented on our portal - how to mount the chandelier to n »width =» 640 "height =" 360 "frameborder =" 0 "allowfullscreen =" allowfullscreen "\u003e
We can assume that we have figured out how the chandeliers of different types are fastened. We hope that our instruction has turned out to be accessible to understanding, and you will be able to fix the chandelier with your own hands without any problems.
For those who do not fully understand all the subtleties of the editing process, we recommend you familiarize yourself with the video presented on our portal - how to fix the chandelier to the ceiling.
Today there will be a photo report on how to connect the chandelier at home. The article is designed primarily for those who independently do it for the first time. Using my advice, you will save a few hundred rubles and get the gratitude and respect of family members.
If you want to see how professionals work :).
I already wrote an article on this topic,. The principal difference of this article is that the chandelier is mounted not on a hook, but on a special bracket.
So, in this case it was necessary to install a chandelier in the kitchen on the ceiling instead of the old, out of fashion. Well, since everything is "in fashion" all Chinese, then the chandelier is the same. This chandelier, installed and connected, (running ahead and advertising the purpose of the article) is shown in the photo at the beginning of the article.
How to attach chandeliers and lamps
Now all the chandeliers and lamps are fastened in such ways known to me.
- Fastening the chandelier to the hook, which is attached to the ceiling. These chandeliers will be hanging because they hang.
- Through a special bracket. First, the bracket is attached to the ceiling, then the chandelier is electrically connected, then the chandelier is attached to the bracket.
- Through the plastic holder-latch. So light fixtures with one lamp of daylight are attached.
- Direct attachment. Through the hole in the luminaire, self-tapping screw or special bolt to the surface.
The old chandelier with the cap removed looked like this:
![]()
An old chandelier on the ceiling. It's easy to guess that this is a kitchen.
The chandelier hangs on the hook, only so all the ceiling chandeliers were hung before. As you might expect, under the tape - stranding hard aluminum + stranded copper. Electricians are usually indignant at this, but the fact remains that such a connection at low current and humidity can work for decades, so we will be tolerant.
Although, as lucky - I wrote recently, how I drank blood.
Remove the chandelier and turn off the chandelier from the ceiling, that's what remains:
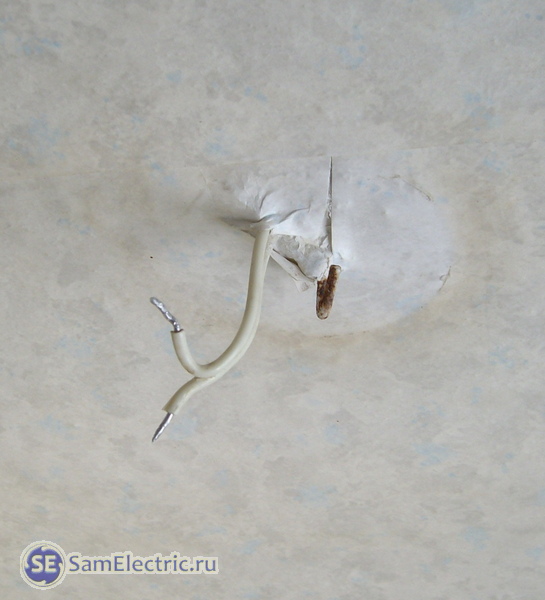
Wire and hook for mounting the chandelier
We see two wires, this means that you need to connect this chandelier through a switch with one key. You can and, although for the kitchen it is not relevant.
At once I will say that we do not bother with the hook, it can be easily turned down. But with the wire you have to be extremely accurate, it can easily break off, so once again do not bend it.
Assembly and installation of a new chandelier
Chandelier, which we want to hang:
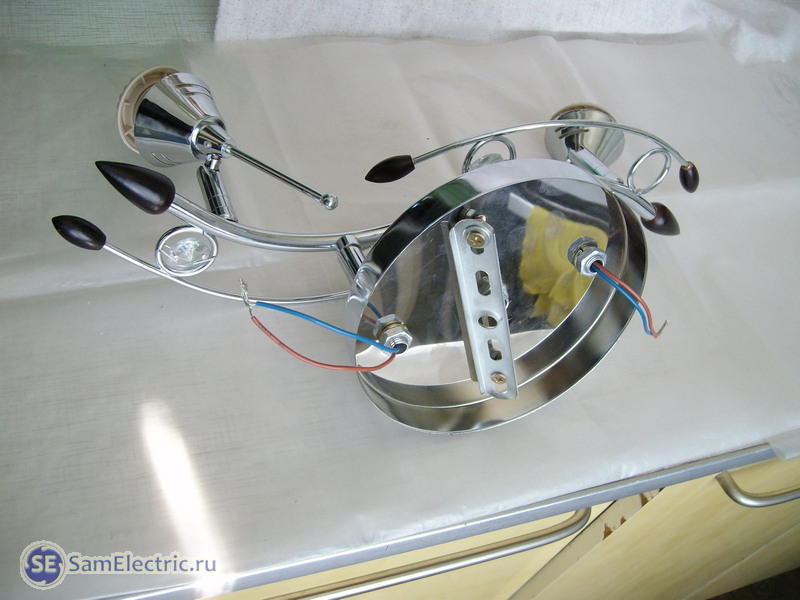
Chinese chandelier on the ceiling. Design is not important to us, the main thing is fixing.
This is the rear view, more precisely the top. The important part is the bracket, which we will mount to the ceiling first.

Bracket and decorative nuts for chandelier mounting
It is important - then not to suffer for a long time at a height, before installing the bracket for fastening the chandelier, carefully tighten the bolts, verify the length (for this, nuts and washers are used) and the distance between them. It is necessary to take into account that the ceiling can be curved, and the length of twisting of decorative nuts is limited.
Now came the most brutal part of the project - we need to make two holes in the ceiling plate, for this we use first a pencil, then a punch. Dowels, self-tapping screws - and the bracket is installed.

Attaching the chandelier to the ceiling
Old hook bend, or break off. The photo shows that the ceiling in this place is curved, so if I pulled the screws harder, the mounting bolts would move apart, and then I would not be able to put a chandelier on them.
It seems to be obvious things, but it's better to tell about them now than you will then detach the heavy chandelier at the height, lower it to the ground, unscrew the bracket and adjust the distance between the bolts.
Connecting a chandelier to two wires
Two wires - then, the switch for a chandelier is one-key.
However, when laying new wiring, I highly recommend in any case to use a cable with three cores. There are two reasons for this. 1) Perhaps in the future there will be a desire to use a chandelier with two groups, ie include it with two keys. With two wires, this can not be done. 2) The wires can be broken for different reasons. And the backup wire will be very handy.
The following photo shows how to connect the findings of the chandelier. This is best done in the case of "hard aluminum + soft stranded copper". The scheme of connecting the chandelier is simple - connect the phase and zero, the lamps in parallel. It is desirable to connect the phase to the internal contact of the cartridge. As a rule, it is a brown wire.

Preparing the chandelier before connecting
There may be two or three groups of lighting. In this case, it would be possible to include two light bulbs in this chandelier separately. This requires a two-key switch and a three-wire line to the chandelier. Now when installing a new wiring is done everywhere. It used to be done only in large rooms.
We connect the chandelier on the ceiling.
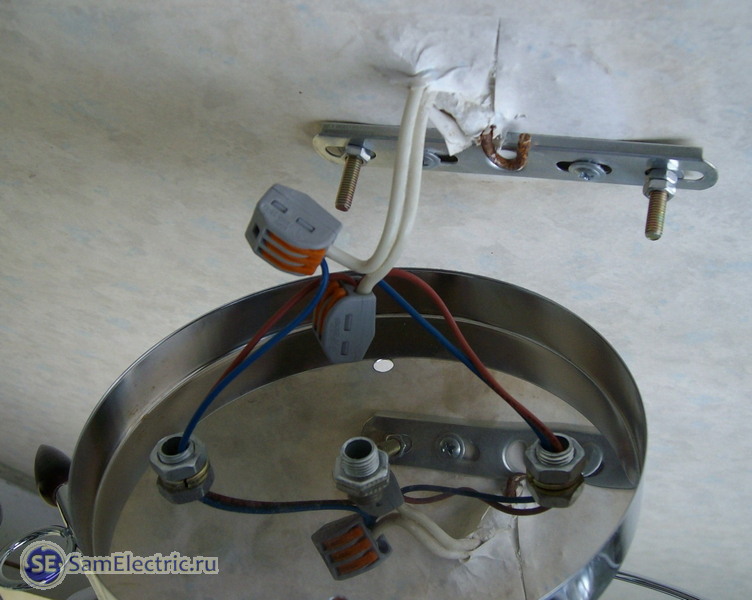
Connecting the chandelier on the ceiling
There is one trick here. For a comfortable connection, in order not to hold a heavy chandelier in your hands, use a piece of hard wire as temporary fastening. One end of the wire clings to the bracket, the other to the chandelier. Chandelier hanging on the temporary technological fastening, and we work quietly. In the case of a suspended chandelier, this advice is useless - there is a regular hook at hand. In this case, the chandelier is very light, I managed without the additional line.
Carefully lay the wires and terminal blocks, the space is very small. I spread the aluminum wires on the different sides of the bracket.
At this stage, the decorative nuts should be in your pocket, so as not to descend behind them.

The chandelier is finished. We are convinced that there are no cracks and distortions. Check the strength of the chandelier. We put on the plafonds. We screw the bulbs.
Let there be light!
How to connect a chandelier to a two-button switch
I am approached with such a question, so I'll tell you how to connect a chandelier to a switch with 2 keys.
In this case, three wires should protrude from the ceiling, and not two, as in the case above. In this case, the switch must be with 2 keys, and 3 wires are also suitable for it. The input wire is the phase, the other two are the "outputs" of the switch to power the two chandelier groups.
For example, if you want to connect a chandelier with 5 lamps to a switch for 2 keys, then after one switch key, the wire goes to the first 2 lamps, then the other to the other three.
In this case, zero is connected to all lamps of the chandelier constantly.
Total, three wires, which connect a chandelier with 5 lamps: zero, phase 1 (after the 1st key), phase 2 (after the 2nd key).
Good luck, and check the wires for phase availability!
If something is not clear, how to install or how to connect a chandelier - ask and write in the comments. If you're wondering what I'll be posting on the SamElectric blog next -
Why a chandelier?
At installation and the device of illumination of premises on the first place for the consumer always there is a uniformity of illumination. That is why today and became so popular, LED stripes and tubes of neon light - their light is not concentrated in one point, does not cut eyes and excludes the appearance of shaded areas.
But with all this well all the known chandeliers, located on the ceiling in the center of the room, did not lose their positions. Even on the contrary: the variety of forms and design designs of modern chandeliers is simply amazing. Chandelier can be an element of the interior, embodying the desire of the owners to chic and outer shine. The chandelier can logically complete the design of the room in the style of hi-tech, it can be brightly inscribed in the interior of the children's room or create an atmosphere of comfort in the living room.
And, in the end, the need for general lighting of the premises has not yet been canceled, but a more successful and beautiful solution to this issue than the chandelier has not yet been invented.
However, the installation of chandeliers has a number of specific features, which we will try to tell.
How to install a chandelier?
The most popular way to date, the installation of the chandelier remains hook. The hook for the chandelier is attached to the ceiling (the present ceiling), for example, using an anchor or plastic dowels. Mount the hook directly on the plasterboard ceiling is unacceptable: it can not withstand the weight of a massive chandelier. The same applies to a stretch ceiling, in which an opening is made for the cable and the end of the hook. The location of the hole is preliminarily strengthened by means of a glued plastic ring.
Chandeliers intended for installation on a hook, have in their composition a constructive element, which can be conditionally called a "glass". The position of the glass on the central tube of the chandelier is adjusted in height so that the glass can conceal a hole in the ceiling and terminal connections of the cable veins. Instead of a tube, by the way, there can be a chain, a cable, and even an electric cord, if its insulation is reinforced, and the weight of the chandelier is not very large (typical for single-lamp chandeliers).
When both switches of the switch are turned on, there must be two "phases" and one "zero", which does not respond with a flashing indicator light. One should not forget only the measures of elementary electrical safety and take this case with all caution.
Proven cores must be marked, and then you can go to the wires emanating from the chandelier. If they are not in doubt, and, for example, the manufacturer has even attached a schematic circuit diagram, it can, as they say, and not bother. But if there is any doubt, then it is better to dispel them. To do this, pair and in turn connect the suspect wires to a two-wire cord with a plug, which we plug into the socket. Of course, the lamps must be in place.
Our task is to find two pairs, from which two different rows of lamps will light, and which will have one common wire. This common wire with all certainty is called zero, and the remaining two wires are phase ones.
For a chandelier controlled by a one-button switch, everything is much simpler. Phase and zero conductors are easy to see in it, and nothing changes drastically from changing them. The main thing is not to make a mistake with the zero protective conductor (if any) and put it on the chandelier body.
Some chandeliers, with a large number of lamps, have only two terminals for connection, that is, they are formally designed to be switched on only with a one-button switch. If the wiring connections in such a chandelier are available for revision, then it can be converted to a two-key switch. Then you need to disconnect the phase wires of one of the groups of luminaires from the common line and output them separately.
Chandeliers and lighting lines are best used for connecting wires. You can apply screw clamps, for example, ZVI, if only flexible ends emanating from the chandelier, pre-irradiate. If there is enough space for editing, then you can get by with ordinary ones. However, it is better to use the same extra space to preserve the stock of the length of the veins. Such a stock certainly will not be superfluous.
A separate line can be mentioned chandeliers with compact halogen lamps, which can include an electronic step-down transformer. Such chandeliers do not need any terminals - they have enough transformer terminals. And some of these chandeliers have the ability to control a transformer with. And this means that even for the stepwise inclusion of the chandelier, a single-key switch will be enough - after all, all control will pass through the wireless line.
Alexander Molokov
Each owner is well aware that the choice of ways to illuminate the premises allows you to give an effective view of the room, emphasize the individual preferences of the owner, create a favorable atmosphere of the home.
The original ways of lighting the apartment characterize the image of the owner as a person who has a design taste, which can create positive emotions and good mood for the guests.
Independently engaged in design, the master uses different types of lamps:
- chandeliers;
- point sources of local illumination;
- decorative lighting bands and garlands.
Features of fixing the first two types of lighting devices are disclosed in this article. To fix the sconces and garlands, they are also well suited.
How to install a chandelier on the ceiling
Always check the wiring before starting any work on the wiring. This will eliminate the possibility of creating short circuits, preserve your health, and ensure safety when working.
The method of installation depends on many factors. His choice is influenced by:
- weight, dimensions and design of the lamp;
- material and type of ceiling;
- the presence of fasteners installed in the construction.
Fixing a chandelier on a concrete ceiling
Almost all apartments within multi-storey buildings now have ceilings made of reinforced concrete slabs. During their installation, builders near the wire exit points for luminaires install special hooks or remove the steel wire tied to the reinforcement.
Grandfather's way to hang a chandelier
In houses of old construction, the fastening wire is most often used, which can be bent in the right direction. It is able to withstand quite a lot of weight, but to check the strength of the fastening it is recommended to pull it with a certain force.

On such fasteners it is convenient to place light plastic chandeliers. To connect electrical wires use an adapter terminal block.
The chandelier fixing element and connecting wires are hidden inside the decorative cover.
Modern methods of fastening
Hooks for chandeliers
The main element that perceives the mechanical loads of the chandelier is a hook, which can have a different design.
For fastening inside reinforced concrete ceilings, hooks are produced:
- equipped at the opposite end with a thread of a self-tapping screw screwed into a plastic anchor fixed in a drilled hole;
- having a swivel mechanism with stops.
The second method can use:
- movable feet with a locking mechanism;
- washer with or without cut;
- rotary plate;
- movable stops.

This method requires the creation of a through hole through a slab with a diameter that ensures the passage of the pivot mechanism, but reliably retains the total weight of the luminaire.
Varieties of such hooks are fastening elements made by the shape of plates, which can be pushed into flat slots drilled with thin drills.
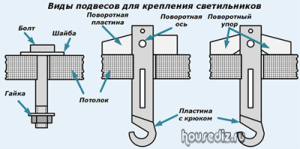
Mounting brackets
These mounting devices do not require the creation of through holes in the plate. For them, it is enough to dislodge the perforator in the ceiling of the socket for the installation of dowels and then insert screws through the bracket.
The mounting bracket itself can be made:
- the shape of the plate with slots for fastening in various convenient places;
- or in the form of a cross from two plates.
In the second method, it is possible to create a larger number of mounting points for self-tapping screws in the ceiling. Therefore, heavier chandeliers are attached to the cross plate.
On all these brackets before their installation on the ceiling screwed threaded studs to fix the base of the chandelier housing by turning nuts.
Before installing the luminaire, attention is drawn to the state of the dielectric layer of the wires. When it is weakened, it is strengthened by winding the insulation tape. However, now on sale there are more effective shrink tubes that are easily put on the place to be insulated, and then under the heating of the flame of the industrial hair dryer, the lighters or even the matches densely settle on the connected surfaces.
Fixing a chandelier on a wooden ceiling
Here the main means of fastening are the simplest hooks made on the end with a sharp self-tapping screw, which is simply screwed into the wood.
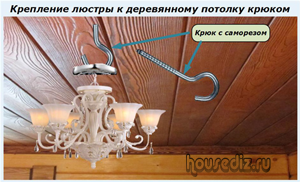
In order for the tree to not crack, and screw without excessive efforts, it is recommended to pre-drill a hole with a smaller drill than the internal diameter of the thread on the self-tapping screw.
The fastening point should be chosen so that the hook would not only rest on the boards with which the ceiling was trimmed, but also with a significant part of it would fit reliably into the beam.
Fastening the chandelier through a suspended structure
Now, home-based masters in the interior of rooms widely use various types of stretch ceilings:
- on a film and fabric basis of synthetic fabrics of various colors:
- suspended structure based on gypsum board and similar dense materials.
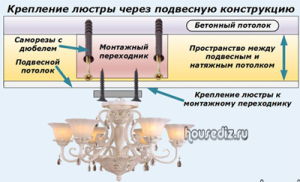
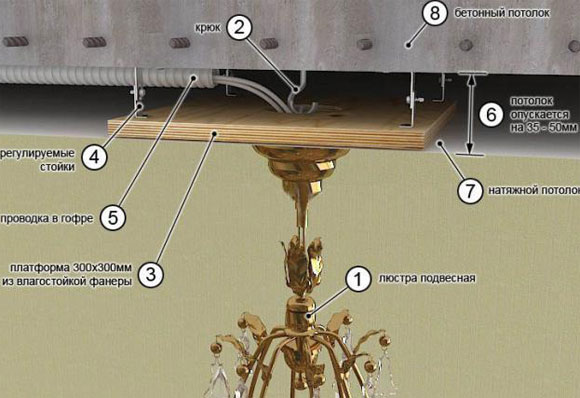
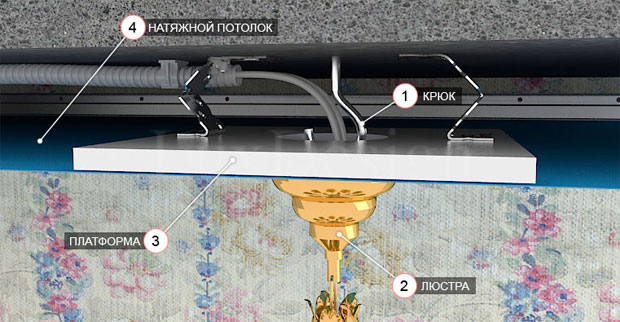
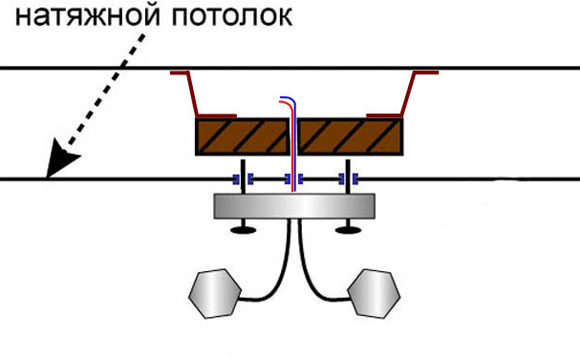
Realization of the desire of the owner to have a beautiful chandelier for lighting a similar room requires the creation of a mounting adapter, the thickness of which is chosen from the gap between the suspended structure and the concrete base.
The adapter itself is fixed to the concrete in advance, before the installation of the suspension cloth, and then the decorative ceiling is mounted and the chandelier is hung over the mounting adapter through it.
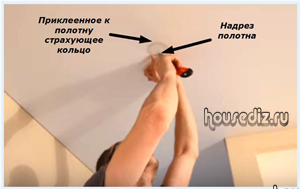
Through gipsokartonnoe coating you can simply screw in self-tapping screws. When stretch ceilings are used, they are fitted with adapters with glued rings, inside which an incision is made of the fabric of the fabric.
Through this slot, draw wires and mount the suspension assembly of the chandelier on the adapter.
Fixture for lighting fixtures
After the hook for hanging the chandelier is installed, it is required to raise the lighting device to the ceiling and connect the electrical wires at a height. Such work requires simultaneous execution of two actions:
- reliable fixation of the luminaire on the ceiling;
- installation wiring.
Therefore, the master does not have enough hands and requires an assistant. For the frequent performance of such works, a simple device consisting of:
- a hook for hanging a chandelier for fixing the ceiling;
- cable made of dielectric material;
- a tip with a rotary mechanism, inserted into the hole of the luminaire.

The principle of its operation is explained by pictures.
The swivel mount works on the same principle as the fisherman's kukan. It is introduced into any opening on the case, and the chandelier is freely hanging on the cable. The wizard has hands free, can connect wiring. When the rotary mechanism is disengaged, the hook is removed and a lamp is hung in its place.
Such a device facilitates installation. It is made for constant work of the same type. But, when a single installation of the chandelier is performed, it can simply be tied with a strong cord.
Method of fixing a spotlight on a false ceiling
Drywall constructions
This material has quite good strength and is available in sheets with different thicknesses. Directly in gypsum cardboard it is customary to install spotlights.

To do this, work is performed in the following order:
- on the base ceiling mount wiring with a small margin in length to connect the cartridge;
- install gypsum board construction;
- drill holes for the lamp with special drills;
- output wires;
- connect the cartridge;
- compress the mounting plates;
- insert the luminaire into the opening until the springs are released to fix the casing.
The protective decorative cover covers the slotted hole in the plasterboard slab.
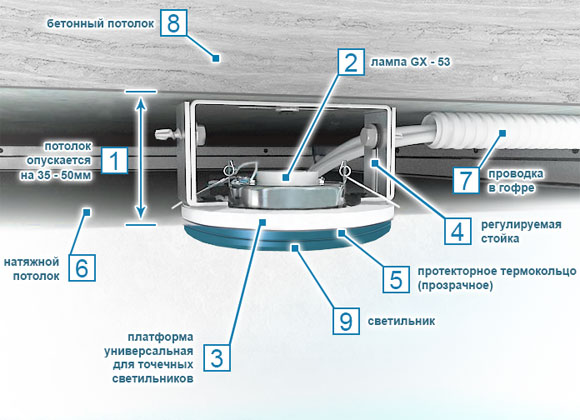
Stretch ceiling
For fixing the spotlights, the same principle is used as for the chandelier - the use of an additional mounting adapter.
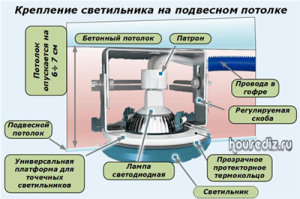
They are usually manufactured in the factory with the ability to adjust the height of the gap between the stretched fabric and the base surface. To this end, the fixed part is fixed to the main ceiling, and the position of the adjusting brackets is set with screw terminals.
On the fabric of the canvas, too, a fastening ring is glued, as for a chandelier, and inside it a cut is made for pulling out the wires and installing the luminaire. Between the housing of the light source and the tension material, there is a transparent protective thermal ring providing thermal protection of the material.
PVC Board Construction
In these ceilings, the installation of spotlights is performed using the same technology as for plasterboards. PVC boards have good strength characteristics, are able to reliably hold light point lights.

In view of the fact that when changing burnt bulbs, increased mechanical loads can be created, mounting adapters are also used for fixing. It is convenient to make them from perforated tin bands with a galvanized surface.
Such structures are easily created, well withstand loads, designed for long-term operation.
After fixing the chandelier on the ceiling to it and the switch it is necessary to connect the wires. This topic is presented
We offer you to watch a video about installing a chandelier.
If you know other ways of fixing fixtures, then tell about them in the comments.