Regardless of the intensity with which modern construction and decoration Materials, brick as was one of the best and practical, so it does not lose relevance today. In the construction of fences, this truth also works. A brick fence around the site is not only the best solution in terms of prestige and presentability, but also a competent investment of funds.
Pros and cons of brick fences
Like any other fence, this option is also inherent in its own merits, and some disadvantages. However, this version of the fence is one of the few for which the cons are more than fully compensated by the advantages in the arsenal. Actually, from the shortcomings of the brick fence of attention there are only two moments - a relatively high price, as well as impressive time costs for the project.
However, these shortcomings belong to the category of nonessential ones, because once investing money in a brick fence, and waiting for it to be built by specialists, you will have at your disposal a fence that will serve not only you but also your descendants.
 The merits of brick fences include such advantages:
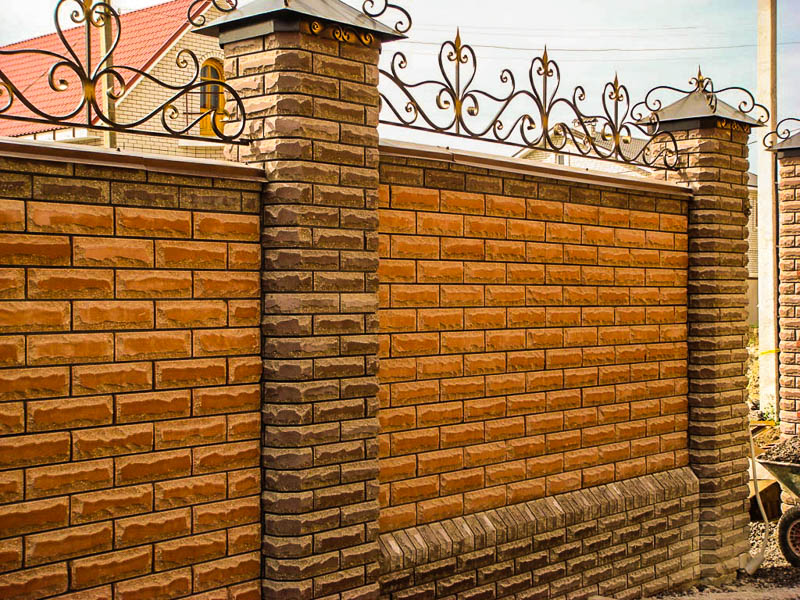
- Presentable. The appearance of fences from brickwork there are at once two positive moments. The first is that the fence looks prestigious, modern and impressive throughout its life. The second point is the compatibility of the brick with any materials. Thanks to this the fence will perfectly harmonize and with simple suburban buildings, and with two-story cottages, and with wooden houses.
- Opacity. For many people along with the conditional zoning of the territory an important criterion is the visual component. That is, the fence, in addition to protecting the court from physical penetration, should also protect from extraneous views. And the option of fencing under consideration will cope with this task perfectly. Often, to completely restrict the site from outside views, although this is not cheap, 2,5-3-meter brick fences are being built.
- Strength and durability. Good brick from a reliable manufacturer easily tolerates both the impact of time and unfavorable weather conditions. Damage to the masonry mechanically is also very difficult, even if you try to do it intentionally. By the durability of the brick is not inferior to almost any other materials that are used for the construction of fences.
- Minimal care requirements. In fact, any withdrawal is not necessary for such fences at all - they do not need to be treated with anticorrosive compounds, periodically dyeing, washing and so on. The only thing that should be paid attention in the future is the treatment of the structure by surface or injection waterproofing.
- Variability. Fencing with the use of bricks can be realized in several ways, which are briefly described below.
All of the above can be reduced to just one point - once investing money in an expensive brick fence, you can forget about the need to remodel, repaint and repair the fence for at least 100 years.
 Varieties of brick fences
By the criterion of variation in the implementation of the projects of fences made of brick give an almost limitless field for imagination and the embodiment of any original design idea. First of all, it is worth considering the solid classical fences. They differ in the thickness of the masonry (1.5-2 bricks), in height, and decorative details.
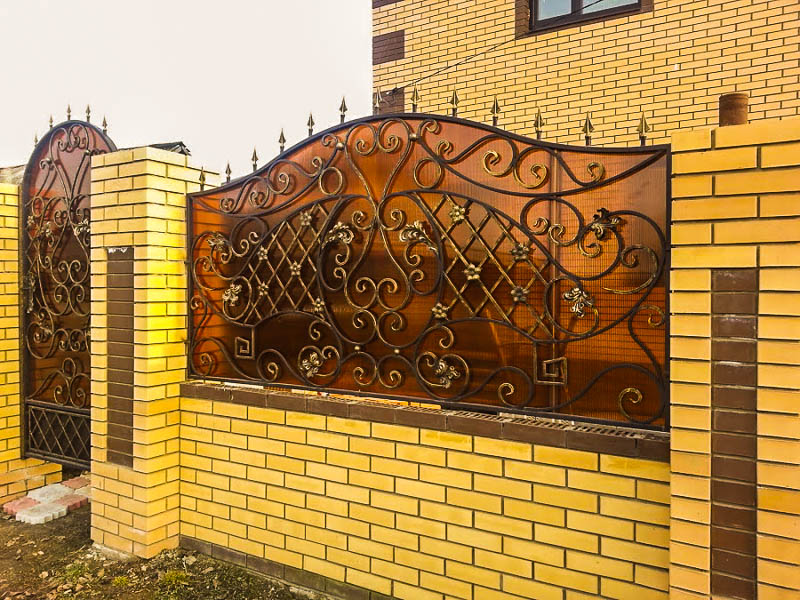
 The second option is a combined brick fence. In such projects, to identify any common features is difficult enough - each project can differ radically. The essence of the combined fence is that the pillars and the basement are made of bricks, and the remaining spans are sewn with sections of other materials - corrugated board, polycarbonate, wood, europain, box and so on.
Construction of fences made of bricks
The classic continuous fence of brickwork is built in several stages, which, regardless of the configuration chosen, are basically the same as the following sequence:
- Preparation and layout of the site. At this stage, from the line of the future fence, all unnecessary and disturbing is removed - trees, bushes, weeds, old fences and so on. It is worth bearing in mind that these works are often not included in the fence construction tariff.
- Arrangement of foundation foundation. On the perimeter of the site, a trench is digging, the width and depth of which depends on the parameters of the fence. In places where the pillars are installed, it expands and deepens, since they require more solid support. The bottom is laid sand or gravel pillow, after which the reinforcing skeleton is tied. In the mounting locations of the supports, vertical or profile steel pipes are fixed vertically. After that, the formwork is assembled on both sides of the trench. To do this, you can use any available materials - building board, timber, laminated plywood, steel sheets and so on. The last step of this stage is the preparation and pouring of concrete.
- Pile laying. The construction of supports should begin after the full hardening of the embedded foundation foundation. Pillars are often placed either in one and a half, or in two bricks. Between the masonry and the previously installed metal pipe, as a rule, there is a void that is filled with a liquid cement-sand mortar. When constructing columns, strict verticality and alignment on smooth lines of the perimeter are strictly observed. If the fence is combined, then in the pillars are set mortgage (metal or wooden), which will be attached sections or lag for spans. When building a continuous fence, reinforcing bars are inserted into the supports, which will serve as an additional bundle of the structure.
- Filling spans. If the fence is made continuous, the spans are laid out of the brick, like a normal wall. If this is a combined fence, then previously installed fittings are hung sections, or lags are installed for the corrugated board or other material.
- Installation of decorative elements. On poles, as a rule, concrete cast, or metal caps, are laid. If the brick fence is solid, then on the spans a special parapets are laid on the cement-sand mortar. These products will serve not only in the role of decorative elements, making the fence completed visually, but also protect the upper edge of the masonry from rain and snow. If other decorative ornaments are provided for the fence, they are also mounted at this stage. This may be the tip of forged parts and so on.
- Hanging gates and gates. The last stage of construction, making the fence complete and fully ready for operation. For the manufacture of the gate under the brickwork, almost any material is suitable. Most often - it's welded structures or forging. When building combined fences, the material, as a rule, is taken to be the same as used to fill the spans.
 More detailed information on the types of fences considered, you can find out from our experts, referring to them at the specified phone number or through the feedback form on the site.
Prices for fences made of bricks and corrugated board
Cost of fence from corrugated board S-20, poles from a brick on the ribbon foundation Price for 1 m.p. with material and work (rub.) |
||
| Height (meters) | Brick smooth | Brick RUST |
| one-side polymer coating | ||
| 1,8 | 9 100 | 9 250 |
| 2,0 | 9 650 | 9 820 |
| 2,5 | 11 600 | 11 750 |
| 3,0 | 14 850 | 15 000 |
| double-sided polymer coating | ||
| 1,8 | 9 170 | 9 350 |
| 2,0 | 9 740 | 9 890 |
| 2,5 | 11 680 | 11 870 |
| 3,0 | 15 000 | 15 350 |
|
||
The cost of one brick pillar with a hood with materials and work (rub.) |
||
| Height (meters) | Brick smooth | Brick RUST |
| 1,5 | 9 000 | 10 000 |
| 1,8 | 10 000 | 12 000 |
| 2,0 | 11 000 | 13 000 |
| 2,5 | 13 500 | 15 500 |
| 3,0 | 16 000 | 18 000 |
|
||
Prices may change due to ongoing stock and market volatility.
Make a reliable and relatively inexpensive fencing for the site can be using a combined fence - the pillars are made of bricks, and the filling (spans) and any light material - wood, profiled sheet, forged fences. The view is solid, and the costs are much less than the "clean" brick fence. And the laying of the pillars is not the most difficult, but profitable. Masters two years ago asked for 2000 rubles per pillar, and today prices have risen more than twice. Fold the brick bricks for fence with your own hands, you can and without the skills of a mason. It is important to follow the technology and everything will turn out.
Foundation for a fence with brick pillars
The choice of the type of foundation for brick poles depends on which material will be filled and also on the type of soil. If the span of the fence is made of light material (corrugated board, wood), it is possible to make a pile foundation under each pillar. The depth to which the pile must be made depends on the type of soil and the height of the groundwater. If the soils are prone to winter whipping (clay or loams) with high groundwater, it should be buried 15-20 cm below the freezing depth of the soil. On well-drained soils (sand and sandy loam), it is enough to dig into 80 cm.
The pile foundation under the brick pillar is made according to the standard technology: a hole of the required depth (diameter 25-35 cm) is drilled, a bucket-two crushed stone is poured into the bottom, it is compacted. Inside the holes set formwork (usually - rolled in two or three layers of ruberoid). Inside the formwork put a pipe around which will later lead the laying of the pillar. The length of the pipes is composed of two quantities: from the part that is embedded in concrete and the one that will stick out from above. Moreover, the upper part of the pipe does not need to be to the very top of the column in this case. It can be 40-50 cm shorter. Exception - the pillars, which will be hung gate and / or wicket. Here, the internal reinforcement should be practically to the very top.
If the fence is planned to be completely brick or in the region large wind loads, most likely you will need to do a full-fledged band foundation. Another option is piles connected by a shallow ribbon.

The construction of a fence with brick pillars on a monolithic reinforced concrete foundation
Mortar and brick for bricks
The solution is made of cement-sand with a proportion of 1: 5 (or 1: 6). Sand is better to take a fine fraction, high grade cement - not lower than M400. For plasticity, you can add a little liquid hand soap or dish detergent (20-30 gr. For standard kneading).
It is important to get the right fluidity when preparing the solution. It should not be dry, but it's inconvenient to work with liquid, because the water is added gradually, following the consistency of the solution. The necessary condition can be checked as follows: lay on some surface some amount of solution, trowel on it, put a cross. Then take the marked site on the trowel and watch the cross: it should not "swim".

You can if you want to get a black solution: add soot to it. It is sold in building stores with bags. Add a small portion of soot and get decorative seams without painting.

Brick for the pillars use any, just pay attention to the number of cycles of defrosting-freezing (the more, the better) and the geometry. Ideally, the deviation in size should not be more than a couple of millimeters. Then it will be easy for you to work. If the party caught a different caliber - carefully sort by size so that in one column the bricks had a minimum discrepancy.
Fence poles: technologies
In most cases, fence posts are made in 1.5 or 2 bricks, cross-section 380 * 380 mm and 510 * 510 mm respectively, height - up to 3 meters.
Clutch lead with a bandage (offset) - the seam of the lower row is covered by the "body" of the brick lying on top. Standard seam - 8-10 mm. Layout of the columns in columns and a half and two bricks on the photo below.

Pile laying: the order of work
On ready-made foundation spread the cutoff waterproofing. It can be a roofing material in two layers, but it is better to use a waterproofing on bituminous mastic. This layer is necessary so that the brick does not "pull" moisture from the ground. If the wet brick freezes, it quickly begins to crack and crumble. Therefore waterproofing is necessary.
The size of the column for waterproofing is applied to the mortar layer a little more than 1 cm. According to the scheme, bricks are laid on it. They are leveled in vertical and horizontal planes, tapping with a special rubber mallet. Masters can use a trowel handle, but in this case, the remnants of the mortar, sticky hands and brick can fly off the plane of the trowel, and it is poorly repaired from the cement.
Ceramic brick very quickly absorbs moisture, because a little delay, it will be difficult to "plant" it in place. To allow the solution to remain plastic for a longer time, the brick is dipped into water for several seconds before laying. This same maneuver makes it easier to wipe the solution from the surface (it is removed immediately with a dry cloth).

The second row is also laid: a solution spreads on the bricks, bricks are exposed to it, but already with a bandaging - unfolding so that the seam is blocked. Align again. Then take the tape measure and check the sizes of the stacked rows. Eliminates even a slight displacement of 1-2 mm. Tap on the butt of a brick (called "poke"), shifting the bricks closer. Then, if the side faces are not smeared, fill the vertical seams. All subsequent series are placed similarly.
If between inner tube reinforcement and brickwork is a void, it is filled. If the distance is small, you can use masonry mortar, if the emptiness is significant, to save space, you can fall asleep with rubble, compact, then pour a liquid cement-sand mortar.
Masonry for rods
Such laying of poles has long been verified, but for beginners, when self-manufacturing hard to withstand a smooth seam. Another problem - the solution gets out of the seam, a dirty surface. It does not turn out very beautiful. To facilitate the work came up with a masonry under the rod. Take a square metal rod with a side of 8-10 mm, cut it not pieces, 10-15 cm longer than the dimensions of the column.

Laying the first row, a bar is placed on the edge of the brick. Fill the site with a solution with a small margin, and closer to the pipe layer do more. Then, leading the trowel along the rod, remove the excess, cleaning the rod from the solution. But the slope of the solution is preserved. They put a brick, level it according to the level. At the same time, it does not give bars to hard, and the position of the other end is controlled by a level.

Then take a short section of the rod about 10 cm (for vertical seam), put it along the poke, the trowel put the mortar on the side of the laid bricks, also removing excess on the rod. The second brick is placed and leveled. After the level is set, the seam is pressed from above by the trowel, and the vertical bar is removed.

So laid out all the bricks in the row. Then the bars are taken out, proceed to the next row. This technology of laying brick poles allows you to control the seams and make them neat. So fold the pillar with their own hands can even a novice mason-lover. It is important only in the process to monitor the parameters of each series.
Video lessons
More complex variant brick pillar - screwed
Features of work with ceramic bricks
Possible problems and solutions
The main problems that can arise when laying the pillars with your own hands is a change in size, their "twisting". Both defects arise due to insufficient control.
When self-contained masonry often the upper rows become much wider than the lower ones. This happens gradually, adding a millimeter or even less, but almost in every row. As a result, at a height of 2 m, the width of the pillar is 400 mm and more, instead of 380 mm. Correcting this error is controlling the size of each row. Control only the building level is not enough. In general, a household tool is used (yellow), and it has a large error. And if the level has a length of 60-80 cm, you will simply not notice slight deviations in the vertical. Therefore, in addition, using roulette - measuring, and you can make the size of the template (for example, from flat bars) which and check for a deviation.

Laying of poles for fence is conducted around the metal reinforcing pipe, verticality is checked after laying each row
Independent laying of the pillars without the experience of such work can lead to yet another error: the faces of the column can be displaced, the column with it seems to be twisted around its axis. This disadvantage is much more unpleasant: try to attach spans to such posts. There will be many problems. Therefore, when laying each row, we must strictly monitor the fact that the angles are strictly located one above the other. The task can be alleviated by using two corners attached to opposite corners. They are temporarily attached to the lower rows (bolts or screws in the seam) and then used as a landmark, placing the bricks strictly in the corner.
Locking elements and fastening of the gate
When laying brick pillars, you need to think about how you will attach a span to them. In order to be able to fix horizontal guides to fill the fence, the pipes in the middle of the column are pre-welded with mortises. It can be corners, pins, "ears" for fastening wooden slats, etc. Weld them at the same height, so that the attached cross-members are strictly horizontal.

One of the options is suitable for fixing corrugated board, fences
Variants of mortgages can be different. Someone makes from a corner, someone has enough hairpins. It all depends on the type of filling the fence (from which the spans will be made) or the weight of the gate leaf.
![]()

Under the gates or wickets, at least three metal parts with a metal thickness of at least 3 mm are required (preferably 4 mm or even more).

We make a hood on a brick pillar
To protect the brick from moisture, the top of the column is closed with a hood. They are sold in large quantities, there are metal, concrete or composite. If desired, the cap on the column of roofing iron can be made by hand. Below is a diagram. You just need to substitute the dimensions, and then bend on the sheet bending along the planned lines. Fasten the product with special rivets, but you can also use self-tapping screws. Only it will be necessary to pre-drill the holes, smudge them with anti-rust, then paint.

Photo-ideas of fences with brick pillars

The most popular option - a fence of corrugated board with brick poles


Ragged stone and fence - combined fence


![]()
Fence is an important element a country house, is a construction that, in addition to its primary function of securing privacy and separating a piece of land near the house from a road or other site, also performs a representative function as a business card of its owner. The shape of the fence, the building materials from which this fence is made, the colors of these materials, should harmoniously complement the surrounding elements of your house. This effect can be achieved in various ways - for example, if the design of the span is similar to the railing of stairs and balconies, and the posts and walls will be made from the same materials as the walls and base of the house. Very many design solutions You can achieve by applying a brick when constructing a fence.
Fences made of metal and clinker bricks are increasingly used in Russia and Europe. Such fences in Europe are called classical. Clinker brick It is a very durable material, practically not absorbing moisture, with high frost resistance. Over time, fence elements built from clinker bricks retain their unchanged attractive appearance. To the fence looked impressive, and the spans and poles, and the lids above the posts should be made of facing clinker bricks. The use of special gutters installed on the upper horizontal part of the fence, with an inclined surface, quickly and efficiently diverts water, protecting the wall of the fence from water. They prevent the penetration of moisture into the seams of the clinker brick column and the formation of unsightly fading. The prefabricated lids on the columns are also made of clinker bricks. They protect the elements of the masonry, and give the fence an additional aesthetics. When laying clinker bricks, a specially designed colored masonry mortar .
 To complete the construction of the fence, figured facing clinker bricks can also be used, which allows using various options for the implementation of projects, including oval and diagonal elements. Facade figured clinker brick allows you to beautifully finish the rounded forms of the fence and the rounded corners of the perillas. The variety of forms of figured clinker bricks will allow you to realize practically any architectural solution. Our company offers clinker bricks from leading manufacturers in Europe and Russia: clinker Feldhaus Klinker
, clinker brick ABC-Klinker
, brick factory Kerameya
, brick Roben
, brick Terca Wienerberger
, brick LSR / RAUF
at an affordable price.
To complete the construction of the fence, figured facing clinker bricks can also be used, which allows using various options for the implementation of projects, including oval and diagonal elements. Facade figured clinker brick allows you to beautifully finish the rounded forms of the fence and the rounded corners of the perillas. The variety of forms of figured clinker bricks will allow you to realize practically any architectural solution. Our company offers clinker bricks from leading manufacturers in Europe and Russia: clinker Feldhaus Klinker
, clinker brick ABC-Klinker
, brick factory Kerameya
, brick Roben
, brick Terca Wienerberger
, brick LSR / RAUF
at an affordable price.
 It is generally accepted that hyperpressed brick
is a new generation of material. I wonder why there was such an opinion? The fact is that this material has higher performance characteristics than ceramic bricks. Hyperpressed brick is characterized by low water absorption, high frost resistance, strength and a number of other positive characteristics. This material It is used for the erection of load-bearing and self-supporting walls in buildings of any number of storeys. Also made of it are structures that require heavy-duty resistance. Plus, a smooth and punctured surface, as well as a variety of colors, allows you to apply hyper-pressed facade brick for finishing fences, facades, arbors, wells, barbecue areas. Stability of the material to temperature extremes allows using it in any climatic conditions (including in the zone of the extreme north). Therefore, any structures will be durable. It is also worth noting that hyperpressed bricks are also used to create garden and pavement paths. They are very durable and able to withstand any weather phenomena.
It is generally accepted that hyperpressed brick
is a new generation of material. I wonder why there was such an opinion? The fact is that this material has higher performance characteristics than ceramic bricks. Hyperpressed brick is characterized by low water absorption, high frost resistance, strength and a number of other positive characteristics. This material It is used for the erection of load-bearing and self-supporting walls in buildings of any number of storeys. Also made of it are structures that require heavy-duty resistance. Plus, a smooth and punctured surface, as well as a variety of colors, allows you to apply hyper-pressed facade brick for finishing fences, facades, arbors, wells, barbecue areas. Stability of the material to temperature extremes allows using it in any climatic conditions (including in the zone of the extreme north). Therefore, any structures will be durable. It is also worth noting that hyperpressed bricks are also used to create garden and pavement paths. They are very durable and able to withstand any weather phenomena.
 Facing full brick is an ideal solution for the construction of brick fences. From it you can build both fence posts and spans. As a rule, a full-bodied brick has a very high frost resistance, a strength grade of M300 and above, and practically does not absorb moisture. Such a brick has a very low percentage of water absorption. After a snowy and frosty winter, your fence will never crack. Thanks to the beautiful properties of this brick, the fence built from it can stand for centuries, without losing its original aesthetics, always pleasing the eyes of the owners and their descendants. One of the leaders in the production of bricks used in the construction of fences is the company LODE, Latvia, which produces from its furnaces facing full bricks LODE. Face brick LODE has been produced for many years and is used not only in the Baltics, but also in Russia, Ukraine, Poland and other European countries. Full-bodied brick LODE has 3 colors, which are constantly in the warehouses of the plant: red, brown and light.
 To solve complex architectural problems in the construction of fences, fireplaces, stoves, the LODE factory produces a variety of shaped and radial full bodied bricks, which helps investors and designers solve the most difficult tasks in decorating the facades of houses and landscapes. The frost resistance of the brick Lode is 100 cycles, and for "ordinary" bricks this figure is 35-50 cycles. Mark for the strength of the brick Lode M200-M300 for hollow and M500 for full-bricks, and for the average Russian analogue M100-M150. Of course, such an excellent brick, and even with logistics from Latvia will not be cheap. Therefore, we propose a mixed budget option for the purchase of full-bodied brick for fence - full brick brick LPS / RAUF
, excellent quality, strength grade M300 - M500, red and brown, standard size, for the construction of spans and poles, and a red and brown radial shaped brick LODE to improve the design of individual fence elements. Such combined version selection of building material will allow you to significantly reduce financial costs when buying facing full-bricks on the fence around the house.
To solve complex architectural problems in the construction of fences, fireplaces, stoves, the LODE factory produces a variety of shaped and radial full bodied bricks, which helps investors and designers solve the most difficult tasks in decorating the facades of houses and landscapes. The frost resistance of the brick Lode is 100 cycles, and for "ordinary" bricks this figure is 35-50 cycles. Mark for the strength of the brick Lode M200-M300 for hollow and M500 for full-bricks, and for the average Russian analogue M100-M150. Of course, such an excellent brick, and even with logistics from Latvia will not be cheap. Therefore, we propose a mixed budget option for the purchase of full-bodied brick for fence - full brick brick LPS / RAUF
, excellent quality, strength grade M300 - M500, red and brown, standard size, for the construction of spans and poles, and a red and brown radial shaped brick LODE to improve the design of individual fence elements. Such combined version selection of building material will allow you to significantly reduce financial costs when buying facing full-bricks on the fence around the house.
A properly constructed brick fence will serve decades without any complaints, providing reliable protection against uninvited guests and weather disasters. With the erection of this solid building, you can manage on your own. Read the guide and proceed.

Bricks will be put on cement mortar. With its preparation you can manage on your own: mix a portion of cement with three portions of sand and add water until a plastic viscous mass is obtained. If desired, we add plasticizer to the mixture - it will prolong the service life of the masonry. If the budget allows, instead of a homemade solution, you can use a special ready mix for brickwork - it's faster and more convenient.
Selection and calculation of bricks
The fence can be laid out from different types of bricks.
Each variant has its own peculiarities, namely:
- red brick will need to be plastered after the completion of the masonry. However, often fences made of red brick remain unplastered according to the design intent of the owners;
- facing bricks allow you to simulate a variety of materials and does not need finishing;
- frost-resistant brick will allow to get the fence of the highest quality with an extended service life.
Choose the type of brick, focusing on your preferences and budget.
Calculate the required quantity building material it is very simple, but you need to know the total area of the future fence. Dependence is the following: when laying walls in 1 brick for the erection of 1 m 2 of the wall, about 100 building elements go off, with double laying - about 200 pieces.
Before the beginning of construction it is necessary to determine the desired height and thickness of the fence. If the fence is erected exclusively for decorative purposes, it can be built and in half of the brick, placing elements with a long face along the fence. When building in a brick, the products can be laid out with a long side across the fence.
If the fence will perform a protective role, it is better to build it in 1.5-2 bricks. Select the height of the design yourself. It can vary in a fairly wide range - from 50 cm to 3.5 m or more.
| The name | Average density, kg / m3 | Porosity,% | Brand frost resistance | Strength grade | Colour |
|---|---|---|---|---|---|
| Solid bricks | 1600-1900 | 9 | 15-50 | 75-300 | red |
| Brick puffy | 1000-1450 | 6-8 | 15-50 | 75-300 | from light brown to dark red |
| Brick hollow "super efficient" | 1100-1150 | 6-10 | 15-50 | 50-150 | shades of red |
| Brick, cladding | 1300-1450 | 6-14 | 27-75 | 75-250 | from white to brown |
| Facing bricks glazed or engobed | 1300-1450 | 6-14 | 27-75 | 75-250 | any |
That the ready fence was more stable and rigid, it is erected not as a continuous masonry, but in the form of pillars with piers between them. Usually, the posts are laid out with a 2.5-6-meter step, in accordance with the chosen thickness and height of the walls. Additional brick poles must be laid out in the places of arrangement of the gates and wickets.
Decide on all the above points and prepare a drawing of the fence indicating the exact dimensions of each element of the structure. Drawing allows you to calculate as accurately as possible required amount materials and better orientate in the performance of masonry.
We proceed to the layout of the foundation. For this we use roulette, rods and rope.
We drive pegs in the corners and along the walls of the future trench in steps of up to 1 m. Between the rods we pull the rope. At the same stage, we note places for arranging pillars, gates and gates.
Carefully verify all the angles - they must be strictly straight. To check this parameter, use the square. It is very important to correct all the discovered drawbacks at the markup stage, because To do this in the future will be much more difficult.
We make the foundation
We begin to build the foundation.
First step. Roy trench. The width is maintained at 60-70 mm wider than the future masonry. In depth, we make at least 80-100 cm - the masonry will weigh a lot, so it's better to be safe. The walls and the bottom of the pit are leveled.
The second step. We fall asleep the bottom of the trench with a 10-centimeter layer of sand. Carefully we compact the pillow. Sand will perform the functions of drainage and shock absorber during seasonal soil movements.
The third step. We install the formwork. We expose the boards so that after the concrete is poured the upper side of the base is perfectly even.
The fourth step. We rebuild the foundation. To do this, we connect the steel bars with wire to the grid according to the size of the foundation. We put the finished mesh on a tamped sand cushion.
Fifth step. Fill the trench with concrete. The solution is bought or prepared from a portion of cement, 4-5 servings of gravel, 2-3 portions of sand and water. The surface of the pouring is carefully leveled and pierced with reinforcement in several places to remove excess air. The fill is given 3-4 weeks for the set of strength. Formwork can be dismantled at least 10 days after pouring. In the heat, spill concrete with water to prevent it from cracking.
Masonry fence
Before laying the bricks are immersed in the water for about a minute. Due to this, the pores of the material are filled with water, and it will not take moisture from the solution.
Pre-cover the frozen foundation with a waterproofing material. Suitable roofing material or folded several times dense polyethylene.
To ensure that the fence is as solid and reliable as possible, we will build a single, integral structure, right along the entire planned length. There are technologies in accordance with which the first columns are laid out to the full height, and then the piers, but we will not consider them.
Fence Clutch Sequence
The first row is the most important part of the work
Applying the device, using it as a restrictor - we apply the solution to the brick. Can be applied to a laid, or stacked brick, this is as to whom it is more convenient
First step. We form the bars. To do this, lay out the perimeter of the future column of 4 bricks, leaving a free space between them. Empty space in the future fill the armature and fill it with concrete. First lay out the columns to a height of 3 bricks.
The second step. We spread the piers between the poles at a similar height.
To make the masonry not just good, but also beautiful, the seams between the bricks should be the same. This is done very simply:
- in addition we buy a round metal rod;
- we lay it over the laid row of masonry - along the twig on each long side of the brick.
The diameter of the rod should be selected in accordance with the desired thickness of the seam. It is not recommended to make seams thicker than 6 mm.
To facilitate the task, you can fix the bars along the entire length with the help of cement mortar. After laying the fourth row of bricks, the lowest rod should be removed and used in the next row.
In the end, it remains only to protect the masonry from precipitation and meltwater. We do this with the help of tin and caps, made of sheet metal. We put the caps on the posts, and the ebb is fixed on the wall section. To fix the mentioned products we use dowels.
Plastering fence
First step. Moisturize the walls.
The second step. Apply a layer of plaster with a thickness of about 1.5 cm.
The third step. Let the applied solution dry for an hour.
The fourth step. We spread plaster with a sharp edge. Leave the finish to dry for two days. Periodically wet the plaster with water so that it does not crack.
Fifth step. After two days, we again wet the plaster with water and treat it with a special grater.
Plastered fence
You have got acquainted with the checked and most effective way of erection of a brick fence. Follow the recommendations received, and it will be all right.
Successful work!