Any, even the most beautiful and fashionable door will look completely unpresentable, unless it is framed by a decent doorway. Nowadays they are made using different technologies and different materials. From what and how, will be discussed below.
Methods of execution of door elements
The device of slopes is a kind of the final stage of the door installation. Today you can find a lot of photos, which depict various in size, texture and complexity of the door slopes. Despite this diversity, the basic principles for the installation of these decorative elements always remain the same.
The door slope is a decorative lining that plays primarily aesthetic function. It is possible to note one more feature of the slope - it is the insulation of the door. On photos this feature of the element is not very well seen, however, from the practical side it feels right away.
Door slopes are performed in two stages:
- rough work;
- decorative work.
Based on the variety of materials that will be used in the process of work, there are also varieties of elements.
There are several types of materials:
- plastic panels;
- made of wood;
- gypsum plasterboard;
- from a laminate;
- from MDF.
At the beginning of the work sealing with special solution, only after that the surface is plastered.
Features of erection by one's own hands
 As in many finishing works, when building this element, the following technologies are distinguished:
- with the use of a frame;
- frameless.
From the point of view of good sound insulation, the most acceptable solution is fixing. Thanks to him, the doorway will not have voids, will not become too flexible over time. The photographs show that such elements look pretty good. Thus, a complete picture of the entire doorway is achieved.
Rothband plaster
Many experts advise for the processing of doorways use dry plaster this particular manufacturer. Of course, it is important to first work out the slopes with mounting foam, carefully fix all the cracks.
To perform the work you need to have at hand only level, spatula with a wide tip and a corner. It will be needed for initial work. The plaster must be applied in two layers, since it is necessary to do this for the first time deep enough, and for the second time, a thin application is sufficient, since this layer will maximize the leveling of the surface.
Only after finishing the roughing can you start the finish line. To do this, wait for the complete drying of the surface, then align and apply the finishing putty. In the event that more sanding layer, work can be considered really high-quality. Then, in any photo, you can be sure that no cracks and gaps were made during the work.
Different materials
On the quality of the door element, you can say, a lot, if you know what material it is made of. Today, there are many options, how exactly can this be done.
Door slopes from plasterboard
 This is an excellent option in the event that you are not going to spend too much money, and I would like to work with a little stress. In case of lack of time, it is necessary to choose gypsum cardboard for the door element. Such parts must be mounted on a special prepared frame. First you need to prepare the workpieces, then cut out the elements. There will be three in total.
In order not to fill additional slots, it is best to cut out the solid parts, and not in parts. After that, each of the parts will be attached to the frame. Best of all, if you left at least a small gap between the carved detail and the slopes. You need to fill it.
According to photographs of such works on the Internet, you can determine who has correctly guessed with color gamut, but who missed a bit. This information will also be relevant in cases where the slope is made of other materials, for example, plastic, MDF or laminate.
Door slopes from MDF, laminate
In the same way as in the previous case, a slope from the MDF material will be mounted on a frame. It must be collected in advance. It is necessary to fasten the elements with the utmost precision.
In this case, liquid nails may be needed. This will be important if you do not want the fastening points to be visible. You can come in handy and planks.
If you compare photos of slopes from different materials, you will clearly see that they all look quite different. So, the slopes made of laminate, look more expensive and presentable. The peculiarity in this case is that you can mount them as in the vertical position, and in the horizontal from the ends of the door opening.
If you are going to make your doorway look really chic, and in photographs it looked like a medieval castle, it makes sense to choose a stone as a material. It is important to remember that in each case there are particularities in the installation and further operation of such a slope.


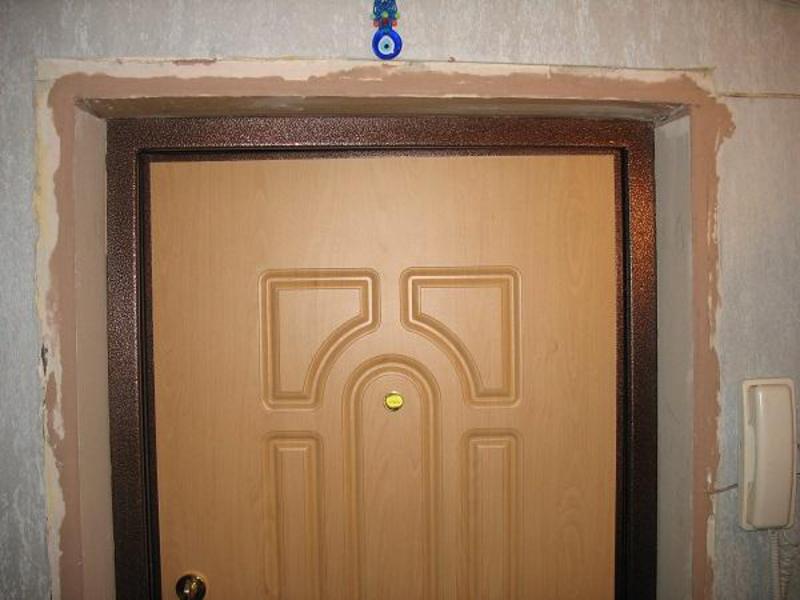


Let's say you just changed the front door. And all would be nothing, just the doorway looks terrible. But the aesthetic part is not so bad. If you do not put slopes on the front door in time, it will blow out into the openings, which means that drafts will appear in your house. And that's not all. Mounting foam, used in the installation process, quickly absorbs moisture, so the heat will not be held in the room. Do the door slopes with your own hands, or purchase a finished copy - the choice is yours. But they must be present.
The slopes can be closed using the following methods:
- application to the surface of cement mortar walls. This method has become quite widespread both among experienced specialists and among beginners. However, together with the budget, there is one solid minus - to prepare cement mortar, however, it is very difficult to apply it to the wall, without practical skills in this matter is indispensable;
- application of glutinous mixture. Such material will cost a pretty penny, but it's much easier to work with it, which the beginner will definitely appreciate. The glue is applied to the surface in several layers;
- installation on the frame. Not the most durable material, but it will reliably hide the wires. In addition, the surface as a result is perfectly flat.
You need to make slopes on the doors in any case. And it's not just aesthetics of appearance, but also in your comfort and safety.
Preparation for finishing
Regardless of which type of finish you prefer, you can not escape the standard preparatory measures. To prevent the door leaf from being damaged, it must be covered with paint tape or with a film. Only after proceed to leveling the surface. All roughness and roughness should be carefully smoothed. For those who decided to apply a special solution for finishing, dust removal is especially important. It should be removed from anywhere, literally from every centimeter of the surface.  Remember: this depends on the reliability of bonding materials. Dust sweep with a normal brush. The main thing - that she had a hard nap. The next preparatory stage is the application of a primer of deep penetration. After that, if you want, you can build a wire along this surface.
Plastering
How to properly trim the slopes the entrance door - You will have to face this question if you need to change the door in your own home. There are a lot of ways of embedding slopes. If you prefer to plaster them, you should complete the entire process in stages:
- prepare the surface. It is recommended to apply a primer;
- the next step is aligning the corners. Strengthening corners are often used;
- further perforated corners are attached. They mount already on the finish putty. Thus, they are securely glued, and as a result you will get perfectly flat angles of slopes;
- very often specialists have to deal with the problem of uneven walls. Really correct at the stage of finishing the slopes of your front door with your own hands: a narrow strip of gypsum board is fixed from the door frame;
- further finishing of the slopes of the doors is carried out with the help of putty. It is not difficult to apply it, however, a lot can go away. Everything depends on the composition of the putty and the thickness of the layer in which it is applied;
- the final stage of plastering is the primer application.
At the end of the work done, the surface can be painted freely or, if desired, pasted with wallpaper.
Bonding the material to a solution
Installation of slopes on a new entrance door can be carried out with the help of a special adhesive mixture. This method does not apply to the cheapest, but the ease of use of the material and the result justify the money you spent. Wet glue is applied in several layers. Do not forget after each step you need to let the surfaces dry completely.
Mounting on a frame
How to fix slopes on the door? Very often the method of fastening materials directly to the frame is used. In this case, special preparatory work is not required from you. You just need to apply a primer to the surface. Implementation of this method of finishing slopes requires metal profiles (they are suitable for installation of plasterboard construction), wooden bars. First, the structure is fixed, and then the coating. Casing materials use different.
MDF
Modern specialists very often prefer to install door slopes from MDF. These plates are characterized by medium density. In the assembly of such a design, you can use conventional screws and carnations. Than remarkable this material, so it's its aesthetic. In addition, his technical qualities indicate a high reliability of the coating.
Laminate
The door slopes of the laminate are installed in approximately the same way as the MDF board. Among the key advantages of this material are reliability, a wide color spectrum, as well as good insulation characteristics and ease of cleaning from various contaminants. When installing the laminate on the already prepared frame, consider the fact that the doorway will somewhat decrease. In addition, one significant disadvantage is that the laminate is exposed to moisture.
Drywall
For embedding slopes, plasterboard is often used. Strong and reliable, cheap and suitable for long-term operation, this material is widely used by both professionals and beginners. Install it on a structure of metal profiles. Fasten with self-cutting. When finishing installation, be sure to put perforated corners. Now you only need to treat the surface with putty.
Door slopes of plasterboard or plastic - a budget option, which has a lot of advantages. Whether you choose plastic material or prefer something more durable depends entirely on you. The main thing - to combine a neat appearance and reliability.


Having installed and admiring the front door, it becomes clear that the work is not over yet. The next stage will be the finishing of the slopes, which perform aesthetic and practical functions. For their arrangement, you can use different materials, stick to different styles.
External slopes of the entrance door
Having installed the door, it is necessary to seal the joints between the door frame and the opening in the wall. The easiest way is to use a mounting foam. After drying, the excess surplus is removed and the tightness is checked.
Closing the door, lighted lighter is carried around the perimeter of the opening - in places where the flame moves, it is necessary to re-froze.
Council. For sure to rule out blowing will allow sealing joints with adhesive cement mortar. Replace it with putty or plaster.

After solidification of the solution or mounting foam, it is possible to fasten door trims. They hide the gap from the eyes, protect the door locks and pins from breaking. we'll tell you in a separate review. Nalichki should approach the front door in design and color. Fasteners carry out special staples.

In some cases, the entrance door is made with a certain groove in the wall - a complete external slope is formed. It is customary to seal it with cement, having previously cleaned the surface of dust and dirt.

Finishing can be absolutely any, but it must be combined with the door. If the latter goes into the heated entrance, you can use a laminate or plastic. But the most optimal and economically advantageous option is to paint the surfaces taken out under the "zero" surface.
Internal slopes of the entrance door
When finishing the slopes of the entrance door inside the building, it is necessary to choose the most suitable material. The options offered by the market are huge:
- Tree
- Plastic
- Plastering
- Drywall

Wood is the classic and the most popular of materials. It can harmoniously fit into any interior, adding to it finesse. But such surfaces under the influence of aggressive factors can quickly lose their appearance, requiring restoration work.

The cheapest and easiest way is to apply a layer of plaster. In the future, it can be painted in any of the colors you like. Over time, when there is an opportunity and a desire, the slopes are easily covered with other, more interesting material.

Despite the widespread use of plastic, door slopes are closed very rarely. This method is used in cases when it is established.

Correct serious irregularities near the door can be plasterboard. Such a method eliminates the need to apply multiple layers of a dry mixture.
Decoration of slopes with wood or plastic
To perform the work you need:
- MDF or laminate, PVC panels
- Mounting foam
- Rule and bubble level
- Wooden slats
- Fasteners
- Tools

Council. Most optimal solution - use MDF board. But it does not always come in width in a thin opening. An alternative can serve as a normal laminate.
The doorway is checked once again for sealing of the joints and the areas where the air leakage is lapped. Then excess foam is cut off, the surface is cleaned and covered with primer.

The next question to be solved is the shape of the slopes. Wooden panels can be located perpendicular to the door or at a certain angle. The form is set by rails mounted on both sides. Making slopes with the letter "L", the rake near the door should be wider, near the corner - thinner. Proportions each picks up individually.

Having fixed the dowel-nails with the supporting rails to the wall, first the upper slope is mounted, then the lateral ones. Panels can be put on special glue or screwed with screws, covering the holes with decorative hats. The corners are neatly hidden by decorative plastic corners.

Precisely on the same principle, the slopes are trimmed with PVC panels. The only difference is that they are planted solely on adhesive compounds so that the surface remains aesthetic.
Finishing of slopes by plastering
Plastering is the most durable and durable finish. For work you will need:
- Rule and bubble level
- Sandpaper
- Sand, cement
- Mixes for puttying
- Primer
- Beacons
- Master OK
- Paint tape

Objects and surfaces that can get dirty are covered with a film or covered with a paint tape. Firstly, guide beacons are set. They are planted on a thick mortar of cement or gypsum, pouring on the wall. If there are large potholes in the wall, the solution must be kneaded more.
Council. The wall is preliminarily covered with primers to prevent the fungus from appearing on it and to improve adhesion to the solution.

Diluting a solution of sand and cement in a ratio of 4 to 1, all potholes are thrown. Apply the first layer of plaster. When the wall gets cold, a reinforcing mesh is applied and work continues. After sketching the mixture, the slope is aligned to the beacons by the rule.

When all surfaces are plastered and dry, a layer of finish putty is applied. After its hardening, the surface is taken out under "zero" with fine sandpaper, it is pasted with wallpaper or painted.
After installing the new doors, I was puzzled by a new question, how to make the slopes of the front door? I agree with the opinion of specialists that without the slopes, the doorway looks dull and incomplete. I did more than once to improve the window openings, but with the doorways everything was more complicated, that's why I started to study the market and sort out possible options, which you could do yourself. The way I trimmed the slopes with a laminate I was interested in immediately and further I will tell you how to correctly make slopes for the entrance doors.
On the features of the material

Laminate has long established itself as an excellent flooring, it is used both for office premises, and for apartment houses and apartments. It's easy to work with, and a wide color palette allows you to embody various design ideas. I personally dealt with laying such panels in my house, but how to trim the doorway with the help of laminate hands, I could not understand.

Laminate is a sheet of MDF, which is covered with decorative layers. The final layer is a protective coating based on resin. You should know that the properties of the material are directly dependent on its type and quality. The popularity of laminate is caused by such advantages:
- The affordable price of the material allows you to refine both the floor, and slopes, and other surfaces
- An attractive view, which is perfectly combined with other elements of the design of the room. In addition, imitation of wooden floors is possible, which gives the room a spectacular
- There are different classes that talk about the strength and durability of a laminate. A huge selection of colors and textures allows you to refine the entrance doors with taste
- Installing the slopes of the entrance door does not take much time and effort, even a beginner can do all the work with his own hands
- Good wear resistance. For a long time does not wear off and is not afraid of blows of moderate strength
- Depending on the type it is moisture resistant, but still does not like a lot of water
Important! The service life of slopes with proper use reaches 10-15 years, this is quite a long time, taking into account the resistance of the material to external damages of a mechanical type.


There are several ways to trim the slopes for the entrance doors with a laminate. Due to this, you can choose a more convenient option for yourself - this is very important when the installation is done by yourself. The following installation methods are possible:
- With the help of glue - suitable liquid nails or similar solutions. But before finishing the entrance doors, you need to level the surface. For this purpose, a drywall or plaster
- Using a mounting foam is the simplest method that does not require maximum alignment. All the flaws disappear when the foam swells
- The frame method is the most complex variant for entrance doors, but at the same time with its help it is possible to deduce as much as possible equal slopes without preliminary leveling of a surface. In addition, you can additionally lay the thermal insulation layer, which is sometimes so necessary for the entrance door and the storage of heat in the room
In addition, it can be mounted both vertically and horizontally, it all depends on your preferences. Due to the huge choice of colors, it is possible to choose a laminate for any color of doors, but it is better to think about choosing single-color materials in advance, because the non-saturation in the color palette will significantly affect the appearance of the room, in general. If you want to beat the situation and make the entrance door of the same color, and the slopes of the other, then choose contrasting shades and do not forget that too much contrast will speak more about your bad taste than about the design abilities.
Finishing process


Before starting the installation yourself, no matter what method you choose, you need to prepare the surface. I decided that I would use the method of gluing with glue. For this, I decided to make the slopes as level as possible. So:
- First of all, I filled the gaps, then applied a layer of plaster. You need to do this on a special grid. After a while, when the mixture completely dries, it is necessary to prime the slopes - this is an additional protection against dust in the openings
- Now the very beginning of the important stage, which should be taken very seriously. At this stage, we make the marking and sawing the laminate. To begin with, the lamella is sawn for the upper part, then the lateral sides are already removed. To cut the laminate, an electric jigsaw is suitable, if there is not one at hand, then use a hacksaw. Although I advise you to acquire this tool or temporarily lend it to your acquaintances.
- Since at hand was mounting foam, I decided that it will serve as a glue composition for the installation of lamellas. Before installing the glue, install the mounting spacers. They will play the role of borders and prevent the movement of the laminate. And to ensure that the level was more convenient to use, on each element on each side, secure the slats. Use wood material and glue it with glue.
- Before gluing the first lamella, attach it to the upper slope and check that the front door does not catch it. Only after this, the mounting foam is applied to the inside of the material, also it can be done with the surface to which it will be glued. Pressing the element to the surface, I fixed it with a paint tape - this keeps it to dry completely. Do not overdo the application of foam, because it swells, and its excessive amount can displace slope elements
- Thus, the sides are installed, taking into account the marking in the assembled state. This will prevent the appearance of gaps in the joints. Do not forget about using the building level. With its help, you can understand if there is not too much foam, and whether the laminate has shifted because of its swelling
- When the slopes of the entrance doors are laid out and all the elements have dried completely, we can proceed to the final process. At this stage, I cut off the excess sticking foam and plastered these openings. Thus, he protected them from negative external influences. But on this the installation of the slopes does not end, so that the appearance of the slope of the entrance doors was beautiful, seal the plastered corner with the corner in the tone of the laid material. This will give the slope a complete view

New doors are installed, garbage is swept and an idealistic picture of fresh repair is broken only by slopes for the entrance doors. Not always the companies that install the doors, commit themselves to repair the slopes - the pleasure to put the finish point in the repair in this case fell to you!
1 Slopes of the front door with your own hands - what should I do?
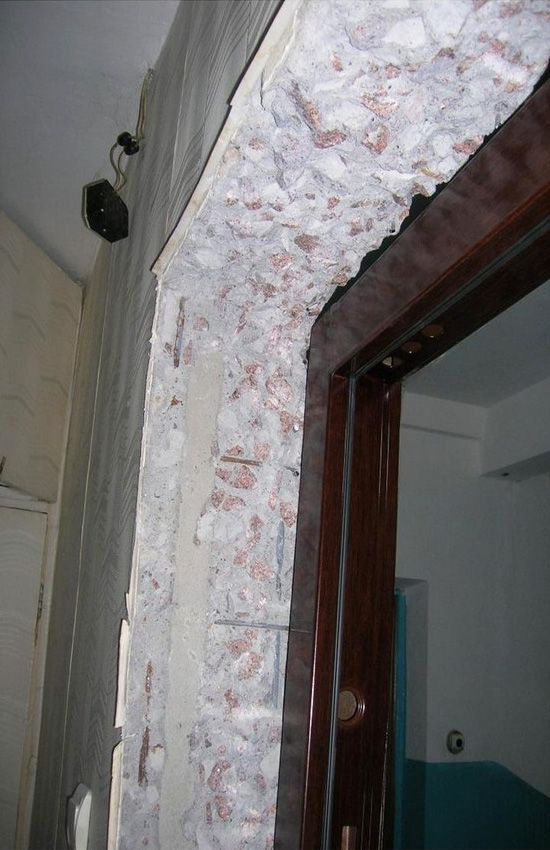
If the exterior of the door is a complete composition with platbands, then inside the apartment the view is far from ideal: gray concrete, mounting foam, bricks and fixtures. All this disgrace will help to hide the internal slopes of the entrance door - a section of the wall bordering the end with the entrance. Fortunately, this process can be performed in several scenarios and you only have to choose which one is most understandable for you and is available for execution.
Set people trying for two quite understandable reasons: to give a complete look and, more importantly, shelter anchorages door frame, on which depends its resistance to burglary. There are several ways of forming slopes: covering with a finishing material on a previously prepared frame, filling with a mortar and plastering, gluing of finishing materials. Finishing materials can be very different: the usual drywall, laminate, wooden lamellas, panels from cellulose and much more.
The sealing of the slopes of the entrance door with a cement or putty solution is the most effective in terms of sound insulation and insulation.

In addition, this option is most acceptable in terms of protection of the door structure - the burglar will have to make a lot of noise to find under the layer of cement fasteners. The solution itself does not have a special external appeal, however, decorative coatings can be mounted on the layer of the mortar, achieving any effect, or applying an ink.
The easiest and fastest way is to install finishing material on a skeleton from a metal profile or wooden брусков. In addition to simplicity, it is also economical, especially in cases where too much mortar is required to seal slopes. This option allows even a person far from construction to achieve a perfectly flat surface. Skeleton slope is the only solution in cases where you want to install lighting and switches directly into the doorway. Do not forget about the possibility of hiding in the framework of "traces" of communications - wires and cables.
2 Installation of slopes of the entrance door - preparatory stage
Whatever method of finishing you would not choose, the preparatory work will be the same. To begin with, you need to protect the door leaf and the box with paint tape, or better cover the entire surface with a film. And only then proceed to leveling the base - if some areas are too protruding, they need to be stitched, and also get rid of all loose materials that hold too loose.

With a broom or a brush with a fairly coarse pile we sweep the dust from all the cracks and cracks, we carefully sweep every centimeter of the base, especially if you decide to finish with a mortar - this affects the bond strength of the materials. Further the surface is primed by the compositions of deep penetration. However, foam concrete or similar loose material should be primed with a normal surface primer.

At this stage, it is possible to lay electrical wiring under the switch or provide a through hole for the cable. For this purpose, an aluminum tube of a slightly larger diameter than the diameter of the cable through which it can subsequently be laid, can be fixed at the very bottom of the skirting. If you plan to do with the formation of the frame, then the wire will have to tinker after it is created.
3 How to fix the slopes of the entrance door - plaster
It necessarily takes place strictly according to the beacon profiles, which are pre-installed on the primed surface. To fix beacons is best to use gypsum solution, which freezes in almost a few hours and allows you not to waste a lot of time. The solution should be applied in two or three places and fixed profiles on it. Profiles should be adjusted using a level - they should be strictly at right angles and in the same plane.

When the gypsum composition under the beacons solidified, begin to knead the cement-sand mortar in the standard proportion of 1 to 4. The sand for the mortar must be well sieved, without debris and lumps, cement M400. Mix the components with a construction mixer or drill with a special nozzle at low speed. Consistency of the finished solution should be at the level of the density of curd mass. If you know how to work with a solution quickly, then you can add a portion of gypsum.

Wide - the main tools for the master plasterer, without which he does not level the surface. Slightly moisten the base of the water to increase the adhesion of materials, apply the grout on the escarpment and align the beacons with a spatula. In a day you can apply two layers of putty - the main and finish. The last layer is ground with an abrasive mesh. What to do with the slope after that - leave it as it is, paint it or cover it with finishing material - it's up to you, all options are acceptable.
4 How to make the slopes of the front door on the frame - a quick way
The preparatory stage, described at the very beginning, is not canceled - although we do not use any solutions, ground the surface. In the future this will prevent it from shedding. To create a frame, you need the metal profiles used to create gypsum board structures, or wooden bars. Both of these should fit snugly against the wall, so the surface should be fairly flat.

To strengthen the structure, the bridge elements are installed on the main bearing elements, especially at the corners between the sides of the opening and the top plane. Then wires and cables are laid. If for plating you use drywall, it is enough to fix it around the perimeter with the help of self-tapping screws. To hide the joint of the drywall and the wall, you can fill it with a solution, but it is easier and faster to cover it with platbands. On the edges, be sure to install the perforated corners, and seal the joints with a special tape. It remains only to putty the surface and level it with a small grater.
Better aesthetic and technical qualities are available in medium density MDF boards. Fastening panels can be carried out with the help of screws, and with the help of small studs, if the wooden crate. Fasteners should be distributed around the edges or in other places that you plan to cover with platbands and corners. Mount the latter can be on liquid nails.

The same principle can be laminate or parquet board. With them a little easier - nails can be hammered into locks, a quality connection it does not hurt. So that all the fastenings will be reliably hidden from prying eyes, unless the corners have yet to be hidden behind the corners.
5 Slopes for entrance doors - a combination of materials
If you are not a master in leveling surfaces, this method is just right for you. The essence of the method is to fix the finishing materials not on the frame, but on a layer of cement-sand mortar or glue. For this, the slopes for the entrance doors must already be leveled and covered with a primer. It is also necessary to indicate the level of the slope and provide an emphasis for finishing materials. To this end, screws or screws are screwed into the surface in such a way that their hats form a single straight line. Consider the thickness of the mortar and the thickness of the finishing materials themselves, so as not to lose out with the overall dimensions of the slope.

Then we knead the solution according to the instructions described above and fill the whole slurry space with the finished mixture. In order to be more reliable, we recommend that you remove the cement-sand mortar slightly less than the level of the hats, as smoothly as you can get. Allow it to harden properly (at least 1 day) and apply a glue solution to the surface.

Glue also apply to the reverse side of the finishing material. After applying the finishing sheets to the slope, lightly press them down so that they are firmly against the surface and the air between them and the cement layer comes out. With the help of the level, find out if you have succeeded in exposing the sheets smoothly, and while the glue is not frozen, adjust their positions. Then you can fix the platbands and corners, if any.