Tools for plastering walls allow high-quality coating on walls. They help the surface to be perfectly smooth and very even. What tools for wall plastering are better to use when preparing walls for decoration, creating original patterns and machining surfaces mechanically, this article will tell.
Features of application of plaster
The technology of plastering walls includes several stages, such as:
- Surface preparation.
- Application of plaster.
- Creating patterns on the material.
The plastering process can be performed:
- Manually.
- Mechanically.
These features determine which tools are used in each case.
What tools are used to prepare the walls
For a reliable connection of the plaster layer to the substrate, it is necessary to remove the remains of the old coating. The old coating layer is removed, if any.
In this case, you need:
- Spatulas.
- Scraper for removing the existing coating.
- Brushes made of metal. For cleaning the dirt from the surface, before applying a new coating.
- Hammer, for tapping the existing plaster mortar or knocking down the old finishing coat.
- Najdachka with a large grain.
- Paint and plaster tools for primer application.
- Trowel for mixing, applying and leveling the solution on the surface.
- Capacity for building mix.
- Mixer for its stirring, or nozzle to the electric drill.
- Shield made of wood or metal, to securely hold the building material on the surface to be trimmed.
- Grater, for grouting the plaster when processing.
- Semi-conductor, for application or distribution of a building mix on a surface.
- Rule, to control the base plane and align the corners.
In addition to tools, you will need:
- Special tool, to eliminate enamel.
- Solution for removal of old materials. Before using it, the instruction is carefully studied.
- Stray, previously applied to concrete, plaster.
- Is allocated special attention sites of fixation wall panels to the outer wall.
- The same manipulations are carried out with brick walls and plaster. In this cleaning should be exposed only to places where the plaster falls well behind the walls. The strength of the superimposed layer is checked by tapping the solution with a hammer. In the problem areas the mixture will ring, on the others such sounds should be absent.
Tip: Before knocking off the plaster, you should check with the tester or detector where the wiring is located. The room must be disconnected from the electrical network, before cleaning the substrate and subsequent priming.
- As vertical guides, beacons are used, which allows you to plan the thickness of the layer for final alignment.
- Mounting beacons (see) is performed using a nylon thread.
What tools are needed to apply the plaster
Tip: The quality of the finishing work depends on the choice of tools for laying the plaster.

For plaster application it is necessary to purchase:
- Master OK.
- A long rule.
- Spatulas, narrow and wide.
- Grater.
- Level and plumb.
- Cord.
When applying a cement-sand mixture:
- With the master or spatula, the solution is manually applied to the wall.
- In one hand a grater is taken, a mortar is put on it and a spatula or trowel pounces on the wall.
Tip: Apply the mortar with a characteristic slap, which will allow the mortar to adhere better to the substrate. Before this, the wall should be moistened with water.
- After filling the surface with mortar, the grater is taken and the plane is leveled. If necessary, the mortar is thrown with a spatula. If you plan to apply a large layer of plaster, the process is divided into several stages:
- apply one layer:
- after drying, after about 7 hours, the following are applied.
Advice: Do not apply coating at a time. Otherwise the plaster will fall off and everything will need to be remade anew.
It can be:
- Trowel, is made of stainless steel.

With its help, decorative plaster is applied and leveled.
- Different sizes of spatulas for plastering, for laying and leveling the coating.
- For the Venetian is taken a modified tool for applying plaster, having the appearance of a metal blade polished on both sides.

The instruction for its application is somewhat complicated, the tool for it is used, as in the photo.

In addition, materials will be needed for polishing the surface. In this case, the price of coverage will be higher. The choice of a tool for decorative coating depends on the technology of its application.
For example:
- When using plaster "bark beetle" (see) a grater is used, which moves along the surface along the applied coating in a certain way.
- A variety of operations are performed by a multifunctional tool, such as a roller, which can have a variety of shapes and patterns.
A distinctive feature of the roller is the possibility of its modernization, without the installation of replacement parts.
For example:
- the surface of the roller can be wrapped with tape or rope, which will allow to obtain a relief pattern;
- you can put a plastic wrap on the roller. In this case, the original pattern will be obtained due to the formation of folds on the film in an unpredictable manner.
- A relief pattern on plaster can be obtained using stencils, which can be with a variety of images.
- For decorative plaster In large volumes mechanized tools are often used, such as a gun.

Its principle of operation, such as that of an airbrush, from the compressor, air is fed into the handle with a plaster tank. Air, passing through the nozzle, captures the plaster, which falls on the walls. In this case, the material should have a consistency similar to that of conventional plaster, the main thing is that the mixture freely slides down the walls of the funnel.
When doing the job, you should constantly update the solution in the funnel, cleaning and removing the old one. Otherwise, it will freeze, and work will become impossible. A gun for applying plaster makes the speed of work above. But you need to consider that in addition you will need a compressor that will create pressure up to four atmospheres.
Which painting and plastering tool is required for plaster application, the details of its application are shown in detail in the video in this article.
The walls in the apartment occupy most of the visible constructions of the house. If the floors can be covered with various materials, and the ceilings are made hanging, then the uneven walls can not hide anywhere. Especially if they do not have carpets and other, distracting coatings, then verticality and unevenness will immediately be noticeable. Therefore, the alignment of the walls with their own hands, the best option for improving the interior of the room in the house (apartment).
When building houses, all finishing work is most often performed by contractor construction organizations, and in private buildings by hired brigades. Often, their lack of control leads to differences along the entire length of the walls to 5-10 cm. The plaster is made by inept guest workers, without the use of a professional tool and sometimes any experience of finishing, forcing the owner of such newly built housing, when settling, to produce additional leveling of the walls.
Necessary materials and tools
For the alignment of walls in an apartment the following materials are used:
- dry building mixtures, followed by dissolving them in water (dry plaster, putty, etc.)
- panels made of plastic, metal, wood-based panels or plasterboard.
To carry out leveling with wet mixtures, you need a special tool:
- spatulas of two or three standard sizes (a tool with a rubber handle is recommended), the metal part should not be too soft,
- a basin with straight walls or a bucket with a capacity of 15-20 liters,
- a special agitator mounted on an electric drill (manual mixing takes a lot of time and effort),
- brush or roller for the performance of the primer,
- rule - a special tool for leveling,
- material for surface cleaning.
Alignment of walls belongs to the category of dirty works, therefore it is necessary to have work clothes made of canvas material.

Sheet leveling
Due to the high laboriousness of the plastering process, many homeowners with small building experience, perform wall plating with sheet material - gypsum plasterboard. This method is also liked by professional brigades - including because of time savings. Panels are attached to a previously equipped metal frame or glued to the wall with special glue.
The main requirement for such work is the removal of the vertical level of the wall surface during the installation of the metal profile.
Aligning walls with wet mixes
The most common method remains the use of a wet type of wall leveling. To perform this type of work, you need minimum skills of using a spatula and removing beacons. Mixtures for leveling walls can be purchased at any store building materials. There you can see the instructions for preparing solutions.
Before the main stage of leveling, you need to remove the old coating from the surface (wallpaper, whitewash, paint). In necessary situations, the flaky, falling off old plaster is removed at the corners and other places. In practice, more often all the old coating is cleaned up to the main concrete or brickwork.
The procedure for leveling walls begins by measuring the differences along the entire length of the wall. This can be done with a long special tool - the building level. Or pulling any cord along the wall. The verticality of the surface is measured with a simple plumb. In the presence of differences of not more than 30 mm, they begin to work. The largest layer of plaster laid should not exceed the permissible sizes.
Beacon alignment
Preparation of the surface for painting is most often done by lighthouses, which serve as a guide. The initial leveling of the walls with putty is made by applying it between beacons and distributing the solution with the rule from the bottom up. The ends of the tool must touch the surface of the beacons installed along the entire height of the wall at a certain distance from each other, corresponding to the length of the rule.
The final leveling of the walls is to trowel the surface with a special device - a plouter. After its completion, it is recommended to apply a primer over the putty for better adhesion of the paint.
Working with trowels
In the absence of experience with the rule, you can use two spatulas. One will serve as a "palette". It will be possible to dose the quality and quantity of the solution. And another spatula, smaller, will be working. They apply a layer of the mixture on the wall. When using a spatula, it should be kept at an angle of 45º to the surface. In this position, the mixture will lie flat.
Surfaces are usually carried out in three layers, with a thickness of at least 1.5-2 mm. The temperature in the room should not be below 10ºC and the sunlight should not be applied to the putty putty. After applying putty, the wall must be primed.
Each owner of an apartment or a private house, who decided to do major repairs of his dwelling, raises many different questions about the conduct of certain construction or finishing works. One of the most common: what methods of leveling the walls, available for self-implementation, exist, and which one to choose in a particular case.
It is necessary, with regret, to state that the walls not only in private houses, but also in modern high-rise buildings, are rarely perfectly even, and in this regard, even the most expensive decoration on them will not look properly. Therefore, whatever the decorative coverage for the final design of the premises is planned, to bring the walls in order, giving them the necessary evenness, it is necessary in almost any case.
Before you choose the alignment method, you need to determine how much the wall is curved. This can be done in several ways using different tools.
To determine the degree of deformation of surfaces, use a long rule, levels different designs and plumb lines.
- The rule, in this case, is the same as one of the building levels, it must have a length of at least 2000 ÷ 2500 mm, since it is required that the tool should rise vertically almost to the full height of the wall, and also so that it can be easily rotated diagonals. As a rule, if it is not in the home "arsenal", a perfectly flat rake can be used. But it should not be too thin, bending with the application of force, otherwise exact measurements will not work. It will be sufficient for its size in the section of 20 × 50 mm.
The rake, level or rule is applied to the wall surface vertically, horizontally and diagonally. Track the size of the gaps formed between the wall and the tool, which will show the degree of unevenness of the surface.
- Another simple and affordable way to check the verticality of the wall, not requiring expensive tools - the use of a plumb. Even if the farm does not have similar adaptationit is not difficult to make it quickly yourself. This requires a thin, but strong cord length of about three meters, as well as a weight of 150 ÷ 200 grams, best of all - a balanced, symmetrical shape.
To use the plumb bob is simple: for this purpose, a nail is fastened to the wall, under the ceiling, from the joint 25 ÷ 30 mm, and the weight attached to it is freely lowered vertically, along the wall. The load must hang freely, without reaching the floor by 10 ÷ 15 mm. When the load calms down and does not move, you can see how distorted the surface is - to measure the gaps at different points in height - and compare the results.
- In addition to the evenness of the walls, it is necessary to check their perpendicularity, that is, the corners of the room should be straight.
The definition of this parameter will help the construction corner, which is applied in several places along the entire height of the joint and makes the necessary notes. True, the gon should be large enough to pinpoint possible deviations.
If there is no large square, then it is better to apply the rule of the "Egyptian triangle". To do this, two legs are added from the angle along the walls, multiples of 3 and 4, and the hypotenuse should be a multiple of 5. For example, one wall is measured with 1.5 m (0.5 × 3), the other with 2 m (0.5 × 4), and the distance between these points should be 2.5 m in a straight line (0.5 × 5). If this is not the case, then the angle is clearly different from the direct one, and it is necessary to search for the cause and the way to eliminate it.
- The most probably optimal and accurate option is the use of a laser level (laser plane builder).
This device specifies perpendicular vertical planes, projects in space lines along which simple measurements with comparisons of the dimensions of the gaps are easy to reveal irregularities of the wall surfaces, their correspondence to the vertical plane and mutual perpendicularity.
Having determined the deviations of the walls from the required plane, the location of the irregularities - depressions or bumps, immediately evaluate their approximate height or depth.
- In the event that surface defects or deviations from the vertical plane are 8 ÷ 15 mm or more, the walls should be leveled by beaconing or by installing plasterboard sheets.
- If the differences do not exceed 5 ÷ 8 mm, then you can fix the surface, bypassing the application of a thin layer of plaster or shpatlevochnogo solution.
Preparing surfaces for leveling
In order to understand the stages of the work on leveling the walls, it is worth considering these processes in more detail. However, before proceeding to a brief description of each of the equalization methods, a few words need to be said about the general preparatory activities for all technologies.
The preparatory stage can be complicated and tiring, but it should not be dismissed, so here is guaranteed the quality of the leveled surface and its operational durability. Especially carefully it is necessary to approach the preparation of walls for plastering, but also drywall also requires its own special approach.
So, the preparation of the walls for further alignment includes several important operations, which include the following:
- The first step of the wall must be completely cleaned of the decorative coating, if it is on the surfaces - the old paint or wallpaper is removed. These processes are produced in different ways, which are described in detail in a separate article.
- After the walls are freed from the old finish, the plaster layer opens, which requires the most thorough examination. Such a revision is necessary, because during the operation, cracks could appear on it, or detachment, partially or completely, is not excluded.
Depending on the degree of damage to the old plaster layer, it will have to be removed completely or to make proper repairs. If this layer has a sufficiently large thickness, a poor-quality material is used for it, and its surface is uneven, then it is better to completely get rid of it.
If the wall has large protrusions, they will have to be knocked down, and small bumps can be ground or scraped with a metal brush.
- If the wall is supposed to "wet" work, then to ensure electrical safety, the room is likely to have to be de-energized. Usually in such cases it is planned to replace the sockets and switches, which means that the old ones must be dismantled and then the exposed wires should be isolated.
- Having cleaned or repaired the surface of the wall, it must be primed several times - this is to strengthen and dust the surface and to create conditions for reliable adhesion between the surface and a new leveling solution.
- If it is planned to level the wooden walls with plaster, they are cleaned of dust and ground with an antiseptic primer over the wood. After that, the dried walls are covered with wooden slats - shingles, which will create a good grip of mortar and wood.
Methods for leveling surfaces
The choice of the method of wall alignment directly depends on their state, that is, whether they have significant curvatures, or simply have to remove a small relief of the surface, which can manifest through the layers of paint or pasted wallpaper.
In fact, there are not so many technological methods of leveling the walls. They have been used for decades, but with the advent of new building materials - are constantly being improved.
So, the walls are leveled in the following ways:
- Plastering, that is, applying a special mortar to the surface of the leveling layer. In turn, this method can be divided into two types - the alignment of walls by lighthouses and without their use.
- Installation of gypsum boards, specifying the desired evenness of the wall surface (often it is also called "dry plaster"). This version of the alignment is also divided into two different approaches - fixing the sheets on the frame, or frameless fastening of GVL directly to the wall.
- Aligning walls with putty This method of bringing the surface in order is used in conjunction with the other two, mentioned above, or independently. If the walls have a smooth surface without large geometric distortions, but there are small irregularities on it, then it is the putty that will help to bring them to an ideal smoothness.
Wall plastering
A few words about leveling solutions
At present, a wide range of ready-made building mixtures intended for plastering works is presented in construction shops. They can be on different bases
- Cement-based plasters are used for outdoor applications, as well as for rooms with a high level of humidity
- Gypsum mixes are suitable for walls from almost any material, but the area of their use is limited only to interior decoration of premises.
However, many masters-finishers and homeowners prefer to prepare plaster solutions themselves. And the basis for this, in addition to cement or gypsum, may be still lime or clay.
Lime and cement-lime solutions have proved themselves for external and internal decoration, and clay-based plasters are generally seen as inexpensive (in the presence of free raw materials) and are suitable for leveling wooden, clay or brick walls.
If you want to try your hand at plastering walls with a homemade solution, then the "recipe" for cooking can be spyed out in the table below:
Name of solution Components The proportions of the solutions, depending on the specific layer "Nabryzg" "priming" Covering or "namyvka" Cement Cement: sand 1: (2.5 ÷ 4) 1: (2 ÷ 3) 1: (1 ÷ 2) Lime Lime paste: sand 1: (2.5 ÷ 4) 1: (2 ÷ 3) 1: (1 ÷ 1.5) Clay Clay: sand 1: (3 ÷ 5) 1: (3 ÷ 5) 1: (3 ÷ 5) Cement-clay Cement: clay: sand 1:4:12 1:4:12 1:4:12 Cement-lime Cement: lime paste: sand 1: (0.3 ÷ 1): (3 ÷ 5) 1: (0.7 ÷ 1): (2.5 ÷ 4.5) 1: (1 ÷ 1.5): (1.5 ÷ 2) Lime-clay Lime paste: clay: sand 0.2 ÷ 1: (3 ÷ 5) 0.2 ÷ 1: (3 ÷ 5) 0.2 ÷ 1: (3 ÷ 5) Lime-plaster Lime paste: gypsum: sand 1: (0.3 ÷ 1): (2 ÷ 3) 1: (0.5 ÷ 1.5): (1.5 ÷ 2) 1: (1 ÷ 1.5) Plastering of walls without installing beacons
The leveling of walls with plaster mortar without beacons is possible in those cases when the wall is relatively even, without serious deformations, depressions and depressions, and it will be sufficient to apply an equalizing mixture of relatively small thickness to bring it to order. I must say at once that this way of putting the surface in order is much more complicated than plastering on lighthouses, since alignment has to be carried out by eye, and it is not easy to do this without proper skill. Therefore, if there is no experience in this work, it is better to entrust it to professional masters.
The process of plastering walls without beacons can be divided into several stages - it is "nabryzg", "ground" and "namyvka."
- "Nabryzg" - this is the first layer of mortar applied to the wall when it is leveled. The mixture for this stage should have a consistency of thick sour cream.
When applying the mortar on a brick or stone wall, its layer should be 10 ÷ 12 mm, on a shingle of a wooden surface 15 ÷ 18 mm.
"Nabryzg" is carried out by the trowel, on which the solution is drawn and from itself, with a small effort, pushes to the surface. If the wall surface is relatively flat and does not require the application of a thick plaster layer, then sometimes the masters "spray" even with a wide brush. When spraying a solution with a brush, do not make the hand a large swing, otherwise, part of the mixture will be sprayed around the room.
It is possible to apply the first layer of plaster using the "smearing" method. In this case, a spatula with a width of 200 ÷ 250 mm is required, by means of which the solution is taken from the container and spread evenly over the wall surface with smears. Ideal alignment of this layer is not required, as it will become the basis for further work.
- "Priming" - this is the second layer when plastering walls without beacons, and it is applied only after the "spray" has completely dried. For the application of "soil" a thicker solution is used - it is thrown on the surface, starting from the bottom of the wall, filling it with areas not covered by the first layer, thus bringing both layers to approximately the same thickness.
Applying this solution on a wall section with a height of 350 ÷ 400 mm, it is leveled by a rule, collecting excess mixes for it, which is sent back to the container, since it can still be used for further work.
When leveling, additional unfilled areas may appear in addition, which must immediately be filled with a solution and then traversed the area with a rule.
Sometimes, instead of the rule for aligning this layer, a special tool is used - a half-circle.
The half-shell also level the solution, collecting both its excess and filling the identified voids.
- "Rinsing" or covering layer of plaster consists of a liquid solution and is intended for liquidation of all flaws remaining on the surface of the wall after application of "ground". The thickness of this layer should not be more than two millimeters, so it is very important to observe the correct consistency of the plaster solution.
In this regard, if the mixture is prepared independently, and not purchased in finished form, all materials used in it, should be sieved through a sieve with cells no more than 0,5 ÷ 1 mm. The solution is stirred to a homogeneous state, since it should not leave even small lumps.
Further, the surface of the wall is wetted with water and a thin layer of liquid solution is applied to it using a spatula and a half-wiper. Then, the wet solution is rubbed in circular motions, which are made counter-clockwise. Therefore, this stage of work is often referred to as surface troweling.
When choosing this method of wall alignment, during each of the stages of work it is necessary to control the verticality and the necessary smoothness of the surface with the help of the rule and level.
Aligning walls with plaster on beacons
Aligning walls with plaster mortar on beacons is a more popular method than without installing them, since these elements greatly simplify the work and allow you to get a perfectly flat surface as a result. However, to work successfully, performing them, there is no need to hurry, especially if the process is performed by the master for the first time.
Leveling Beacon System
As beacons for leveling surfaces, special perforated metal profiles with a projection, the height of which can vary depending on the required thickness of the plaster layer, are most often used.
Lighthouses are installed on the wall surface vertically, at a distance from each other, providing a convenient work rule of the available length (approximately 200 ÷ 300 mm less than the length of the rule). For beginners, usually the installation step is not more than 1000 ÷ 1200 mm. Fastening of profiles is most often performed on the quick-drying solution laid out along the slides.
Sometimes for making beacons use improvised devices, for example, pieces of plywood, drywall or ceramic tiles, which are also glued to the solution according to the pre-marked labels and the plumb line.
However, it is much easier to level the whole profiles, since they are fixed vertically from floor to ceiling and do not give a retreat from the intended level.
The conclusion is that the most important in the process of leveling the walls by the lighthouses is their correct exposure, which is performed in compliance with certain rules.
- Further, the applied solution, starting from the bottom of the covered section of the wall, is leveled by a rule that rests against metal beacons and guides along them, like on rails. At the same time, excess solution is collected on the rule, which is regularly removed with a spatula, sent back to the container and used for the next spray. When leveling, the rule is shifted upwards, but at the same time slightly moving horizontally in one and the other side, which helps fill all voids in the layer and maximize the use of the entire applied solution.
- Most of these passages, the rule will have to be done several times, with filling with the help of a trowel or spatula of identified cavities. As a result, you should get a flat surface, level with the guides of the lighthouse system.
- After plastering the wall, when the solution grit slightly, the beaconing profiles are carefully removed from the plaster layer. The remaining grooves are closed with a mortar and leveled over a common surface.
- Further, still the wet surface of the plaster is rubbed with a special construction float. The work is performed in a circular motion counter-clockwise.
- To ennoble the inner and outer corners of the wall a special corner spatula is used.
- External corners, especially in those cases when a thick leveling layer is applied, is recommended to be strengthened with metal perforated corners, which are pressed into the wet solution and adjusted for the building level.
1 - the old wall surface to be leveled;
2 - twisted screws, whose butt ends are aligned in the same vertical plane. The step between the screws is 200 ÷ 300 mm;
3 - slides of building glue on a gypsum base;
4 - sheet drywall.
It is much easier to install a drywall on a more or less even wall, having prepared it with a primer. To do this, on the sheet itself or on the surface of the wall, a glue mass is applied pointwise to the slides.
Next, the gypsum board rises and presses against the vertical surface, and then, if necessary, its verticality is adjusted by a gentle tapping. In order not to damage the sheet, the adjustment can be carried out by the edge of the rule, which will cover the entire width of the sheet at once.
When fixing a sheet on the wall, the correctness of its position must be controlled by the building level. To the first, fixed on the wall, the finishing cloth, the second and all subsequent sheets are fitted. After the glue dries, the seams between the plasterboard are sealed with a mesh-serpyank or a special tape, and then zashpatlevyvayutsya.
Frame method of plasterboard mounting
The skeleton method of wall alignment has its advantages and disadvantages, and is even more popular than fastening sheets to glue.
The disadvantage of this technology can be called the fact that the frame system very significantly conceals the area of the room, since the crate itself, plus a sheet of plasterboard, to it, make up a total thickness of at least 50 mm, that is, the room will decrease from each side to this distance.
The merit of such an alignment is much greater, therefore, if the area permits, this method will become an ideal variant of the transformation of the room.
The obvious "plus" of this installation is the ability to insulate and soundproof the wall by placing in the space between it and the lining the layer of the corresponding material. This is especially true for apartments located in panel houses.
On the positive side, it can also be attributed to the fact that under the skeleton system is not required "super-thorough" preparation of the walls.
- They need to be cleaned from the decorative coating just to make sure that there are no deep cracks in the wall. Small surface defects do not interfere with the installation work.
- Priming the walls before fixing the profiles is necessary, and for this an antiseptic solution is used, which will protect the surfaces from the appearance and development of mold.
After the primed surface has dried completely, it is possible to proceed with the marking and installation work.
Profiles are usually set in steps of 600 mm (along the axes), since the width of all sheets of plasterboard is 1200 mm. Thus, each sheet set vertically will be fixed on three lines. In addition, it is convenient from the point of view that the overwhelming number of insulating materials is produced by mats of exactly this width - 600 mm.
To achieve an ideal flatness of the walls, it is necessary to carefully align the metal profiles along the vertical, thus setting the future plane of the surface to be created.
Since the profiles are fixed in special brackets - straight hangers, with perforated side "wings", it is possible to accurately adjust their distance from the wall. Suspensions are fixed on the line using dowels or self-tapping screws (depending on the wall material) in increments of 500 ÷ 600 mm.
The protruding ends of the side shelves are easily folded back after securing the pillars in them, so they will not interfere with further fixation of the drywall sheets.
To make it easier to manage the alignment of the frame, first accurately exposed vertically and relative to each other and fastened to the outer racks. Then, cords are stretched between them, which indicate how far the intermediate profiles should be pushed out from the wall.
If the ceilings in the room are high enough, horizontal cross-pieces are sometimes mounted between vertical racks, which will give the system additional rigidity and strength.
Fastening sheets to the frame is done with the help of special black screws TN25 (3,2 × 25 mm), the caps of which need to be drowned in the gypsum board for 1 ÷ 1.5 mm. In the future, these holes left from the hats will need to be puttied.
It should be noted that sometimes sheets of plasterboard are mounted in two layers - in this case the wall covering to be created will have a higher strength. The sheets of the outer layer must overlap the joints of the sheets of the lower layer.
After the wall is leveled with the gypsum board system, they begin to seal the joints, and after the solution dries, the wall is primed and shpatlyuetsya. The layer of putty should completely hide the joints. The final stage of the work is the application of a decorative coating - paint or wallpaper.
Alignment of walls with putty
Bringing to the ideal of the surface of walls with putty can be called the final stage for any chosen method of their alignment under interior decoration. In addition, the putty, as the only leveling layer, is used if the wall itself is sufficiently flat, but has small errors in the form of small depressions or minor roughness that may appear through decorative finish - wallpaper or color.
The putty has a finer structure of the mixture, and when it is kneaded it acquires high plasticity, it is easily applied and distributed on the prepared, primed surface, masking flaws and making the wall perfectly smooth.
The application of this leveling layer is carried out by spatulas (trowels) different widths, but in large areas a wide spatula is always used, with a working surface of 400 and more millimeters.
Wall filling is a complex process that requires a certain experience, since it is necessary to achieve smoothness of the walls, and the spatula in its unskilled hands with its edges almost always leaves furrows of different depths on the surface of the raw plastic solution, and this must be avoided. If they are formed, they should be immediately aligned, since after setting the putty mixture this will be difficult.
Typically, two (or even more) layers are applied - one leveling, and the second, finishing - bringing the surface to the ideal. Accordingly, different types of fillers can be used for different stages.
The final stage of shpatlevochnyh work is always grinding the surface to the desired degree of smoothness. This final stage of wall leveling is carried out using a special float on which meshheads or sandpaper of the required degree of granularity are installed. There is also a special electric tool - grinders of different principle of operation, which make it possible to speed up this rather laborious process.
Many craftsmen, in order to achieve an ideal result, use portable lighting when doing grinding work, which perfectly reveals poorly aligned sections of the wall, down to the smallest surface defects.
So, proceeding from all the above, we can conclude that even with no experience in leveling the walls, it is possible to choose a method that will be able to even for a beginner builder. Taking on the performance of these works, you can not only save a decent amount, but also be confident in their quality - after all done, as they say, "for yourself." Therefore, starting the renovation of the apartment, you need to properly weigh your financial and creative capabilities, and boldly get down to business.
At the end of the publication - a small video sketch, which also should help the reader in choosing the method of leveling the walls.
Video: What kind of wall alignment to choose?
To obtain high-quality plaster coating, a set of special tools and tools is needed. Consider what tools are needed for plastering walls.
When carrying out preparatory work
- For perforation of smooth surfaces, perforators with attachments, chisels, plaster hammers with a kyle, axes and bucarda (a metal heavy hammer with teeth on the impact surface) are used.
- Pollution is cleaned with a steel spatula and metal brushes.
- Vacuum cleaners are used for dust removal of walls.
- Priming compositions are applied by roller, paint brushes and maklovice (special large brush with long handle).
- To control the installation of lighthouses, laser, water and rack levels, a plumb line, a nylon thread, a metal or wooden plaster square are used.
Tools and equipment for the preparation of solutions
- Mixer construction or a drill with a blade nozzle to stir the mixture.
- Stucco metal box, trough or bucket in which the solution is prepared.
- Capacity for dosing the volume of components.
- Stucco station or machine in which mechanized mixing of the solution takes place.
- Work gloves to protect your hands from splashes of solutions.
Tool for plaster application and leveling
Tools for plaster application:
- plaster trowel, made of stainless sheet. It has a shape resembling a heart;
- hopper - plaster scoop (volume ≤ 1 l);
- wide spatula;
- falcon, has the shape of a plate. Can be wooden or metal with a handle in the middle, attached perpendicular to the base. The product is poured onto the product, transferred to the application site and the trowel is poured onto the wall.
Tool for leveling walls with plaster:
- the rule is an aluminum or wooden rack with a length of 50 to 300 cm, equipped with a bubble level. Available with a rectangular, trapezoidal and h-shaped profile. To level the solution on the slopes, in the outer and inner corners there are pustules and husks;
- metal and plastic spatulas with a rectangular or trapezoidal blade;
- trowels;
- cutting - a kind of plaster blade with a narrow and short blade, the spout can be sharp or rounded. It is used for fine work on cornices, pilasters and other architectural elements of complex shape;
- venetian trowel - a tool for applying decorative plaster, having rounded edges.
At finish finish
- Grater and semitrailers.
- Steel trowel for ironing and sealing the finish layer (polished stainless steel plate with handle).
- Tool for decorative Venetian plaster in the form of a "Venetian" trowel, a kind of ironing, with the help of which the marbles are made marbles.
- Various types of rollers - rubber, fabric, polyurethane, film, fur.
- Prefabricated stencils are made of plastic, rubber, film or made independently of cardboard, thin plywood and other materials. They are used for original finishing of different finishes.
The lover does not need to purchase such large sets of tools, you need to buy a minimum for performing specific types of plastering work. The main condition is simplicity and convenience of use.
The term "finishing works" includes a list of accompanying operations from painting the walls to laying the tiles. All of them are carried out only on a carefully leveled wall surface.
Modern methods of leveling walls are divided into two groups. Depending on the technology and materials, there is a distinction between dry (using gypsum boards) and crude (correction of the surface by the construction mixture) methods, each of which has its own characteristics. In order to choose the most suitable method, it is necessary to measure irregularities with a laser level, plumb bob or ordinary level. From potholes and hollows, oscillating within five millimeters, you can get rid of and using putty. Irregularities of about 3-5 centimeters? Then you should buy a building mix. Differences more than 5 centimeters better align, using gypsum cardboard.
How to level the walls with plaster?
Just before you level the walls, you need to do a number of preparatory work:
- dismantle obsolete decoration Materials;
- estimate the surface to be plastered.
The wall should not crumble or exfoliate. Often in the case of work on old plaster after complete drying of the first layer, defects that were not visible before are found.
The key to success is to meet three conditions:
- careful preparation of the surface;
- the right choice of building mix;
- presence of accurate beacons.
To smooth the brickwork, it is recommended to use a mixture on the cement. The cost of this plaster mixture is relatively low. It is allowed to apply a fairly thick layer of material, which is important when decorating brick walls. It should be noted that when applying a layer more than 2 centimeters, it is necessary to use stucco for reinforcing the composition.
For plastering a smooth concrete wall, leveling mixtures for gypsum-based walls will be required. Microparticles of quartz, which are part of the material, make the wall a bit rough. But in the beginning, you must first primetute the surface. Reinforcement is carried out by a polymer mesh with a cell size of 5 × 5 mm.
![]()
Many are interested in what kind of solution to level the walls of concrete. For the plastering of concrete with a rough surface, plaster or cement compounds are used. Primer is also mandatory, but without the addition of quartz.
When processing foam concrete surfaces, mainly gypsum mixtures are used. Preliminary priming of deep penetration is mandatory.
Pazogrebnevye plates, which are used for the construction of partitions, should be plastered with plaster mixture on a conventional primer.
The next step after evaluating the surface and its preparation for applying the plaster mixture will be the location of the lighthouses.
Beacon Installation
It is customary to call beacons in construction a sort of guide for controlling the leveling of the surface with the use of liquid mixtures. As a beacon for plaster use a perforated profile, the width of which depends on the volume of the applied mixture. Beginners are better to use purchased beacons, the beauty of which is that they do not need to be removed after work and mask the depressions left after removal.

Beacons are placed on vertical strips of a quick-hardening mortar or mixture, which will be plastered. The distance between the beacons is determined taking into account the size of the rule (it should be supported by two beacons and not slipping).
![]()
Technology of plaster application
In the interval between the beacons of the trowel and the "falcon," the "namet" is thrown - an excessive amount of the mixture. A falcon is a tool with a handle remotely reminiscent of a trowel, but with a base that is much larger than the base of the trowel. Specialists dial trowel mixture from the "falcon" and discarded between the lighthouses. The use of this tool can significantly increase the productivity of labor, because there is no need to return to the solution tank each time. So, the time costs for equalization are also reduced.
Then, the solution is uniformly distributed from the bottom to the top. In order to immediately apply a layer of plaster thicker, make a rough nest, not leveling it. After the drying of the rough layer, the finishing coat is applied. Finite nests are also leveled by the rule.
How to level the walls with putty?
The surface before priming with putty is also primed. Spatting the surface with your own hands is not an easy task. It should be noted that this method is not always suitable, as it is possible to level the walls for painting with putty only with small differences in "heights". In other cases, the putty will be the final step of a multi-step process.
To carry out the shpatlevaniya need a wide and narrow spatulas, as well as a cuvette with a flat bottom. Consistency of the mixture should be such that the cone, formed from stirring by a stick, retains its shape. Over time, putty thickens, so it should be periodically diluted with water or a primer. The mixture of the desired consistency is well held in an upright position, without slipping off the spatula.
Prepared properly putty put in a cuvette and cover, so as not to dry out. A small amount of a mixture is applied to the surface of the wall with a spatula. Further, with measured horizontal and vertical movements, align the applied putty to a thickness of one to two millimeters, holding the spatula at an angle. It should be noted that the greater the tilt angle of the spatula to the surface, the smaller the thickness of the layer of the mixture remaining on the surface. For convenience, the spatula blade is fixed with the other hand.

After "grasping" the mixture, it must be slightly washed with a primer. This is done in order to remove the influx and various irregularities. The first layer after complete drying (at least 24 hours after washing) is treated with a sandpaper for grinding to smooth the roughness. If necessary, you can apply and the second layer, but before that you need to primed the previously zashpatlevannuyu surface. Applying a second coat without a primer can lead to cracking, since moisture will be absorbed into the previously applied putty. After a day, the surface is again ground with sandpaper, wound on a board or a small bar.
How to align the walls with a rotband?
Starting putty "Rotband" is a plaster mixture made by Knauf - famous brand in the construction industry. Used for internal works. Sometimes Rotband putty is called plaster. For facade decoration, this mixture should not be used, since Rotband contains gypsum, which is prone to the harmful effects of the environment. The characteristics of this material far exceed the properties of ordinary putty. It is much more plastic and dries more slowly, so it is extremely convenient to use. Due to these advantages, the leveling to the final finish level with the Rotband mix is much faster. The work is conducted in several receptions, as well as with the use of ordinary putty, but the starting and finish finishing is carried out by one mixture.
Putty is best mixed with a mixer. So it will turn out without dry lumps. When leveling large unevennesses, a special shpatlevochnaya grid is used. The technique of applying with beacons can also be performed by a mouthworm.
Frame method for leveling walls with plasterboard
How can I level the walls with large potholes? For these purposes, drywall is suitable. Correction irregularities gypsum plasterboard - the most effective and low-budget of all possible options. Carried out in frame or frameless ways.
When installing by the wireframe method First, a frame is created, on which sheets of plasterboard are fastened. The frame is constructed of a beam or a metal profile of two types - a guide and a rack. The frame from the beam is not so durable (it is subject to the influence of microorganisms, moisture, is prone to deformations). Install it is also much more difficult. Therefore, builders often use the metal profile as the basis.
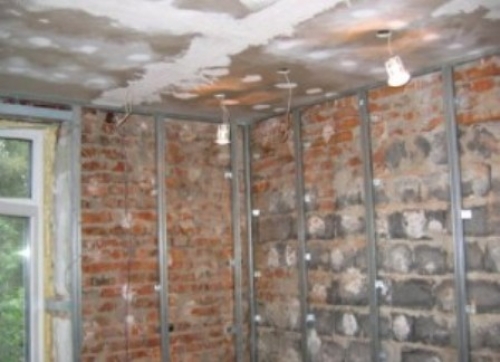
First you need to build a frame. To do this, screw the guide profiles parallel to each other to the ceiling. Then after every 40-60 cm we set the guides taking into account the width of the drywall sheet (120 cm). At this stage, if necessary, conduct the insulation of the walls with a wool or styrofoam.
After assembling the frame proceed to fasten the sheets of gypsum board to the metal profile. Do this with self-tapping screws made of oxidized metal. Installation of drywall sheets is carried out in steps of 40-60 cm (depending on the distance between the guide profiles). The hat of the samore is slightly "hiding" in the sheet.

Frameless method somewhat differs. In this case, the sheets are glued directly to the surface in need of finishing. A significant disadvantage of the frameless method is that it is not possible to level the wall with serious defects with this method.
There are other ways to level the walls with your own hands. For example, plywood or plastic panels. The execution technique is similar to the plasterboard leveling, but instead of the profiles for fixing the plywood or plastic panels wooden bars are used. This method is quite economical, that is why it is used in the finishing of cottages, garages, bathrooms, etc. It also allows you to hide communications.
To your walls become even, carefully evaluate their condition and determine which of the ways will be most appropriate. Smooth walls - the first step to the fact that the decoration materials really decorate your interior.