Garage - a narrowly functional room, the device of which must meet special requirements. In a limited area you need to distribute a significant load, so the floor in the garage is better to perform from strong, wear-resistant materials.
The basic requirements for the device of the floor in the garage
Any machine has a significant mass and requires constant maintenance with a set of tools that increase the load on the floor surface, so it is better to provide several features if you start arranging the floor in the garage:
- The strength and stability of the material to mechanical action, the floor in the garage almost daily subjected to high dynamic loads, so must have a reliable base.
- The topcoat should be resistant to chemical compounds and not react to the penetration of fuels and lubricants.
- Moisture resistance of the material - it is impossible to exclude the seasonal penetration of moisture into the garage, when enough water and snow fall from the wheels or fenders of the car.
- A floor covering for a garage with flame retardant properties will provide fire safety and will not allow the spread of smoke.
Based on the above criteria, you can exclude such materials to make the floor in the garage, like wood and linoleum. There is an opinion that if wood is impregnated with special substances, it will become a suitable material for making the floor in the garage, however, over time, the fire retardant composition loses its properties, and the continuous spreading of fuels increases the risk of fire.
Important! Only some materials correspond to making garage floors, among which - concrete or cement screed with the subsequent laying of a finishing coating or modern polymeric floors (acrylic, polyurethane, epoxy). If you choose a variant with polymeric floors, you will also have to make a priming of the concrete foundation.
Pour concrete tie
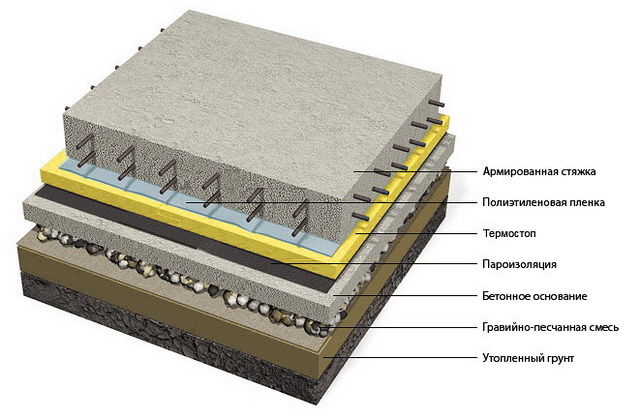
The main problem when laying a concrete foundation is associated with the interaction of concrete and the surrounding soil, which should not be mobile or contain water. In order to prevent the negative consequences of excess moisture, you need to pour gravel crumb, which will take over the drainage functions and excess water will go away. Gravel embankment, which should be at least 10 cm thick, is covered by a sand layer of the same height as seen in the photo to compact the bulk layer and strengthen the adhesion to the concrete.
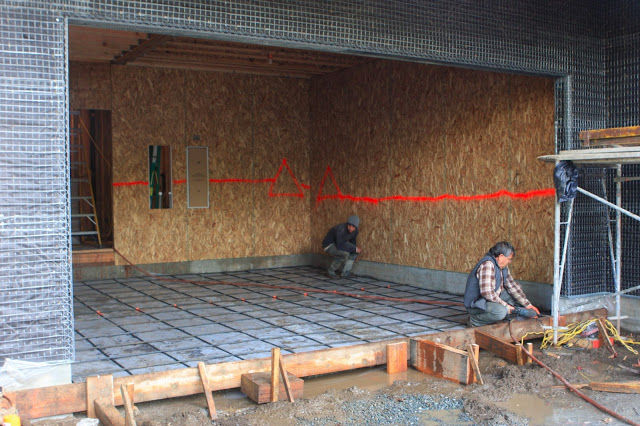
Waterproofing - necessary element to exclude the penetration of water from the ground into the subarea area. To do this, use a material such as a dense polyethylene film, which must be laid with canvases overlapping 20 cm one on the other. Next, a concrete cushion is poured, which should be 20 cm thick, to use a beacon installation to equalize it to spend less time and material on leveling the screed. The concrete cushion must be reinforced with a reinforcing mesh of at least 10 mm thickness, as in the photo.
![]()
At the final stage, the floor in the garage is flooded with a cement screed, to strengthen it, you also need to use a metal grid with 10x10 cm cells. The screed should also be covered with polyethylene and leave to dry until it becomes a light shade that indicates a complete lack of water in the screed . For the final leveling of the floor, self-leveling mixtures can be used, in which plasticizers have been added to improve performance.
If the surrounding conditions allow unobstructed washing of the car in the garage, the floors need to be poured with a slight slope for a quick drain of dirty water.
Floor coverings for garage
In order to make a clean floor for the garage, you can use different materials:
- topping system - is used to strengthen the concrete-cement surface and can be either the final version of the floor finish, or preparatory for laying the finish coat; hardening topping mixtures consist of crystalline quartz or corundum rocks with the addition of a metal powder;
- floor tiles - this is the most common option when choosing the finishing materials for the garage, in order to lay out the flooring with tiles, it is better to use frost-resistant porcelain stoneware, which is able to withstand the increased load; porcelain stoneware "gres" - not enameled ceramic tile single firing, very durable, available in various colors and shades; ceramic granite tiles have remarkable technological characteristics: low water absorption, resistance to abrasive loads and chemical agents, a variety of colors and patterns; ceramic granite better tolerates impact and temperature changes;
![]()
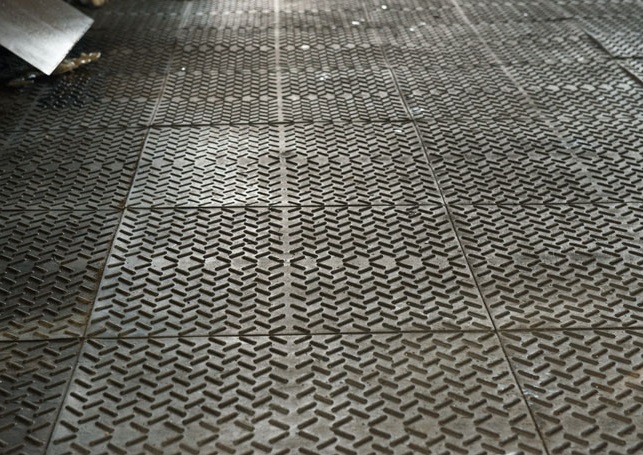
- rubber cover - affordable to each option, inexpensive and durable, it is made from fractional chips, obtained from old car tires, thick rubber is produced in rolls or in the form of tiles, which can be very easily put; coating has a relief non-slip structure, when laying it is better to use a glue composition intended for street work;
- modular flooring for a garage - such a coating is assembled according to the type of puzzles, the main component for its production is polyvinyl chloride, which provides increased strength and elasticity of the coating; if you choose a floor covering made of PVC, you can even not glue it to the base, because the installation is done by the method of joining special locks; PVC coating is antistatic, has a rough surface with an anti-slip effect and you can buy a coating of any shape and color, as seen in the photo;
- painting of concrete base - the cheapest option of finishing, but the usual paints eventually wear out and peel off, so it is better to apply a special impregnation for concrete, which penetrates into the thickness by 2-3 cm and stays on the floor for a long time; in the photo it is noticeable that paint for concrete allows you to choose the desired coloring; latex, one- and two-component epoxy paints must be applied in accordance with the attached instructions to achieve a sustainable result; You need to calculate your capabilities so that you can perform the coloring in one step, as the paint dries quickly.

Especially demanding garage owners use the method of polishing concrete, which consists of several stages: the cleaned concrete surface without cracks and drops is grinded by abrasive mechanisms, concrete is impregnated with hardening mixtures and polishing starts, after which the surface needs to be finished with several layers of polyurethane varnish. If to achieve an impressive decorative effect in concrete add granite or marble chips, the polished surface will acquire a unique pattern. Looking at the photo, you can be sure that the ground concrete floors have an interesting intricate texture.
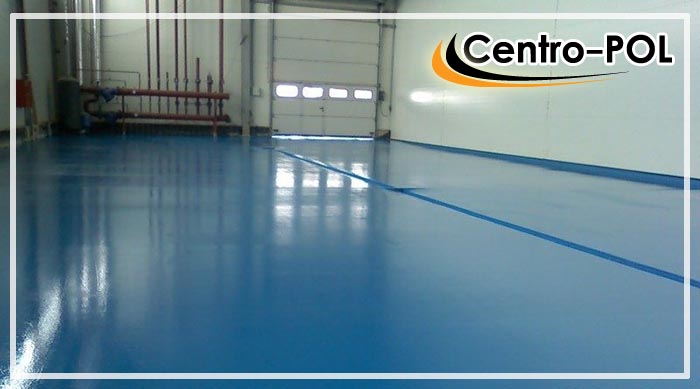
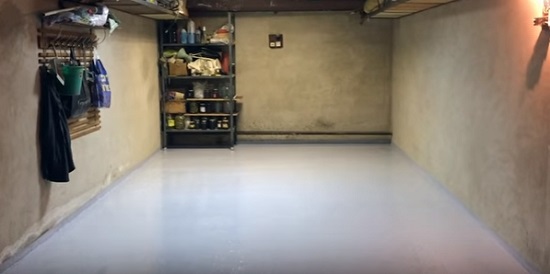
The polymer floor covering for the garage combines many advantages - both high technological properties, and an attractive external condition. Polymer coating is made from special mixtures that are easily kneaded and spread over the floor plane with a needle roller. If the resulting polymer mixture is of the correct liquid consistency, then it is capable of self-leveling, and the master needs to remove the possible air bubbles from the mixture with thorns on the platen. Before this, it is necessary to repeatedly prime the concrete base with astringent mixtures to prepare the surface for applying the polymer coating. The dried floors must be sanded and dyed in order to achieve a perfect effect, as in the presented photo.

Surface of polymeric floors is amazingly smooth, smooth and durable, resistant to any atmospheric phenomena. With polymeric floors, the garage will acquire a finished, distinctive interior into which any car will fit. Of course, the price of a polymer coating, which is much more expensive than a tile, can stop a car owner from such a choice.
Coating for the garage floor we select by the same criteria as any other. The difference in the placement of accents.
So, soundproofing can be neglected. And here fire safety should not only remain in the first place, but also receive special attention.
In contact with
Choosing a floor covering for a garage, you need to think what material more reliable.
Let's see what kind of floor is it better to make a wooden or concrete in the garage or can it be made of rubber?
Earthy
In the garage, the floor does not have to be multi-layered, it can only include a base, even if it is priming. Simplicity and cheapness of this option is obvious.
Work plan:
- remove the turf;
- align and compact the soil.
- low wear resistance;
- humidity.
- lay a layer of clay ~ 15 cm thick.
Causes afflictions in the future will be:
The latter will be reduced:
But evenly distribute the load on the ground the second layer of the floor. It will either be a preparation for finish coat, or directly exposed to operational influences.
Concrete
How to cover the floor in the garage? Can concrete. The concrete floor on the ground consists of a cement-sand screed and an auxiliary layer under it - gravel. You can arrange a floating screed - not touching the walls. Then the floor will remain intact when shrinking the garage.
IMPORTANT! The screed does not have to touch the pipes exactly (then the pipes will remain intact).
Gravel is poured directly onto the ground base, cover with a layer of sand (each layer is leveled and rammed) and covered with a film with allowance on the walls to the level of the finish layer. Strips of polyethylene overlap, with the gluing of joints.
Careful waterproofing and a sufficient layer of sand and gravel cushion will avoid humidifying the concrete from the side of the ground and additional dampness in the garage.
Already on the film arrange the first cement-sand screed with steel mesh in the base. Total screeds are made two or three, between them you can lay a roll thermal insulation.
Given that base concrete layers are not rigid, and the last coupler is designed to form a slope of the floor in the direction of the exit, choose a cement composition, laid and aligned manually. The thickness of the entire structure is significant and will require excavation - pit creation.
If the base - reinforced concrete slab, then the pillow made of loose materials makes it thinner. You can do and one bound floor screed (adhesion to the slab will provide adhesion).
Than to make floors in garage? See a photo below:
What will make you happy coating for the garage on the floor:
- fire safety (sand and cement are not prone to burning and self-ignition);
- strength;
- economy;
- natural materials.
Styling features:
- duration of solidification (if necessary, regular wetting of the surface);
- labor intensity.
What will have to put up with in the process exploitation:
- Hygroscopicity: any liquid is quickly absorbed into the concrete, then they return to the room with moisture, smells.
- Dust retention, and its creation.
- This floor covering in the garage is cold.
Reduce the porosity will help special paints, which will have to be applied more than once, and impregnations, rubbed once - in the final screed before it hardens.
A radical solution is to confine oneself one layer concrete and on it to create a third layer: wooden, polymer, rubber, tile.
Wood
Any wooden structures Bribes:
- easy assembly and dismantling;
- availability of material, ready to take various forms;
- low weight;
- low heat absorption.
There are two spoons of tar: the tree rotates well and burns well (and moistened with engine oil or gasoline - "well-no-then-word"). The fragility of the floor (taking into account the nature of the operation of the room) recedes into the background.
Antiseptic, antiseptic compound and fire retardant are processed and logs framework, and boards flooring. Before assembly is good dry.
Select wood coniferous or oak. The cells formed by the lags are filled with moisture-absorbing material. We lay the boards without cracks.
With a flat base, you can do without logs, only with thick boards, but the absence of a ventilation gap will increase the humidity.
Which floor in the garage is better concrete or wood? With reasonable use and care, the wooden floor will last long, the room will be drier than with the concrete floor. But once competently executed earthwork and concrete work will make your choice reasonable.
Floor covering in garage: 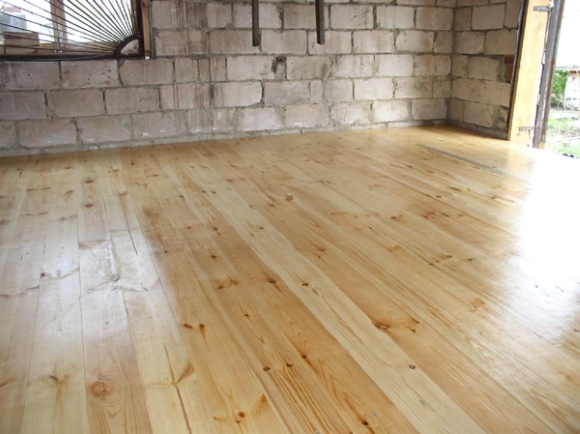
Polymer coating
What floor is better to do in the garage? Definitely sex.
Such floors differ: by thickness, degree of filling and type of resin in its composition.
For the garage suitable highly-filled: epoxy and polyurethane. Their thickness is 4-8 mm, they are ready to withstand high mechanical loads.
IMPORTANT! Work on the device is allowed at temperature not lower than 15 ° С
In the cold are arranged acrylic floors. They harden faster, but are difficult to lay and are not resistant to abrasive damage.
Such a floor covering in the garage has a lot advantages:
- strength, impact resistance;
- resistance to abrasive wear;
- chemical resistance (in particular to gasoline, acetone, motor oil, etc.);
- hygienic;
- non-slip;
- decorativeness.
- noiselessness;
- ease of repair;
- durability (up to 10-15 years);
- fire safety: after solidification, the composition becomes a low-flammable and non-propagating flame.
Afflicted at a time - high cost material. Concerned with high requirements to the quality of the foundation: it must be extremely durable, smooth and clean throughout the area.
Pay attention to the work! The threshold of flammability of liquid composition is low!
Based on rubber
What should be the floor in the garage? The basis can be.
- Monolithic rubber floors
Floor coating of whole road rubber. Much more widely distributed floors from rubber crumbs - recyclables from tire recycling.
For use in the premises, a compound is prepared, after curing, not allowing water and air to pass through - the rubber crumb turns out to be bound by a polyurethane film.
Floors from rubber crumbs are good in that:
- strong, weakly washable;
- do not slip;
- polymerization of the mixture takes one day - the optimal period for the creation of a seamless and monophonic coating;
- the basis can be not only concrete, but also the soil, and the tree;
- easy to clean;
- decorative due to the presence of pigments in the composition;
- can be applied to non-horizontal surfaces.
Minuses: a stowage machine is required for laying. Finished tiles from rubber chips will solve this problem by increasing the cost of the floor.
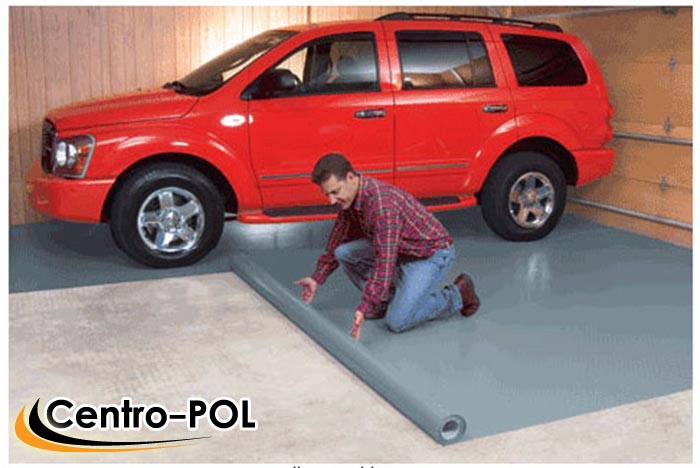
How to make floor in the garage? Rubber canvas. The creation of this finishing layer will take several days.
Before laying rubber cloth The screed must be primed with a mixture of turpentine and polyurethane glue. The laid rubber needs to "lie down" for a few days before it is ready to be fixed to the surface. Glue the canvas polyurethane glue.
Advantages finished rubber floor:
- non-slip;
- water resistance;
- practicality;
- sufficient chemical resistance;
- non-toxicity;
- length of service life;
- uncomplicated installation.
disadvantages - the need to replace the whole cut of the blade in case of damage.
ATTENTION! Both rubber and rubber chips belong to combustible substances, with strong smoke formation.
How can I floor the floor in the garage? See a photo below:

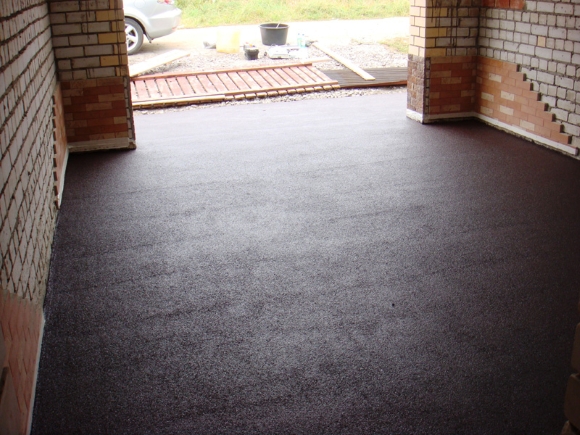
From asphalt crumbs
Than to make floors in garage? One of the options - asphalt crumbs.
The crumb, formed when removing the old asphalt pavement, is used for repairing roads, in open parking lots.
- The floor does not dust like gravel.
- Economical, being a secondary material.
Use materials containing bitumen, indoors prohibit and fire and sanitary standards (bitumen - a carcinogen).
This method of flooring is resorted to because of its cheapness at one's own risk.
The crumb is laid on the ground base, rammed, sometimes covered with a layer of cast asphalt or asphalt slabs, but then the humidity in the garage grows too.
Operational disadvantages:
- deformability under prolonged loads;
- resistance to oil and gasoline.
When choosing materials and installing a garage floor in summer
Alexey Shamborskiy, December 18, 2016
The most favorite place of leisure for any car owner is the garage. The condition of this room and its functionality are reflected on the storage conditions and convenience of servicing the vehicle. In this article we will consider the topic of how to build a floor in the garage with your own hands with a detailed description of each step of the process.
Advantages of concrete floor
Be it garage of foam concrete or skeleton garage , the floor in it can be arranged in several ways. They can be wooden, laid out of tiles or concrete. The fastest, most practical, inexpensive and reliable option is the bulk floor. This option is the most popular and meets all the requirements for the materials of the garage finish, namely:
- Greater strength and resistance to mechanical stress;
- High resistance to aggressive chemical products - gasoline, engine oil, solvents, antifreeze and other harmful liquids;
- Provides fire safety;
- Durability.
Concreting the floor in the garage provides an ideal reliable coating that lasts for centuries and is as stable as possible to any external factors. Next, we will talk about how to fill the floor in the garage according to all the rules with observance of important nuances in the performance of this work.
Preparation for work

Before starting the pouring process, it is required how to prepare the base for it. To do this, the top layer of the earth in the garage is completely removed, the remaining part is carefully leveled and tamped. Above, to reinforce the surface, a pillow of sand and gravel is covered with a thickness of about 15 cm, which is also densely packed.
The waterproofing layer is laid on the prepared base. For this you can use ruberoid , polyethylene film or other material that protects against moisture. Then a layer of insulation is formed with the help of any heat-insulating materials.
![]()
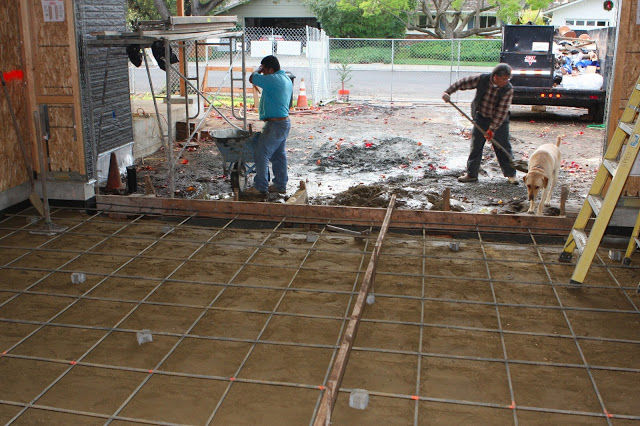
Above the resulting multilayered structure, reinforcing mesh is laid, which will make the floor surface more durable and resistant to mechanical stresses. After completing all the preparatory work, go to the main stage.
Pouring concrete floors in the garage
Before pouring the floor in the garage to get a good result with an even, sturdy surface, it is necessary to install aluminum beacons at a distance of 30 cm to 40 cm from each other. The metal profile is fixed to the base with a thick alabaster solution. After the guides fully grasp you can proceed to the formation of our concrete floor.

The solution is made of sand, gravel, cement and water. All components are thoroughly mixed until a continuous homogeneous mass is obtained. The water is added gradually to the desired density, so that too much liquid is not obtained. The concrete mixture quickly thickens, so it is necessary to work quickly to have time to use it in one hour.

The concrete is poured between the aluminum slats and compacted and leveled with a screed or metal rule. So, layer by layer, the entire garage floor area is filled. Special attention is given to the places of connection of the floor with the walls of the garage, where we carefully level the surface with a conventional trowel.

To ensure that the surface is perfectly even on top of the concrete layer, the floor screed in the garage is more liquid cement mortar. In this case, a slight slope of the coating is made towards the gate or the grate.

To ensure that the concrete floors last longer and do not form potholes and cracks in the places under the wheels of the car, it is desirable to treat the resulting surface with a special strengthening compound. This can be ordinary paint or persistent polymer impregnation. Treatment with such a composition closes small pores, which can get moisture and dust, causing a gradual destruction of the floor surface. The coating is made after the concrete has completely hardened.
More detailed information on how to make the floor in the garage with your own hands can be obtained from our photos and video materials. On specific examples, you can see the results of each stage of the work and see the final outcome of their work.
Video of filling the floor in the garage with your own hands
Floor covering in the garage - the question is not as simple as it looks at first glance. The room has its own features of operation, which causes certain requirements. Choosing which floor is best done in the garage, the motorist considers such factors as: practicality, durability, cost.
Requirements for the floors in the garage
The main characteristic that floors in the garage should have are strength. The coating is subjected to great mechanical stress. First of all, it is the weight of the vehicle itself. When entering and leaving the car, the floor is subjected not only to static, but also to dynamic loads, which is fraught with its expansion. In addition, in the garage are often placed shelves with tools and spare parts, which also have a significant mass.
The second aspect to which attention should be paid is chemical stability. Even with the most accurate use of fuel, lubricants, antifreeze and other automotive fluids, the appearance of spots on the floor is inevitable. Some materials are not designed for contact with reagents.
When selecting floors for a garage, care must be taken for fire safety: there are flammable substances in the room. For unheated garages, the issue of frost resistance and moisture resistance of the coating is relevant.
Concrete floors
Installation of concrete floors in the garage is the most common option. Its advantages:
- high mechanical strength;
- chemical inertness;
- fire safety;
- long service life;
- relatively low cost.
Disadvantages of the material:
- possibly cracking due to mechanical influences or temperature differences;
- high degree of dust release, which settles on the car and racks;
- concrete absorbs oily substances, forming indelible stains with an unpleasant odor.
To a large extent, minimizing all these negative phenomena is possible by impregnating the floor of the garage with an abrasion-resistant paint.
Installation of concrete floors
Before pouring concrete, remove the upper contaminated soil layer, level and tamp the surface. After that, the soil is covered with clay. Then a pillow of gravel-sand mixture 10 cm thick is poured. 
When creating a heat-insulated floor, a thermal insulation is laid on the gravel-sand backfill. The optimum option is extruded polystyrene foam with a density of 35 kg / m 3. It has sufficient strength to withstand the weight of the cement screed and the car. It is possible to use claydite, but it is much inferior in its thermal insulation characteristics and absorbs moisture. Mineral cotton wool and polystyrene foam are not suitable because of their low strength: these materials will collapse under the weight of cement and lose their qualities.
At the next stage of work, the insulation is covered with waterproofing and a reinforcement belt is created. It can be connected from a reinforcement 8-10 mm in diameter with a pitch of 20 cm or use a finished grid 6 mm thick with a 10 cm cell that is lapped one cell and tied with plastic clips or a binding wire. Before pouring concrete, install metal beacons that will determine the level of the floor.
For pouring use concrete grade not lower than M250. The solution is poured in parts and aligned with the rule, resting it on the beacons. It is better to carry out the work in the summer, since for a normal hardening of the concrete, a temperature of about 20 ° C is required. To the floor does not crack, it is periodically watered. Full congealing takes place in a month.
An alternative to screeding can be stacking ready reinforced concrete slabs. This method is faster, but requires the involvement of special equipment, which will affect the financial costs. 
Concrete covering can independently perform the function of the floor for the garage or serve as a basis for laying the finishing materials.
Facing the concrete base
Facing the concrete floor improves its characteristics and ennobles the appearance. It can be made with ceramic or PVC tiles.
Ceramic tile

For the finish of the garage, several types of ceramics that have the necessary strength and frost resistance are suitable:
- outdoor ceramic tiles for outdoor works;
- clinker tiles;
- porcelain stoneware.
The material should be selected with non-slip coating to avoid injury.
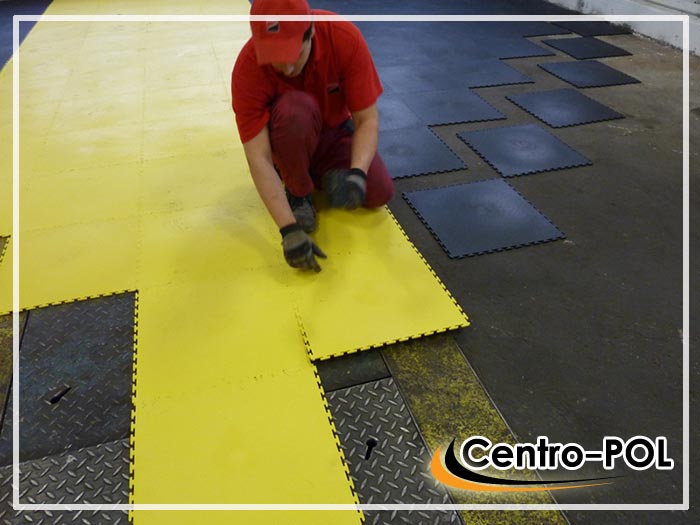
PVC Tile
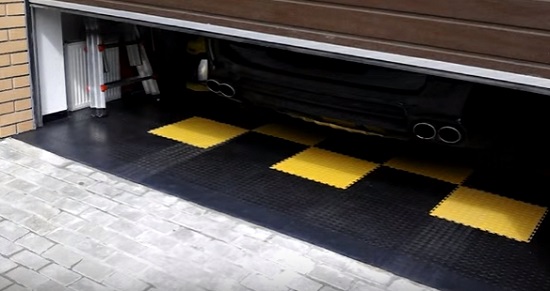
Modern PVC Tiles for garages is issued in the form of modules with lock connections. This simplifies installation as much as possible, which is done without glue. Just as necessary, it can be dismantled. Advantages of PVC tiles:
- high resistance to mechanical stress;
- elasticity, absorbing vibration;
- non-sliding coating;
- aesthetic appearance
Wooden floors
Wooden floor for the garage can be advised to people who prefer comfortable conditions while servicing their car. Its advantages:
- a warm surface, which is important in the repair, when the motorist has to lie down to get to the car;
- ecological cleanness: the tree does not emit dust and toxic substances;
- relatively low cost;
- simplicity of installation;
- maintainability: broken boards can easily be replaced with new ones.
The disadvantages are:
- susceptibility to biological damage;
- flammability.
Minimize the shortcomings possible by treating the surface of wood with antiseptic and antipyrine.
Arrangement of wooden floors
The garage floor is often made of coniferous wood, the ideal option may be larch, but its cost is slightly higher. The thickness of the boards is 30-50 mm. The moisture content of the lumber should not exceed 10%. 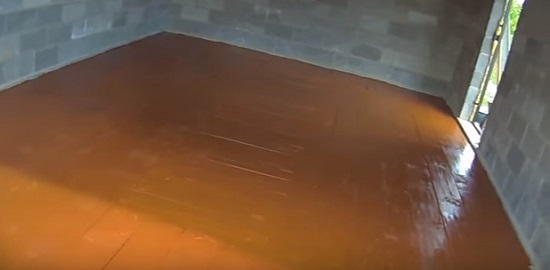
The wooden floor is mounted on a concrete base or on a sand and gravel pillow. The most commonly used is the construction of logs with the installation under the boards of the supporting beams in 0.5-1 m increments. To distribute the load of the lag evenly, it is recommended to lay across the garage, and the boards along. If a reverse circuit is used, it is necessary to strengthen the beams with the seats under the wheels of the car.
Installation of a wooden flooring on a concrete base is quite simple and does not require preparatory work. To avoid contact of wood with concrete, the screed is covered with a waterproofing film. The lags are exposed according to the level: first, beacon beams are laid with a step of about 2 m, then intermediate between them. Fixation to concrete is carried out by dowels. The space between the lags can be filled with any kind of insulation. Fastening of boards to logs is made by nails or self-tapping screws. The disadvantage of the lag structure is a significant reduction in the height of the room, so if the coupler has a flat surface, then you can perform the flooring without installing the beams directly on the concrete, using a thick floorboard with a studded profile. 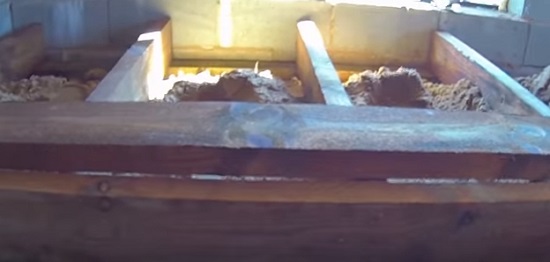
Wooden floors can be spread even if there is no concrete screed in the garage. For this, a number of preparatory work should be carried out. First, remove the top layer of the soil to a depth of about 50 cm. Calculate the height to which the floor can be raised by adding the thickness of its components: up to 30 cm - sand and gravel cushion, 10-15 cm - thickness of the log, 3-5 cm - thickness of the boards.
Sand and gravel are covered with layers, each of which is moistened and compacted. For sealing use either a hand tool or a special machine - a vibrator. The prepared base is covered with a waterproofing film.
On the perimeter of the garage, a bar is laid, to which lags of the same section are attached with the help of g-shaped brackets. This design contributes to a uniform distribution of loads. Also, the support for logs can serve as concreted brick posts, installed in steps of 30-100 cm. After the installation of the frame, the insulation and the planking are done.
Floors are covered with linseed oil and paint to avoid oil absorption by the tree.
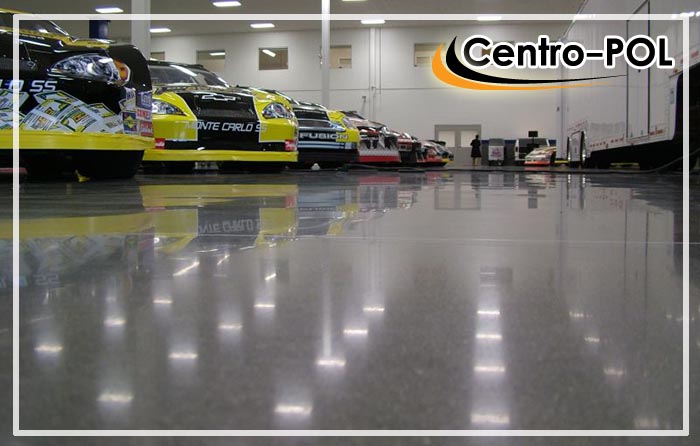
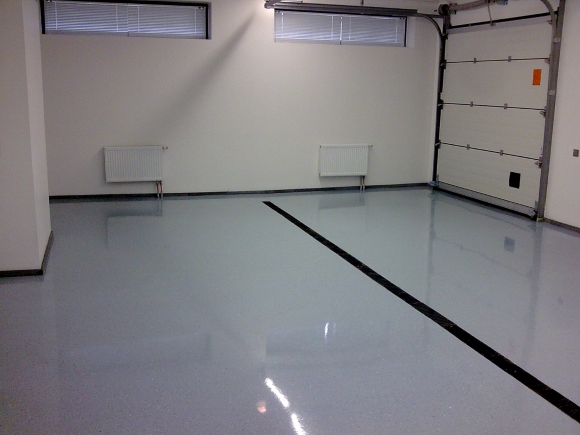
Self-leveling floors
Self-leveling floors for a garage are a modern solution, differing not only in excellent performance characteristics, but also bringing an aesthetic highlight to its interior. The material is durable, refractory, its service life is about 40 years. Technical capabilities allow you to create a single-colored surface, and patterned. 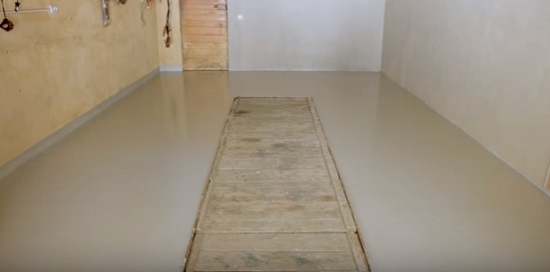
Under the filling floors are understood various mixtures, consisting, as a rule, of two components: polymer and hardener. The substance is applied in a liquid form, and after drying it forms an ideally smooth and strong surface. Choosing which floor in the garage is best done, it is necessary to take into account the strength and nature of mechanical loads, temperature and humidity characteristics of operation and other factors.
Varieties of self-leveling floors:
Installation of self-leveling floors
Self-leveling floors are mounted on a concrete base. It can be either new or old. In the latter case, a number of measures should be taken to level the screed, seal cracks, clean oil stains and tread marks. The order of performance of works:
- Crack the cracks and potholes, discard weak fragments, clear of debris and dust, degrease, pour the solution, wait for drying.
- Remove the traces of rubber from the rubber using a grinder.
- Eliminate oil stains: with a greasy surface, the bulk floor does not mesh.
- Conduct treatment of concrete with a weak solution of hydrochloric acid, spraying it from the spray gun. After treatment, wash the floor.
- Apply a primer coat of the filling compound with a brush or roller.
- Complete the finish. The mixture is diluted in accordance with the instructions, applied to the floor in small parts, aligned with the rule and the needle roller to remove air bubbles.
Complete drying of the mixture occurs after 1-2 weeks. If desired, you can create a picture of acrylic paint with imitation wood, granite, marble, etc., and then cover the floor with a layer of sealant.
Video
During the operation, the floor in the garage is daily subjected to serious tests. The length of his service directly depends on how correctly the arrangement was carried out. Insufficient attention to detail can lead to rapid wear and deterioration of consumer characteristics floor covering. However, strictly observing the technology of work execution, you can make a reliable and durable floor in the garage with your own hands.
Selecting the method of floor installation
Before the beginning of the installation of the base of the floor, soil surveys and evaluation of terrain unevenness in the terrain are carried out. If a high groundwater level is found, then drainage works are performed. With the location of the garage on the slope and the presence of a large difference in height, the ground is previously leveled, the top layer of the earth is removed.
Then the optimal method of flooring equipment is chosen.
For the floor in the garage can be used:
- wooden flooring;
- monolithic reinforced concrete slab;
- concrete screed.
The wooden floor in the garage is rarely done, as it does not meet the requirements of fire safety and does not have high strength. However, it is quite warm, cozy and contributes to the creation of a special atmosphere in this room.
For its installation, an even platform is initially prepared. On it are established on a level posts or supports from a brick. Their number depends on the size of the garage and the planned load on the floor. As an option, the basis for the floor can be the foundation of the garage.
The log is supported by logs of a beam, the cross section of which must be at least 150 * 150 mm. Beforehand they are impregnated with liquid bitumen or water-repellent impregnation. Between them a waterproofing and a heater is laid. Then boards are cut at least 50 mm thick, treated with an antiseptic. Lags must be mounted across the garage, and boards are fixed along the intended line of the car.
| Board thickness, mm | Spacing between lags, mm |
|---|---|
| 20 | 300 |
| 24 | 400 |
| 30 | 500 |
| 35 | 600 |
| 40 | 700 |
| 45 | 800 |
| 50 | 1000 |
Plate of reinforced concrete
In places that have a significant slope or a high level of groundwater, it is advisable to lay a solid foundation on the floor in the garage. This greatly reduces the time of work and simplifies the process of installation.
Lay the slab only on the prepared base. To do this, gravel or crushed stone is poured onto the floor in the garage with a layer of 20 cm, and then sand. All this is carefully rammed. On a dense surface, a frame of metal profiles is laid, on which the plate itself is already lowered. It is inadmissible to lay it directly on the ground, because due to soil movement and during operation, the plate may crack.
Do not use a hollow floor slab to install the floor in a garage that is not heated in winter.
On top of the laid foundation, a layer of cement screed or the final bulk polymer floor is poured. The result is a durable and reliable coating. The only drawback of the slab is that it requires expensive construction equipment to install it.
With your own hands it is safer and easier to make a concrete floor in the garage. However, first you should consider the question of whether you need a pit in the garage.
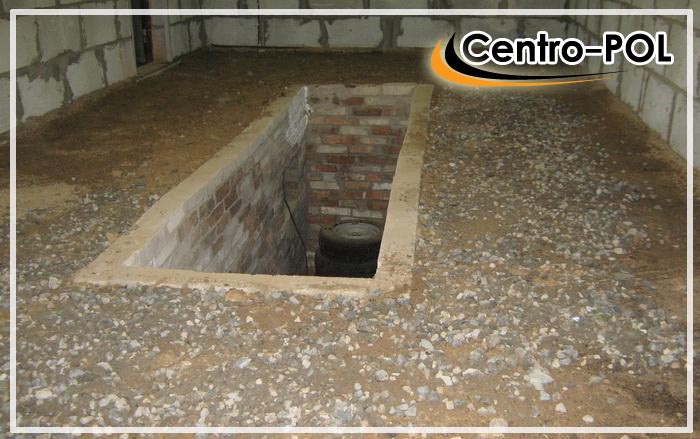
Inspection pit
For convenience of carrying out of repair of the car in a garage the inspection pit is equipped.
But it should be borne in mind that in the presence of a high level of groundwater the construction of underground structures in the garage can become extremely problematic.
For the inspection pit in the garage:
- dig a foundation pit in the ground, having a depth of 20 cm more than the growth of the owner of the machine, a width of 80-90 cm and a length of about a meter (depending on the dimensions of the machine);
- fill a layer of gravel and sand on the floor and make a thin layer of cement screed (5-10 cm);
- along the walls make the formwork and pour cement or lay out the bricks on the mortar;
- on top of the finished walls put a welded frame of 60 mm iron corner and fix it with cement mortar.
Once the pit is ready, you can proceed with further work on the arrangement of the floor in the garage.
Concrete floor in the garage
Substrate preparation
Before the beginning of the work, the approximate height of the future floor is calculated. It should be slightly above the threshold. All the extra land from the garage is exported. Then the surface is filled up:
- crushed stone of fine fraction with a layer from 30 cm to 85 cm (depending on the type of soil);
- sifted fine sand with a layer from 15 cm to 20 cm.
All this is carefully leveled, tamped, watered and tamped again. To do this, you can use special equipment or do with improvised tools. The result should be a solid and even foundation. The deviation of the plane of the prepared floor surface from the level should not be more than 5 mm per meter.
Sand sipping
Waterproofing, insulation and reinforcement
On rammed sand rolled ruberoid, waterproof, rubemast or glass. It is used to lay extruded polystyrene foam with a thickness of 5 to 10 cm. This insulation will help to avoid the problems associated with the freezing of concrete in the winter season. A thick film or a waterproof membrane is spread on the expanded polystyrene foam. Strips of film must be laid with overlap on each other not less than 15 cm, and the joints between them are glued transparent tape.
On the walls, the waterproofing material is fixed at an altitude exceeding by 5 cm the expected level of the finished floor.
At the next stage, the reinforced frame is assembled. For this, a reinforcement of 8 to 12 mm in thickness is used. Select it is necessary depending on the expected load on the concrete slab. If the garage is large and there are many heavy machines in it, then iron bars for reinforcement should be as thick as possible.
Iron rods are connected with each other by wire. Welding is not allowed, since the frame structure must have a certain mobility. The edges, angles and joints should be strengthened as reliably as possible. For cross-members in the frame, a 6 mm thick reinforcement is used. As a result, a strong two-layered lattice with a distance between the rods of 5-10 cm should be obtained.
Under the lower reinforcing mesh, supports are placed 3-5 mm high. The overall height of the frame should be slightly less than the planned thickness of the concrete slab, which is selected on the basis of soil analysis and climatic conditions of the region. On sandy grounds in the absence of low temperatures in the winter season, the thickness of the slab from 25 mm to 35 mm is allowed. On abrasive soils in areas with traditionally low winter temperatures, the thickness of the concrete base should exceed 45 mm.
From the walls the frame from the fittings is separated by a compensation gap. It is necessary to provide a concrete slab free space for gradual expansion and narrowing at different times of the year. In the absence of a distance between the floor and the walls of the garage, the entire structure may collapse. As cushioning material is used damper tape, polystyrene or soft insulation.
Beacon Installation
For the device of a flat concrete slab, beacons are installed on top of the frame on the solution. They can be metal, aluminum or wood. They are installed so that the upper surfaces of all the beacons are in the same plane. This is done using a laser or building level, you can use for this purpose, and a normal construction cord. To do this, it is pulled over the diagonals of the room and adjusted to the level.
First, the beacons are fixed along the walls, the following are set at a distance of the length of the rule, which will be leveled with the concrete solution. Fill the concrete can begin only after the solidification of the cement mixture on the lighthouses.
It is compulsory for the installation of guides to provide a slope of at least 2 cm towards the garage door. This will ensure in the future timely outflow from the finished floor of water and other liquids.
Once the beacon profiles are securely fastened over the entire surface of the floor, you can proceed to the direct installation of the concrete slab.
Video - Beacon Installation
Pouring concrete
To install the floor in the garage, you must use a strong frost-resistant concrete, which has a mark not lower than M300.
| Concrete grade | Mass composition, C: P: N, kg | Volumetric composition of 10 liters of cement P / S, l | |
|---|---|---|---|
| 100 | 1: 4,6: 7,0 | 41/61 | 78 |
| 150 | 1: 3,5: 5,7 | 32/50 | 64 |
| 200 | 1: 2,8: 4,8 | 25/42 | 54 |
| 250 | 1: 2,1: 3,9 | 19/34 | 43 |
| 300 | 1: 1,9: 3,7 | 17/32 | 41 |
| 400 | 1: 1,2: 2,7 | 11/24 | 31 |
| 450 | 1: 1,1: 2,5 | 10/22 | 29 |
| Concrete grade | Mass composition C: P: N, kg | The volume composition of 10 liters of cement P / S, l | The amount of concrete from 10 liters of cement, l |
|---|---|---|---|
| 100 | 1: 5,8: 8,1 | 53/71 | 90 |
| 150 | 1: 4,5: 6,6 | 40/58 | 73 |
| 200 | 1: 3,5: 5,6 | 32/49 | 62 |
| 250 | 1: 2,6: 4,5 | 24/39 | 50 |
| 300 | 1: 2,4: 4,3 | 22/37 | 47 |
| 400 | 1: 1,6: 3,2 | 14/28 | 36 |
| 450 | 1: 1,4: 2,9 | 12/25 | 32 |
In areas with difficult climatic conditions, it is necessary to add special additives and plasticizers to the cement mix. Self-preparation of the solution will take a long time, and will not serve as a guarantee of the formation of a durable coating.
Leveling screed over insulation
Concrete for filling the floor in the garage must have the most consistent consistency. It is practically impossible to satisfy this requirement in an artisanal situation.
The best option is to order a mixer with a concrete solution. This will allow you to do all the work at once, which is also an indispensable factor in the successful completion of the installation of the floor. It is strictly forbidden to pour a concrete mixture into several receptacles. This will lead to the rapid destruction of the integrity of the coating.
During the pouring, the mixture is distributed by the rule on the beacons, while air is thoroughly expelled from it. For this purpose, a shovel or submersible vibrator is used for concrete. The main goal installation works is the formation over the entire surface of the garage floor of a continuous and even mass of the solution that does not have voids inside.
The next day after pouring the floor over the entire area is covered with a dense rag, which is daily moistened with water.
Do not allow direct sunlight to hit the floor of the garage until it reaches the required strength level.
Full hardening of the concrete slab will occur only after 28 days. After this, it will be possible to proceed with the final stage and finishing works.
Finishing Coating
By itself, concrete is not a durable coating. It inevitably collapses and cracks, gradually absorbs oil, gasoline and chemical compounds. Therefore, the ready-made concrete floor makes sense to cover with a thin protective layer having a higher threshold of strength.
It can be:
The choice of material for decoration depends only on the personal preferences and financial capabilities of the owner of the garage. The sequence of installation of most of these materials in the garage is no different from the actions during normal repairs in the apartment. Initially, the floor in the garage is dust-free. Then it is applied with a primer. Then the selected material is glued according to the instructions.
In any case, a properly made concrete base will serve as a reliable support for any modern coating.