Even the most good doors can eventually start to squeak or sag: gravity and friction can not be canceled by anyone. And if they are heavy steel, then even the metal will tire of keeping them. After the summer, the plastic bags also "hang" and they are almost always in the heat in the heat, which leads to such results. To tolerate these "disgrace" is not necessary, as well as spend money on their elimination. Adjustment of the entrance doors is a delicate matter, but in most cases you can manage by yourself. Once you have adjusted the hinges and the porch with your own hands, you will then easily repeat.
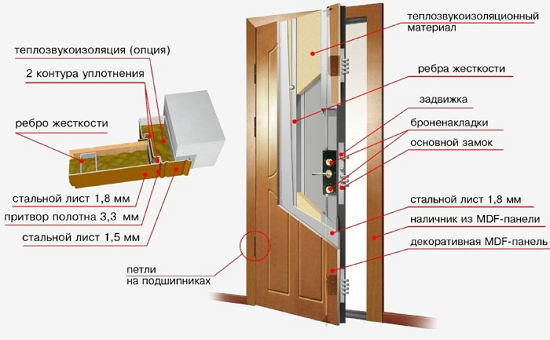
Adjustment of the metal entrance door
- creak;
- draft - blowing from under the canvas (cracks along the perimeter or top / bottom);
- it closes with difficulty.
The solution to all these problems is called "adjusting the entrance door," but this involves very different measures - from banal lubrication and replacement of the sealant, to actual adjustments and mechanical influences.
Sometimes, to solve a problem, you need to go through all the methods, and sometimes the problem can be eliminated only radically - a replacement. Most often this situation occurs with cheap Chinese products. Adjusting the entrance doors of Chinese production is almost impossible. Of course, you can try to do something yourself: firms and masters are not taken for them.
Eliminate Scratch
The doors may creak for two reasons: the lining of the hinges is clogged or the door leaf touches the frame. Although both are called "creaking", but the nature of the sound is different. Easier to cope with the clogging of loops, because they usually start with this procedure.
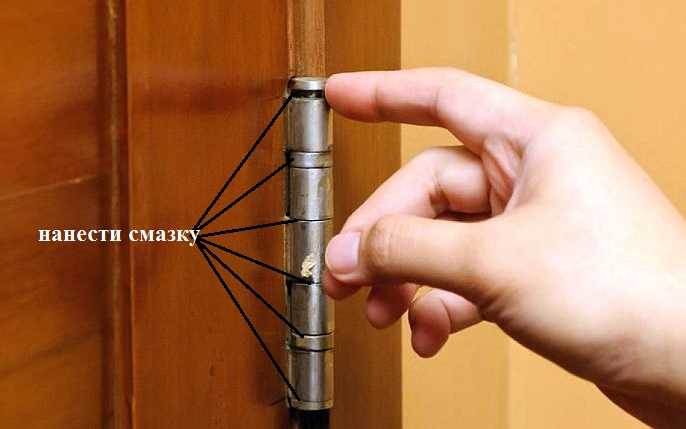
Grease of loops
First remove the old grease, at the same time removing the adhering dirt to it. The procedure is standard: wipe with a soft rag every where traces are visible. If this procedure has not been done for several years, and loops of the standard classical type, and even separable, the canvas can be removed. It is better to clean in the removed state.

If the loops are rusty and do not remove, although they should, do not try to knock them down with a hammer or sledge hammer. Do more harm than help. It is better to buy a rust remover. It is sold usually in the form of sprays. Apply on a rusty loop and wait for a fixed time. After you remove the canvas from the hinges and clean. But this time you need to remove all the rust. To clean metal, then cover with a rust converter and then with grease.
After the old grease is removed, take a "fresh" and put it on the hinges. If the canvas is removed, there will be no problems - lubricate the pin and the ring. If there are still some rubbing mechanisms on the frame, lubricate them too.
In loops of the traditional type, scratches can occur due to the fact that the washer was being pinched on the rod. You inspect it after you have removed the door leaf. With signs of abrasion - replace. Place a new washer made of carbide metal. Instead, you can put an engraver. He will also compensate for the load.
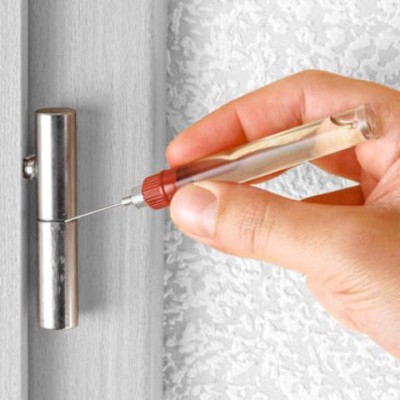
If the loops are all-in-one, find a liquid lubricant in the can (most common WD40) or machine oil that can be applied with a large syringe. All rubbing parts are processed carefully.
There is another method, but it is destructive. At the top of the loop, drill a hole, which is then filled with lubricant. The trick is not to damage the mechanism that is inside.
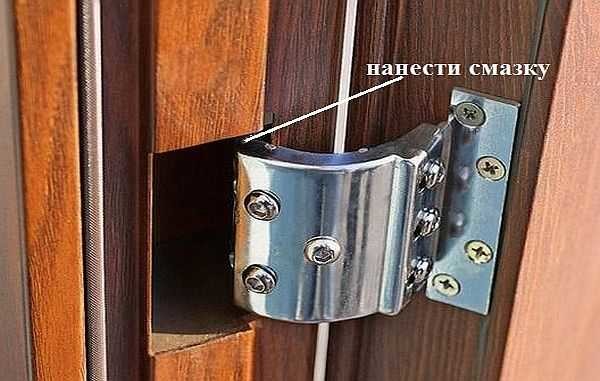
If the hinges are hidden, find all the turning parts and lubricate them. Often in such models there are holes in which oil is applied.
After the lubrication is applied, the doors are swung from side to side several times, distributing the grease. If the reason was this, the creak goes away. The final touch is wipe the excess oil.
Than grease the hinges of the front door
To choose the lubricant, it is necessary first of all for the temperatures in which the loop is operated. If the hinges go out into the street, a composition is required that does not thicken at low temperatures. Here the choice is not very big:
- Lithol. Works reliably at temperatures from -40 ° C to + 120 ° C.
- Solidify. The temperature range is slightly lower, but it is also sufficient: from -35 ° C to + 65 ° C.
For entrance doors going into the entrance and operated at plus temperatures, you can add several more names to this list:

Elimination of friction about the box
If, after processing the loops, the creak was left, most likely, it is caused by the friction of the door leaf against the box. Inspect door frame for abrasions. If you find any signs of abrasion, see which of the loops is closer. It will need to be regulated, if there is such an opportunity.
The difficulty is that there are a lot of types and models of loops and unequivocally say that it is not possible to do it. All that is possible is to list the main points that can be. Based on them you, perhaps, determine how to "treat" your door.
Two types of loops for the input metal door with adjustment
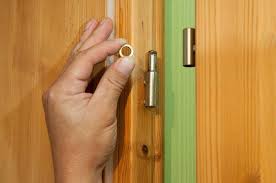
In standard hinges, no adjustment possibilities are available. In this case, the adjustment of the entrance doors is to replace the washer. Choose their more or less thickness, adjusting the position of the door leaf. In some hinges with a ball on top there is an adjusting screw. Unscrewing it, raise the door a little, screwing it down and lowering it. You can try to fix it with his help.
If the standard hinges on the steel door are welded, we can assume that this opportunity is exhausted. If they are screwed on, the fixing screws loosen, move the leaf in the desired direction as far as possible. Then the screws are tightened. Check if the problem has disappeared. If not, try with another loop. Sometimes you need to loosen all the loops, and pull the canvas in this position. In general - determine the place where to press, and where - to press.
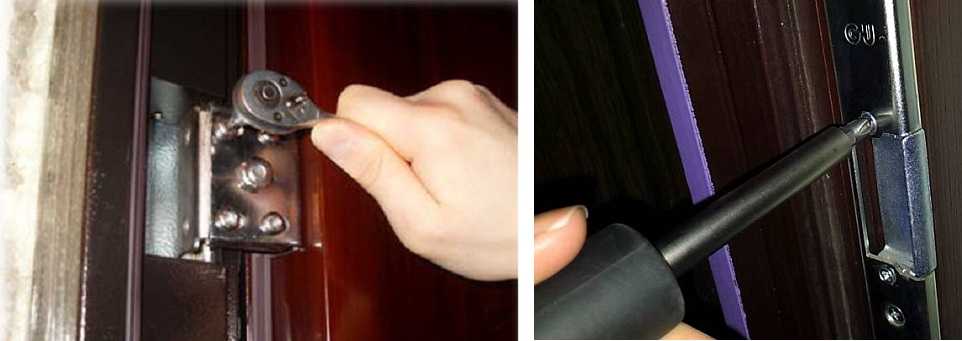
There are models of hinges in which the adjusting holes are hidden under the protective cap. But just so it can not be removed: it is fixed with a bolt, which is unscrewed from inside the room. Example of adjusting such a loop in the video.
If the hinges on the front door are screwed, you can eliminate the friction of the door leaf against the box with their help. First loosen the screws near the place where the abrasion is observed. Try to move the door leaf a little. For a start, you can tap with your palm or your fist, moving it in the right direction. Try a couple of times to open / close. Did it help? Tighten the clamping screws back. And try again to open / close.
If it does not help, you can use some kind of lever, hit with a rubber mallet or a hammer through the board. But do not overdo it. Especially gently you need to handle Chinese products: very flimsy.
If these manipulations, too, did not give anything, you have to loosen the screws on all the hinges and try to move the canvas across the entire area. Take care of the edge of the canvas and shake it. In this case, the loops should be in their place. Try, open close. If there is no squeak, twist the bolts. That's all, the adjustment of the hinges of the entrance door can not give more. The next thing you can try is to change the geometry of the door frame. About this in the next paragraph.
In the photo above (right picture) there is a loop with the possibility of adjustment. After loosening the screws, you can turn the adjusting screw. It does not help - we try to move the canvas, as described above.
Eliminate a loose porch (blowing from under the door)
Sometimes, from under the front door, it blows noticeably. If you look at the perimeter, you will most likely find that at some point the door leaf is not close to the door frame. There may be a decent size gap. Check your suspicions with a sheet of paper. Open the doors, insert a piece of paper between the canvas and the doorpost and close the doors. If the vestibule is normal, the paper either stretches with a very high force, or is clamped so that it can not be taken out. Only to break. If the sheet is taken out freely, then the fit is not enough.
The simplest explanation is that the sealer has lost its elasticity. If the door is several years old, it is possible. And first of all, change the seal. Did not help or only partially solve the problem? Moving on.

Replacement of the seal - the first step, if it runs from under the entrance door
If the blade is displaced relative to the door in a horizontal plane, we remove the draft from under the entrance door by first moving the door leaf. This is written above: loosen the fixing screws on the hinges, then try to move the canvas in the desired direction. Check the result - the slot has disappeared - tighten all screws to their original position.
Sometimes the crevices under the entrance door are caused by the skewing of the door frame. This is checked using the level. Most likely, it was bent in the place where a sheet of paper is freely removed. The second option, on the contrary, put the box in the place where the sheet is pressed, because the "normal" part can not be pressed. All this is determined by means of the eye level and level. Having decided what the problem is, we are trying to restore the geometry to the norm. The measures depend on how the box is installed:

The option of correcting the gap in the vestibule is shown in the video. After installation of the front door it turned out that it was blowing heavily from under it. The owner corrected the skewing of the hammer.
Eliminate the sagging of the door (shuffles about the threshold)
If after several years of operation the doors have become difficult to open, while rubbing against the threshold, most likely the fact is that the ball or bearings have been worn out. If there is possibly an adjustment, even remove them do not have to. Just unscrew one of the bolts, raise it slightly upwards.

If there is no adjustment, there are several options:
- replacement of loops;
- replacement of bearings with new ones;
- installation instead of bearing washers.
All this is determined on the basis of the situation and the design of the loop.
Adjustment of plastic entrance doors
Problems can be the same: friction, creaking of loops and loose connection to the frame, because of what can blow. But the adjustment of PVC doors is simpler - the loops and mechanisms are standardized, there are not many kinds. So there is a hope that you will cope with problems with your own hands, without calling a master.
Adjusting the balcony door
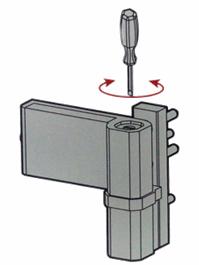
After the summer plastic doors on the balcony sag: in the summer they often and for a long time remain open, because of what happens such a nuisance. Then they touch the threshold, an unpleasant sound is heard, the plastic is erased. In this case, it is necessary to raise the blade upwards. This is done by adjusting it, which is in the upper part of the lower loop.
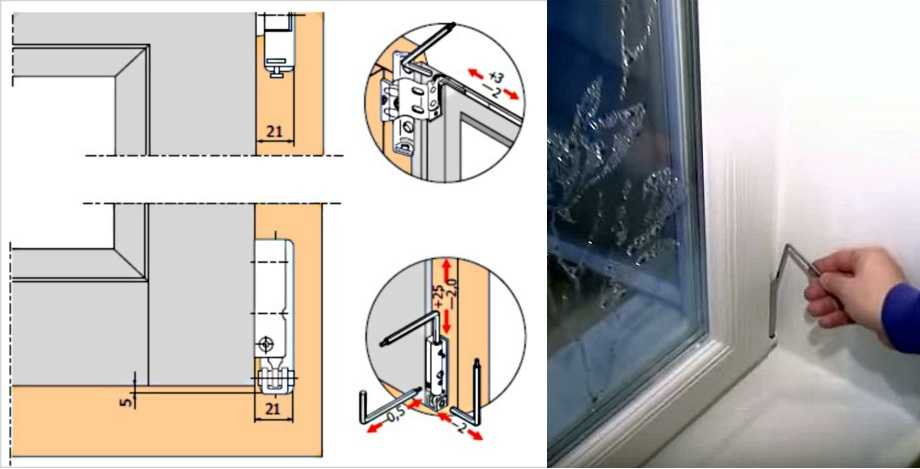
Do this with the lock open, but the door is paved. Take the hexagonal key (usually 4 or 5) and insert into the hole, turn a few turns. It is not necessary to immediately lift it, as this can cause other problems. You raise only until the problem is fixed.
Sometimes, when closing the door, rubs against the side, touching the metal clips. It turns out that you need to move the canvas in the direction of the loop part. For this, there is another adjustment on the same loop. It is located at the bottom, visible when the door is open.
This adjustment is also exactly carried out by a pair of turns clockwise or counterclockwise. If you need to prevent the doors from rubbing against the counter, turn counter-clockwise. Make a couple of turns, check. As soon as the problem is gone, stop. Otherwise, you can move so that the lock will no longer "cling" to the counterpart.
If the upper left corner "clings", you need to adjust the loop, which is at the top. The principle is the same: one or two turns, until the trouble is eliminated.

Adjusting the upper hinge - pressing the upper left corner
Adjustment of the clip (so as not to shine)
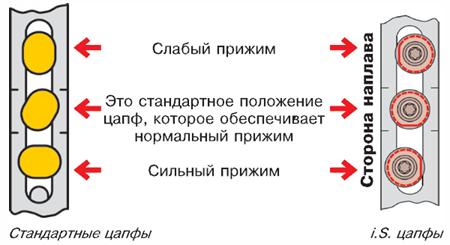
Sometimes a weak clamp is observed from the side of the lock part. It seems that the canvas is exactly adjacent, but from under the door it is palpable. In the summer, this is not a problem, but with the onset of cold weather, it sensibly lowers the temperature. There are two ways. First, we adjust the clamping pins. These are metal ledges on the leaf.

They are of two kinds. as in the photo above - an oval shape, and round, but with an eccentric in the middle. The position of this element determines the degree of clamping of the leaf to the frame. The way of changing the position depends on the shape of the trunnion. If it is as in the photo, take the pliers, tighten and slightly turn. The maximum clamp if the long side is turned horizontally, the minimum - if it is directed vertically upwards. There are also all the intermediate options.
If there is an eccentric in the center of the trunnion, then there is a hole under the hexagon. You insert it and turn, achieving the necessary degree of pressing.

Stasis set the maximum value is not recommended: seals quickly lose elasticity. Also, make sure that all eccentrics are rotated in the same way. This ensures the proper operation of the hardware.
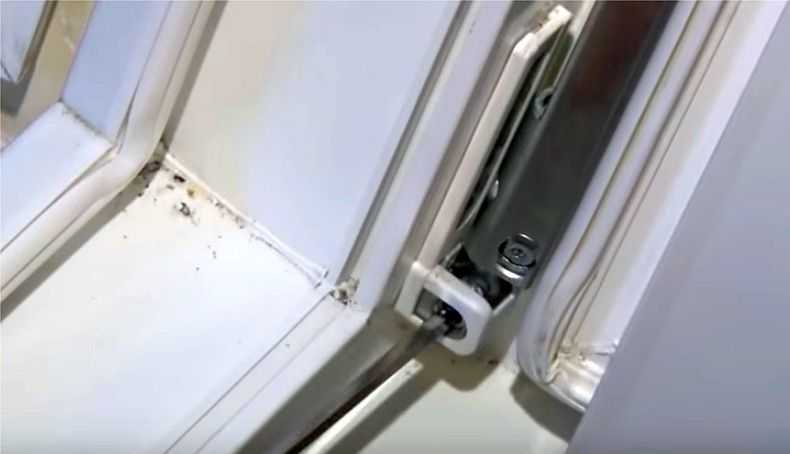
But sometimes the situation is that the door of the balcony door is loosely pressed from the side of the hinges. This is also eliminated by adjusting the loops. At the bottom it is under the protective cap. Take it off (pull up). Take the key (hex) and with a pair of turns adjust the clamp of the lower right corner of the balcony plastic door.

Also, there are hidden hinges on the frame, in which the possibility of adjusting the clamp is also included. They are on the frame from the hinge side. Adjustment with the same hexagonal wrench. Turns "on" and "against" the hour hand.

Adjusting the entrance doors from plastic
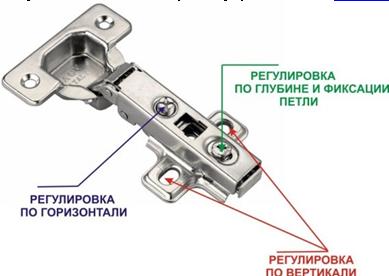
On the plastic entrance doors, the hinges are different, and the locking and folding fittings are missing. In them there are closed loops of the overhead type. They have three adjustments:
- height of the door leaf with respect to the frame - from the bottom of the hinge;
- density of pressing the blade to the frame - from above on the loop;
- movement of the leaf horizontally - laterally

They are enough if the doors were initially set correctly: the limits of the changes in positions are significant, which makes it possible to compensate for those changes that occurred during the operation.
If a squeak arises in the loops, they must be lubricated. To do this, remove the top cap and into the opened hole in which the lubricant is laid. Since plastic doors are mainly used in private houses as an entrance, they go out into the street or into an unheated room, then you choose a lubricant that does not thicken at low temperatures (Litol and Solidol).
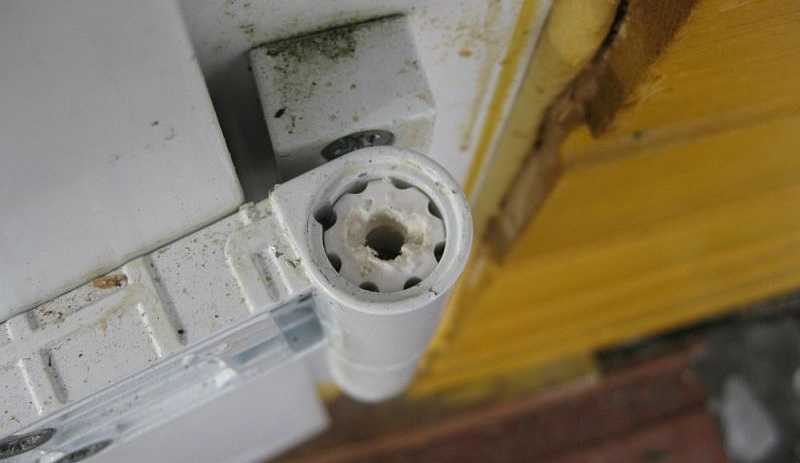
Lubricate here
In some models, the lid is simply tampered with, in others, you need to unscrew it, and then pull it out. Determined by place.
Sometimes there is a situation where intervention is required: the lock is not fixed. If the leaf clamp is normal, correction of the counter plate is necessary. She is mobile in such doors. Loosen the fixing screws, use a screwdriver to move the bar slightly in the desired direction and tighten the screws back. Check. Should help.
In order not to invite a specialist who knows how to adjust the hinges for metal doors and save money, it is worth reading the following recommendations. This will allow you to do the work yourself. Adjusting the hinges of metal doors does not require special skills and the use of complex tools.
Carbon steel and stainless steel are used for making stitches. In some cases, an alloy of steel and brass with chromium spraying (a more expensive option). Door hinges for metal doors by their design door hinges can be divided into:
- loop groups with supporting bearings;
- loops with a supporting ball;
- hidden type;
- classical.
Classic - the most simple, cheap and quickly wear. Modern doors are rarely completed by them, but loops of this type are still encountered. Hidden hinges for metal doors have a high degree of anti-burglary. Hinges with supporting bearings and ball have the longest service life: carbide metal rubbing parts wear out more slowly than conventional carbon steel. In addition, during their operation, there is no play and creak.
How to adjust the metal door hinges: the classic option
During operation, door hinges are subjected to heavy loads, which leads to their wear. To some extent, such wear can be compensated for by adjustment, for which the following should be done.
- If the hinges are not welded to the door leaf and the door box, but are fastened to the screws, replace them. Under the load they are deformed, as a result of which the door sags. For replacement it is required to find screws from carbide metal.
- In the event that the loops only creak a little, you can lubricate them by slightly lifting the doors with scrap, using it as a lever. WD-40 smear is also effective: a small amount of liquid will eliminate the scratch.
- If there are obvious traces of the washer on the rod, it should be replaced. This operation will require the participation of several people with the instrument. The door is removed from the hinges, the old washer is removed, after which the rod and its nest are wiped, removing dust and metal shavings.
- On the place of the erased washer a new one is installed, necessarily of hard metal. It should be slightly thicker than the previous one (taking into account the workings). You can install an engraver instead of a washer: it will absorb and reduce the load on the lower part of the loop.
- The loop can be slightly upgraded: it is necessary to drill a through hole at the top. Through it periodically during the operation it will be possible to fill the machine oil with a syringe.
- The hinge pin must be lubricated with a thick grease, such as "Litol" and re-hung the door.
- It is necessary to test the operation of the hinges by opening and closing the doors several times. In the event that there is a friction of the canvas on the box, it is necessary to eliminate it with the help of an additional washer or a replacement already installed in a smaller thickness.
How to adjust metal doors with internal hinges
In the first place in terms of the degree of protection against hacking there are hidden hinges for metal doors. Their price is higher than the classical, but the costs are justified by high reliability. Internal hinges for metal doors are adjustable and not adjustable. The latter should be replaced in case of failure, so it is better to choose metal doors with hidden loops that can be adjusted. This is done as follows.
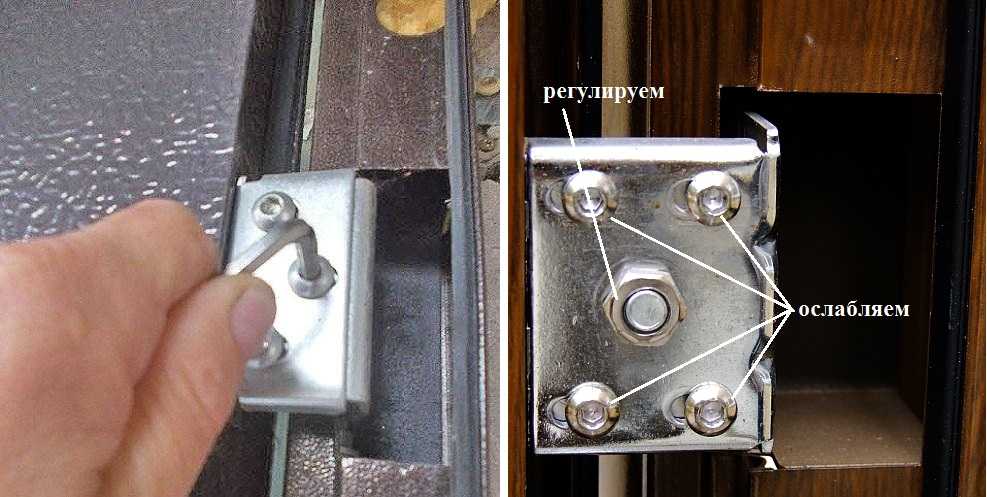
- To change the angle of the door leaf installation vertically, it is necessary to shift the loop to the left or to the right. It is necessary to loosen the uppermost and the lowermost tightening screws. After - adjacent (they are located on the same line). To do this, use a 4 mm Allen key. The screws rotate 180 ° counterclockwise.
- Also, in the counterclockwise direction, the recessed screws located in the upper and lower end parts of the loop rotate. You can see them if you look at the loop from above.
- The central adjusting screw is tightened, due to which the door is attracted (the gap between the web and the box decreases). If you loosen the screw, the door will be on the contrary - "walk away" from the box.
- After adjusting the position of the door leaf, the tightening screws are tightened in the same order in which they were weakened.
- In order to change the height of the installation of the blade, it is necessary to loosen the same screws (installed in the end part of the hinge), as indicated in paragraph 1.
- Loosening the bottom end screw and tightening the top, the door leaf is lowered, and vice versa, by loosening the top screw and tightening the bottom one - lift. After adjustment, all loosened screws are tightened, but without exerting excessive force (so as not to disturb the position of the blade).
- The concealed hinges for metal doors should be purged, dust-free and lubricated with engine oil, spraying it between rubbing surfaces using an oil can or medical syringe.
Your attention is the adjustment of the metal door hinges (the video demonstrates the DR Hahn VL-BAND AL loop for the aluminum door).
Adjusting the hinge with a ball bearing or with bearings
Loops of this type are adjusted with a screw located in the upper part. When the screw is screwed, the lower part of it will rest against the ball (or the pin of the mating part of the loop) and lift the door leaf. This must be done as the metal is abraded.
Having completely unscrewed the screw, it is possible to grease the loop mechanism through the hole, after which the screw is put back into place. In this way, the door leaf can be properly installed and the load on the hinges and shutters can be reduced. This procedure should be carried out periodically, as a result of which the adjustment of the loops is violated.
Adjusting the hinges is the final stage of fitting the fittings on doors and windows. With the help of the adjustment, it is possible to achieve a smooth opening of the door (window), fixing it in a certain position, and also to remove gaps or excessive contiguity between the door leaf (window leaf) and the door frame (window frame). How to adjust the hinges on windows and doors of various types (including furniture doors, read on.
Adjustment of door hinges
When installing doors, the following types of loops are most often used:
- mortise. This type of loops is installed inside the door leaf and the main box;
- hidden hinges. Fall into the category of mortise. The main difference is that the hardware housing is not visible when the door is closed. As a rule, the hidden loops are equipped with 3D adjustment;

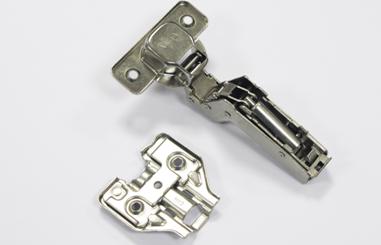
- loops with door closer, which can be both embedded and hidden. Most often, such products can be found on furniture doors.
Mortise hinges
Consider how to adjust the hinges of the hinged type. The procedure will require:
- a simple screwdriver, suitable for the diameter of the fastening elements;
- hex key size.
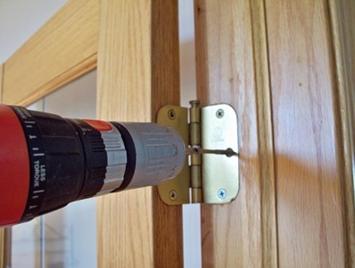
Adjustment of simple mortise loops is carried out exclusively in one direction forwards and backwards. For adjustment it is necessary:
- remove all the decorative lining from the door hinge (especially this applies to PVC and metal-plastic doors);
- loosen the fixing screws of the two extreme hinges;
- align the position of the door relative to the door frame;
- lock the door by tightening the fasteners.
If you can not solve the problems in opening (closing) the door in the manner described, it is necessary to replace the hinges.
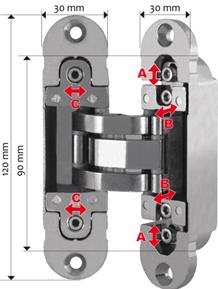
Hidden 3D loops
Adjustment of 3D loops causes the greatest number of difficulties among beginning masters. It is carried out with the help of a special key included in the kit of the loop when you buy it. The whole process is as follows:
- before adjusting the hidden hinges, it is necessary to remove the covers that cover the hinge mechanism. The main number of adjusting screws is located on the side installed on the door frame;

- bolts A allow you to adjust the height of the door relative to the door frame;
- the adjustment of the concealed hinges with bolt B makes it possible to align the gap between the door and the door frame;
- with the C bolts, the door leaf is adjusted horizontally.
The process of correct loop adjustment is presented in the video.
Hinges with closers
The hinges with door closers are regulated in three main directions:
- vertically. Offset of the loop occurs due to loosening, alignment and subsequent fixation of fasteners located on the sides of the hinge body;
- horizontally. For aligning the position of the door, an eccentric is used, located on the hinge body closer to the center of its base;
- in depth. The position of the loop is changed by rotating a special screw located in the groove on the body of the element.
In addition to the position of the door, you can adjust the operation of the door closer, which affects the speed and smoothness of closing the door.
Adjustment of the door closer is done by a separate screw, which can be located:
- in the end part of the loop. Such devices are most often used for aluminum doors;
- in the loop cup (mainly used in furniture loops, since such an arrangement of the door closer allows to significantly reduce the dimensions of the hardware);
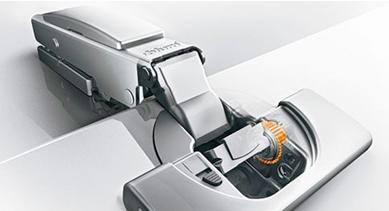
- in the lateral part, which opens when pressed. Hinges can be used for both doors and furniture.
Adjust the smoothness and speed of the door closer very carefully. Any sudden movement, strong stretching or loosening can damage the device, which will lead to the need to replace the loop.
Adjustment of window hinges
To adjust the loops plastic windows will require:
- hex key # 4, made in the form of the letter G;
- various screwdrivers;
- pliers.
To adjust, you need to pay attention to the following elements:
- lower loop, which is rotary. By adjusting this loop, it is possible to align the window leaf in the vertical direction and the lower part of the scraper horizontally;
- a hinge located on top, which is swing-and-tilt. Adjustment of this element of the fittings allows to achieve the correct positioning of the window in the right-left direction;
- locking trunnions. The fittings are located along the perimeter of the window. By adjusting the pins, the clamping force is equalized, that is, the position is closer to the next.
Horizontal adjustment
In order to adjust the window in the horizontal direction, it is necessary:
- open the sash;
- remove decorative lining, closing hinges;
- insert the hexagonal key into the special hole that is located in the side of the loop;
- if you rotate the key in the clockwise direction, the window leaf will approach the loop at the top, and vice versa.

The optimum position of the window can be achieved only with simultaneous adjustment of the upper and lower loops.
Vertical adjustment
Adjust the position of the window in the vertical direction can only be due to the lower loop. To perform the procedure it is necessary:
- install the key in the hole that is in the top part of the hinge from the end;
- the window leaf will rise if the key is turned clockwise, and go down in the opposite direction.

Adjust the clamp
The force of pressing the window to the frame is made by adjusting the loops and pins.
To enhance the attraction in the area of window hinges, it is necessary:
- remove from the outside of the hinges decorative pads;
- using a hexagonal wrench, rotate the bolt located on the outside of the hinge.
Adjustment of the locking pins is performed according to the scheme shown in the figure.
Adjustment of door and window hinges allows to achieve optimum arrangement of a door leaf or a window leaf concerning a box or a frame. Correct adjustment increases the service life of the fittings and the door (window).
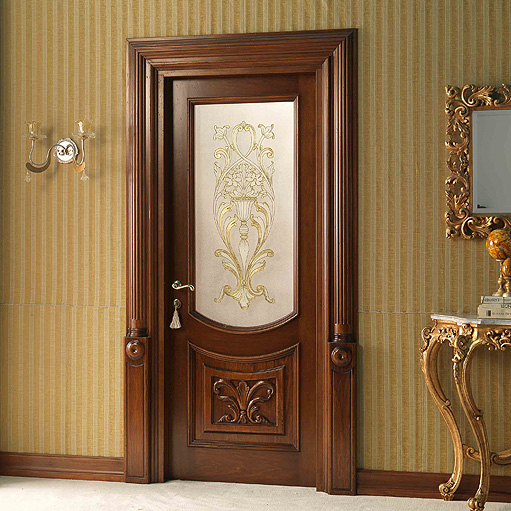
Any dwelling, no matter how many rooms in it, was difficult to imagine without interior doors. First of all, this enclosing structure is necessary for bathrooms and toilets. Therefore, it is important that the interior doors work properly for a long time. For this purpose, at the final stage of the installation, the doors are adjusted.

In addition, it is often necessary to adjust the old doors. It is with this process that we try to understand our article. But let's start with a general description of the constructive elements interior doors.
Often, the owners of housing, not deprived by nature of the ability to manual work, decide to install and adjust the doors of their own house. In principle, such work can be done by one's own hands. But it is important for beginners to know what the interior door consists of.
The main constructive element of any door is the canvas, it is on him first of all pay attention when buying a door. Another name for the canvas is the leaf.
The installation of the door and its operation are impossible without the box that is installed in the doorway, and already the sheet itself is attached to it. The box is the original structural element of each concrete door, coinciding with it according to the color solution. This means that the installation of a new leaf in the old box is not possible.
Often a box comes complete with a finished canvas. It consists of three or four elements. If the door is planned without a threshold, then the box is U-shaped, it includes 2 long vertical bars (loop and feigned) and one short horizontal (lintel). If necessary, the box design includes a threshold, in which case it will look like a closed loop.
Decorative function is made of clypeus. It is he who closes the seam at the place where the door frame is mounted in the wall opening.
If the thickness of the wall is greater than the thickness of the door frame, then additional lath. It is also a decorative element, the color of which coincides with the canvas.
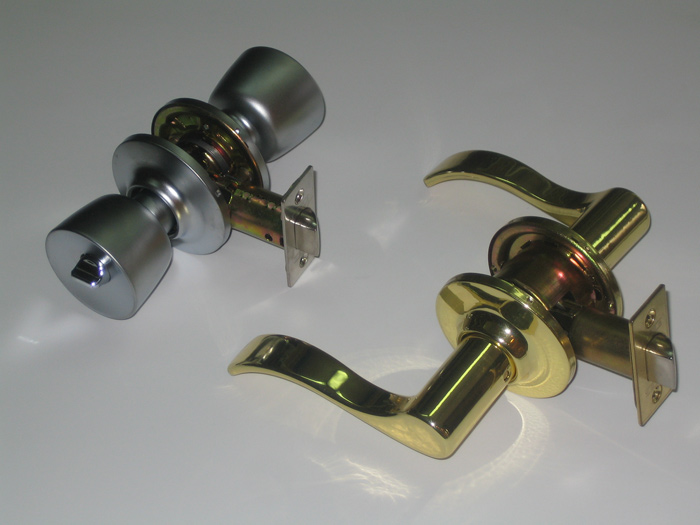
An important detail of the doors is the fittings, which includes two hinges on which the canvas is fastened to the box, a latch and a set of handles. For doors installed, for example, in a bathroom or a toilet, a locking device is provided that allows you to close the door from the inside.

These are the main structural elements interior doors.
Adjustment of interior doors as the final stage of installation
So, the process of installing the interior door is coming to an end. The box is installed in the opening, and the sash is suspended to it. At this stage, before the gap is gaped between the opening in the wall and the beams of the box, it is necessary to adjust the door. First, a primary inspection is carried out on the opening and closing of the door, the uniformity of the distance between the leaf and the box. The reasons for the fact that the size of the gap is not the same, there may be several.
The gap can be so uneven that the door will jam the top or bottom.
If during the inspection there are no violations, then proceed to a more thorough check, during which several basic malfunctions can be detected. Let's consider each of them, the reasons and ways of their elimination separately.
It's impossible to close the door
This is the most common problem. Causes that prevent the normal closure of the interior doors, a few.
This is mainly due to the a skewing of a door box, which is due to its incorrect installation, during which insufficiently fastened the beams together or did not keep the correct proportions when connecting the horizontal and vertical bars.

Identify the presence of a skew box can be using a level or plummet. If the case is really in the box, then it will need to be removed. It is necessary to check whether the cross-section of the joints of the beams is flat, to connect them with each other anew, strictly observing the angle of 90 degrees. Secure all joints with a minimum of two screws. As a result, you should get a straight letter P with firmly connected corners.
They may be either not sufficiently recessed compared to the surface of the box or web.

In some cases, you can tighten the loop by tightening the screws in it, but this does not always work. If it does not help, you will have to unscrew the hinges and close the fixing point with a chisel or grinding.
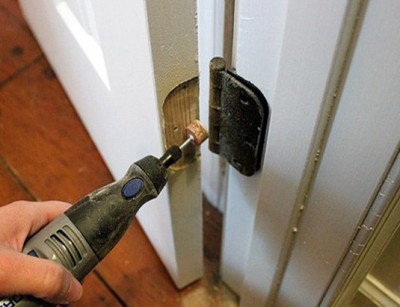
Grooving the groove grooves with grinding
The hinges can also be incorrectly installed in the horizontal plane: they are deeply removed from the front of the blade. Then they will need to be removed and moved closer to the facade of the sash.
The door is stuck in the opening
This means that the door closes without problems, but it is not easy to open it. There are two main reasons for this problem.
First, the fasteners of the beams of the box are not sufficiently tightened. Here everything is simple: you need to tighten the screws that fasten the feigned bar in the opening.
Secondly, too deep grooves can be prepared for loops. To cope with this problem, it is necessary to remove the door, remove the hinges and put cardboard under their flaps.
Unclosed door opens or closes by itself
This occurs when the door frame is not mounted strictly vertically. If its top is littered aside, where the flap opens, the door opens. When the top of the box is littered in the opposite direction, the door closes. You can fix this by aligning the box, especially the loop bar. You can use a plumbline as a guide, but a longer level is preferable. It is permissible to use a short level, for this it is necessary to bind it, for example, to a rule. Align the box, secure it to the opening.
In addition to problems with the box, hinges or door leaf, there may be inaccuracies in mounting the locking mechanisms.
Adjusting locks and door handles
A frequent problem with the installation of the door lock is its insufficient deepening. As a result, the side lath of the lock or the door handle touches the door jamb. The way out of this situation is to penetrate the opening for the latch or lock mechanism.
Sometimes the screws of the lock or the latch are not sufficiently screwed, so the mechanism dangles in the groove. The solution is simple - tighten the fasteners.
Adjustment of old doors
Despite the fact that the adjustment is the final stage of the installation of the door, it is often necessary to carry out for the old doors.
One of the main and often encountered problems of non-new interior door designs is the creak of loops. Sometimes this is observed in new doors. To eliminate this problem, lubricate the loops with machine oil. To do this, a wedge is put under the door, the door is raised to partially remove from the hinges. In the appeared gap in the loop pipetted with oil, which can be replaced by a piece of graphite lead of a simple pencil.
Another common problem with old doors is skewness. There are several reasons for it.
For wooden doors, the skew may be associated with the swelling of the fabric. In this case, it is necessary to determine the location of the bulging. For this, paper is applied to the supposed distorted area and the door is closed. A place where there will be a trace from the carpenter and is a stretch of the embossing of the canvas. It is necessary to cut it, and paint the door itself, as it was described in the case of a new door with broken geometry.
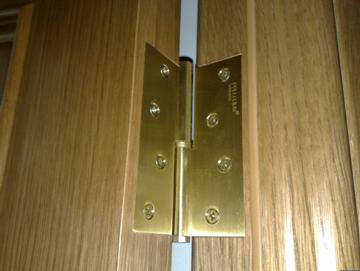
For heavy doors, for example, made from a solid, the skew may be associated with the deformation of the hinges. This is usually caused by the fact that the loops were not selected correctly.
Note! Heavy wooden doors should be installed not on two, but on three hinges.
Correct the twisted hinges in several ways:
- replace with new stronger ones;
- install additional loops;
- unscrew the screws from the hinges and replace them with longer ones;
- to strengthen the nests for screws with a cork greased with glue;
- install the washers in the hinges, so that the door will rise a couple of millimeters in the center of the hinge.
Installing the washer
The skew of the door leaf can be caused by changing the geometry of the opening in the wall. Without replacement of door elements this defect can be eliminated as follows:
- to undermine the door in a place of skew;
- remove and rearrange the door frame, adjusting the joints of the beams with respect to the angle of 90 degrees.
In the latter case it is necessary to focus on the building level, and the box is firmly fixed to the doorway. To do this, through the box in the wall, two holes are made from the side of each bar. The depth of the holes in the wall must be at least 50 mm. In the holes drive pins of metal or wood. Wooden fasteners are pre-glued.
Concluding remarks
The installation of the door and its adjustment can be made independently, but you must observe the maximum accuracy, so as not to damage the resulting canvas or box.
Note! If a wooden door is planned or already installed in your house, then remember that its prevention should be done annually.
If you have doubts about your own abilities, it's better not to risk and entrust the whole process of installing and adjusting the installation of the door to professionals.