Artificial trees can be considered an excellent decorative element for any room. They always remain ever-blooming and decorate the house. They can be used as a gift. You can make decorative trees with your own hands in any variation. However, before starting work, you should decide what type of wood will need to be used as a base.
Making an ever-blooming tree
To carry out the work, you will need to prepare superglue, corrugated paper, PVA glue, and a knitting needle. The master will also need any object that resembles a trunk. It is important to prepare the pot too. Before starting work, stock up on plaster. To make decorative trees with your own hands, you need to take corrugated paper and make several strips out of it. The size of the flowers will depend on the width of these blanks; in this case, this parameter varies from 1 to 2 cm. If corrugated paper is not available, it can be replaced with napkins or tissue paper.
Making flowers

First you need to cut the green squares that will form the basis of the leaves. The squares should have a side equal to 4 centimeters. Next, you can start making flowers; you need to fold the paper one by one, adding glue. You can fold each strip at an angle of 90 degrees, but it is permissible to experiment, since different bending angles of the strip will affect the shape of the flower. A regular stick and ball will do for this. The latter needs to be fixed on a stick using superglue or tape.
Ball assembly

Next, using PVA glue, you can begin to attach the roses to the ball. If you decide to make decorative trees yourself, the master class presented in the article will help you. When all the flowers are secured, you can add leaves, strengthening them in any order. Now you need to “plant” the tree. For this, a pot must be used, which can be replaced with a cup. The entire space must be filled with plaster, which is diluted with water until the mixture becomes thick. Now the structure can be seated in a pot; it is preferable to install everything against the wall so that it is possible to support the structure. The tree must be left in this state until the plaster hardens. The plaster should then be covered with green fiber or painted with acrylic paint. By making decorative trees with your own hands, you can decorate them as you wish. You can use satin ribbons for this.
Making a tree from fabric flowers

This tree is very simple to make, you will need some fabric, a bamboo stick, a pot, buttons and ribbons, and chalk. A needle, as well as thread and scissors, will come in handy. Make sure you have a floral sponge and padding polyester. You will need to cut out circles from the fabric, which are most easily drawn using a mug. Next, the circles are stuffed with padding polyester and sewn together.
Barrel manufacturing and assembly

Now comes the turn of the bamboo stick, which needs to be wrapped with green tape. When you make decorative trees with your own hands, the next step is to insert a floral sponge into the pot and install a stick in it. Next, use glue to fix the moss, and then glue the flower to the stick. If you wish, you can also decorate the pot with ribbon and then add a button.
Making coffee tree
To carry out the work, you need to prepare a ball, PVA glue, threads, superglue, a pot and a stick for the barrel, as well as tape, plaster and coffee beans. First you will need to prepare a foam ball. It needs to be wrapped with threads and the grains attached to the surface of the workpiece; glue should be used. It is initially recommended to wrap the spherical element with threads, the ends of which can be attached with glue. Next, you should designate the place where the barrel will be installed. You need to leave a small circle, the diameter of which is 1 cm, where the threads and grains will be glued. If you decide to make a decorative tree with your own hands, then at the next stage you need to start gluing the grains. For this, it is preferable to use PVA glue, since superglue can corrode foam.
It is preferable to apply glue to small areas, each of which should be covered with grains. In this way, you will need to continue until the entire surface is covered. There is no need to press the elements too hard. It is better to let the structure dry after pasting half the ball, which will take about half an hour, only after that you can continue. After the first layer has been pasted and the composition has dried, you can move on to the second layer. This time you can use superglue, the grains should be turned with the convex side down. It is better to strengthen them in those places where gaps are visible. It is not necessary to coat each element with glue; you can squeeze the composition onto a newspaper, and then dip the grains in it.

Now the entire structure must be left to dry completely. When making a decorative tree with your own hands, at the final stage you need to leave gaps for the trunk, which are then sealed with grains. Next, a pot is prepared; in this case, it is preferable to use one made of glass. In order for the wood to hold up well, you must also use gypsum. You can add some coffee grounds to it when preparing it, so you will achieve a brown color. When the plaster is poured, you need to install the tree in it and lean it against the wall. The tree should remain in this state overnight. You can sprinkle everything on top with hazelnuts. You can decorate the trunk as you wish; satin ribbon is often used for this.
Another option for making wood
Before making decorative trees with your own hands, you need to familiarize yourself with the technology of the work. In this case, you will need polystyrene foam, yarn, wire, green coffee, pliers, masking tape, a pot or other utensils. As in the previous case, the pot will need to be filled with plaster. But first, prepare a foam ball, which you can make yourself, and then wrap it with thick threads. You will need several of these balls; in this example, we will consider an option in which there are six of them.
Next, you can begin making the base; in this case, it is recommended to use not wire, but an electrical aluminum wire, which has 3 cores at the base. The lower part of the tree will consist of three veins, while, rising higher, the trunk will have several branches and individual knots. If you are thinking about how to make a decorative tree with your own hands, then the next step is to bend the wire as your imagination requires. This will allow you to get separate branches. You can strengthen them together using masking tape. Pliers will allow you to cut the wire, but you can remove the braiding as much as you want to insert foam balls. In order for the barrel to be as soft as possible, you need to use masking tape and wrap it around the element. In order to fix it better, you can use glue.
Now you can place the previously obtained balls on the frame. You need to pour plaster into the pot and install the tree in it. Once the plaster has hardened, you can decorate the tree as desired. Now you can stick on the second layer of coffee beans. When making decorative trees for your home with your own hands, you can slightly change the design, using technology that you develop yourself as the basis for the work.

Finally
Trees made using the method described above can be made in different modifications. For example, if you do not use the barrel, but only the balls themselves with grains glued to them, then these elements can be fixed to the surface of the canvas. The latter can be made into a real painting. In order to make a decorative tree on the wall with your own hands, you will need to prepare a sheet of plywood. Afterwards the structure must be framed.
It can be called an excellent decorative element for any room.
Making an ever-blooming tree
If you decide to make a tree with your own hands from tree branches, then you can take a flowering composition as a basis. In addition to the main named element, you will need a knitting needle, plaster, corrugated paper, super glue, a pot, and also an object whose shape resembles a sphere. A knitting needle is useful for winding flowers.
Work technology
If you decide to do this, first you need to prepare corrugated paper, from which several strips are made. Their width will determine the size of the flowers. The article discusses an example that involves the use of strips of different widths. In this case, it varies from 1 to 2 cm. Instead of white corrugated paper, you can use papyrus or ordinary table napkins. First you need to cut blanks for making leaves, which will initially have a square shape. Each element will have sides equal to 4 centimeters. At the next stage, you can start making flowers. It is recommended to add a certain amount of glue after each crease, which will strengthen the flower. This is especially required for the central part.

When you make a tree with your own hands from tree branches, you can bend each strip 90 degrees, but if you wish, you can experiment; different bending angles will determine the shape of the flower. This indicates that the process can produce flowers not only of different shapes, but also of different sizes.
Making the base
When you make a tree with your own hands from tree branches, the flowers obtained at the previous stage can be fixed on the branches with glue, decorating everything with prepared petals. As an alternative solution, the roses can be attached to a ball. It, in turn, can be glued to a natural branch. The ball can be made from ordinary threads twisted into a ball. After the ball can be fixed on the branch, which can be done with super glue and tape, you can begin to attach the roses to the ball. Once all the elements are strengthened, you can add a number of leaves, which are strengthened in random order. Now the tree needs to be planted in a pot, which is often replaced with an old cup. Lastly, you need to fill in the plaster, and then dilute everything with water.

It is important to achieve a thick composition. At the next stage, the resulting tree can be planted in the prepared mixture. It is better to place the entire structure against the wall to provide support. It is important to prevent the tree from falling until the plaster dries. Before you make a tree with your own hands, you might want to think about how you will cover the hardened plaster. It may be green fiber. Another solution involves the use of acrylic paint to decorate the surface. You can decorate the branches with thin ribbons of any color, but those with a green tint will look most harmonious.
Making a tree from fabric flowers

If you are thinking about how to make a tree with your own hands, then you can use several other materials, including fabric. The main components are still branches. Among other things, you need to prepare a bamboo stick, the height of which is 20 cm, as well as a pot, some fabric, chalk, scissors, buttons and some sponge, moss, glue and padding polyester.
Manipulations for making wood
If you decide to make a tree with your own hands, the master class presented in the article will allow you to carry out this work quite simply. At the first stage, you need to prepare the fabric from which the elements in the form of circles are cut. In order to carry out this work as simply as possible, you can use a regular glass or a jar lid for marking. The circles are stuffed with padding polyester and then sewn together. A bamboo stick or tree branch can be partially wrapped with green tape, which is secured with glue. A bamboo stick is placed in the prepared pot. The moss needs to be laid on the surface, fixed with glue, and then the flower is glued to the improvised trunk.

If you want to make a tree from leaves with your own hands, then you can additionally strengthen these elements with glue. However, it is worth remembering that such a composition is very fragile. It is not worth installing it in a nursery, for example. If you wish, you can decorate the pot with various elements, including buttons.
Making coffee tree
You can make your own baby tree from coffee beans. This design will decorate the room, and the child will be able to help you during the work process. For manipulation, a ball is useful, which is recommended to be made of polystyrene foam. Stock up on super glue, brown thread, PVA glue, and a fairly thick tree branch. You will need coffee beans, a pot and plaster of Paris.
First you will need to prepare a foam ball, which is wrapped with thread. This will allow the coffee beans to be firmly attached to the surface. The ends of the threads are fixed with the same glue. It is important at this stage to note where the trunk will be located. A small hole with a diameter of 1 cm is left in this area. There is no need to glue grains and threads into this area.
If you decide to make a tree from leaves with your own hands, then this composition can be decorated with the mentioned elements, which are pre-dried. They can be varnished to prevent them from falling off when accidentally touched. Now the grains are glued to the surface of the ball; it is best to use PVA glue for this. It is advisable to apply the composition to a small area, and then glue the grains. When applying the elements, you need to press them a little. After the first layer of grains has been glued, the structure should be left for about half an hour until it dries. After this, the master can begin to glue the second layer of grains.

Final works
You need to install a tree branch in the intended place, sealing the remaining space with grains. For greater effect, you can use a glass cup with plaster poured into the bottom. To give it the appropriate color, you need to add coffee grounds to the composition. After this, the tree is installed in the mixture, the structure is leaned against the wall and left to dry completely. After this, you can add hazelnuts to the cup, decorating the trunk with ribbon.
They can be made by any home craftsman with their own hands. However, this may require special tools. It will be much easier to use branches prepared in advance. If you plan to make woodwork with your own hands at home, then you may need a special knife. However, it is recommended to choose soft wood species for this.
Decorative trees are considered a worthy decoration for a home. They are appropriate in any interior; you just need to think in advance about the color scheme that fits into the finished design project. Ornamental trees do not require special conditions of maintenance and care. They do not need to be watered as they are artificial plants. These decorative items are freely sold in stores, but it is better to make topiary with your own hands. It will take some time to make it, but in the end you will get a unique decorative tree that fits perfectly into the existing interior of the room. And it’s better to build a topiary yourself, because according to the ancient Chinese teachings of Feng Shui, this tree brings joy to the house. By making a decorative tree, a person charges it. According to legend, topiary can only bring happiness to its creator.
Topiary: history of appearance and significance in modern interiors
The word topiary or topiary comes from the term “topia” - a decorative garden plot. The concept came from Ancient Rome and meant various figures carved from the crowns of trees or bushes. Ancient Roman civilization disappeared, but the idea of beautifully decorating gardens was picked up by the Catholic Church. Then topiary entered social life. Their heyday came in the 17th century: it was then that decorative trees appeared in the residences of rulers of states, incl. and in the Russian Empire. Then they were forgotten, but in the 20th century topiaries became popular again. Now they were no longer used to decorate gardens and palace walls, but were planted in pots. Today, topiaries are no longer planted. They can be made from any materials. Topiaries are made in the most bizarre shapes and colors, often combining materials in quite controversial ways. They are otherwise called trees of happiness, believing that they bring joy to the house. They can be made from:
- coffee beans;
- walnuts;
- fir cones;
- straw;
- sweets;
- napkins;
- silk ribbons;
- plastic bags, etc.
Where to start assembling wood
Assembling a topiary must begin with planning the appearance of the future tree of happiness and finding the necessary parts. The appearance of topiary is determined by the style of the interior for which it is made. First, find the materials necessary to construct the base of the tree. In any case, you will need tape, glue, colored paper, polystyrene foam, polyurethane foam, etc. The list of parts is limited only by the imagination of the creator. After collecting the necessary things, you can start creating a topiary. First, the barrel is assembled, because it is the basis of topiary. Moreover, it must not only be strengthened, but also covered with varnish or paint. Then one end of the trunk is attached to a pot, stone or shell, and a ball is hung on the other, which will later become the crown of the tree of happiness. It is best to use glue to hold all the parts of the topiary together.
The basis
To construct the basis of the tree of happiness, whatever is at hand at that moment will do. To make a base from newspapers, you first need to crumple them thoroughly, and only then form a sphere according to the given parameters. Newspapers are crumpled and pressed tightly, after which they are wrapped with tape. The base can also be made from newspaper clippings, but in this case they should be placed in a plastic bag. If you need to make a small base from padding polyester, you first need to compact it into a sock or stocking, then give it the required shape and wind it tightly with sewing thread. It’s even better to make this base from polystyrene foam, using ordinary packaging from household appliances. But polystyrene foam crumbles and is inconvenient to roll into a ball, so this base is not very popular. In addition to those mentioned above, the following materials can become the basis of topiary:
- polyurethane foam;
- Knitting thread;
- papier-mâché, etc.
Trunk
The trunk of the tree of happiness connects the base with the crown, so it must be strong and stable. Its role can be ordinary wire, secured with artistic tape, twine or plastic. To make the product more realistic, this trunk can be made from a wooden branch or wood chips. But first this branch must be cleared of bark, covered with varnish and stain. If you are making a low topiary, then as a trunk you can take a popsicle stick, sushi sticks or wooden skewers fastened together. The color and type of trunk depends on the material of the base and crown. For topiary with coffee beans, white or brown colors are suitable. A curved trunk for a European tree can only be made from wire. You can also take any material that is approximately suitable for the trunk of a topiary, shape it and fill it with plaster.
Crown
To make a topiary crown, absolutely any materials that are currently at hand are suitable. To do this, you can take paper napkins, corrugated paper, folded origami, nylon tapes, etc. Then the crown needs to be decorated. To do this, take fir cones, real seashells, coffee beans, artificial flowers, etc. The crown is the main accent of the tree of happiness, so its design must be approached very seriously. The trunk and stand only emphasize the overall theme of the topiary, so it is advisable to first decide on the material for the crown, and only then design the remaining parts of the tree. But the topiary trunk may not be able to withstand a crown that is too large, so it should not be overloaded. Only the stand of the tree of happiness can be decorated with some elements.
Stand
As a stand for topiary, you can take an ordinary flower pot, a large flat stone or an iron bucket, decorate them beautifully and place them under the crown. The decor of the tree of happiness stand can be anything. It is decorated using the decoupage technique, decorated with lace or bright unusual shreds. You can stick stones, shells and artificial flowers on the stand. This topiary element is a semantic continuation of the crown, so its design must be based on the existing elements of the decorative product. If the tree is decorated in a marine style, then shells and multi-colored pebbles will be appropriate, and for a topiary in a romantic style you will need lace and hearts made of colored paper. The size of the tree's crown should be larger than its stand in order for the composition to look harmonious.
Wood making workshops
Making topiary with your own hands is easy. To do this, you do not need to have artistic taste or designer education. The ideal tree of happiness is decorated intuitively from available materials. There are many master classes on this topic on the Internet, some of them are presented below, but you should not follow these instructions step by step. According to Feng Shui, topiary quickly and effectively activates any sector of an apartment or house, instantly filling it with the necessary energy. But for it to work properly, it must be decorated with the necessary elements. To normalize family relationships, jasper or amazonite should be glued to the topiary stand. A tree with a tiger's eye, charoite or turquoise will help you climb the career ladder. And to improve your overall financial situation, you need to decorate your topiary with jet or a hawk’s eye.
From coffee beans
For this topiary, you need to take high-quality large coffee beans and stick them on the base for the crown, laying them out with the central strip down. The ball is completely covered. To do this, it is better to take a glue gun, although you can do without it, using regular glue from a tube. When the ball is completely sealed, take a plastic tube, which is sealed along the entire length with double-sided tape, departing 2-3 cm from both edges. Satin ribbon, fabric or corrugated paper of the desired color is glued to the tape. Then you need to dilute the alabaster and pour the resulting mixture into a pot or iron bucket. Then they insert the barrel into this mixture and wait for the alabaster to harden. After the mixture has hardened, its surface is spread with coffee beans in 2-3 layers. The finished crown is glued to the top of the trunk itself.
The resulting topiary can be decorated with an elegant bow or jewelry.
From the cones
Do-it-yourself topiary from cones is made according to a similar scheme. Small half-opened pine cones are glued onto the foam ball at small intervals from each other. If the gaps are too large, they can be filled with acorns or chestnuts. For additional fixation of elements, you can use golden or brown threads. To make a trunk, you need to put together several (up to 10) bamboo skewers, wrap them with thick white or brown thread, leaving open areas along the edges of the sticks. Then you need to dilute the alabaster with water or take a ready-made cement mixture, pour it into a flower pot and insert the tree trunk into the base. When the mixture hardens, it is decorated with pine needles or sisal, a fully formed crown of the tree of happiness is attached to the trunk, and the pot is decorated with a satin or openwork ribbon.
From satin ribbons and other fabrics
As a base for satin ribbon topiary, you can take a foam sphere or a ball of crumpled newspapers, secured with thick threads dipped in PVA glue. Then you need to take satin ribbons of any color, roll them into small rolls, first bending the ribbons at a right angle. You need to bend the satin ribbon several times until it runs out of length. The result of these actions should be a rose bud. Upon completion of production, it is necessary to sew all the petals with a thin silk thread at the base. The number of such roses is determined by the size of the base. Usually 20-30 flowers are required. Then they decorate the crown of the topiary. You can take an ordinary twig as a trunk for such a tree, and use a clay flower pot for the stand. The stand and tree trunk should be decorated with elegant green leaves made of satin ribbons or silk.
Corrugated paper
First you need to take a round foam ball. Then you need to make roses from corrugated paper. If they are very large, then there will be a lot of free space between the flowers that will need to be covered with something, so it is better to make these roses medium-sized. For one small topiary you will need 35-45 roses. To do this, it is better to take paper of different colors in order to alternate the shades of roses on the topiary in the future. The trunk for the tree of happiness can be made from traditional sushi sticks, and ordinary polystyrene can be used as soil. Alabaster is difficult to make, but foam is easy to find. Only the barrel needs to be inserted into the foam base the first time. At the same time, you need to decorate the crown by gluing roses in a chaotic manner. Then the crown is attached to the trunk and the topiary is considered ready. If desired, the soil in the pot is covered with artificial grass, and the trunk of the tree is decorated with a bright bow.
The sea tree of happiness can be made from materials brought from the sea: pebbles, shells, dried crabs and pearls. They should be used to cover the base for the topiary crown. If there are only a few shells and pebbles, the space between them can be decorated with sisal, artificial starfish and marine-themed salt dough crafts. When making a topiary trunk, it is better to take sushi sticks decorated with satin ribbons of white, blue or sand color. As a stand for the tree of happiness, you should take a white flower pot, which can be decorated with artificial pearls, lace and small figures made of salt dough. Inside this pot you need to fill it with alabaster and insert the topiary trunk into this alabaster mixture. You can put sisal fibers, sea pebbles and shells on top of the frozen filling.
Money topiary made of coins and bills
This topiary is usually made from fake banknotes, but for decoration, you can attach real coins to the crown of a tree or stand. Of course, it is better to use rare, antique or foreign coins rather than ordinary ones. To begin with, each bill needs to be folded in half, slightly moving the edges, and then folded into an envelope, securing the uneven edges with double-sided tape. The number of bills depends on the size of the base ball, but traditionally about 20-25 bills are required. The trunk of the money tree can be made from twigs or sushi sticks, and a flowerpot can be used as a stand. The outside of the flowerpot can be decorated with special self-adhesive paper with images of money or lace. Alabaster is poured into the pot itself, the trunk is placed in it and wait for it to dry. After this, the topiary soil is laid out with coins, wood sawdust or decorative stones.
From dried flowers and fresh flowers
Making a tree from dried flowers is quite simple. You can decorate the base for the topiary crown with dried flowers and yellowed leaves, but the flowers and leaves taken for these purposes must be strong and dense, otherwise they will simply fall apart during work. Dried flowers are attached directly to the foam ball. A curved branch from the street is taken as a trunk, and an ordinary clay pot is turned into a stand. The inside of the pot is filled with alabaster, first fixing the trunk of the topiary. This trunk is inserted into the finished tree crown, and the dried alabaster is decorated with dry leaves and flowers. Topiary from fresh flowers is usually created by professional florists, but you can try making it at home yourself. To do this, you need to take rose buds, chamomile flowers, lilies or chrysanthemums, correctly and carefully cut off their stems and attach them to the base of the crown. Otherwise, the technique for producing a tree of happiness and decorating a topiary pot is similar to making it from dried flowers.
Topiary is called the tree of happiness. This is a kind of offshoot of landscape design. Even in ancient Rome, there was the gardening art of topiary, which involved cutting trees and shrubs to shape. By the 21st century, connoisseurs of beauty had a desire to contemplate topiaries not only in the garden. This is how home topiary appeared. A stable composition on a solid base, reminiscent of wood. As a rule, topiary is round, but if desired, it can be given any shape. Some craftsmen even make topiary from dry branches so that the crown is not round, but spreading.
@wo_rld_country_

Types of topiary
In the manufacture of topiary, not only materials familiar to handicrafts are often used, but also fresh flowers. Therefore, they can be conditionally divided into two main types:
Alive
Living topiaries are rarely made at home, but they are still worth talking about. The product, although not durable, is still popular. Most often, topiary from fresh flowers is made by florists to order. The basis is a floral sponge or other material on which the flowers will feel good. The composition may contain additional details that do not require special care, but the main content is flowers.

@myatnie_oblaka_flowers
Artificial
Artificial topiary is the most popular among needlewomen. With proper care, they can decorate your apartment for years. Foam or cotton wool is most often used as the basis for such a product, since they are most convenient to work with. After processing, various decorations are attached to the base. This can be any material, from coffee beans to eggshells.

www.diy.ru @home_sweet_home_ukr
Seasonal compositions are often made using appropriate materials. For example, in winter topiary you will definitely find pine needles, cinnamon sticks or Christmas tree decorations.

And in the autumn there will be dry leaves, cones or berries.

What elements does topiary consist of?
Even the most complex topiary usually consists of three basic elements:
- crown
- trunk
- the base where you will need to “plant” the topiary

The crown, as we have already said, is a foam ball, which will need to be decorated in the future.
The barrel is made from different materials. Plastic tubes, dry branches, iron rods.
And the base of the tree is any stable surface or some kind of container, for example, an ordinary flower pot.
Now that we have figured out the components, we need to understand how to decorate the product.
What to use?
What the topiary will consist of depends only on the flight of your imagination, but there are several of the most popular materials that are suitable for a beginner.
Coffee beans. One of the most popular topiary details is coffee. It is easy to handle and does not require any processing.

@tulun_nyushen_dolls__
Many needlewomen use buttons, yarn and

If you know how to handle polymer clay, then it won’t be difficult for you to make a few nice details for your future product before starting work. More often, craftsmen make flowers.

Sometimes topiaries are made from candies and other sweets; this version of homemade topiaries is especially loved by children.

@dagldiyan_olesyadagldiyan_olesya
Common Mistakes
- Crown smaller than pot
If you want to use a large pot for topiary, then the base of the crown should be larger than it so that your tree does not get lost against the general background.
- Overloaded with color
It is important to maintain the same color scheme in topiary and not mix incompatible colors, so the product will turn out stylish and will be pleasing to the eye.
- Overload with details
As a rule, topiaries are made in a specific theme, and a clutter of details will blur the whole picture, depriving the tree of happiness of its individuality.
How to make topiary at home
All topiaries are made according to the same principle, so first you should master the basics of needlework in order to eventually learn how to make complex, multifaceted compositions.

If you want to make topiary yourself, we suggest watching several available master classes on this topic.
DIY crown base
How to make a coffee topiary
DIY summer topiary
Ball of fresh flowers
Decorative trees created with your own hands will allow you to decorate your cottage or apartment. Once you remember how to make a bonsai, you can easily create one too.
DIY decorative tree - master class

Such a poplar tree can be placed outdoors; it is not afraid of bright rays of the sun and precipitation.
To make it, prepare:
- green plastic bottle;
- thick and thin wire;
- candle;
- scissors;
- a needle;
- cement or gypsum;
- glue;
- pot;
- matches;
- green and gray threads.

Dilute cement or gypsum, pour the solution into a pot, and place a tree trunk with curved ends in the container. While the mass hardens, the poplar tree needs to acquire branches. To make leaves for them, cut different sized squares and cut out leaves from them. After heating the needle over the flame, make a hole in the upper part.

Insert a thin wire here, fold it in half, twist it. Connect three branches into one, make several such preparations.

To make a decorative tree with your own hands, connect several blanks consisting of three branches.

Cover the wire parts with gray thread and secure the ends with glue. Leave the lower part of the branch free; it will need to be attached to the trunk.

Use the same technique to complete the entire tree, wrapping its trunk with gray thread.

To make grass, cut green threads of the same size and fold them in half. Lubricate the bends with glue, attach the workpieces to a plaster or cement base.

This is how wonderful the poplar tree turned out. If you want to make a whole mini-garden, then check out the second master class.
How to make a homemade apple tree with your own hands?

This decorative tree is suitable for indoor spaces, as its flowers are made of yarn.
To make it, take:
- wire;
- green and brown fabric;
- cardboard;
- pencil;
- scissors;
- wire cutters;
- scotch;
- glue;
- pot;
- gypsum or cement;
- hook;
- brown and red threads.

Armed with tape, use it to attach three small ones to one large branch. Form several such blanks.

At the next stage, the branches need to be wrapped in fabric. Fleece or velvet looks especially beautiful, use these fabrics.
From the selected brown material you need to cut strips, their width is 2 cm. Wrap them around the newly created branch blanks, leave 3 cm free at the bottom. Secure the ends of the fabrics with glue.

Use this technique to design several blanks. Now they need to be collected into a single tree. To do this, you need to cut a strip 3 cm wide from the fabric, wrap it around the fabric and connected branches. Also secure the ends of the material with glue.
To make the decorative tree further, you need to install it in the chosen container. If it does not have a narrow neck, pour gypsum or cement mortar into the container to fix the plant. Straighten the branches and you can start decorating them.

Now you need to cut the green fabric into leaves of different sizes. To prevent their edges from spreading, pour these blanks over the flame, without bringing them too close to it.

Glue the leaves onto the branches, and you can start creating fruits. We will make them from pompoms. Cut out two circles with a diameter of 3 cm from cardboard. Draw a smaller circle inside and cut it out. You will get two cardboard rings like this.

Connect them into one piece, wind a red thread around it, helping yourself with a crochet hook. The yarn should completely cover the workpiece. Now you need to cut it along the outer edge, lay a brown thread, and use it to tighten the resulting pompom.

Cut out leaves from green fabric and glue them onto a brown thread.

Hang the prepared fruits on the branches. You can decorate the pot as you wish.
If you still want to make a decorative tree for the street, then the following option will suit us.
DIY Christmas tree
To create it, you will need a small set of necessary things, these are:
- thin and thick wire;
- green wool threads;
- gypsum;
- lighter;
- candle;
- glue;
- scissors;
- green plastic bottles;
- cotton wool;
- capacity;
- Christmas decorations;
- artificial snow.

While the plaster hardens, make twigs to create an elegant Christmas tree. Cut off the neck and bottom of a green plastic bottle with your own hands. Using scissors, the rest of this container needs to be chopped into equal strips. Their long edges must be cut into a fringe.

Using a heated needle on a flame, make a small hole in the corner of this plastic piece. Insert a thin wire here, fold it in half and twist it. Do the same with the rest of the blanks.

Now, starting from this corner, roll the wire. To ensure that the turns of plastic are fastened together, periodically bring the whole side of the workpiece to the candle flame.

It is not necessary to cover the entire branch with such needles, but only its upper part. Do the same with the rest of the details.

You can melt the needles over a candle flame or leave them in their original form. The blanks should be of different sizes.

The crown of the decorative tree will be the shortest. Attach it here using the free end of the wire.

Then there are slightly larger branches.

Gradually assemble the entire tree, then wrap green thread around its trunk, securing the ends with glue.

If you are making a Christmas tree for the New Year or in the middle of summer you want to remember this holiday, then decorate the pot with artificial snow, you can replace it with ordinary cotton wool. Leave the Christmas tree as is or decorate it with toys.

This decorative tree looks great at any time of the year. If you still have green plastic bottles left, maybe you can make a second Christmas tree with your own hands using a different principle.
This is how it will turn out.

Take:
- dense polyethylene or green oilcloth;
- satin ribbon;
- Styrofoam;
- tree branch;
- suitable container;
- glue gun;
- alabaster;
- wire;
- beads.

In total you will need about 20-25 of these tapes. To turn these parts into twigs, wind each one onto a piece of wire.

Roll the cardboard into a cone and secure the sheet in this position using a stapler, straighten the edges with scissors. Spread glue on one side of the branch and attach it to the back of the top of the cardboard cone.

If the fixation of the branch is weak, then first wrap its end with threads, lubricate them with glue and attach to the cone.
Here's how the Christmas tree is made. Place it in a suitable container with your own hands, pour alabaster or other quick-drying solution into it. Hold in this position for some time so that the mass sets. You can lean it against a vertical support to free your hands.
When the Christmas tree is fixed, cover the surface of the solution with pieces of foam plastic, which will become snowdrifts by gluing this material.
The container can be decorated, for example, with twine. It is also fixed with glue.
In order for a decorative tree to acquire needles, take blanks made of film and wire. Wrapping them around the cone, fix the turns with glue.

When the entire surface of the cardboard is decorated in this way, you need to decorate the Christmas tree. To do this, cut strips from a thin satin ribbon and tie them in the form of bows. To prevent the ends of these objects from fraying, scorch them over a flame.

Wrap the Christmas tree with gold thread from top to bottom in a spiral, and glue bows. You can decorate the pot with beads and rejoice at what a beautiful DIY Christmas tree it turned out to be.

If you want to get acquainted with another method that will tell you how to make a decorative coniferous tree with your own hands, then the third master class in this section is for you.

Very soon you will have a tree like this. Making it with your own hands is quite simple. The main thing is to have a simple set of materials and equipment, which consists of:
- green plastic bottle with a volume of 2 liters;
- tape;
- album sheet;
- scissors

From the remaining part of the container you need to cut 9 blanks:
- three pieces will measure 4 by 6 cm;
- the next three pieces are 7 by 8 cm;
- three more blanks 5.5 by 8 cm.

Now cut each such detail on one side into strips in the form of a fringe. Their width is 4 mm, do not reach the top by about 1 cm.

Now you need to twist all these strips using the blunt side of the blade. Press it firmly against the plastic and move it down and up several times.

Now these “cilia” need to be attached to the trunk.

Attach the largest ones downwards using tape; the smallest ones should be at the top.

Roll one smaller piece into a fountain shape and insert it into the upper part of the paper cone.

If you want to make a tree for the street, then use plastic instead of cardboard. This is such a wonderful Christmas tree, created with your own hands.

How to make a bonsai?
Such a decorative tree can also be made from the most unexpected materials.

To create such a craft you will need:
- tracing paper;
- pencil;
- wire;
- support for flowers;
- Styrofoam;
- aluminium foil;
- dye;
- tassels;
- green paper;
- scissors;
- hot glue or liquid nails;
- newspapers;
- gypsum;
- textile;
- PVA glue.

By twisting these two ends of the wire at the top, you will form a trunk. And bend it several times in different directions. Make branches from wire and screw them to the base of the tree.

You will make smaller branches from thin wire, also screwing it into place.

Now wrap the foil tightly around the tree and its thicker branches. Then cover this blank with brown paint. Use a dry brush to go over it to make the bark look as realistic as possible.

Cut leaves from green fabric and attach a piece of wire to each using liquid nails or hot glue. Now it will be easy to attach the leaves to the branches. If desired, cover the sheets with green paint.

To secure the decorative tree in the container, pour alabaster or plaster into it. You can put this solution only on the bottom of the pan, and place crumpled newspapers on top. They are also covered with a small amount of plaster. You can decorate the surface of the pot with green-colored shavings or cover it with paint of that shade.
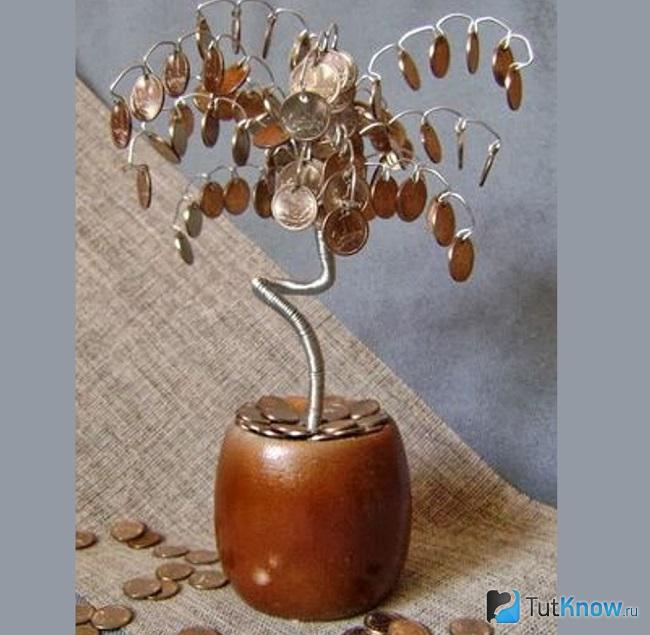
Here's how to make a bonsai using old buttons. Such an original tree will become an interesting decoration for the room.

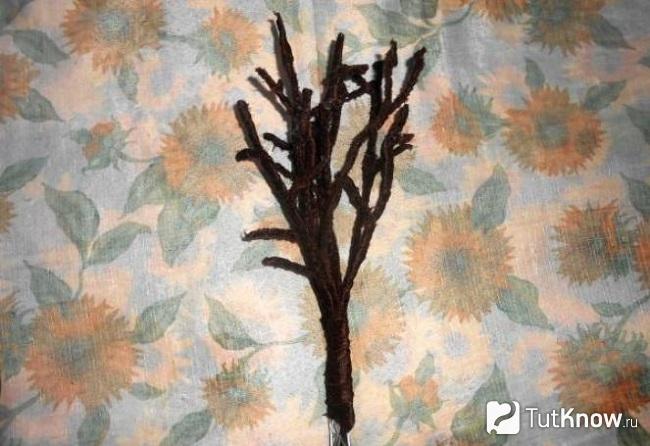
Twist the wire pieces.
For creativity you will need only three items:
- wire;
- coil;
- buttons.
Instead of buttons, you can use small denomination coins. Using a thin drill bit, holes are made in them and then strung onto branches.
These are the decorative trees you can make with your own hands. If you want to see the process of making such products, then we suggest you sit comfortably in an armchair or on a chair to watch the video.
If you are interested in the process of creating a bansai, then check it out again. But the manufacturing idea is a little different, as you will see now.